Page 429 of 561

428 Practical hintsWhat to do if …Display message
Possible cause/consequence
Possible solution
Tire pressure displayed
only after driving
a few minutes
Vehicles with Advanced TPMS*:
The tire inflation pressure is being checked.
�
Drive the vehicle for a few minutes.
Tire pressure monitor
inoperative
The TPMS or Advanced TPMS* is
malfunctioning.
�
Have the TPMS or Advanced TPMS* checked by an
authorized Mercedes-Benz Light Truck Center.
Tire pressure monitor
inoperative
No wheel sensors
There are wheels without wheel sensors
mounted (e.g. winter tires).
�
Have the TPMS or Advanced TPMS* checked by an
authorized Mercedes-Benz Light Truck Center.
�
Have the wheel sensors installed by an authorized
Mercedes-Benz Light Truck Center.
Tire pressure monitor
temporarily
unavailable
The TPMS or Advanced TPMS* is unable to
monitor the tire pressure due to�
a nearby radio interference source
�
excessive wheel sensor temperatures
�
As soon as the causes for the malfunction are no
longer present, the TPMS or Advanced TPMS* auto-
matically becomes active again after a few minutes
of driving.
Tire pressure monitor
Wheel sensor missing
One or more sensors malfunction (e.g. bat-
tery in one or more wheel sensor is empty).
One or more wheels without wheel sensors
mounted (e.g. spare tire).
�
Have the TPMS or Advanced TPMS* checked by an
authorized Mercedes-Benz Light Truck Center.
�
Have the wheel sensors installed by an authorized
Mercedes-Benz Light Truck Center.
Vehicles with Advanced TPMS*:
The tire pressure for the respective tire is shown in
the multifunction display.
Page 430 of 561
429 Practical hints
What to do if …
Symbol messagesDisplay symbol
Display messages
Possible cause/consequence
Possible solution
#
malfunction
Visit workshop
The battery is no longer charg-
ing.
Possible causes:�
alternator malfunctioning
�
broken poly-V-belt
Do not forget that the brake sys-
tem requires electrical energy
and may be operating with re-
stricted capability. Considerably
greater brake pedal force is
required and the stopping dis-
tance is increased.
�
Stop in a safe location or as soon as it is
safe to do so and check the poly-V-belt.
If it is broken:
�
Do not continue to drive. Otherwise the
engine will overheat due to an inoperative
water pump which may result in damage
to the engine. Notify an authorized
Mercedes-Benz Light Truck Center.
If it is intact:
�
Drive immediately to the nearest autho-
rized Mercedes-Benz Light Truck Center.
Adjust driving to be consistent with
reduced braking responsiveness.
Page 438 of 561

437 Practical hints
What to do if …
Display symbol
Display messages
Possible cause/consequence
Possible solution
N
Check eng. oil level
when next refueling
The engine oil level is too low.
�
Check the engine oil level (
�page 346).
USA only:Add 1 qt. engine oil
when next refuelingCanada only:Add 1 liter engine oil
when next refueling
The engine oil level is too low.
�
Add engine oil (
�page 349) and check
the engine oil level (�page 346).
Engine oil level
Stop, engine off
There is no oil in the engine.
There is a danger of engine
damage.
�
Carefully bring the vehicle to a halt as
soon as as it is safe to do so in a safe
location.
�
Turn off the engine.
�
Add engine oil (
�page 349) and check
the engine oil level (�page 346).
Engine oil level
Reduce oil level
You have added too much
engine oil. There is a risk of dam-
aging the engine or the catalytic
converter.
�
Have oil siphoned or drained off.
Observe all legal requirements with
respect to its disposal.
Change engine oil
Visit workshop
It may be that there is water in
the engine oil.
�
Have the engine oil checked.
Page 449 of 561
448 Practical hintsWhat to do if …Display symbol
Display messages
Possible cause/consequence
Possible solution
H
Rectify
tire pressure
The pressure is too low in one or more
tires.
�
Check and correct tire inflation
pressure as required.
Tire pressure
Caution: Tire defect
One or more tires are deflating.
�
Carefully bring the vehicle to a halt,
avoiding abrupt steering and braking
maneuvers.
�
If necessary, change the wheel.
Caution: Tire defect
Vehicles with Advanced TPMS*:
One or more tires are deflating.
The respective tire is shown in the
multifunction display.
�
Carefully bring the vehicle to a halt,
avoiding abrupt steering and braking
maneuvers.
�
If necessary, change the wheel.
Warning!
G
Do not drive with a flat tire. A flat tire affects
the ability to steer or brake the vehicle. You
may lose control of the vehicle. Continued
driving with a flat tire will cause excessive
heat build-up and possibly a fire.
Page 450 of 561
449 Practical hints
What to do if …
Display symbol
Display messages
Possible cause/consequence
Possible solution
H
Tire pressure
Check tires
The tire pressure in one or more tires is
already below the minimum value.
�
Carefully bring the vehicle to a halt,
avoiding abrupt steering and braking
maneuvers.
�
Check and adjust tire inflation
pressure as required.
�
If necessary, change the wheel.
Check tires
Vehicles with Advanced TPMS*:
The tire pressure in one or more tires is
already below the minimum value.
The respective tire is shown in the
multifunction display.
�
Carefully bring the vehicle to a halt,
avoiding abrupt steering and braking
maneuvers.
�
Check and adjust tire inflation
pressure as required.
�
If necessary, change the wheel.
Warning!
G
Do not drive with a flat tire. A flat tire affects
the ability to steer or brake the vehicle. You
may lose control of the vehicle. Continued
driving with a flat tire will cause excessive
heat build-up and possibly a fire.
Page 456 of 561
455 Practical hints
Where will I find ...?
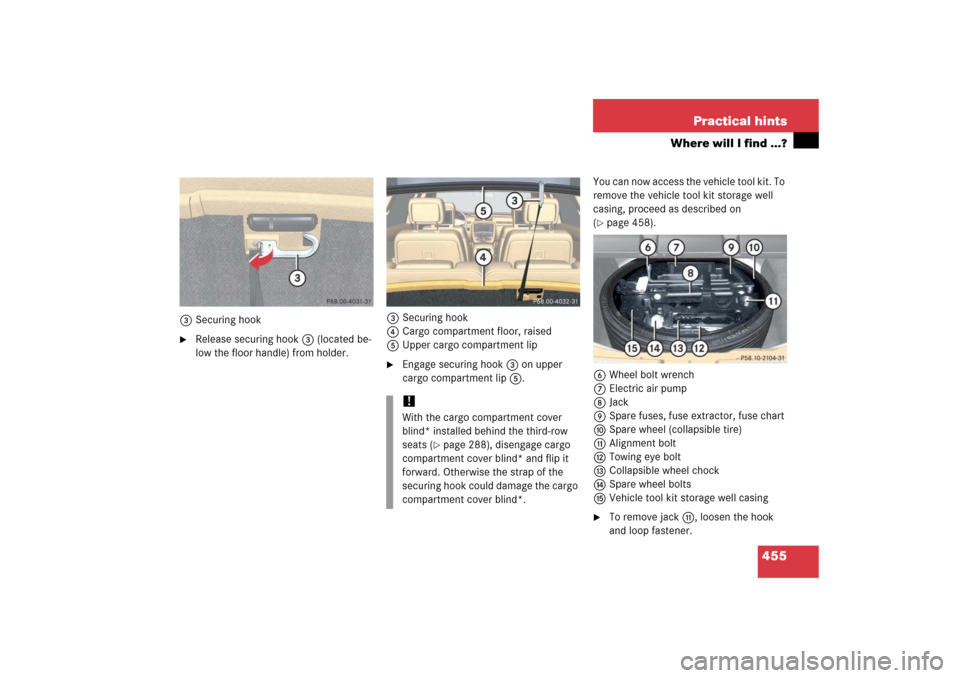
3Securing hook�
Release securing hook 3 (located be-
low the floor handle) from holder.3Securing hook
4Cargo compartment floor, raised
5Upper cargo compartment lip
�
Engage securing hook 3 on upper
cargo compartment lip 5.You can now access the vehicle tool kit. To
remove the vehicle tool kit storage well
casing, proceed as described on
(
�page 458).
6Wheel bolt wrench
7Electric air pump
8Jack
9Spare fuses, fuse extractor, fuse chart
aSpare wheel (collapsible tire)
bAlignment bolt
cTowing eye bolt
dCollapsible wheel chock
eSpare wheel bolts
fVehicle tool kit storage well casing
�
To remove jackb, loosen the hook
and loop fastener.
!With the cargo compartment cover
blind* installed behind the third-row
seats (
�page 288), disengage cargo
compartment cover blind* and flip it
forward. Otherwise the strap of the
securing hook could damage the cargo
compartment cover blind*.
Page 457 of 561

456 Practical hintsWhere will I find ...?Vehicle jackThe vehicle jack is located underneath the
storage compartment floor.
Storage position�
Remove vehicle jack from its storage
compartment (
�page 454).
�
Push crank handle up.
Operational position�
Turn crank handle clockwise until it
engages (operational position).
Before storing the vehicle jack in its stor-
age compartment:
�
The vehicle jack should be fully col-
lapsed.
�
The handle must be folded in (storage
position).
Warning!
G
The jack is designed exclusively for jacking
up the vehicle at the jack take-up brackets
built into both sides of the vehicle. To help
avoid personal injury, use the jack only to lift
the vehicle during a wheel change. Never
get beneath the vehicle while it is supported
by the jack. Keep hands and feet away from
the area under the lifted vehicle. Always
firmly set parking brake and block wheels
before raising vehicle with jack.
Do not disengage parking brake while the
vehicle is raised. Be certain that the jack is
always vertical (plumb line) when in use,
especially on hills. Always try to use the jack
on level surface. Make sure the jack arm is
fully seated in the jack take-up bracket.
Always lower the vehicle onto sufficient ca-
pacity jackstands before working under the
vehicle.
Page 473 of 561

472 Practical hintsReplacing bulbs�
Turn bulb socket 5 clockwise until it
engages.
�
Insert corner-illuminating front fog
lamp 1 back into bumper.
�
Fasten retaining screws4.
�
Reinsert cover 2 and press it in until it
engages.
�
Fasten retaining screw3.Additional turn signal lamps bulbs
The additional turn signal lamps in the
exterior rear view mirrors have LEDs.
If a malfunction occurs or LEDs fail to func-
tion, the entire turn signal unit must be re-
placed. Have the turn signal unit replaced
by an authorized Mercedes-Benz Light
Truck Center.
Front sidemarker lamp bulbs
Since replacing the sidemarker lamp bulbs
is a technically highly demanding process,
we recommend you have the sidemarker
lamp bulbs replaced by an authorized
Mercedes-Benz Light Truck Center.
Replacing bulbs for rear lamps
Before you start to replace a bulb for a rear
lamp, do the following first:�
Turn the combination switch to
positionM (
�page 147).
Tail lamp unit
�
Open the tailgate (
�page 122).
iTo access the tail lamp units, you have
to remove the cover in the correspond-
ing side trim panel of the cargo com-
partment.
��