Page 402 of 539

401 Practical hints
What to do if …
Display message
Possible cause
Possible solution
Front passenger
airbag
activated
see Oper.’s Man.
Front passenger front air bag is
activated while driving even
though a child, small individual,
or object below the system’s
weight threshold is on the front
passenger seat, or the front
passenger seat is empty. Ob-
jects on the seat or forces act-
ing on the seat may make the
system sense supplemental
weight.
Stop the vehicle in a safe location as soon as possible and check the
front passenger seat for the following:�
Switch off the ignition (
�page 34).
�
Remove child and child restraint from front passenger seat and
properly secure the child in rear seat employing the child restraint if
necessary.
�
Remove any other items from on and around the front passenger
seat and make sure the storage bag on the back of the front passen-
ger seat is empty.
�
Make sure that no objects which apply forces to the seat are present
(e.g. objects such as books, briefcases etc. lodged behind or around
the seat, head restraints pushing against roof etc.). The system may
recognize such forces as supplemental weight and sense that an oc-
cupant on the front passenger seat is of a greater weight than actu-
ally present.
�
Keep the seat unoccupied, close the front passenger door and
switch on the ignition (
�page 34).
(Continued on next page)
Page 433 of 539
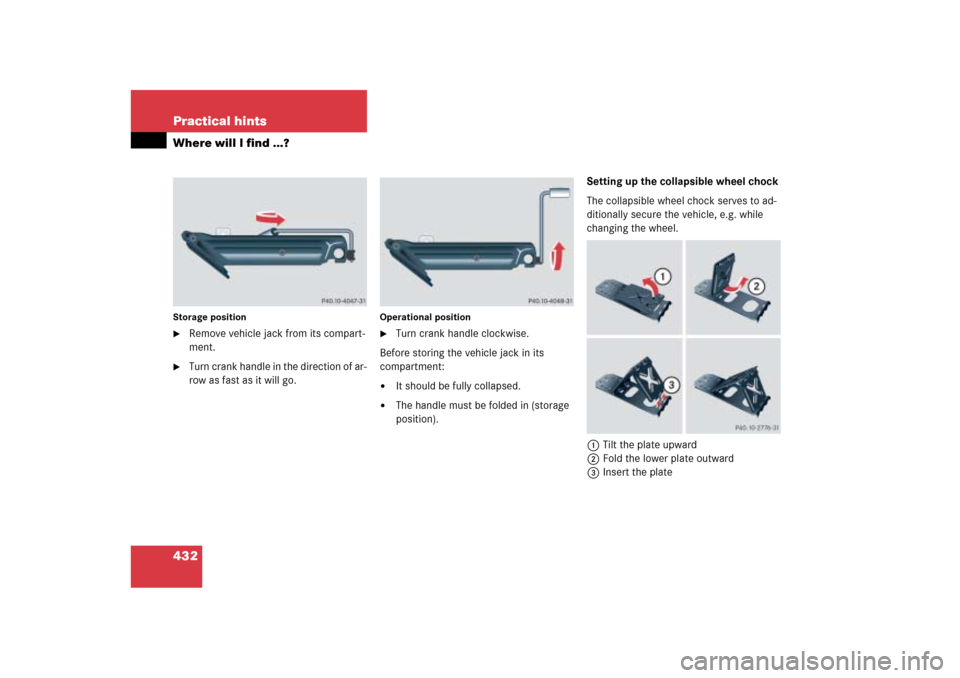
432 Practical hintsWhere will I find ...?Storage position�
Remove vehicle jack from its compart-
ment.
�
Turn crank handle in the direction of ar-
row as fast as it will go.
Operational position�
Turn crank handle clockwise.
Before storing the vehicle jack in its
compartment:
�
It should be fully collapsed.
�
The handle must be folded in (storage
position).Setting up the collapsible wheel chock
The collapsible wheel chock serves to ad-
ditionally secure the vehicle, e.g. while
changing the wheel.
1Tilt the plate upward
2Fold the lower plate outward
3Insert the plate
Page 455 of 539

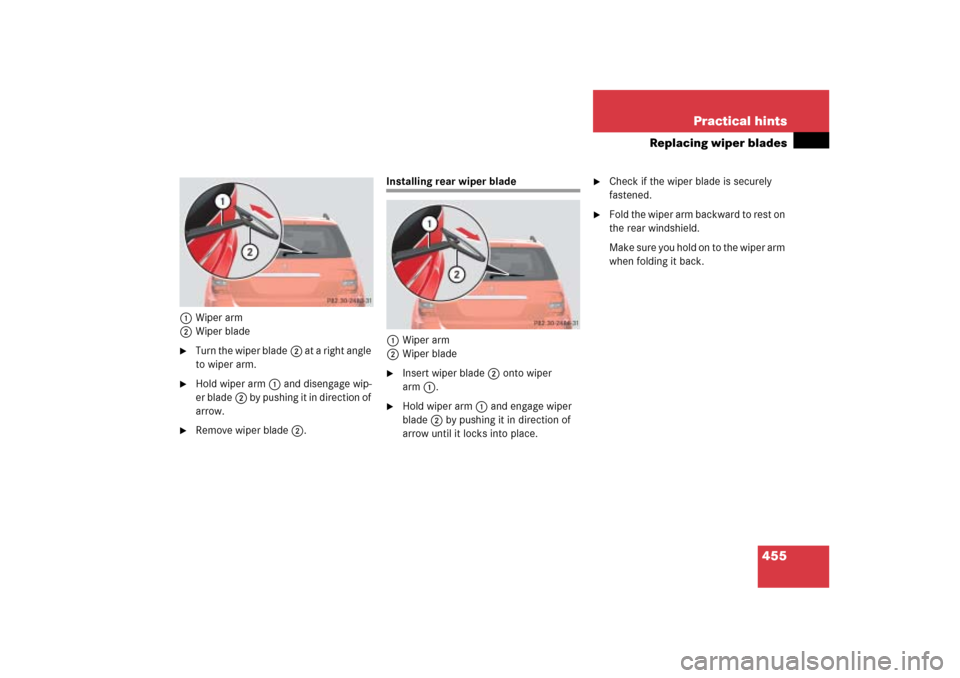
454 Practical hintsReplacing wiper blades�
Let tab2 latch into both recesses of
attachment3.
�
Check if the wiper blade is securely
fastened.
�
Fold the wiper arm backward to rest on
the windshield.
Make sure you hold on to the wiper arm
when folding it back.
Removing rear wiper blade�
Fold wiper arm1 (
�page 455) for-
ward until it engages.
!Never open the hood when the wiper
arms are folded forward.
Hold on to the wiper when folding the
wiper arm back. If released, the force
of the impact from the tensioning
spring could crack the windshield.
Do not allow the wiper arms to contact
the windshield glass without a wiper
blade inserted.
Make certain that the wiper blades are
properly installed. Improperly installed
wiper blades may cause windshield
damage.
For your convenience, we recommend
that you have this work carried out by
an authorized Mercedes-Benz Light
Truck Center.
Warning!
G
For safety reasons, switch off wipers and
remove SmartKey from starter switch (vehi-
cles with KEYLESS-GO*: Make sure the
vehicle’s on-board electronics have
status
0) before replacing a wiper blade.
Otherwise the motor could suddenly turn on
and cause injury.
��
Page 456 of 539
455 Practical hints
Replacing wiper blades
1Wiper arm
2Wiper blade�
Turn the wiper blade2 at a right angle
to wiper arm.
�
Hold wiper arm1 and disengage wip-
er blade2 by pushing it in direction of
arrow.
�
Remove wiper blade2.
Installing rear wiper blade
1Wiper arm
2Wiper blade�
Insert wiper blade2 onto wiper
arm1.
�
Hold wiper arm1 and engage wiper
blade2 by pushing it in direction of
arrow until it locks into place.
�
Check if the wiper blade is securely
fastened.
�
Fold the wiper arm backward to rest on
the rear windshield.
Make sure you hold on to the wiper arm
when folding it back.
Page 464 of 539
 battery, also referred to as
“fleece” battery. Such batteries do not
require topping-up of the electrolyte
level")
463 Practical hints
Battery
!
The battery is a valve-regulated lead
acid (VRLA) battery, also referred to as
“fleece” battery. Such batteries do not
require topping-up of the electrolyte
level. VRLA batteries therefore do not
have cell caps and the battery cover is
non-removable. Do not attempt to
open the battery as otherwise the bat-
tery will be damaged.
Even though VRLA batteries do not
require topping-up of the electrolyte
level and cannot be opened to check
the electrolyte level, the battery condi-
tion must be checked periodically by
performing a battery conductance test.
Refer to Maintenance Booklet for bat-
tery condition testing intervals.
As with any other battery, the battery
may discharge if the vehicle is not
operated for an extended period of
time. You can connect a battery
maintenance charge unit tested and
approved for use on your vehicle model
or disconnect the battery to prevent
battery discharge. Contact an
authorized Mercedes-Benz Light Truck
Center for more information.
!The factory-equipped VRLA battery is
leak-proofed. Only use a battery as re-
placement that has the same security
features and is of identical size,
voltage, and capacity as the
factory-equipped battery.
The battery, the battery ventilation
tube (
�page 468) and the vent plug
(
�page 468) must always be securely
installed when the vehicle is in opera-
tion.
Warning!
G
Jump starting must only be done using the
jump-start contacts located in the engine
compartment (
�page 470).
Page 469 of 539

cBattery�
Tilt the batteryc with the negative
terminal side upwards.
�
Take out the battery maintaining its
tilted position in the direction of the
arrow")
468 Practical hintsBatteryStep 8 (Removing)
cBattery�
Tilt the batteryc with the negative
terminal side upwards.
�
Take out the battery maintaining its
tilted position in the direction of the
arrow.Step 9 (Reinstalling)
�
Carry out step 8 in reverse order
(�page 468).
Battery, shown removed for illustration9Battery ventilation tube
dVent plug
�
Carry out step 10 to reconnect the
battery (
�page 468).
�
Follow steps 5 to 1 in reverse order to
completely reinstall the battery
(�page 467) to (
�page 465).
Step 10 (Reconnecting)
�
If the battery has been removed, first
carry out step 8 in reverse order
(�page 468).
�
Open the driver’s door.
�
Make sure all electrical consumers are
turned off.
�
Make sure the SmartKey has been re-
moved from the starter switch.
Vehicles with KEYLESS-GO*:�
Make sure the vehicle’s on-board
electronics have status0 (Open the
driver’s door. With the driver’s door
open, the vehicle’s on-board elec-
tronics have status0, same as with
the SmartKey removed from the
starter switch).
!The battery, the battery ventilation
tube9 and the vent plugd must
always be securely installed when the
vehicle is in operation.
Page 478 of 539

477 Practical hintsFuses
�Fuses
The electrical fuses in your vehicle serve to
stop the supply of electricity to a device
that is malfunctioning. This helps to
prevent damage to the other vehicle
electronics. If a fuse is blown, the compo-
nents and systems secured by this fuse
will stop operating.
The following aids are available to help you
change fuses (
�page 478):
�
Fuse chart
�
Spare fuses
�
Fuse extractorThe electrical fuses are located in different
fuse boxes:
�
Main fuse box in engine compartment
(�page 478)
�
Fuse box in cargo compartment
(�page 479)
�
Fuse box in passenger compartment
(�page 479)
Warning!
G
Only use fuses approved for Mercedes-Benz
with the specified amperage for the system
in question. Never attempt to repair or
bridge a blown fuse. Otherwise, a short cir-
cuit could result and cause a fire.!Only install fuses that have been tested
and approved by Mercedes-Benz and
that have the specified amperage
rating. Otherwise, electrical parts or
systems could be damaged.
Never attempt to repair or bridge a
blown fuse. Have the cause determined
and remedied by an authorized
Mercedes-Benz Light Truck Center.
!Keep the fuse boxes free by contamina-
tion and wetness. Otherwise, electrical
parts or systems could be damaged.
Page 520 of 539

519 Index
L
Labels, identification 484
Lamp bulbs, exterior 443
Lamps, exterior
Front 443
Light sensor 420
Messages in display 418, 420
Rear 444
Lamps, indicator and warning
ABS 382
Air bag Off 72
Battery (SmartKey with
KEYLESS-GO*) 114
Battery (SmartKey) 108
Brakes 383
CHECK ENGINE 385, 386
CHECK Engine malfunction
indicator lamp 386
Engine diagnostics 385, 386
ESP
®
387
Front fog lamps 138
Fuel reserve 388
Rear fog lamp 138
Seat belts 388, 389
SRS 390Language
Multifunction display 164
Setting 164
LATCH type child seat anchors 88
LATCH type child seat mounts 88
Layout of poly-V-belt drive (ML 350) 485
Layout of poly-V-belt drive (ML 500) 485
Leather upholstery*
Cleaning 380
Lever
For cruise control 238
License plate lamps
Messages in display 419
Replacing bulbs 444, 451
Light alloy wheels
Cleaning 379
Light sensor 420
Lighter see cigarette lighterLighting 138
Automatic headlamp mode 139
Cargo compartment lamp 147
Daytime running lamp mode 140
Door entry lamps 147
Front fog lamps 142
High beams 142
Instrument cluster illumination 148
Interior 145
Locator lighting 141
Low beam 138
Manual headlamp mode 139
Night security illumination 141
Parking lamps 138
Rear fog lamp 142
Settings (control system) 167
Standing lamps 138
Limiting the gear range 187
Limp Home Mode 192
Line of fall 503