Page 142 of 539

141 Controls in detail
Lighting
USA only
By default, the daytime running lamp mode
is deactivated. Activate the daytime
running lamp mode using the control
system, see “Setting daytime running lamp
mode (USA only)” (
�page 167).
When the engine is running, and you turn
the exterior lamp switch to positionC
orB, the manual headlamp mode has
priority over the daytime running lamp
mode.
The corresponding exterior lamps switch
on (
�page 54).
Locator lighting and night security
illumination
The locator lighting and the night security
illumination are described in the “Control
system” section, see “Setting locator light-
ing” (�page 168) and “Setting night secu-
rity illumination” (
�page 169).Fog lamps
Warning!
G
In low ambient lighting or foggy conditions,
only switch from positionU toB with
the vehicle at a standstill in a safe location.
Switching fromU toB will briefly
switch off the headlamps. Doing so while
driving in low ambient lighting conditions
may result in an accident.iFog lamps will operate with the parking
lamps and/or the low beam headlamps
on. Fog lamps should only be used in
conjunction with low beam headlamps.
Consult your State or Province Motor
Vehicle Regulations regarding permis-
sible lamp operation.
iFog lamps cannot be switched on with
the exterior lamp switch in
positionU. For switching on the fog
lamps, turn the exterior lamp switch to
positionB first.
Page 170 of 539

169 Controls in detail
Control system
�
Move the selection marker to the Lighting
submenu using theæ
orç button.
�
Press buttonj ork repeatedly
until you see this message in the dis-
play:
Function Surround lighting
.
The selection marker is on the current
setting.
�
Press buttonæ orç to select
the desired setting.
The locator lighting will be switched on
or off.
�
Turn the exterior lamp switch to
positionU when exiting the vehicle
(�page 138).Setting night security illumination
(Headlamps delayed shut-off)
Use this function to set whether and how
long you would like the exterior lamps to
illuminate during darkness after exiting the
vehicle and all doors closed.
With the delayed shut-off feature activated
and the exterior lamp switch in
position
U
before the engine is turned
off, the following lamps will switch on
when the engine is turned off:
�
Parking lamps
�
Tail lamps
�
License plate lamps
�
Side marker lamps
�
Front fog lamps
�
Move the selection marker to the Lighting
submenu using theæ
orç button.
�
Press buttonj ork repeatedly
until you see this message in the dis-
play:
Headlmp. delayed shut-off
.
The selection marker is on the current
setting.
iYou can reactivate this function within
ten minutes by opening a door.
If after turning off the engine you do not
open a door or do not close an opened
door, the lamps will automatically
switch off after 60 seconds.
��
Page 186 of 539

185 Controls in detail
Automatic transmission
Transmission positions
Effect
ì
Park position
Shift into park positionP only
when vehicle is stopped. The
park position is not intended to
serve as a brake when the vehi-
cle is parked. Rather, the driver
should always set the parking
brake in addition to shifting into
park positionP to secure the
vehicle.
!SmartKey:
If you turn off the engine using the
SmartKey and remove the SmartKey
from the starter switch, the transmis-
sion automatically will shift to park
positionP. Keep in mind that turning
off the engine with the SmartKey alone
will not automatically shift the trans-
mission toP. Only when the SmartKey
is removed from the starter switch will
the transmission automatically shift
toP.
KEYLESS-GO*:
If you turn off the engine using the
KEYLESS-GO start/stop button and
open the driver’s door, the transmis-
sion automatically will shift to park
positionP. Keep in mind that turning
off the engine using the KEYLESS-GO
start/stop button alone will not auto-
matically shift the transmission toP.
Only when the driver’s door is opened
will the transmission automatically
shift toP.
Even though this is possible, make it a
practice to always shift into park
positionP before turning off the engine
and removing the SmartKey from the
starter switch, or when using
KEYLESS-GO*, before turning off the
engine with the start/stop button and
opening the driver’s door.Warning!
G
If you want the gear position to remain inN
(for example when the vehicle is pulled
through a car wash), do not remove the
SmartKey from the starter switch or, when
using KEYLESS-GO*, do not turn off the
engine using the KEYLESS-GO start/stop
button* and open the driver’s door. Other-
wise, the transmission will shift toP and
lock the wheels, preventing the vehicle from
being pulled through a car wash.
Page 260 of 539

259 Controls in detail
Loading
�Loading
Loading instructions
Load distributionThe gross vehicle weight which is the
weight of the vehicle including fuel, tools,
spare wheel, installed accessories, pas-
sengers and luggage/cargo must never
exceed the load limit and Gross Vehicle
Weight Rating (GVWR) for your vehicle as
specified on the placard(s) located on the
driver’s door B-pillar. In addition, the load
must be distributed in such a way so that
the weight on each axle never exceeds the
Gross Axle Weight Rating (GAWR) for the
front and rear axle. The GVWR and GAWR
for your vehicle are indicated on the certi-
fication label which can be found on the
driver’s door B-pillar.The handling characteristics of a fully load-
ed vehicle depend greatly on the load dis-
tribution. It is therefore recommended to
load the vehicle according to the illustra-
tions shown, with the heaviest items being
placed towards the front of the vehicle.
Please pay attention to and comply with
the following instructions when loading the
vehicle and transporting cargo:
�
Always place items being carried
against front or rear seat backrests,
and fasten them as securely as possi-
ble.
�
The heaviest portion of the cargo
should always be kept as low as possi-
ble against front or rear seat backrests.
Warning!
G
Always fasten items being carried as secure-
ly as possible using cargo tie-down rings and
fastening materials appropriate for the
weight and size of the load.
In an accident, during hard braking or sud-
den maneuvers, loose items will be thrown
around inside the vehicle, and can cause in-
jury to vehicle occupants unless the items
are securely fastened in the vehicle.
To help avoid personal injury during a colli-
sion or sudden maneuver, always use parti-
tion net when transporting cargo.
Never drive vehicle with the tailgate open.
Deadly carbon monoxide (CO) gases may
enter vehicle interior resulting in uncon-
sciousness and death.
Page 261 of 539

260 Controls in detailLoadingFor additional safety when transporting
cargo while the rear seats are unoccupied,
fasten the outer seat belts crosswise into
the opposite side buckles.Cargo tie-down rings
The vehicle is equipped with six tie-down
rings.
Four tie-down rings are located in the
cargo compartment.
1Cargo tie-down ringTwo additional tie-down rings are located
on the floor in front of the rear bench seat.
1Cargo tie-down ring
�
Carefully secure cargo by applying
even load on all rings with rope of suffi-
cient strength to hold down the cargo.
iThe cargo compartment is the pre-
ferred place to carry objects. The en-
larged cargo compartment should only
be used for items which do not fit in the
cargo compartment alone.
iWhile the partition net* will help pro-
tect you from smaller objects, it cannot
prevent the movement of large, heavier
objects into the passenger compart-
ment in an accident, during hard brak-
ing or sudden maneuvers. Such items
must be properly secured using the
cargo tie-down rings.
Page 262 of 539

261 Controls in detail
Loading
Hooks
Four hooks located on the rear compart-
ment trim panels, two on each side.
1Hook
Use the hooks to secure light weight items.
The maximum permissible weight per hook
is 9 lbs (4 kg).
Split rear bench seat
To expand the cargo compartment, you
can fold down the left and right rear seat
backrests.
The two sections can be folded down sep-
arately to enlarge the cargo compartment.Folding the backrest forwardWarning!
G
When expanding the cargo compartment,
always fold the seat cushions fully forward
and always use the partition net when trans-
porting cargo.
Unless you are transporting cargo, the back-
rests must remain properly locked in the up-
right position.
In an accident, during hard braking or sud-
den maneuvers, loose items will be thrown
around inside the vehicle, and can cause
injury to vehicle occupants unless the items
are securely fastened in the vehicle.
Always use the cargo tie down rings
(�page 260).
!Always release the seat cushion and
fold it up before folding the seat back-
rests forward. The covering on the seat
backrest may otherwise be damaged.
When the rear bench seat is folded for-
ward, the front seats cannot be moved
to the rearmost position. Otherwise
you could damage the front seats and
the rear bench seat.
Page 263 of 539
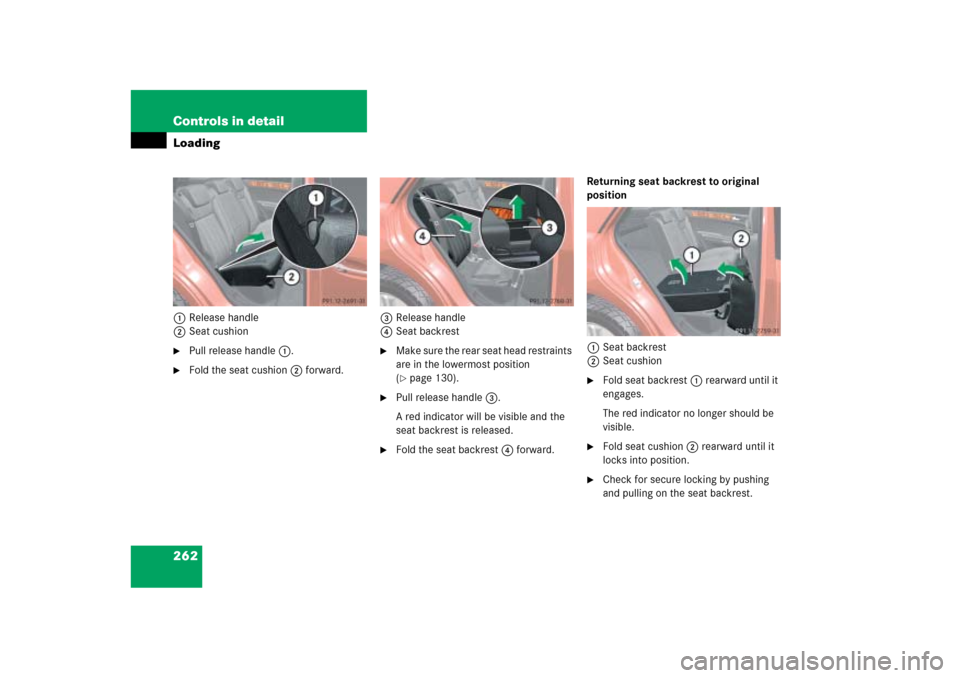
262 Controls in detailLoading1Release handle
2Seat cushion�
Pull release handle1.
�
Fold the seat cushion2 forward.3Release handle
4Seat backrest
�
Make sure the rear seat head restraints
are in the lowermost position
(�page 130).
�
Pull release handle3.
A red indicator will be visible and the
seat backrest is released.
�
Fold the seat backrest4 forward.Returning seat backrest to original
position
1Seat backrest
2Seat cushion
�
Fold seat backrest1 rearward until it
engages.
The red indicator no longer should be
visible.
�
Fold seat cushion2 rearward until it
locks into position.
�
Check for secure locking by pushing
and pulling on the seat backrest.
Page 264 of 539

263 Controls in detail
Loading
Partition net*Use of the partition net is a particularly im-
portant safety factor when the vehicle is
loaded higher than the top of the seat
backrests with smaller objects.
The partition net can be installed behind
the backrests of the front or rear seats.
�
Open the partition net zipper.
�
Roll out the partition net.
�
Unfold the partition net until it audibly
engages.
Engaging partition net
1Holder
2Mounting hook
Warning!
G
If a red indicator is visible with the backrest
up, then the backrest is not properly locked
into position.
Always lock backrest in its upright position
when the rear seats are occupied, or the ex-
tended cargo compartment is not in use.
Check for secure locking by pushing and
pulling on the backrest.
Warning!
G
Always lock backrest in its upright position
when rear seat bench is occupied by pas-
sengers, or cargo is being carried behind the
seat bench.
To help avoid personal injury from smaller
objects being thrown around in the occu-
pant compartment during a collision or sud-
den maneuver, always use partition net
when transporting cargo.
The partition net cannot prevent the move-
ment of large, heavier objects into the pas-
senger compartment in an accident. Such
items must be properly secured using the
cargo tie-down rings (
�page 260) in the
cargo compartment floor.
Passenger use of seats behind installed par-
tition net is restricted because of the foot-
well being taken up by the net.