Page 146 of 539
145 Controls in detail
Lighting
Switching on hazard warning flasher�
Press hazard warning flasher
switch1.
All turn signals are flashing.
Switching off hazard warning flasher
�
Press hazard warning flasher switch1
again.
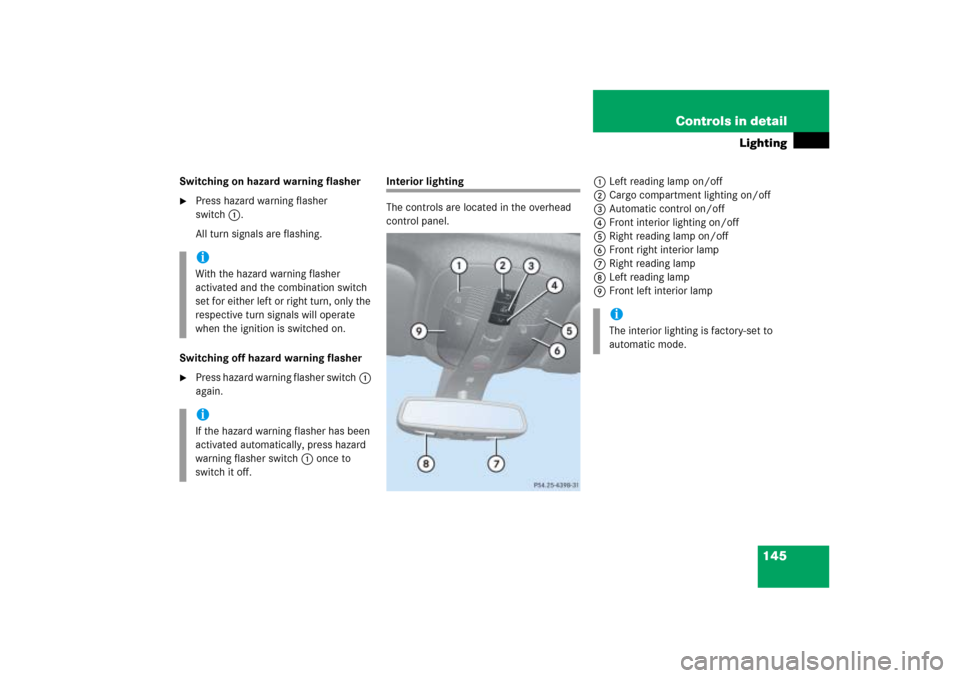
Interior lighting
The controls are located in the overhead
control panel.1Left reading lamp on/off
2Cargo compartment lighting on/off
3Automatic control on/off
4Front interior lighting on/off
5Right reading lamp on/off
6Front right interior lamp
7Right reading lamp
8Left reading lamp
9Front left interior lamp
iWith the hazard warning flasher
activated and the combination switch
set for either left or right turn, only the
respective turn signals will operate
when the ignition is switched on.iIf the hazard warning flasher has been
activated automatically, press hazard
warning flasher switch1 once to
switch it off.
iThe interior lighting is factory-set to
automatic mode.
Page 148 of 539

147 Controls in detail
Lighting
Switching right front reading lamp on
and off�
Press button5.
The right reading lamp comes on.
�
Press button5 again.
The right reading lamp goes out.
Switching rear interior reading lamps on
and off
The rear interior reading lamps are located
above the rear side windows next to the
grab handles.
1Rear interior reading lamp
�
Press reading lamp1 in direction of
arrow.
The reading lamp comes on.
�
Press reading lamp1 in direction of
arrow again.
The reading lamp goes out.
Cargo compartment lamp
The cargo compartment lamp switches on
if the tailgate is opened.
If you leave the tailgate open for an extend-
ed period of time, the cargo compartment
lamp will switch off automatically after ap-
proximately five minutes.Switching cargo compartment lamp on
and off manually
�
Press switch2 (
�page 145).
The cargo compartment lamp comes
on.
�
Press switch2 again.
The cargo compartment lamp goes out.
Door entry lamps
For better orientation in the dark, the
corresponding door entry lamps will switch
on in the darkness when you open a door
and the automatic control is activated.
The door entry lamps will switch off when
the corresponding door is closed.
iIf you turn the SmartKey in the starter
switch to position0 and switch off the
headlamps, the door entry lamps will
remain lit for approximately five
minutes.
Page 150 of 539
.
�
If it is not displayed, press buttonè
orÿ on the multifunction steering")
149 Controls in detail
Instrument cluster
Trip odometer
Make sure you are viewing the trip odome-
ter display (
�page 150).
�
If it is not displayed, press buttonè
orÿ on the multifunction steering
wheel (
�page 151) until the trip odom-
eter appears.
�
Press and hold the reset button on the
instrument cluster (
�page 148) until
the trip odometer is reset.
Tachometer
The red marking on the tachometer
(�page 24) denotes excessive engine
speed.To help protect the engine, the fuel supply
is interrupted if the engine is operated
within the red marking.
Outside temperature indicator
The outside temperature is displayed in
the multifunction display (
�page 150).The temperature sensor is located in the
front bumper area. Due to its location, the
sensor can be affected by road or engine
heat during idling or slow driving. This
means that the accuracy of the displayed
temperature can only be verified by com-
parison to a thermometer placed next to
the sensor, not by comparison to external
displays (e.g. bank signs etc.).
When moving the vehicle into colder ambi-
ent temperatures (e.g. when leaving your
garage), you will notice a delay before the
lower temperature is displayed.
A delay also occurs when ambient temper-
atures rise. This prevents inaccurate tem-
perature indications caused by heat
radiated from the engine during idling or
slow driving.
!Avoid driving at excessive engine
speeds, as it may result in serious en-
gine damage that is not covered by the
Mercedes-Benz Limited Warranty.
Warning!
G
The outside temperature indicator is not de-
s i g n e d t o s e r v e a s a n i c e - w a r n i n g d e v i c e a n d
is therefore unsuitable for that purpose.
Indicated temperatures just above the freez-
ing point do not guarantee that the road sur-
face is free of ice. The road may still be icy,
especially in wooded areas or on bridges.
Page 158 of 539

157 Controls in detail
Control system
AUDIO menu
The functions in the
AUDIO
menu operate
the audio equipment which you currently
have turned on.
If no audio equipment is currently turned
on, the message
AUDIO OFF
is shown in the
display.
The following functions are available:Select radio station
�
Turn on the Modular COMAND System
and select radio. Refer to separate
Modular COMAND System operating
instructions.
�
Press buttonè orÿ repeatedly
until you see the currently tuned sta-
tion in the multifunction display.
1Waveband setting
2Station frequency
�
Press buttonk orj repeatedly
until the desired station is found.Select satellite radio station* (USA
only)
The satellite radio is treated as a radio ap-
plication.
�
Select satellite radio with the corre-
sponding key on the Modular COMAND
System.
1SAT mode and preset number
2Channel name or number
Function
Page
Select radio station
157
Select satellite radio station*
(USA only)
157
Operate CD player
158
iYou can only store new stations using
the corresponding feature on the radio,
see separate Modular COMAND
System operating instructions.
You can also operate the radio in the
usual manner.
��
Page 160 of 539

159 Controls in detail
Control system
�
With the Modular COMAND system
switched on and route guidance acti-
vated, the direction of travel and
maneuver instructions appear in the
multifunction display.
Please refer to the COMAND manual for in-
structions on how to activate the route
guidance system.
Off-road menu
Use the
Off-road
menu to display the
settings for Air suspension* and compass.
�
Press buttonè orÿ repeatedly
until you see one of the following mes-
sages in the multifunction display (de-
pending on vehicle configuration):
Compass
Example Vehicle level* settings�
Press buttonk orj repeatedly
until the desired setting is found.
Vehicle status message memory menu
Use the vehicle status message memory
menu to scan malfunction and warning
messages that may be stored in the
system. Such messages appear in the mul-
tifunction display and are based on condi-
tions or system status the vehicle’s system
has recorded.Warning!
G
Malfunction and warning messages are only
indicated for certain systems and are inten-
tionally not very detailed. The malfunction
and warning messages are simply a remind-
er with respect to the operation of certain
systems and do not replace the owner’s
and/or driver’s responsibility to maintain
the vehicle’s operating safety by having all
required maintenance and safety checks
performed on the vehicle and by bringing
the vehicle to an authorized Mercedes-Benz
Light Truck Center to address the malfunc-
tion and warning messages.
Page 169 of 539

mode.
With daytime running lamp mode se-
lected and the exterior lamp switch at
positionM,")
168 Controls in detailControl system�
Pressæ orç to select
Manual
or
daytime running lamp (
Constant
)
mode.
With daytime running lamp mode se-
lected and the exterior lamp switch at
positionM, the following lamps will
come on automatically when the en-
gine is turned on:
�
Parking lamps and low beam
headlamps
�
License plate lamps (in low ambient
light conditions)Setting locator lighting
With the locator lighting feature activated
and the exterior lamp switch in
position
U
, the following lamps will
switch on during darkness when the vehi-
cle is unlocked with SmartKey:
�
Parking lamps
�
Tail lamps
�
License plate lamps
�
Side marker lamps
�
Front fog lamps
The locator lighting switches off when the
driver’s door is opened. It switches off au-
tomatically after a period of approximately
40 seconds.
iIf you turn the exterior lamp switch to
another position, the corresponding
lamp(s) will switch on.
For safety reasons, resetting the Lighting
submenu to factory settings
while driving will not reset the daytime
running lamp mode.
In the display you will then see the mes-
sage:
Lighting - Cannot be com-
pletely reset to factory settings
while driving.
��
Page 172 of 539

171 Controls in detail
Control system
Vehicle submenu
Access the
Vehicle
submenu via the
Settings...
menu. Use the
Vehicle
sub-
menu to make general vehicle settings.
The following functions are available:Adjusting compass zone
This function is not available if your vehicle
is equipped with the Modular COMAND
System and navigation module*.
Use this function to set the compass zone.
To set the compass zone:
�
Move the selection marker to the Vehicle
submenu using theæ
orç button.
�
Press buttonj ork repeatedly
until you see this message in the dis-
play:
Compass Adjustment Zone
.
The selection marker is on the current
setting.
�
Press buttonæ orç to set the
respective compass zone.For information on how to select the prop-
er geographic zone, see “Compass”
(
�page 295).
Calibrating compass
This function is not available if your vehicle
is equipped with the Modular COMAND
System and navigation module*.
Use this function to calibrate the compass
zone.
To calibrate the compass:
�
Move the selection marker to the Vehicle
submenu using theæ
orç button.
�
Press buttonj ork repeatedly
until you see this message in the dis-
play:
Compass Calibration
.
The selection marker is on the current
setting.
Function
Page
Adjusting compass zone
171
Calibrating compass
171
Display when ignition is
switched off
172
Set automatic locking
172
Limiting opening height of tail-
gate*
173
��
Page 187 of 539

186 Controls in detailAutomatic transmission
Effect
í
Reverse gear
Shift into reverse gearR only
when the vehicle is stopped.
ë
Neutral
No power is transmitted from the
engine to the drive axle. When
the brakes are released, the
vehicle can be moved freely
(pushed or towed).
To avoid damage to the trans-
mission, never shift into
positionN while driving.
If the ESP
® is deactivated or
malfunctioning:
Shift into positionN only if the
vehicle is in danger of skidding,
e.g. on icy roads.
ê
Drive
The transmission shifts
automatically. All forward gears
are available.
!Coasting the vehicle, or driving for any
other reason in positionN can result in
transmission damage that is not cov-
ered by the Mercedes-Benz Limited
Warranty.
Warning!
G
Getting out of your vehicle without shifting
into positionP is dangerous. Also,
positionP alone is not intended to or capa-
ble of preventing your vehicle from moving,
possibly hitting people or objects.
Always set the parking brake in addition to
shifting to positionP (
�page 52).
When parked on an incline, turn the front
wheels towards the road curb.
Do not park this vehicle in areas where com-
bustible materials such as grass, hay or
leaves can come into contact with the hot
exhaust system, as these materials could be
ignited and cause a vehicle fire.