Page 116 of 539

115 Controls in detail
Locking and unlocking
Checking the batteries�
Press button‹orŒ.
Battery check lamp5 comes on brief-
ly to indicate that the SmartKey with
KEYLESS-GO batteries are in order.
Unlocking and opening the tailgate
You can unlock and open the tailgate sep-
arately.
A minimum height clearance of 7 ft
(2.15 m) is required to open the tailgate.The handle is located above the rear
license plate recess.
�
Pull on the handle
or
Vehicles with tailgate opening/closing
system*:
�
Press and hold buttonŠ on the
SmartKey with KEYLESS-GO until the
tailgate unlocks and opens.
�
Have the vehicle battery and the
battery connections checked
(�page 462).
�
Use the mechanical key to lock the
doors (
�page 436).
If the SmartKey with KEYLESS-GO is
malfunctioning, contact an authorized
Mercedes-Benz Light Truck Center.
iIf battery check lamp5 (
�page 110)
does not come on briefly during check,
then the SmartKey with KEYLESS-GO
batteries are discharged.
Replace the batteries (
�page 440).
You can obtain the required batteries
at any authorized Mercedes-Benz Light
Truck Center.
iIf the batteries are checked within sig-
nal range of the vehicle, pressing the
button‹orŒ will lock or un-
lock the vehicle accordingly.
Page 213 of 539

212 Controls in detailClimate controlActivating
Moist air can fog up the windows. You can
dehumidify the air with the air condition-
ing.�
Press button2 again.
The indicator lamp on button2
comes on.
The air conditioning uses the refrigerant
R134a. This refrigerant is free of CFCs
which are harmful to the ozone layer.
Residual heat and ventilation
With the engine switched off, it is possible
to continue to heat or ventilate the interior
for up to 30 minutes. This feature makes
use of the residual heat produced by the
engine.Activating
�
Turn the SmartKey in the starter switch
to position0or1, or remove it from
the starter switch.
�
Press buttonT (
�page 204).
The indicator lamp on buttonT
comes on.
Deactivating
�
Press buttonT (
�page 204).
The indicator lamp on buttonT
goes out.
!If the air conditioning cannot be turned
on again, this indicates that the air con-
ditioning is losing refrigerant. The com-
pressor has turned itself off.
Have the air conditioning checked at
the nearest authorized Mercedes-Benz
Light Truck Center.
iHow long the system will provide heat-
ing depends on the coolant tempera-
ture and the battery voltage.
Regardless of the temperature and air
volume set on the climate control panel
an interior temperature is aimed at by
72°F (22°C) and the blower runs for
the protection of the battery on low
stage.
Page 228 of 539
, or re-
move it from the starter switch.
�
Press buttonT (
�p")
227 Controls in detail
3-zone automatic climate control*
Activating�
Turn the SmartKey in the starter switch
to position0 or1 (
�page 34), or re-
move it from the starter switch.
�
Press buttonT (
�page 218).
The indicator lamp on buttonT
comes on.
Deactivating
�
Press buttonT.
The indicator lamp on buttonT
goes out.
Rear air conditioning1Left rear center air vent, adjustable
2Right rear center air vent, adjustable
3Temperature control
4Air distribution and air volume
(automatic, manual)
5Air distribution (directs air through
both center air vents)
6Air distribution (directs air through the
footwells and side air vents)
7Rear air conditioning on/off
8Decrease air volume
9Increase air volume
Activating rear air conditioning
�
Press buttonU.
The indicator lamp on buttonU
comes on. The temperature, air volume
and air distribution are adjusted
automatically.
iThe residual heat is automatically
turned off:�
when the ignition is switched on
�
after about 30 minutes
�
if the coolant temperature is too
low
�
if the battery voltage drops
Page 278 of 539
.
�
Open the ashtray (
�page 275).
�
Push in cigarette lighter1.
The cigarette lighter w")
277 Controls in detail
Useful features
Cigarette lighter*
1Cigarette lighter�
Switch on the ignition (
�page 34).
�
Open the ashtray (
�page 275).
�
Push in cigarette lighter1.
The cigarette lighter will pop out auto-
matically when hot.
12-V sockets
Power outlets are located in the front pas-
senger footwell, the rear passenger foot-
well, and the right-hand side of the cargo
compartment.�
Switch on the ignition (
�page 34).
Warning!
G
Never touch the heating element or sides of
the cigarette lighter; they are extremely hot.
Hold the knob only.
When leaving the vehicle always remove the
SmartKey or SmartKey with KEYLESS-GO*
from the starter switch, take it with you, and
lock the vehicle. Do not leave children unat-
tended in the vehicle, or with access to an
unlocked vehicle. Unsupervised use of vehi-
cle equipment may cause an accident
and/or serious personal injury.iThe cigarette lighter socket can be
used to accommodate electrical acces-
sories up to a maximum of 180 W.
If the engine is off, and the cigarette
lighter is being used extensively, the
vehicle battery may become
discharged.
iThe power outlets can be used to
accommodate electrical consumers
(e.g. air pump, auxiliary lamps) up to a
maximum of 240 W.
If the engine is off, the battery may be-
come discharged if used for long peri-
ods of time.
Page 382 of 539
381 Practical hints
What to do if …
Where will I find ...?
Unlocking/locking in an emergency
Opening/closing in an emergency
Replacing SmartKey batteries
Replacing bulbs
Replacing wiper blades
Flat tire
Battery
Jump starting
Towing the vehicle
Fuses
Page 417 of 539

416 Practical hintsWhat to do if …Display symbol
Display messages
Possible cause
Possible solution
A
Reserve fuel
The fuel level has dropped below
the reserve mark.
�
Refuel at the next gas station
(�page 323).
Check gas cap
See Operator’s Manual
A loss of pressure has been de-
tected in the fuel system. The
fuel cap may not be closed prop-
erly or the fuel system may be
leaky.
�
Check the fuel cap (
�page 323).
If it is not closed properly:
�
Close the fuel cap.
If it is closed properly:
�
Have the fuel system checked by an au-
thorized Mercedes-Benz Light Truck Cen-
ter.
a
Hood open
Trunk open
You are driving with the hood or
the tailgate open.
�
Close the hood (
�page 326) or the tail-
gate (
�page 120).
F
Key
Check battery
The SmartKey with
KEYLESS-GO* batteries are
discharged.
�
Change the batteries (
�page 440).
Please do
not forget key
This display appears (for a maxi-
mum of 60 seconds) if the driv-
er’s door is opened with the
engine shut off and no SmartKey
in the starter switch.
This message is only a reminder.
�
Insert SmartKey in the starter switch.
�
Take the SmartKey with KEYLESS-GO*
with you when leaving the vehicle.
Page 441 of 539

440 Practical hintsReplacing SmartKey batteriesIf the batteries in the SmartKey or the
SmartKey with KEYLESS-GO* are dis-
charged, the vehicle can no longer be
locked or unlocked. It is recommended to
have the batteries replaced at an autho-
rized Mercedes-Benz Light Truck Center.
Batteries contain materials that can harm
the environment if disposed of improperly.
Recycling of batteries is the preferred
method of disposal. Many states require
sellers of batteries to accept old batteries
for recycling.
SmartKey
Replacement batteries: Lithium, type
CR 2025 or equivalent.�
Remove mechanical key1
(�page 435).1Mechanical key
2Slide
3Battery compartment
�
Insert the mechanical key1 in direc-
tion of arrow in side opening.
�
Using mechanical key1 push gray
slide2 to unlatch battery
compartment3.
�
Pull the battery compartment3 out of
the housing in direction of arrow.
Warning!
G
Keep the batteries out of reach of children.
If a battery is swallowed, seek medical help
immediately.
iWhen inserting the batteries, make
sure they are clean and free of lint.iWhen replacing batteries, always
replace both batteries.
The required replacement batteries are
available at any Mercedes-Benz Light
Truck Center.
Page 442 of 539
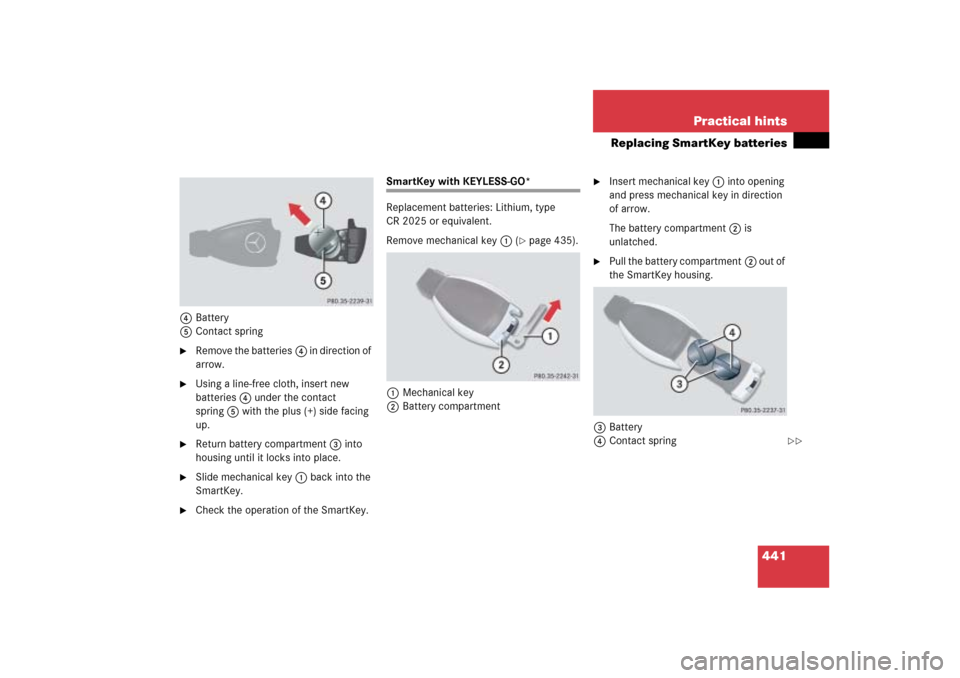
441 Practical hints
Replacing SmartKey batteries
4Battery
5Contact spring�
Remove the batteries4 in direction of
arrow.
�
Using a line-free cloth, insert new
batteries4 under the contact
spring5 with the plus (+) side facing
up.
�
Return battery compartment3 into
housing until it locks into place.
�
Slide mechanical key1 back into the
SmartKey.
�
Check the operation of the SmartKey.
SmartKey with KEYLESS-GO*
Replacement batteries: Lithium, type
CR 2025 or equivalent.
Remove mechanical key1 (
�page 435).
1Mechanical key
2Battery compartment
�
Insert mechanical key1 into opening
and press mechanical key in direction
of arrow.
The battery compartment2 is
unlatched.
�
Pull the battery compartment2 out of
the SmartKey housing.
3Battery
4Contact spring
��