Page 233 of 417
 and rules for off-road
driving (
�page 228).
�Switch off the exterior lamps as well as
the climate control.
�Select gear ra")
232 Operation
Driving instructions
�Comply with the warnings
(
�page 227) and rules for off-road
driving (
�page 228).
�Switch off the exterior lamps as well as
the climate control.
�Select gear range2 or1 on the auto-
matic transmission (
�page 154).
�Enter the water only at a shallow spot,
driving at walking speed.
�Do not stop vehicle while immersed in
water, and do not shut off the engine.
There is a very high level of driving re-
sistance in water. The surface is slip-
pery and may not be firm, making
pulling away in water difficult and dan-
gerous.
�Clean mud off the tire tread after driv-
ing through water.
�To dry the brakes, apply pressure to the
brake pedal several times after leaving
the water.
Crossing obstacles!
Never accelerate before driving into
the water. The bow wave could force
water into the engine and auxiliary
equipment, thus damaging them.
!
If possible, use the assistance of a sec-
ond person outside the vehicle to scout
the path you intend to take and check
for adequate ground clearance when
you cross obstacles with your vehicle.
The person assisting you outside the
vehicle should always be a safe dis-
tance away from the vehicle and posi-
tioned so that he or she cannot get hurt
in case of any unexpected vehicle
movement.
After off-road driving or crossing obsta-
cles, inspect vehicle for any damage,
especially vehicle underbody and sus-
pension components. Failure to do so
can adversely affect the vehicle’s fu-
ture performance, including increased
chance of an accident.
Page 234 of 417
 and rules for off-road
driving (
�page 228).
�Select gear range1 on")
233 Operation
Driving instructions
�Check the vehicle clearance before
crossing obstacles.
�Comply with the warnings
(
�page 227) and rules for off-road
driving (
�page 228).
�Select gear range1 on the automatic
transmission (
�page 154).
�Cross obstacles (e.g. tree stumps or
big rocks) very slowly by aiming one of
the front wheels at the center of the ob-
stacle, and repeat same with the rear
wheel.Ruts
�Check the vehicle clearance before
driving in ruts.
�Comply with the warnings
(
�page 227) and rules for off-road
driving (
�page 228).
�Select gear range1 on the automatic
transmission (
�page 154).
�Drive slowly next to the ruts rather than
through them if at all possible.
!
Special attention is needed when you
cross obstacles on a steep incline.
The vehicle could slide sideways as a
result of its possible slanted position
which in turn may result in the vehicle
tipping or rolling over.
!
A number of off-road tracks or other by-
roads have deep ruts. If the vehicle
does not have enough ground clear-
ance:
�it could be damaged
�the underside of the vehicle may
come down on a surface and re-
main stuck
After off-road driving or crossing obsta-
cles, inspect vehicle for any damage,
especially vehicle underbody and sus-
pension components. Failure to do so
can adversely affect the vehicle’s fu-
ture performance, including increased
chance of an accident.
Page 249 of 417
 and
(
�page 377).
Transmission flu")
248 Operation
Engine compartment
�Screw oil filler cap2 back on filler
neck.
For more information on engine oil, see the
“Technical data” section (
�page 376) and
(
�page 377).
Transmission fluid level
The transmission fluid level does not need
to be checked. The transmission has a per-
manent supply of automatic transmission
fluid.
If you notice transmission fluid loss or gear
shifting malfunctions, have an authorized
Mercedes-Benz Light Truck Center check
the automatic transmission.
Coolant level
The engine coolant is a mixture of water
and anticorrosion/antifreeze.
When checking the coolant level,
�the vehicle must be parked on level
ground.
�the engine must be cool. The coolant
level should reach the Cold Level mark
(plastic bridge) in the reservoir.
!
Excess oil must be siphoned or drained
off. It could cause damage to the
engine and catalytic converter not
covered by the Mercedes-Benz Limited
Warranty.Warning!G
In order to avoid any possibly serious burns:
�Use extreme caution when opening the
hood if there are any signs of steam or
coolant leaking from the cooling system,
or if the coolant temperature display in-
dicates that the coolant is overheated.
�Do not remove pressure cap on coolant
reservoir if coolant temperature is
above 158°F (70°C). Allow engine to
cool down before removing cap. The
coolant reservoir contains hot fluid and
is under pressure.
�Using a rag, slowly open the cap approx-
imately 1/2turn to relieve excess pres-
sure. If opened immediately, scalding
hot fluid and steam will be blown out un-
der pressure.
�Do not spill antifreeze on hot engine
parts. Antifreeze contains ethylene gly-
col which may burn if it comes into con-
tact with hot engine parts.
��
Page 274 of 417

273 Operation
Tires and wheels
Tire ply material
1Plies in sidewall
2Plies under tread
This marking tells you about the type of
cord and number of plies in the sidewall
and under the tread.Tire and loading terminology
Accessory weight
The combined weight (in excess of those
standard items which may be replaced) of
automatic transmission, power steering,
power brakes, power windows, power
seats, radio, and heater, to the extent that
these items are available as
factory-installed equipment (whether
installed or not).
Air pressure
The amount of air inside the tire pressing
outward on each square inch of the tire.
Air pressure is expressed in pounds per
square inch (psi), or kilopascal (kPa) or
bars.
Aspect ratio
Dimensional relationship between tire
section height and section width
expressed in percentage.Bar
Another metric unit for air pressure. There
are 14.5038 pounds per square inch (psi)
to 1 bar; there are 100 kilopascals (kPa)
to 1 bar.
Bead
The tire bead contains steel wires wrapped
by steel cords that hold the tire onto the
rim.
Cold tire inflation pressure
Tire inflation pressure when your vehicle
has been sitting for at least three hours or
driven no more than one mile (1.6 km).
Curb weight
The weight of a motor vehicle with stan-
dard equipment including the maximum
capacity of fuel, oil, and coolant, and, if so
equipped, air conditioning and additional
optional equipment, but without passen-
gers and cargo.
i
For illustration purposes only. Actual
data on tires are specific to each vehi-
cle and may vary from data shown in
above illustration.
Page 321 of 417
320 Practical hints
What to do if …
Display symbolDisplay messagePossible causePossible solution
DRIVE TO WORKSHOP!The seat belt system is malfunctioning.�Visit an authorized Mercedes-Benz
Light Truck Center as soon as
possible.
§TC IN NEUTRALNo gear has been selected in the transfer
case, it is in NEUTRAL.�Engage transfer case to gear position
HIGH or LOW (
�page 157).
Warning!G
If the transfer case is in NEUTRAL, the
Pposition of the transmission will not hold
the vehicle. The parking brake must be ap-
plied to hold vehicle in place.
Page 330 of 417
329 Practical hints
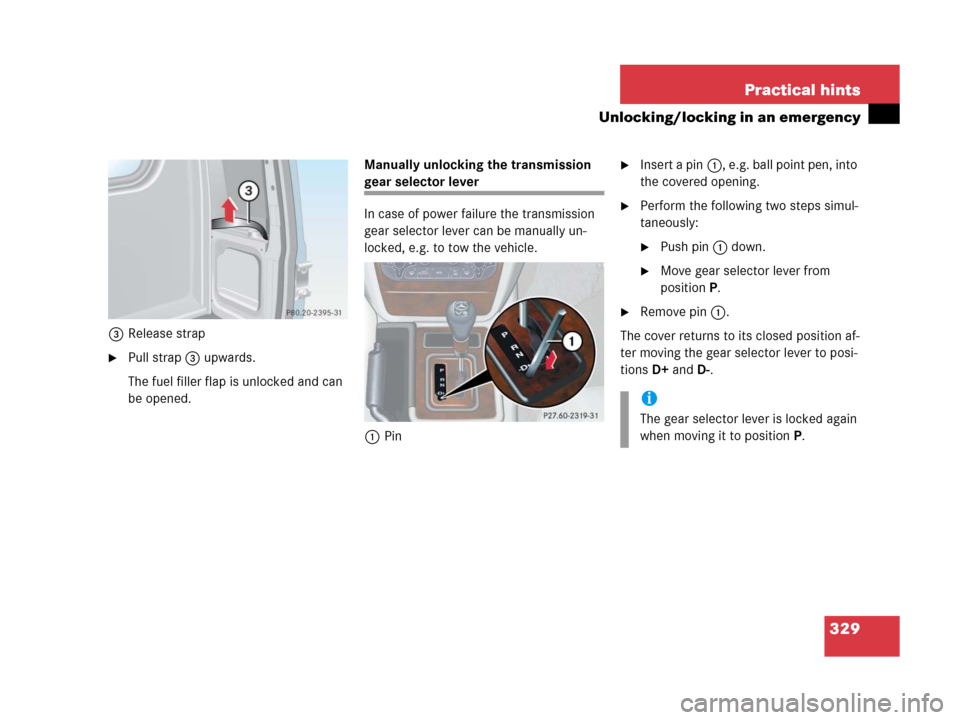
Unlocking/locking in an emergency
3Release strap
�Pull strap 3 upwards.
The fuel filler flap is unlocked and can
be opened. Manually unlocking the transmission
gear selector lever
In case of power failure the transmission
gear selector lever can be manually un-
locked, e.g. to tow the vehicle.
1Pin
�Insert a pin1, e.g. ball point pen, into
the covered opening.
�Perform the following two steps simul-
taneously:
�Push pin1 down.
�Move gear selector lever from
positionP.
�Remove pin1.
The cover returns to its closed position af-
ter moving the gear selector lever to posi-
tions D+ and D-.
i
The gear selector lever is locked again
when moving it to positionP.
Page 360 of 417

359 Practical hints
Towing the vehicle
Warning!G
With the engine not running, there is no
power assistance for the brake and steering
systems. In this case, it is important to keep
in mind that a considerably higher degree of
effort is necessary to brake and steer the ve-
hicle. Adapt your driving accordingly.
i
The gear selector lever will remain
locked in positionP and the SmartKey
will not turn in the starter switch if the
battery is disconnected or discharged.
For more information, see “Battery”
(
�page 353) and “Jump starting”
(
�page 356).
For information on manually unlocking
transmission gear selector lever, see
(
�page 329).
i
To signal turns while being towed with
hazard warning flasher in use, turn
SmartKey in starter switch to
position2 and activate combination
switch for left or right turn signal in
usual manner – only the selected turn
signal will operate.
Upon canceling the turn signal, the
hazard warning flasher will operate
again.
!
When towing the vehicle with all wheels
on the ground, note the following:
With the automatic central locking acti-
vated and the SmartKey in starter
switch position2, the vehicle doors
lock if the wheels are turning at vehicle
speeds of approx. 9 mph (15 km/h) or
more.
To prevent the vehicle doors from lock-
ing, deactivate the automatic central
locking (
�page 142).
Towing of the vehicle should only be
done using the towing eye. Never at-
tach tow cable, tow rope or tow rod to
vehicle chassis, frame or suspension
parts.
Page 361 of 417

360 Practical hints
Towing the vehicle
Transporting the vehicle
When transporting the vehicle, you can use
the towing eyes for pulling the vehicle onto
a trailer or transporter.
�Move the gear selector lever to posi-
tion N.
�Shift the transfer case to neutral posi-
tion N.
�To avoid damaging the vehicle, it
should only be tied down on the
wheels / wheel rims, not on chassis
components such as the transverse
link or trailing arm.Towing the vehicle - various problem
scenarios
�Comply with all towing information
(
�page 358).
In case of engine damage, transmission
damage or malfunctions in electrical
equipment
�Move the gear selector lever to posi-
tion N.
�Shift the transfer case to neutral posi-
tion N.In case of transfer case damage or for
towing vehicle distances exceeding
30 miles (50 km)
The propeller shafts to the drive axles must
be removed.
In case of front axle damage
Raise the front axle when towing. The pro-
peller shaft between the rear axle and the
transfer case must be removed.
In case of rear axle damage
When the rear axle is raised, the vehicle
can only be towed with a wheel lift or a dol-
ly placed under its front wheels.
!
When removing drive shaft, place M10
nuts on bolts as distance sleeves and
tighten using M8 nuts.
Always install new self-locking nuts
when reinstalling the drive shaft.