Page 335 of 417
334 Practical hints
Replacing SmartKey batteries
SmartKey
Replacement batteries: Lithium, type
CR 2025 or equivalent.
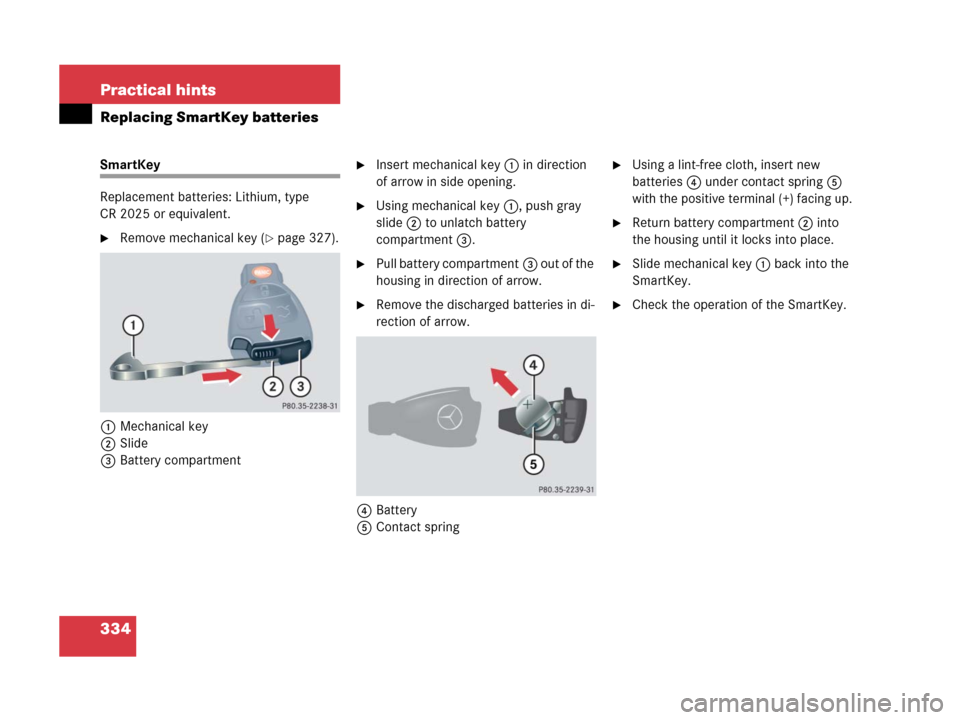
�Remove mechanical key (�page 327).
1Mechanical key
2Slide
3Battery compartment
�Insert mechanical key1 in direction
of arrow in side opening.
�Using mechanical key1, push gray
slide2 to unlatch battery
compartment3.
�Pull battery compartment3 out of the
housing in direction of arrow.
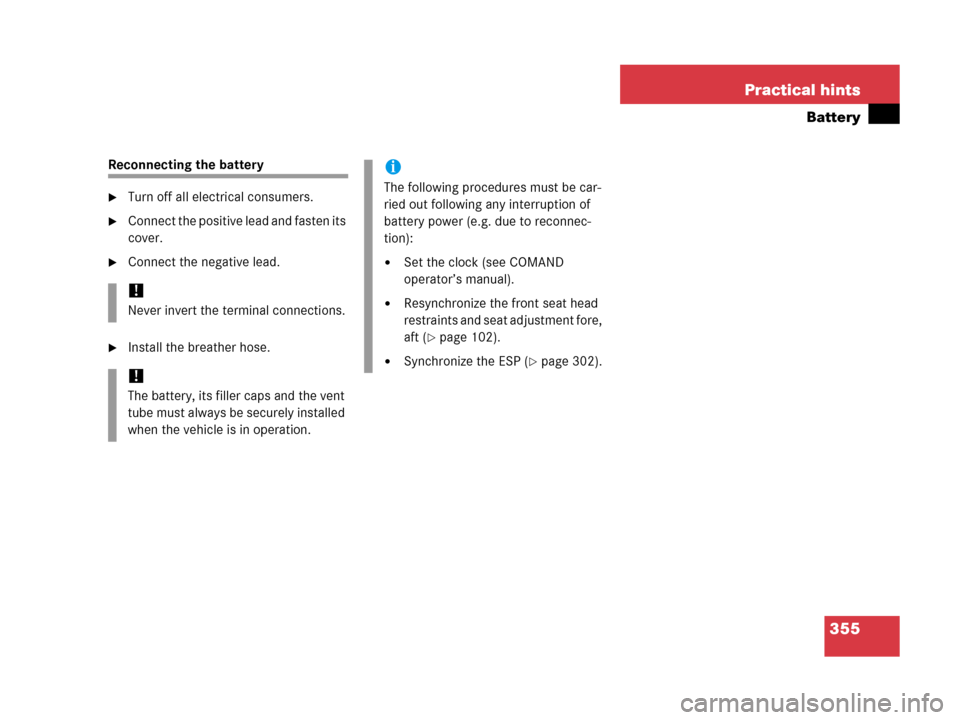
�Remove the discharged batteries in di-
rection of arrow.
4Battery
5Contact spring
�Using a lint-free cloth, insert new
batteries4 under contact spring5
with the positive terminal (+) facing up.
�Return battery compartment2 into
the housing until it locks into place.
�Slide mechanical key1 back into the
SmartKey.
�Check the operation of the SmartKey.
Page 354 of 417

353 Practical hints
Battery
�Battery
The battery is located in front of the rear
seat bench and below the cup holder
Batteries contain materials that can harm
the environment if disposed of improperly.
Large 12 volt storage batteries contain
lead.
Recycling of batteries is the preferred
method of disposal. Many states require
sellers of batteries to accept old batteries
for recycling.Charging the battery
Warning!G
Failure to follow these instructions can re-
sult in severe injury or death.
Observe all safety instructions and precau-
tions when handling automotive batteries
(
�page 251).
Never lean over batteries while connecting,
you might get injured.
Battery fluid contains sulfuric acid. Do not
allow this fluid to come in contact with eyes,
skin or clothing. In case it does, immediately
flush affected area with water and seek
medical help if necessary.
A battery will also produce hydrogen gas,
which is flammable and explosive. Keep
flames or sparks away from battery, avoid
improper connection of jumper cables,
smoking, etc.
Warning!G
Do not place metal objects on the battery as
this could result in a short circuit.
Use leak-proof battery only to avoid the risk
of acid burns in the event of an accident.Warning!G
Never charge a battery while still installed in
the vehicle unless the accessory battery
charge unit* approved by Mercedes-Benz is
being used. Gases may escape during charg-
ing and cause explosions that may result in
paint damage, corrosion or personal injury.
An accessory battery charge unit* specially
adapted for Mercedes-Benz vehicles and
tested and approved by Mercedes-Benz is
available, permitting the charging of the bat-
tery in its installed position. Contact an
authorized Mercedes-Benz Light Truck
Center for information and availability.
Charge battery in accordance with the sepa-
rate instructions for the accessory battery
charger*.
Page 355 of 417

354 Practical hints
Battery
Have the battery removed at a
Mercedes-Benz Light Truck Center.
If you charge the battery yourself, make
sure to comply with the operating instruc-
tions for your battery charger.Disconnecting the battery
�Read and observe safety instructions
and precautions (
�page 251) and
(
�page 353).
�Turn off all electrical consumers.
�Disconnect the battery negative lead.
�Remove the cover from the positive ter-
minal.
�Disconnect the battery positive lead.
�Remove the breather hose from the
battery.
!
Have the battery checked regularly by
an authorized Mercedes-Benz Light
Truck Center.
Refer to Maintenance Booklet for main-
tenance intervals or contact an autho-
rized Mercedes-Benz Light Truck
Center for further information.
!
Never loosen or detach battery termi-
nal clamps while the engine is running
or the SmartKey is in the starter switch.
Otherwise the alternator and other
electronic components could be se-
verely damaged.
Warning!G
With a disconnected battery
�you will no longer be able to turn the
SmartKey in the starter switch
�the gear selector lever will remain
locked in position
P
Page 356 of 417
355 Practical hints
Battery
Reconnecting the battery
�Turn off all electrical consumers.
�Connect the positive lead and fasten its
cover.
�Connect the negative lead.
�Install the breather hose.
!
Never invert the terminal connections.
!
The battery, its filler caps and the vent
tube must always be securely installed
when the vehicle is in operation.
i
The following procedures must be car-
ried out following any interruption of
battery power (e.g. due to reconnec-
tion):
�Set the clock (see COMAND
operator’s manual).
�Resynchronize the front seat head
restraints and seat adjustment fore,
aft (
�page 102).
�Synchronize the ESP (�page 302).
Page 357 of 417

356 Practical hints
Jump starting
If the battery is discharged, the engine can
be started with jumper cables and the bat-
tery of another vehicle. Observe the
following:
�Jump starting should only be performed
when the engine and catalytic convert-
er are cold.
�Do not start the engine if the battery is
frozen. Let the battery thaw out first.
�Only use 12 volt battery to jump start
your vehicle. Jump starting with a more
powerful battery could damage the ve-
hicle’s electrical system, which will not
be covered by the Mercedes-Benz
Limited Warranty.
�Use only jumper cables with sufficient
cross-section and insulated terminal
clamps.
�Always make sure the jumper cables
are not on or near pulleys, fans, or
other parts that move when an engine
is started or running.
Warning!G
Failure to follow these directions will cause
damage to the electronic components, and
can lead to a battery explosion and severe
injury or death.
Never lean over batteries while connecting
or jump starting, you might get injured.
Battery fluid contains sulfuric acid. Do not
allow this fluid to come in contact with eyes,
skin or clothing. In case it does, immediately
flush affected area with water, and seek
medical help if necessary.
A battery will also produce hydrogen gas,
which is flammable and very explosive. Keep
flames or sparks away from battery, avoid
improper connection of jumper cables,
smoking, etc.
Attempting to jump start a frozen battery
can result in it exploding, causing personal
injury.
Read all instructions before proceeding.
!
Avoid repeated and lengthy starting at-
tempts.
Do not attempt to start the engine us-
ing a battery quick charge unit.
If engine does not run after several un-
successful starting attempts, have it
checked at the nearest authorized
Mercedes-Benz Light Truck Center.
Excessive unburned fuel generated by
repeated failed starting attempts may
damage the catalytic converter and
may present a fire risk.
Make sure the jumper cables do not
have loose or missing insulation.
Make sure the cable clamps do not
touch any other metal part while the
other end is still attached to a battery.
!
Do not tow-start the vehicle.
Page 358 of 417

357 Practical hints
Jump starting
The jump-start contacts are located in the
engine compartment.
�Make sure the two vehicles do not
touch.
�Turn off all electrical consumers.
�Apply parking brake.
�Shift gear selector lever to positionP.1Cover
2Positive (+) terminal
3Negative (-) terminal
�Open cover1 of the positive terminal
of both vehicles.
�Connect the positive terminal2 and
the positive terminal of the charged
battery with the jumper cable. Clamp
cable to charged battery first.
�Start engine of the vehicle with the
charged battery and run at idle speed.
�Connect negative terminal3 and the
negative terminal of the charged bat-
tery with the jumper cable. Clamp ca-
ble to charged battery first.
�Start the engine of the disabled
vehicle.
Now you can again turn on the electrical
consumers. Do not turn on the lights under
any circumstances.
�Remove the jumper cables first from
the negative terminals on each battery
and then from the positive terminals on
each battery.
You can now turn on the lights.
�Have the battery checked at the
nearest authorized Mercedes-Benz
Light Truck Center.
Warning!G
Keep flames or sparks away from battery.
Do not smoke.
Observe all safety instructions and precau-
tions when handling automotive batteries
(
�page 251) and (�page 353).
Page 360 of 417

359 Practical hints
Towing the vehicle
Warning!G
With the engine not running, there is no
power assistance for the brake and steering
systems. In this case, it is important to keep
in mind that a considerably higher degree of
effort is necessary to brake and steer the ve-
hicle. Adapt your driving accordingly.
i
The gear selector lever will remain
locked in positionP and the SmartKey
will not turn in the starter switch if the
battery is disconnected or discharged.
For more information, see “Battery”
(
�page 353) and “Jump starting”
(
�page 356).
For information on manually unlocking
transmission gear selector lever, see
(
�page 329).
i
To signal turns while being towed with
hazard warning flasher in use, turn
SmartKey in starter switch to
position2 and activate combination
switch for left or right turn signal in
usual manner – only the selected turn
signal will operate.
Upon canceling the turn signal, the
hazard warning flasher will operate
again.
!
When towing the vehicle with all wheels
on the ground, note the following:
With the automatic central locking acti-
vated and the SmartKey in starter
switch position2, the vehicle doors
lock if the wheels are turning at vehicle
speeds of approx. 9 mph (15 km/h) or
more.
To prevent the vehicle doors from lock-
ing, deactivate the automatic central
locking (
�page 142).
Towing of the vehicle should only be
done using the towing eye. Never at-
tach tow cable, tow rope or tow rod to
vehicle chassis, frame or suspension
parts.
Page 363 of 417
362 Practical hints
Fuses
The fuse box is located on the left side of
the cockpit in the passenger compart-
ment. It contains:
�Fuse chart
�Spare fuses
�Special spare extractor
Additional fuses are located in:
�Battery box
�Front passenger footwell under the
cockpit
�Middle tunnel
Fuse box in passenger compartment
Opening
1Cover
�Open the driver’s door.
�Remove cover1 in direction of ar-
rows.
Fuse box in battery box
The battery box is located under the cover
in the rear footwell.
Replacement of fuses can only be per-
formed by a Mercedes-Benz Light Truck
Center.i
Only install fuses that have been tested
and approved by Mercedes-Benz and
that have the specified amperage rat-
ing.
Never attempt to repair or bridge a
blown fuse. Have the cause determined
and remedied by an authorized
Mercedes-Benz Light Truck Center.
!
Do not use sharp objects such as a
screw driver to open fuse box cover1
in the dashboard, as this could damage
it.