Page 117 of 417

116 Controls in detail
Lighting
Interior lighting
The controls are located in the overhead
control panel.
1Cargo compartment lamps
2Right reading lamp
3Rocker switch for automatic control
system
4Left reading lampAutomatic control
Activating
�Move rocker switch3 to center
position.
The interior lighting switches on in
darkness when you
�unlock the vehicle
�open a door
�remove the SmartKey from the
starter switch
Additionally, entry lamps in the door
trays will come on when you open
a door.
The interior lighting switches off automati-
cally following an adjustable time delay.
For more information, see “Setting interior
lighting delayed shut-off” (
�page 141).Deactivating
�Press the = symbol on rocker
switch3.
The interior lighting and the entry
lamps remain switched off in darkness,
even when you
�unlock the vehicle
�open a door
�remove the SmartKey from the
starter switch
i
Leaving an interior light switch in the
ON position for extended periods of
time with the engine turned off could
result in a discharged battery.
i
If the door remains open, the interior
lamps switch off automatically after
approximately five minutes.
Page 118 of 417
117 Controls in detail
Lighting
Manual control
Switching lamps on
�Press the W symbol on rocker
switch3.
The interior lighting remains on even
when the doors are closed.
Switching lamps off
�Move rocker switch3 to center posi-
tion to activate the automatic control.
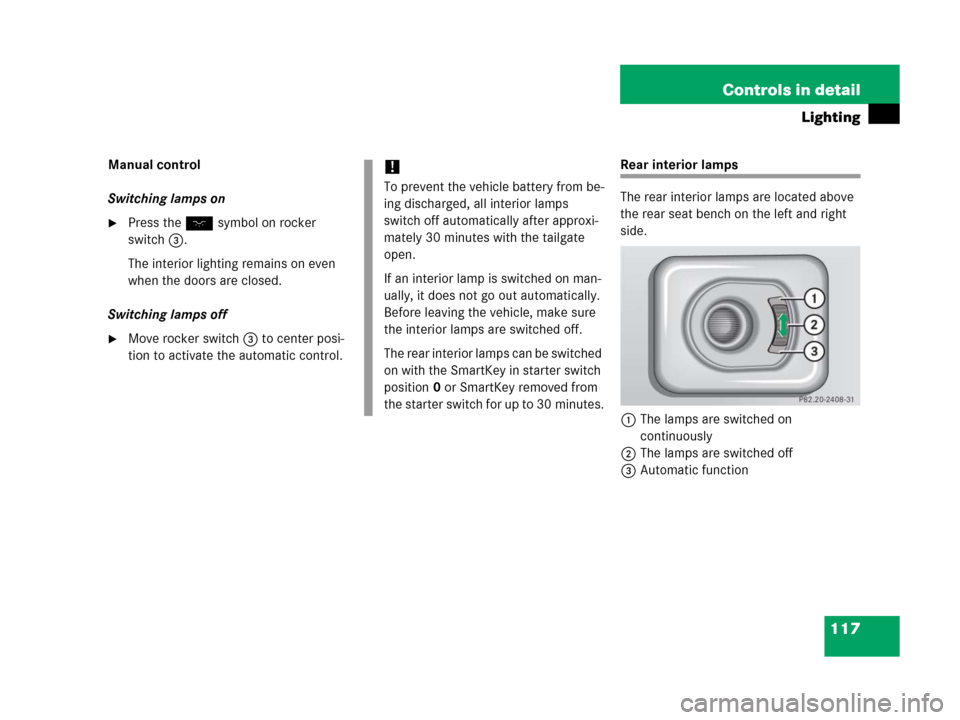
Rear interior lamps
The rear interior lamps are located above
the rear seat bench on the left and right
side.
1The lamps are switched on
continuously
2The lamps are switched off
3Automatic function!
To prevent the vehicle battery from be-
ing discharged, all interior lamps
switch off automatically after approxi-
mately 30 minutes with the tailgate
open.
If an interior lamp is switched on man-
ually, it does not go out automatically.
Before leaving the vehicle, make sure
the interior lamps are switched off.
The rear interior lamps can be switched
on with the SmartKey in starter switch
position0 or SmartKey removed from
the starter switch for up to 30 minutes.
Page 168 of 417
167 Controls in detail
Good visibility
Deactivating
�Press button F in the control panel
of the climate control.
The indicator lamp in the button goes
out.
i
The rear window defroster uses a large
amount of power. To keep the battery
drain to a minimum, turn off the de-
froster as soon as the rear window is
clear.
!
Heavy accumulation of snow and ice
should be removed before activating
the defroster.
The defroster is automatically turned
off after approximately 6-17 minutes of
operation depending on the outside
temperature and vehicle speed.
If several power consumers are turned
on simultaneously, or the battery is
only partially charged, it is possible that
the defroster will automatically turn it-
self off.
When this happens, the indicator lamp
inside the switch starts blinking.
As soon as the battery has sufficient
voltage, the defroster turns itself back
on.
Page 174 of 417
173 Controls in detail
Climate control
Residual engine heat utilization
With the engine switched off, it is possible
to continue to heat or ventilate the interior
for a short while, depending on the temper-
ature setting of the climate control.
Air volume and distribution are controlled
automatically.
Activating
�Turn the SmartKey in starter switch to
position1 or0 or remove it from the
starter switch.
�Press button °.
The indicator lamp in the button comes
on.
Set the left and right temperature to
your personal requirements.Deactivating
�Press button ° again to switch off.
The indicator lamp in the button goes
out.
The residual heat is automatically turned
off:
�when the SmartKey in starter switch is
turned to position2
�after about 30 minutes
�if the battery voltage dropsDeactivating the climate control
system
Deactivating
�Set the air volume control switch to
position0.
Reactivating
�Set the air volume control switch to any
speed.
Page 203 of 417

202 Controls in detail
Useful features
You can take and place telephone calls
using thes andt buttons on the
multifunction steering wheel. Use the con-
trol system for performing other telephone
functions (
�page 146).
See separate operating manual for infor-
mation on how to operate the telephone.
Tele Aid The Tele Aid system
(Telematic Alarm Identification on
Demand)
The Tele Aid system consists of three
types of response:
�Automatic and manual emergency
�Roadside Assistance and
�Information
The Tele Aid system is operational provid-
ing that the vehicle’s battery is charged,
properly connected, not damaged and cel-
lular and GPS coverage is available.
The speaker volume of a Tele Aid call can
be adjusted when using the volume control
on the multifunction steering wheel. To
raise, press buttonæ and to lower,
press buttonç.
�To activate, press the SOS button, the
Roadside Assistance button• or
the Information button¡, depend-
ing on the type of response required.
!
The initial activation of the Tele Aid sys-
tem may only be performed by com-
pleting the subscriber agreement and
placing an acquaintance call using the
SOS button. Failure to complete either
of these steps will result in a system
that is not activated. If the system is
not activated, the indicator lamp in the
SOS button stays on after switching on
ignition and the message
TELE AID
EMERG. CALL – NOT ACTIVATED
will be
shown in the multifunction display for
approx. 10 seconds.
If you have any questions regarding ac-
tivation, please call the Response
Center at 1-800-756-9018 (in the USA)
or 1-888-923-8367 (in Canada).
Page 218 of 417
217 Operation
The first 1000 miles (1500 km)
Driving instructions
At the gas station
Engine compartment
Battery
Tires and wheels
Winter driving
Maintenance
Vehicle care
Page 252 of 417

251 Operation
Battery
�Battery
The battery is located in front of the rear
seat bench and below the cup holder. Jump
starting terminals are located in the left
side of the engine compartment
(
�page 357). Refer to Maintenance
Booklet for battery maintenance intervals.
The battery should always be sufficiently
charged in order to achieve its rated ser-
vice life.
If you use your vehicle less than approxi-
mately 200 miles (300 km) per month,
mostly for short-distance trips, or if it is not
used for long periods of time, you will need
to have the battery charge checked more
frequently and corrected if necessary.
When replacing batteries, always use bat-
teries approved by Mercedes-Benz.
If you do not intend to operate your vehicle
for an extended period of time, consult an
authorized Mercedes-Benz Light Truck
Center about steps you need to observe.Batteries contain materials that can harm
the environment if disposed of improperly.
Recycling of batteries is the preferred
method of disposal. Many states require
sellers of batteries to accept old batteries
for recycling.
For more information, see “Battery”
(
�page 353).
G
Observe all safety instructions
and precautions when handling
automotive batteries.
A
Risk of explosion
D
Keep flames or sparks away
from battery. Do not smoke.
B
Battery acid is caustic. Do not
allow it to come into contact
with skin, eyes or clothing.
In case it does, immediately
flush affected area with clear
water and seek medical help if
necessary.
E
Wear eye protection.
C
Keep children away.
F
Follow the instructions in this
Operator’s Manual.
i
If the battery is discharged
�you will no longer be able to turn
the SmartKey in the starter switch
�the gear selector lever will remain
locked in positionP
Page 276 of 417
 in excess of those
standard items whic")
275 Operation
Tires and wheels
Production options weight
The combined weight of those installed
regular production options weighing over
5 lbs (2.3 kilograms) in excess of those
standard items which they replace, not
previously considered in curb weight or
accessory weight, including heavy duty
brakes, ride levelers, heavy duty battery,
and special trim.
PSI (P
ounds per square inch)
A standard unit of measure for air pressure
-> bar, kilopascal (kPa).
Recommended tire inflation pressure
Recommended tire inflation pressure
listed on placard located on driver’s door
B-pillar for normal driving conditions.
Provides best handling, tread life and
riding comfort.Rim
A metal support for a tire or a tire and tube
assembly upon which the tire beads are
seated.
Sidewall
The portion of a tire between the tread and
the bead.
TIN (Tire Identification Number)
Unique identifier which facilitates efforts
by tire manufacturers to notify purchasers
in recall situations or other safety matters
concerning tires and gives purchases the
means to easily identify such tires. The TIN
is comprised of “Manufacturer’s identifica-
tion mark”, “Tire size”, “Tire type code”
and “Date of manufacture”.
Tire load rating
Numerical code associated with the
maximum load a tire can support.Tire ply composition and material used
This indicates the number of plies or the
number of layers of rubber-coated fabric in
the tire tread and sidewall. Tire manufac-
turers also must indicate the ply materials
in the tire and sidewall, which include
steel, nylon, polyester, and others.
Tire speed rating
Part of tire designation; indicates the
speed range for which a tire is approved.
Traction
Force exerted by the vehicle on the road
via the tires. The amount of grip provided.
Tread
The portion of a tire that comes into
contact with the road.


Driving instructions
At the gas station
Engine compartment
Battery
Tires and wheels
Winter driving
Maintenance
Vehicle care")