Page 157 of 417
156 Controls in detail
Automatic transmission
Emergency operation (Limp Home
Mode)
If vehicle acceleration worsens or the
transmission no longer shifts, the trans-
mission is most likely operating in limp
home (emergency operation) mode. In this
mode, only 2nd gear and reverse gear can
be activated.
�Stop the vehicle.
�Move gear selector lever toP.
�Turn off the engine.
�Wait at least ten seconds before re-
starting.
�Restart the engine.
�Move gear selector lever to positionD
(for second gear) orR.
�Have the transmission checked at an
authorized Mercedes-Benz Light Truck
Center as soon as possible.
Page 176 of 417

175 Controls in detail
Power windows
�Power windows
Opening and closing the windows
The side windows are opened and closed
electrically. Switches for operating all the
side windows are located on the driver’s
door. The switches for the respective win-
dows are located on the front passenger
and the rear doors.
1Switch for rear door window override
(
�page 78)
2Left front window
3Right front window
4Right rear window
5Left rear window
�Turn SmartKey in the starter switch to
position1 or2.Opening the windows
�Press switch 2 to 5 to the resistance
point.
The corresponding window will move
downwards until you release the
switch.
Closing the windows
�Pull on switch 2 to 5.
The corresponding window will move
upwards until you release the switch.
Fully opening windows (Express-open)
�Press switch 2 to 5 past the
resistance point and release.
The corresponding window opens
completely.
Stopping windows
�Press or pull respective switch again.
Warning!G
When closing the windows, make sure there
is no danger of anyone being harmed by the
closing procedure.
The closing procedure can be immediately
halted by releasing the switch or by releas-
ing button‹ on the SmartKey.
When leaving the vehicle, always remove the
SmartKey from starter switch, take it with
you, and lock the vehicle. Do not leave chil-
dren unattended in the vehicle, or with ac-
cess to an unlocked vehicle. Unsupervised
use of vehicle equipment can cause an acci-
dent and/or serious personal injury.
Page 209 of 417

208 Controls in detail
Useful features
Call priority
The Tele Aid system processes calls using
the following priority.
�Automatic emergency – First priority
�Manual emergency – Second priority
�Roadside Assistance – Third priority
�Information – Fourth priority
Should a higher priority call be initiated
while you are connected, an upgrade (al-
ternating) tone will be heard and the ap-
propriate indicator lamp will flash.
If certain information such as vehicle iden-
tification number or customer information
is not available, the operator may need to
retransmit.
During this time you will hear a beep and
voice contact will be interrupted. Voice
contact will resume once the retransmis-
sion is completed. Once a call is conclud-
ed, a beep will be heard and the
appropriate indicator lamp will stop flash-
ing. The COMAND system operation will
resume.If other service calls such as a Roadside
Assistance call or Information call are ac-
tive, an Emergency call is still possible. In
this case, the Emergency call will take pri-
ority and override all other active calls.
!
If the indicator lamps do not start flash-
ing after pressing one of the buttons or
remain illuminated (in red) at any time,
the Tele Aid system has detected a
fault or the service is not currently ac-
tive, and may not initiate a call. Visit an
Mercedes-Benz Light Truck Center and
have the system checked or contact
the Response Center at
1-800-756-9018 (in the USA) or
1-888-923-8367 (in Canada) as soon
as possible.
i
The indicator lamp in the respective
button flashes until the call is conclud-
ed. Calls can only be terminated by a
Response Center or Customer
Assistance Center representative, ex-
cept Roadside Assistance and
Information calls, which can also be
terminated by pressing buttont on
the multifunction steering wheel.
Page 305 of 417
304 Practical hints
What to do if …
Symbol messages
Display symbolDisplay messagePossible causePossible solution
#BATTERY/ALTERNATOR
VISIT WORKSHOP!The battery was charged with a battery
charger or jump started.�Have the battery checked at a service
station.
The battery is no longer charging.
Possible causes:
�alternator malfunctioning
�broken poly-V-belt
�Stop immediately and check the
poly-V-belt.
If it is broken:
�Do not continue to drive. Otherwise
the engine will overheat due to an in-
operative water pump which may re-
sult in serious engine damage not
covered by the Mercedes-Benz Limited
Warranty. Notify an authorized
Mercedes-Benz Light Truck Center.
If it is intact:
�Turn off unnecessary electric consum-
ers.
�Drive immediately to the nearest
authorized Mercedes-Benz Light Truck
Center.
UNDERVOLTAGE
ENGINE ON!The battery has insufficient voltage.�Start the engine.
Page 309 of 417
.
Display symbolDisplay messagePossib")
308 Practical hints
What to do if …
During severe operating conditions and
stop-and-go city traffic, the coolant tem-
perature may rise close to 248°F (120°C).
Display symbolDisplay messagePossible causePossible solution
ÏCOOLANT
STOP, ENGINE OFF!The coolant is too hot. �Stop the vehicle and turn off the en-
gine.
�Only start the engine again after the
message disappears. You could other-
wise damage the engine.
Warning!G
Driving when your engine is badly overheat-
ed can cause some fluids which may have
leaked into the engine compartment to
catch fire. You could be seriously burned.
Steam from an overheated engine can cause
serious burns and can occur just by opening
the hood. Stay away from the engine if you
see or hear steam coming from it.
Turn off the engine, get out of the vehicle
and do not stand near the vehicle until the
engine has cooled down.
!
The engine should not be operated with
the coolant temperature above 248°F
(120°C). Doing so may cause serious
engine damage which is not covered by
the Mercedes-Benz Limited Warranty.
Page 315 of 417

314 Practical hints
What to do if …
Display symbolDisplay messagePossible causePossible solution
. 3RD BRAKE LIGHT
CHECK LIGHT!
The high mounted brake lamp is malfunc-
tioning. This message will only appear if
all light emitting diodes have stopped
working.�Visit an authorized Mercedes-Benz
Light Truck Center as soon as
possible.
ADD. TURN SIG., L
CHECK LIGHT!The left turn signal in the exterior rear
view mirror is malfunctioning. This mes-
sage will only appear if all light emitting
diodes have stopped working.�Have the LEDs replaced as soon as
possible.
ADD. TURN SIG., R
CHECK LIGHT!The right turn signal in the exterior rear
view mirror is malfunctioning. This mes-
sage will only appear if all light emitting
diodes have stopped working.�Have the LEDs replaced as soon as
possible.
AUTOM. LIGHT ON
REMOVE KEY!You have left the SmartKey in the starter
switch.�Remove the SmartKey from the starter
switch.
BRAKE LIGHT
DRIVE TO WORKSHOP!Brake lamp illumination is delayed or
lamp is permanently on.�Visit an authorized Mercedes-Benz
Light Truck Center as soon as
possible.
BRAKE LIGHT, L
CHECK LIGHT!
The left brake lamp is malfunctioning.�Visit an authorized Mercedes-Benz
Light Truck Center as soon as
possible.
Page 328 of 417

327 Practical hints
Unlocking/locking in an emergency
�Unlocking/locking in an emergency
Unlocking the vehicle
If you cannot unlock the vehicle with the
SmartKey, open the driver’s door and the
tailgate using the mechanical key.
The passenger door cannot be unlocked
manually.
1Mechanical key locking tab
2Mechanical key
�Move locking tab1 in direction of ar-
row and slide the mechanical key2
out of the housing.
Unlocking the driver’s door
�Unlock the door with the mechanical
key. To do so, push the mechanical key
in the lock until it stops and turn it to
the left.Unlocking the tailgate
If you are unable to unlock the tailgate with
the SmartKey, open the tailgate with the
mechanical key as follows:
1Unlocking in an emergency
2Lock cylinder
3Handle�Insert the mechanical key into lock
cylinder2.
�Turn the mechanical key counterclock-
wise to position1 and release it.
�Remove the mechanical key.
i
Unlocking your vehicle with the me-
chanical key will trigger the anti-theft
alarm system. To cancel the alarm, do
one of the following:
�Press button Œ or ‹ on the
SmartKey.
�Insert the SmartKey in the starter
switch.
��
Page 351 of 417
350 Practical hints
Flat tire
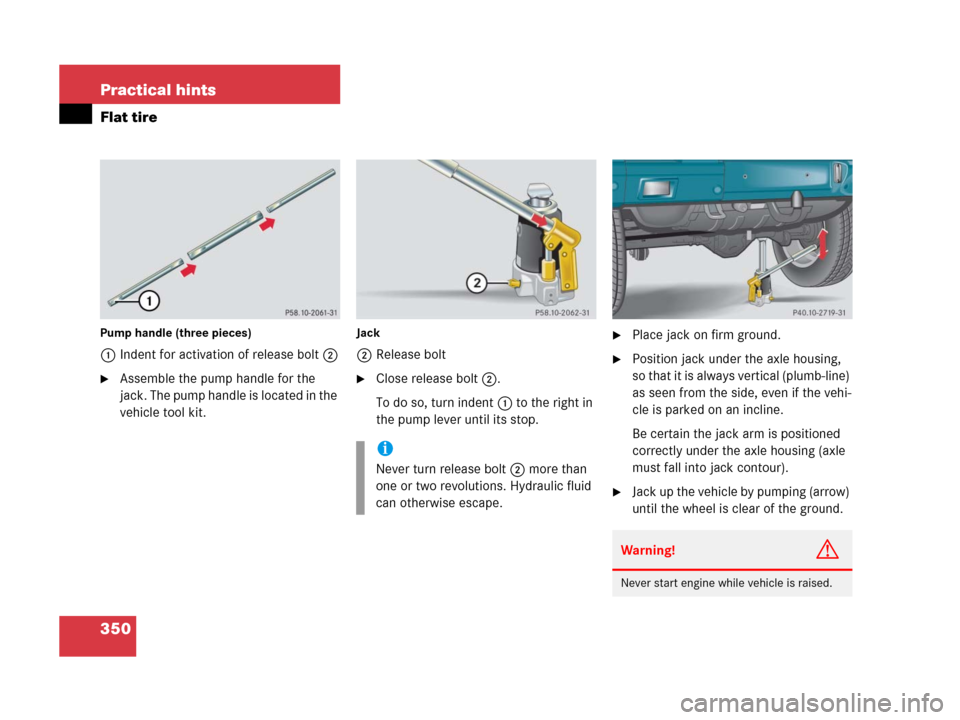
Pump handle (three pieces)
1Indent for activation of release bolt2
�Assemble the pump handle for the
jack. The pump handle is located in the
vehicle tool kit.
Jack
2Release bolt
�Close release bolt2.
To do so, turn indent1 to the right in
the pump lever until its stop.
�Place jack on firm ground.
�Position jack under the axle housing,
so that it is always vertical (plumb-line)
as seen from the side, even if the vehi-
cle is parked on an incline.
Be certain the jack arm is positioned
correctly under the axle housing (axle
must fall into jack contour).
�Jack up the vehicle by pumping (arrow)
until the wheel is clear of the ground.
i
Never turn release bolt2 more than
one or two revolutions. Hydraulic fluid
can otherwise escape.
Warning!G
Never start engine while vehicle is raised.

If vehicle acceleration worsens or the
transmission no longer shifts, the trans-
mission is most likely operating i")