Page 100 of 521

99 Safety and Security
Driving safety systems
Note on driving with the
electrohydraulic brake system�
Following extended periods of only
minor loads to your brake system, you
should occasionally apply the brakes
when traveling at high speeds. This
improves the grip of the brake pads.
�
After driving on wet or snow-covered
roads, you should apply your brakes
firmly before parking your vehicle. This
produces heat which serves to dry the
brake disks and help prevent corro-
sion.
�
On long and steep grades, shift to a
lower gear (gear range1, 2, or 3) to
prevent the brakes from overheating
and to reduce brake wear.
�
After hard braking, it is advisable to
drive on for some time so that the air
stream will cool down the brakes fast-
er.
�
Only Mercedes-Benz approved compo-
nents (e.g. brake pads) should be
installed on your vehicle. Brake pads
not approved by Mercedes-Benz may
impair the safety of your vehicle.Four wheel electronic traction system
(4MATIC) with the ESP
®
Models with all-wheel-drive only.
The 4MATIC improves vehicle’s ability to
use available traction, e.g. during winter
operation in mountains under snowy
conditions, by applying power to all four
wheels.
Warning!
G
Be very careful not to endanger other road
users when you apply the brakes.
Page 101 of 521

100 Safety and SecurityDriving safety systemsWarning!
G
If you see the ESP
® warning lampv
flashing in the speedometer, proceed as fol-
lows:
�
While driving off, apply as little throttle
as possible
�
While driving, ease up on the accelera-
tor
�
Adapt your speed and driving style to
the prevailing road conditions
Failure to observe these guidelines could
cause the vehicle to skid.
The ESP
® cannot prevent accidents result-
ing from excessive speed.
!Do not tow with one axle raised.
Otherwise the transfer case can be
damaged, which is not covered by the
Mercedes-Benz Limited Warranty.
!Performance testing must only be con-
ducted on a two-axle dynamometer.
Otherwise the transfer case can be
damaged, which is not covered by the
Mercedes-Benz Limited Warranty.!Because of the ESP’s
® automatic oper-
ation, the engine and the ignition must
be shut off (SmartKey in starter switch
position0 or1 or KEYLESS-GO
start/stop button* in position0 or1)
when the parking brake is being tested
on a brake test dynamometer.
Active braking action through ESP
®
may otherwise seriously damage the
front or rear axle brake system.
Operational tests with the engine
running can only be conducted on a
two-axle dynamometer.
Page 102 of 521

101 Safety and Security
Anti-theft systems
�Anti-theft systems
Immobilizer
The immobilizer prevents unauthorized
persons from starting your vehicle.
Activating
With the SmartKey�
Remove the SmartKey from the starter
switch.
With KEYLESS-GO*
�
Turn off the engine by means of the
start/stop button on the gear selector
lever.
�
Open the driver’s door.Deactivating
With the SmartKey
�
Switch on the ignition.
With KEYLESS-GO*
�
Start the engine by means of the
start/stop button on the gear selector
lever.
Anti-theft alarm system
Once the alarm system has been armed, a
visual and audible alarm is triggered when
someone opens:�
a door
�
the tailgate
�
the hood
The alarm will stay on, even if the activat-
ing element (a door, for example) is imme-
diately closed.
The alarm system will also be triggered
when
�
someone attempts to raise the vehicle
�
the vehicle is opened using the
mechanical key
�
someone opens a door from the inside
iIn case the engine cannot be started
(yet the vehicle’s battery is charged),
the system is not operational. Contact
an authorized Mercedes-Benz Center
or call 1-800-FOR-MERCedes (in the
USA), or 1-800-387-0100 (in Canada).
Page 103 of 521

102 Safety and SecurityAnti-theft systemsArming the alarm system
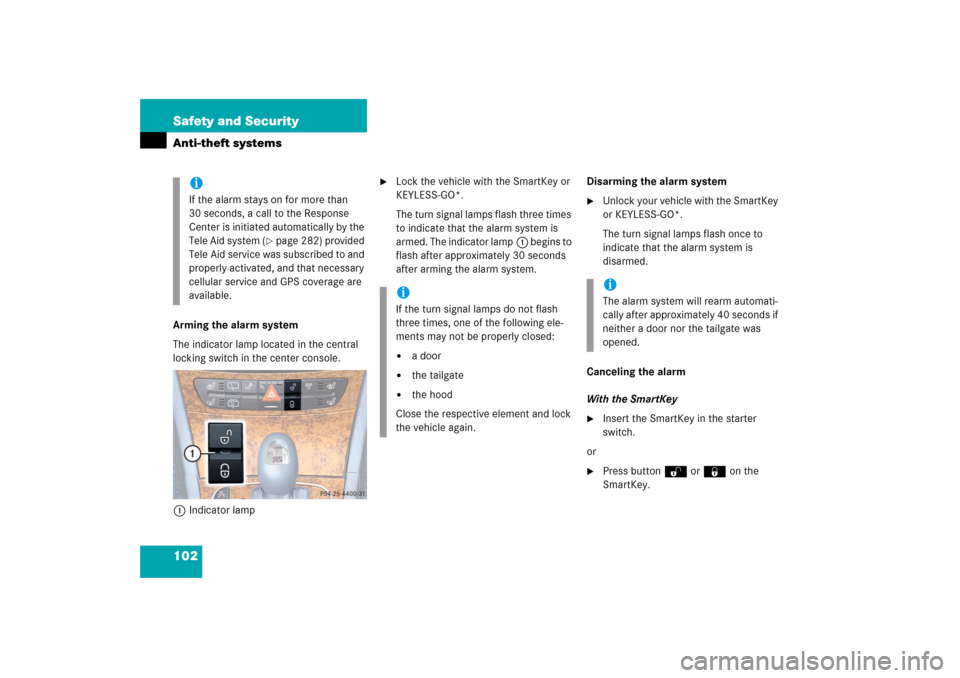
The indicator lamp located in the central
locking switch in the center console.
1Indicator lamp
�
Lock the vehicle with the SmartKey or
KEYLESS-GO*.
The turn signal lamps flash three times
to indicate that the alarm system is
armed. The indicator lamp1 begins to
flash after approximately 30 seconds
after arming the alarm system.Disarming the alarm system
�
Unlock your vehicle with the SmartKey
or KEYLESS-GO*.
The turn signal lamps flash once to
indicate that the alarm system is
disarmed.
Canceling the alarm
With the SmartKey
�
Insert the SmartKey in the starter
switch.
or
�
Press button Œ or ‹ on the
SmartKey.
iIf the alarm stays on for more than
30 seconds, a call to the Response
Center is initiated automatically by the
Tele Aid system (
�page 282) provided
Tele Aid service was subscribed to and
properly activated, and that necessary
cellular service and GPS coverage are
available.
iIf the turn signal lamps do not flash
three times, one of the following ele-
ments may not be properly closed:�
a door
�
the tailgate
�
the hood
Close the respective element and lock
the vehicle again.
iThe alarm system will rearm automati-
cally after approximately 40 seconds if
neither a door nor the tailgate was
opened.
Page 104 of 521
103 Safety and Security
Anti-theft systems
With KEYLESS-GO*�
Pull an outside door handle.
The SmartKey with KEYLESS-GO must
be within 3 ft (1 m) of the vehicle.
or
�
Press the KEYLESS-GO* start/stop
button (
�page 37).
The SmartKey with KEYLESS-GO must
be inside the vehicle.
Tow-away alarm
Once the tow-away alarm is armed, a visual
and audible alarm will be triggered when
someone attempts to raise the vehicle.Arming tow-away alarm
�
Lock the vehicle with the SmartKey or
KEYLESS-GO*.
The tow-away alarm is automatically
armed after about 30 seconds.
iThe tow-away protection alarm is trig-
gered, for example, if the vehicle is lift-
ed on one side.
If the alarm stays on for more than
30 seconds, a call to the Response
Center is initiated automatically by the
Tele Aid system* (
�page 282), provid-
ed that the Tele Aid service was sub-
scribed to and properly activated, and
that necessary cellular service and GPS
coverage are available.
Page 105 of 521

104 Safety and SecurityAnti-theft systemsDisarming tow-away alarm
To prevent triggering the tow-away alarm
feature, switch off the tow-away alarm be-
fore towing the vehicle, or when parking on
a surface subject to movement, such as a
ferry or auto train.
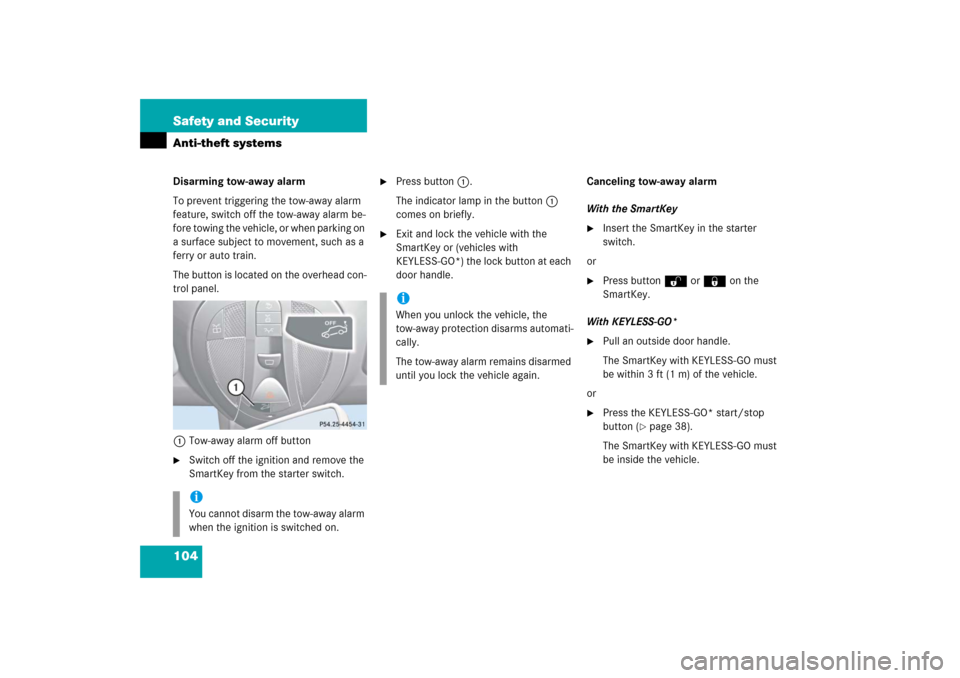
The button is located on the overhead con-
trol panel.
1Tow-away alarm off button�
Switch off the ignition and remove the
SmartKey from the starter switch.
�
Press button1.
The indicator lamp in the button1
comes on briefly.
�
Exit and lock the vehicle with the
SmartKey or (vehicles with
KEYLESS-GO*) the lock button at each
door handle.Canceling tow-away alarm
With the SmartKey
�
Insert the SmartKey in the starter
switch.
or
�
Press button Œ or ‹ on the
SmartKey.
With KEYLESS-GO*
�
Pull an outside door handle.
The SmartKey with KEYLESS-GO must
be within 3 ft (1 m) of the vehicle.
or
�
Press the KEYLESS-GO* start/stop
button (
�page 38).
The SmartKey with KEYLESS-GO must
be inside the vehicle.
iYou cannot disarm the tow-away alarm
when the ignition is switched on.
iWhen you unlock the vehicle, the
tow-away protection disarms automati-
cally.
The tow-away alarm remains disarmed
until you lock the vehicle again.
Page 138 of 521

137 Controls in detailSeats
Folding bench seat in cargo compart-mentFolding out the folding bench seat
1Release handle for seat backrest
2Release handle for seat cushion
Before folding out the seat backrest, you
must:
�
fold the rear seat backrests into an up-
right position and lock them into place
�
move the handle for the twin roller
blind into the upper position
iThe folding bench seat in the cargo
compartment is approved only for per-
sons up to a height of 4.6 ft (1.40 m)
and a maximum weight of 110 lbs
(50 kg).
The twin roller blind must be installed
when the folding bench seat is in use.Warning!
G
When using the folding bench seat in the
cargo compartment, the seats in front of it
must be in the driving position.
Only drive when the head restraints for the
folding bench seat have been properly ad-
justed. The head restraints should be adjust-
e d so t ha t th e ba c k of th e h ea d is s uppo r te d
at approximately eye level. This can reduce
a child’s risk of injury in the event of an ac-
cident.
Warning!
G
Make sure that the seat belt is positioned
correctly on the body and is engaged in the
seat belt buckle.
Damaged covers should be replaced with
original covers only.
Do not leave children unattended in the ve-
hicle, even when they are secured in a child
restraint system.
Make sure that luggage and other objects
are adequately secured. The load could oth-
erwise injure someone in the event of an ac-
cident, during hard braking or steering
maneuvers.
iThe rear seat backrests can be adjust-
ed to a more reclined position to make
the folding bench seat more comfort-
able (
�page 262).
Page 146 of 521

145 Controls in detail
Lighting
Canada only
The daytime running lamp mode is manda-
tory and therefore in a constant mode.
When the engine is running, and you shift
from a driving position to positionN orP,
the low beam headlamps will switch off
with a three-minute delay.
When the engine is running, and you�
turn the exterior lamp switch to
positionC, the parking lamps
switch on additionally.
�
turn the exterior lamp switch to
positionB, the manual headlamp
mode has priority over the daytime run-
ning lamp mode.
The corresponding exterior lamps
switch on (
�page 54).USA only
By default, the daytime running lamp mode
is deactivated. Activate the daytime run-
ning lamp mode using the control system,
see “Setting daytime running lamp mode
(USA only)” (
�page 172).
When the engine is running, and you turn
the exterior lamp switch to
positionCorB, the manual head-
lamp mode has priority over the daytime
running lamp mode.
The corresponding exterior lamps switch
on (
�page 54).
Locator lighting and night security illu-
mination
Locator lighting and night security illumi-
nation are described in the “Control sys-
tem” section, see (
�page 173) and
(
�page 174).
iWith the daytime running lamp mode
activated and the exterior lamp switch
in positionM, the high beam head-
lamps cannot be switched on.
The high beam flasher is available at all
times.