Page 444 of 514

443 Practical hints
Replacing bulbs
Replacing bulbs for rear lamps
Before you start to replace a bulb for a rear
lamp, do the following first:�
Turn the exterior lamp switch to
positionM (
�page 127).
Tail lamp unit
�
Open trunk lid.
�
Swing the trim panel covering the cor-
responding rear lights to the side.
1Connector
2Tab
�
Disconnect electrical connector1.
�
Pull tab2 in the direction of the ar-
row.
�
Remove the bulb carrier.
�
Press gently onto the respective bulb
and turn counterclockwise out of its
bulb socket.
�
Press the new bulb gently into its bulb
socket and turn clockwise until it
engages.
1Brake lamp
2Turn signal lamp
3Backup lamp
4Standing and side marker lamp
5Rear fog lamp (driver’s side)/tail
�
Reinstall the bulb carrier.
Let tab2 engage.
�
Connect the electrical connector1
until it engage.
�
Reinstall trim panel.
License plate lamp
1Screws
�
Loosen both screws1.
�
Remove the license plate lamp.
�
Replace the tubular lamp.
�
Reinstall the license plate lamp.
�
Retighten the screws1.
Page 452 of 514
451 Practical hints
Flat tire
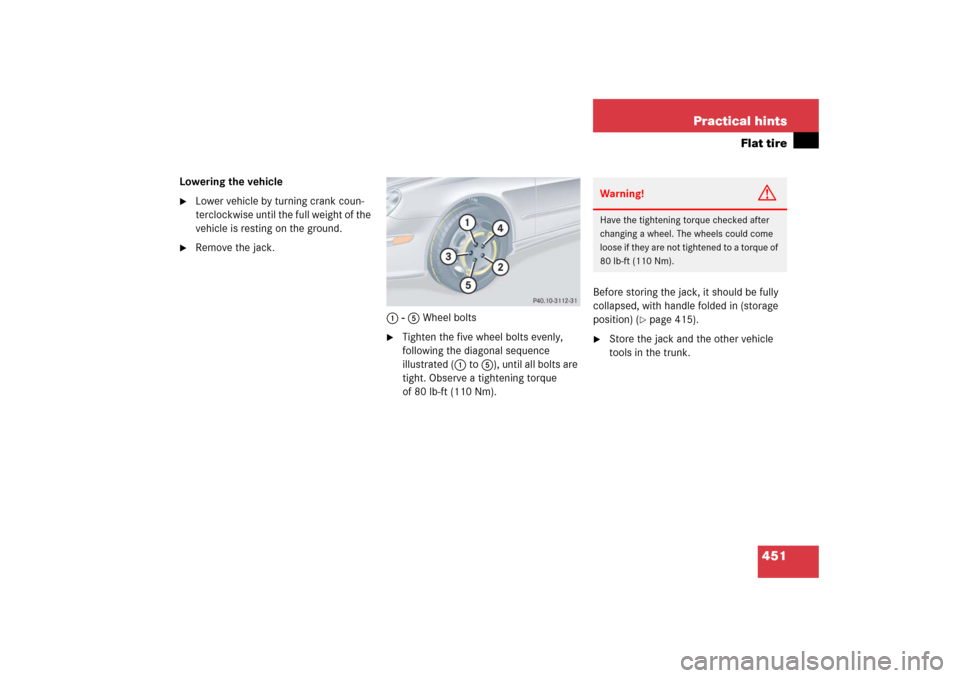
Lowering the vehicle�
Lower vehicle by turning crank coun-
terclockwise until the full weight of the
vehicle is resting on the ground.
�
Remove the jack.
1 - 5 Wheel bolts
�
Tighten the five wheel bolts evenly,
following the diagonal sequence
illustrated (1 to 5), until all bolts are
tight. Observe a tightening torque
of 80 lb-ft (110 Nm).Before storing the jack, it should be fully
collapsed, with handle folded in (storage
position) (
�page 415).
�
Store the jack and the other vehicle
tools in the trunk.Warning!
G
Have the tightening torque checked after
changing a wheel. The wheels could come
loose if they are not tightened to a torque of
80 lb-ft (110 Nm).
Page 456 of 514

455 Practical hints
Battery
Charging and reinstalling the battery�
Charge battery in accordance with the
instructions of the battery charger
manufacturer.
�
Reinstall the charged battery. Follow
the previously described steps in
reverse order.
Reconnecting the battery�
Turn off all electrical consumers.
�
Remove SmartKey from starter switch.
Vehicles with KEYLESS-GO*:�
Press the start / stop button until
the engine shuts off.
�
Open the driver’s door.
�
Connect the battery positive lead and
fasten its cover3.
�
Connect the battery negative lead2.
�
Reinstall the filter box (
�page 453).
Batteries contain materials that can harm
the environment if disposed of improperly.
Large 12-volt storage batteries contain
lead. Recycling of batteries is the preferred
method of disposal. Many states require
sellers of batteries to accept old batteries
for recycling.
Warning!
G
Never charge a battery while still installed in
the vehicle unless the accessory battery
charge unit* approved by Mercedes-Benz is
being used. Gases may escape during charg-
ing and cause explosions that may result in
paint damage, corrosion or personal injury.
An accessory battery charge unit* specially
adapted for Mercedes-Benz vehicles and
tested and approved by Mercedes-Benz is
available, permitting the charging of the bat-
tery in its installed position. Contact an au-
thorized Mercedes-Benz Center for
information and availability. Charge battery
in accordance with the separate instruc-
tions for the accessory battery charger*.
!The battery, its filler caps and the vent
tube must always be securely installed
when the vehicle is in operation.!NEVER invert the terminal connections!
iThe following procedures must be
carried out following any interruption of
battery power (e.g. due to reconnect-
ing):�
Set the clock (
�page 153).
Vehicles with COMAND*:
see COMAND operator’s manual.
�
Synchronize the side windows
(�page 251).
Page 464 of 514
463 Practical hintsFuses
Mainfuse box in passenger compartment
The main fuse box is located in the passen-
ger compartment on the driver’s side of
the cockpit.
1Main fuse box coverOpening fuse box
�
Open the driver’s door.
�
Insert flat, blunt object as a lever into
the edge of the fuse box cover1 at
the position indicated by the arrow.
�
Loosen fuse box cover1 from cockpit
using lever.
�
Using your hands, remove fuse box
cover1 rearward.
Closing fuse box
�
Attach fuse box cover1 in the front.
�
Fold fuse box cover1 in until it
engages.
Fuse box in engine compartment
The fuse box is located in the engine com-
partment on the driver’s side.
1Cover
2Screw
3Retainer
Removing cover�
Twist screws2 90° counterclock-
wise.
�
Lift the rear of cover1.
�
Slide out retainer3 and remove
cover1 by pulling towards front.
!Do not use sharp objects such as a
screw driver to open the fuse box
cover1 in the cockpit, as this could
damage it.
Page 465 of 514
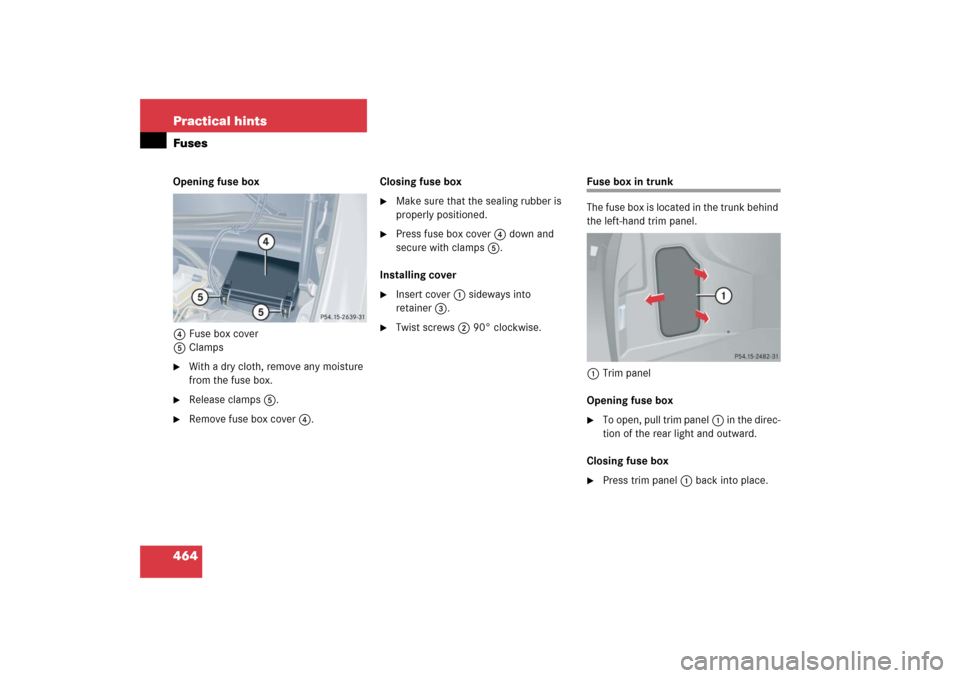
464 Practical hintsFusesOpening fuse box
4Fuse box cover
5Clamps�
With a dry cloth, remove any moisture
from the fuse box.
�
Release clamps5.
�
Remove fuse box cover4.Closing fuse box
�
Make sure that the sealing rubber is
properly positioned.
�
Press fuse box cover4 down and
secure with clamps5.
Installing cover
�
Insert cover1 sideways into
retainer3.
�
Twist screws2 90° clockwise.
Fuse box in trunk
The fuse box is located in the trunk behind
the left-hand trim panel.
1Trim panel
Opening fuse box�
To open, pull trim panel1 in the direc-
tion of the rear light and outward.
Closing fuse box
�
Press trim panel1 back into place.
Page 496 of 514

495 Index
Carpets, cleaning 371
Catalytic converter 316
CD changer* 227
CD player 146, 227
Center console 27
Lower part 28
Upper part 27
Central locking
Automatic 117, 159
Locking/unlocking from inside 118
Central locking switch 118
Certification label 468
Charcoal filter 204
Children in the vehicle 75
Air bags 64
Blocking rear
side window operation 85
Front passenger front
air bag off indicator lamp 81
Infant and
child restraint systems 69, 75
LATCH-type child seat anchors 83
LATCH-type
child seat anchors design A 84
LATCH-type
child seat anchors design B 84Occupant Classification System
(OCS) 78
Cigarette lighter 286
Climate control see
climate control system 186
Climate control system
Air conditioning refrigerant 481
Air conditioning, Cooling 194, 206
Air distribution 190, 200
Air recirculation mode 192, 203
Air vents 195, 208
Air volume 190, 191, 201
Charcoal filter 204
Control panel,
Automatic climate control 197
Control panel, Climate control 187
Deactivating/Reactivating 189, 199
Defogging 202
Defrosting 201
Defrosting, Rear window 185
Front defroster 191
MAXCOOL 202
Residual engine heat
and ventilation* (REST*) 207
REST* 490
Temperature 190, 200Clock 25, 153, 154
Setting time 153, 154
Cockpit 22, 487
Cockpit Management and Data System
see COMAND*
Cold tire inflation pressure 355
Collapsible wheel chock 413, 416
COMAND* 487
COMAND* see separate
COMAND operating instructions
Combination switch 52, 131
Control system 139, 487
Functions 143
Multifunction display 140
Multifunction steering wheel 140
Resetting to factory default 148
Control system menus 142, 143, 489
AUDIO 145
NAV* 146
Settings 148
Settings, Submenus 149
Standard display 144
Submenus 141
TEL* 163
Trip computer 161
Vehicle status message memory 146