Page 422 of 514
421 Practical hints
Unlocking/locking in an emergency
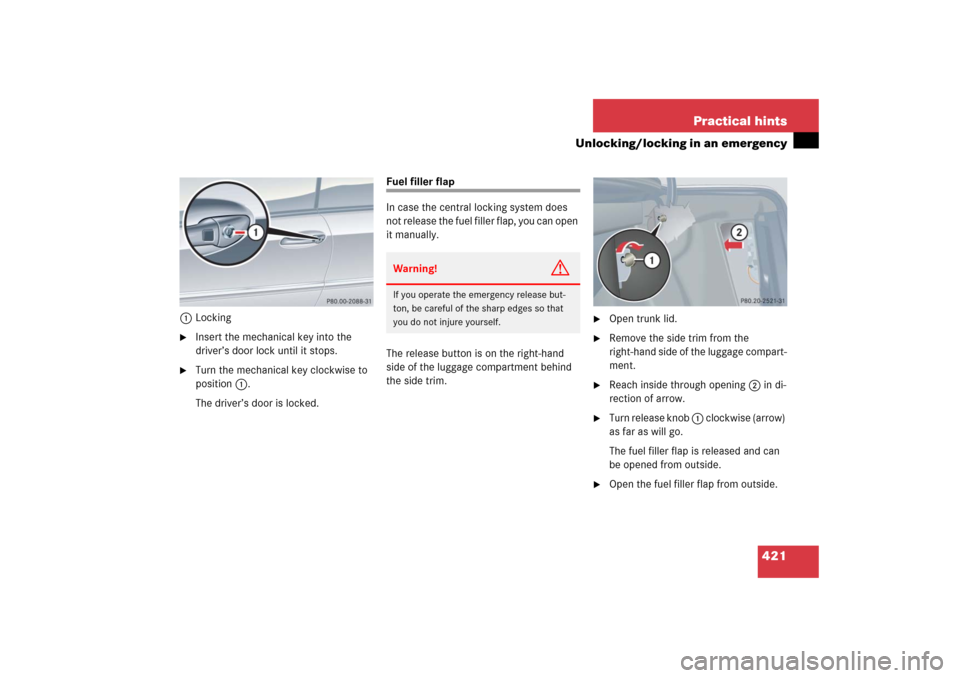
1Locking�
Insert the mechanical key into the
driver’s door lock until it stops.
�
Turn the mechanical key clockwise to
position1.
The driver’s door is locked.
Fuel filler flap
In case the central locking system does
not release the fuel filler flap, you can open
it manually.
The release button is on the right-hand
side of the luggage compartment behind
the side trim.
�
Open trunk lid.
�
Remove the side trim from the
right-hand side of the luggage compart-
ment.
�
Reach inside through opening2 in di-
rection of arrow.
�
Turn release knob 1 clockwise (arrow)
as far as will go.
The fuel filler flap is released and can
be opened from outside.
�
Open the fuel filler flap from outside.
Warning!
G
If you operate the emergency release but-
ton, be careful of the sharp edges so that
you do not injure yourself.
Page 424 of 514

423 Practical hints
Opening/closing in an emergency
�Opening/closing in an emergency
Operating roll bars manually
Releasing roll bars manually
If the roll bar system is malfunctioning, you
can release the roll bars manually.
�
Close the soft top (
�page 257).
�
Open the trunk (
�page 108).
�
Fold back the luggage cover
(�page 262).
�
Take hex wrench out of its storage
location in the storage well casing
(�page 413).1Perforation
�
Push hex wrench through
perforation1 in trim of rear wall in
trunk.
Warning!
G
If the yellow roll bar warning lamp in
the clock does not go out after starting the
engine, or if it comes on while driving, then
the roll bar system is not operating properly
and may not activate in an accident. In this
case, raise the roll bars manually before
continuing to drive.
For safety reasons drive only with the roll
bars raised until the malfunction is repaired.
Have your vehicle checked at an authorized
Mercedes-Benz Center.
iWith the roll bars released, the soft top
cannot be operated using the soft top
switch and the rear head restraints
cannot be lowered using the rear head
restraint lowering switch.
Warning!
G
Make sure no one is located in the roll bar’s
path of motion while the next steps are be-
ing carried out.
When the roll bar is manually released, the
rear head restraints and the roll bar under-
neath shoot up almost instantaneously.
��
Page 428 of 514
427 Practical hints
Opening/closing in an emergency
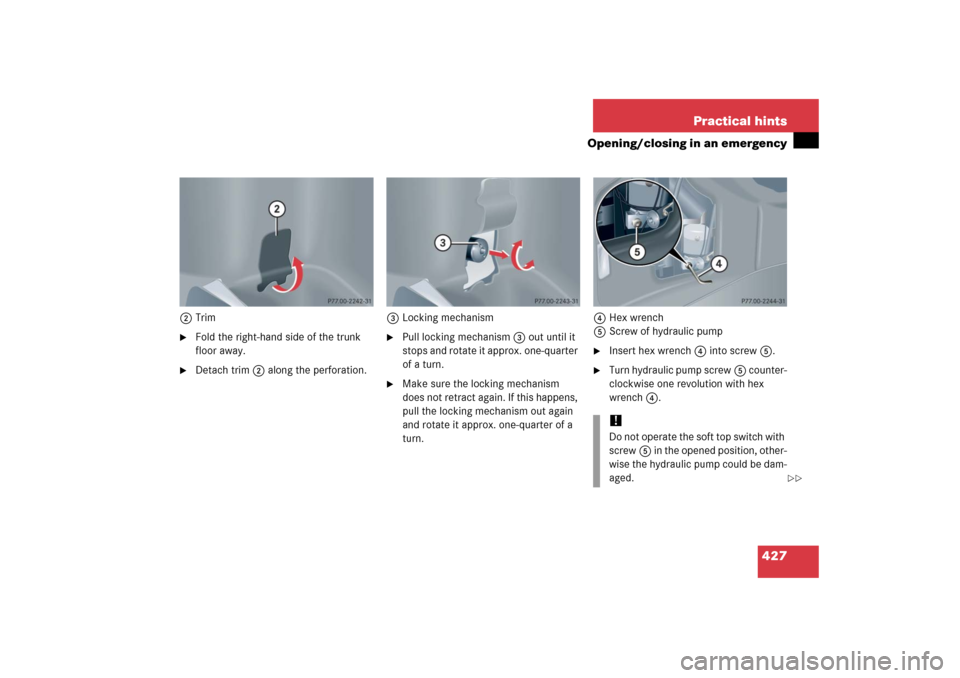
2Trim�
Fold the right-hand side of the trunk
floor away.
�
Detach trim2 along the perforation.3Locking mechanism
�
Pull locking mechanism3 out until it
stops and rotate it approx. one-quarter
of a turn.
�
Make sure the locking mechanism
does not retract again. If this happens,
pull the locking mechanism out again
and rotate it approx. one-quarter of a
turn.4Hex wrench
5Screw of hydraulic pump
�
Insert hex wrench4 into screw5.
�
Turn hydraulic pump screw5 counter-
clockwise one revolution with hex
wrench4.!Do not operate the soft top switch with
screw5 in the opened position, other-
wise the hydraulic pump could be dam-
aged.
��
Page 432 of 514
431 Practical hints
Opening/closing in an emergency
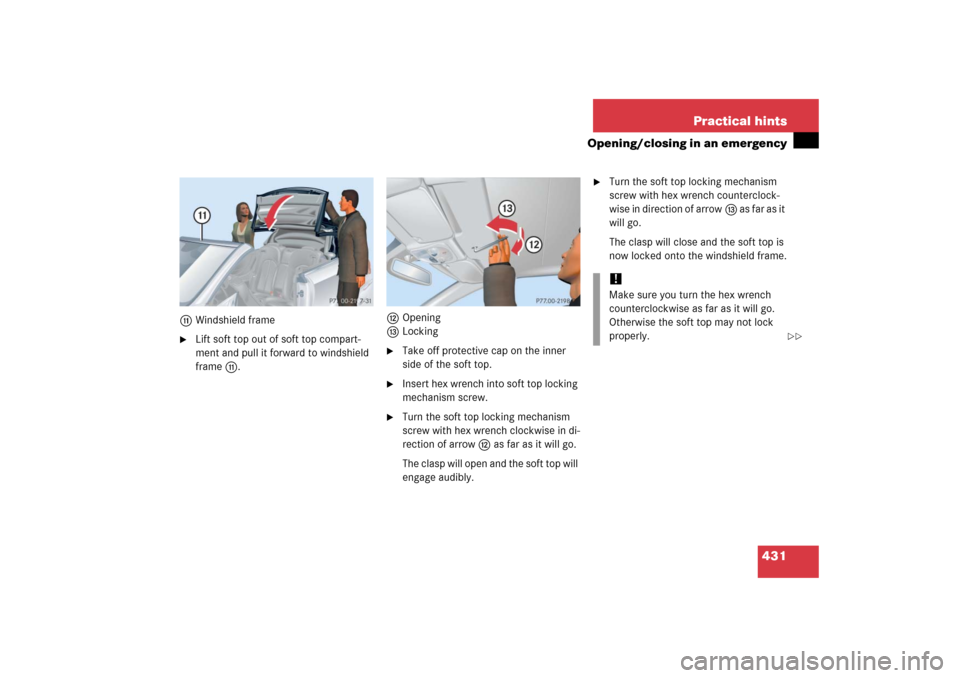
bWindshield frame�
Lift soft top out of soft top compart-
ment and pull it forward to windshield
frameb.cOpening
dLocking
�
Take off protective cap on the inner
side of the soft top.
�
Insert hex wrench into soft top locking
mechanism screw.
�
Turn the soft top locking mechanism
screw with hex wrench clockwise in di-
rection of arrowc as far as it will go.
The clasp will open and the soft top will
engage audibly.
�
Turn the soft top locking mechanism
screw with hex wrench counterclock-
wise in direction of arrowd as far as it
will go.
The clasp will close and the soft top is
now locked onto the windshield frame.!Make sure you turn the hex wrench
counterclockwise as far as it will go.
Otherwise the soft top may not lock
properly.
��
Page 434 of 514

433 Practical hints
Opening/closing in an emergency
hLocking �
Insert hex wrench into soft top locking
mechanism screw.
�
Turn the soft top locking mechanism
screw with hex wrench counterclock-
wise in direction of arrowh as far as it
will go.
The soft top is locked onto the wind-
shield frame.
�
Have the soft top operation checked at
an authorized Mercedes-Benz Center
as soon as possible.
Warning!
G
Position hands as indicated by arrows so
that when you press soft top compartment
coverf forward and lower material ten-
sioning framee, your hands cannot be-
come trapped.
!Make sure you turn the hex wrench
counterclockwise as far as it will go.
Otherwise the soft top may not lock
properly.!If, after completing the soft top emer-
gency operation, the trunk cannot be
opened using the remote trunk lid re-
lease switch in the driver’s door,
theŠ button on the SmartKey, or
the trunk lid release handle in the li-
cense plate recess, press the soft top
compartment cover down again as de-
scribed above.
Do not open the trunk with the emer-
gency key, as this could otherwise
damage the trunk lid and the soft top
compartment cover.
Page 441 of 514

440 Practical hintsReplacing bulbsReplacing bulbs for front lamps
Before you start to replace a bulb for a
front lamp, do the following first:�
Turn the exterior lamp switch to
positionM (
�page 127).
�
Open the hood (
�page 321).
Front lamps halogen-type
1Housing cover for low beam headlamp
2Housing cover for high beam head-
lamp, parking and standing lamp3Bulb socket for turn signal lamp bulb
4Bulb holder of low beam bulb
5Bulb holder of high beam bulb
6Bulb socket for parking and standing
lamp bulb
Low beam bulb
�
Turn housing cover1 counterclock-
wise and remove it.
�
Turn bulb holder4 with the bulb coun-
terclockwise and remove it.
�
Pull the bulb at its socket out of bulb
holder4.
�
Insert the new bulb so that its socket
locates in the recess of bulb holder4
and is level to it.
�
Reinsert bulb holder4 with the bulb in
the lamp and turn clockwise.
�
Align housing cover1 and turn it
clockwise.
High beam bulb
�
Turn housing cover2 counterclock-
wise and remove it.
�
Turn bulb holder5 with the bulb coun-
terclockwise and remove it.
�
Pull the bulb at its socket out of bulb
holder5.
�
Insert the new bulb so that its socket
locates in the recess of bulb holder5
and is level to it.
�
Reinsert bulb holder5 with the bulb in
the lamp and turn clockwise.
�
Align housing cover2 and turn it
clockwise.
Page 442 of 514

441 Practical hints
Replacing bulbs
Front turn signal lamp bulb�
Turn bulb socket3 counterclockwise
and remove it.
�
Press gently onto the bulb and turn
counterclockwise out of bulb
socket3.
�
Press the new bulb gently into bulb
socket3 and turn clockwise until it
engages.
�
Place bulb socket3 back into the
lamp and turn it clockwise.
Parking and standing lamp bulb
�
Turn housing cover2 counterclock-
wise and remove it.
�
Pull out bulb socket6 with the bulb.
�
Pull the bulb out of the bulb socket6.
�
Press the new bulb into bulb socket6.
�
Press bulb socket6 back into the
lamp.
�
Align housing cover2 and turn it
clockwise.Front lamps Bi-Xenon*-type
1Bulb socket for turn signal lamp
2Housing cover for high beam flasher,
parking and standing lamp
3Housing cover for Bi-Xenon* headlamp4Bulb holder for high beam flasher bulb
5Bulb socket for parking and standing
lamp bulb
Warning!
G
Do not remove the cover
3
for the Bi-Xe-
non* headlamp. Because of high voltage in
xenon lamps, it is dangerous to replace the
bulb or repair the lamp and its components.
We recommend that you have such work
done by a qualified technician.
Page 443 of 514

442 Practical hintsReplacing bulbsHigh beam bulb for high beam flasher�
Turn housing cover2 counterclock-
wise and remove it.
�
Turn bulb holder4 with the bulb coun-
terclockwise and remove it.
�
Pull the bulb at its socket out of bulb
holder4.
�
Insert the new bulb so that its socket
locates in the recess of bulb holder4
and is level to it.
�
Reinsert bulb holder4 with the bulb in
the lamp and turn clockwise.
�
Align housing cover2 and turn it
clockwise.Front turn signal lamp bulb
�
Turn bulb socket1 counterclockwise
and remove it.
�
Press gently onto the bulb and turn
counterclockwise out of bulb
socket1.
�
Press the new bulb gently into bulb
socket1 and turn clockwise until it
engages.
�
Place bulb socket1 back into the
lamp and turn it clockwise.
Parking and standing lamp bulb
�
Turn housing cover2 counterclock-
wise and remove it.
�
Pull out bulb socket5 with the bulb.
�
Pull the bulb out of the bulb socket5.
�
Press the new bulb into bulb socket5.
�
Press bulb socket5 back into the
lamp.
�
Align housing cover2 and turn it
clockwise.Additional turn signal lamps
The additional turn signal lamps in the ex-
terior rear view mirrors have LEDs.
If a malfunction occurs or LEDs fail to func-
tion, the entire turn signal unit must be re-
placed. Have the additional turn signal unit
replaced by an authorized Mercedes-Benz
Center.
Front side marker lamp
Since replacing the side marker lamp bulbs
is a technically highly demanding process,
we recommend you have the side marker
lamp bulbs replaced by an authorized
Mercedes-Benz Center.