Page 403 of 514
 ap-
pears while the engine is running and at
operating temperature, the engine oil l")
402 Practical hintsWhat to do if …?When the message
Add 1 qt. engine oil
at next refueling (Canada:
1 liter
) ap-
pears while the engine is running and at
operating temperature, the engine oil level
has dropped to approximately the
minimum level.When this occurs, the warning will first
come on intermittently and then stay on if
the oil level drops further.
Visually check for oil leaks. If no obvious oil
leaks are noted, drive to the nearest ser-
vice station where the engine oil should be
topped to the required level with an
approved oil specified in the Factory
Approved Service Products pamphlet.
Display symbol
Display message
Possible cause/consequence
Possible solution
:
Engine oil level
Visit workshop
The engine oil has dropped to a critical
level.
�
Check the engine oil level
(�page 323) and add oil as required
(�page 325).
�
If you must add engine oil frequently,
have the engine checked for possible
leaks.
The measuring system is malfunctioning.
�
Have the measuring system checked
by an authorized Mercedes-Benz
Center.!The engine oil level warnings should
not be ignored. Extended driving with
the symbol displayed could result in
serious engine damage that is not
covered by the Mercedes-Benz Limited
Warranty.
Page 410 of 514

409 Practical hints
What to do if …?
Display symbol
Display message
Possible cause/consequence
Possible solution
(
Lock driver’s
seat
The driver seat backrest is not engaged.
Fold back and push the seat backrest un-
til the seat cushion and seat backrest au-
dibly engage into the driving position.
Lock front
passenger seat
The passenger seat backrest is not en-
gaged.
Fold back and push the seat backrest un-
til the seat cushion and seat backrest au-
dibly engage into the driving position.
<
Seat belt system
Drive to workshop
The seat belt system is malfunctioning.
�
Visit an authorized Mercedes-Benz
Center as soon as possible.
L
Tele Aid malfunction
Drive to workshop
One or more main functions of the Tele
Aid system are malfunctioning.
�
Have the Tele Aid system checked by
an authorized Mercedes-Benz Center.
1
Restraint system
defective
Drive to workshop
The system is malfunctioning.
�
Drive with added caution to the near-
est authorized Mercedes-Benz Center.
Warning!
G
In the event a malfunction of the SRS is indi-
cated as outlined above, the SRS may not be
operational.
For your safety, we strongly recommend
that you visit an authorized Mercedes-Benz
Center immediately to have the system
checked; otherwise the SRS may not be de-
ploy when needed in an accident, which
could result in serious or fatal injury, or it
might deploy unexpectedly and unnecessar-
ily which could also result in injury.
Page 411 of 514
.")
410 Practical hintsWhat to do if …?Display symbol
Display message
Possible cause/consequence
Possible solution
K
Lock top
The soft top is not properly locked.
�
Lock the soft top again (
�page 259).
Top being opened
The soft top is not completely open or
closed. The hydraulics are losing pres-
sure.
�
Open or close the soft top all the way.
Top
Visit workshop
The soft top is malfunctioning.
�
Have the system checked at an autho-
rized Mercedes-Benz Center as soon
as possible.
Start engine to
operate top
The on-board voltage is too low.
�
Start the engine.
Top locked
as vehicle is moving
You have attempted to open or close the
soft top while driving.
�
Pull over to the side of the road and re-
peat soft top operation while the vehi-
cle is stationary.
_
Steering oil
Visit workshop
The steering gear oil level is too low. There
is a danger of steering gear damage.
�
Have the system checked by an autho-
rized Mercedes-Benz Center.
Warning!
G
If the level of steering gear oil in reservoir is
too low, the steering power assistance could
fail. Much greater effort will then be needed
to turn the steering wheel.
Do not add steering oil without checking the
steering system.
Do not drive the vehicle. Have the system
checked at an authorized Mercedes-Benz
Center as soon as possible.
Page 416 of 514

415 Practical hints
Where will I find...?
Vehicle jackThe vehicle jack is located in the storage
compartment underneath the trunk floor.
Storage position�
Remove vehicle jack from its
compartment.
�
Turn crank handle in direction of arrow
as far as it will go.
Operational position�
Turn crank handle clockwise.
Before storing the vehicle jack in its com-
partment:
�
It should be fully collapsed
�
The handle must be folded in (storage
position)
Warning!
G
The jack is designed exclusively for jacking
up the vehicle at the jack take-up brackets
built into both sides of the vehicle. To help
avoid personal injury, use the jack only to lift
the vehicle during a wheel change. Never
get beneath the vehicle while it is supported
by the jack. Keep hands and feet away from
the area under the lifted vehicle. Always
firmly set parking brake and block wheels
before raising vehicle with jack.
Do not disengage parking brake while the
vehicle is raised. Be certain that the jack is
always vertical (plumb line) when in use, es-
pecially on hills. Always try to use the jack
on a level surface. Make sure the jack arm is
fully seated in the jack take-up bracket.
Always lower the vehicle onto sufficient
capacity jackstands before working under
the vehicle.
Page 418 of 514

417 Practical hints
Where will I find...?
1Vehicle tool kit
Wheel wrench
Jack
2Arrow
3Minispare wheel, Wheel bolts for
Minispare wheel
4Vehicle tool kit storage well casing�
Remove vehicle tool kit storage well
casing4.
�
Remove Minispare wheel3.Storing the Minispare wheel
�
Place Minispare wheel3 in wheel
well.
�
Place vehicle tool kit storage well
casing4 over the Minispare wheel.
Make sure arrow 2 on vehicle tool kit
storage well casing4 points in the
direction of travel.
�
Place storage well casing (
�page 414)
over the vehicle tool kit storage well
casing 4 and turn the retaining screw
(
�page 414) clockwise as far it will go
to secure the Minispare wheel.
�
Disengage trunk floor handle in upper
edge of trunk and lower trunk floor cov-
er.
iArrow2 on vehicle tool kit storage
well casing4 must point in the
direction of travel. Otherwise you
cannot place the storage well casing
(�page 414) on top and secure the
Minispare wheel with the retaining
screw (
�page 414).
!To prevent damage, always disengage
trunk floor handle from upper edge of
trunk and lower trunk floor before
closing the trunk.Warning!
G
The dimensions of the Minispare wheel are
different from those of the road wheels. As
a result, the vehicle handling characteristics
change when driving with a Minispare wheel
mounted.
The Minispare wheel should only be used
temporarily, and should be replaced with a
regular road wheel as quickly as possible.
Do not switch off the ESP
® when a Minis-
pare wheel is mounted.
Page 419 of 514
418 Practical hintsWhere will I find...?In case of a flat tire, you may temporarily
use the Minispare wheel when observing
the following restrictions:�
Do not exceed a vehicle speed of
50 mph (80 km/h).
�
Drive to the nearest tire repair facility
to have the flat tire repaired or
replaced as appropriate.
�
Do not operate vehicle with more than
one Minispare wheel mounted.
For more information, see “Rims and tires”
(
�page 471).
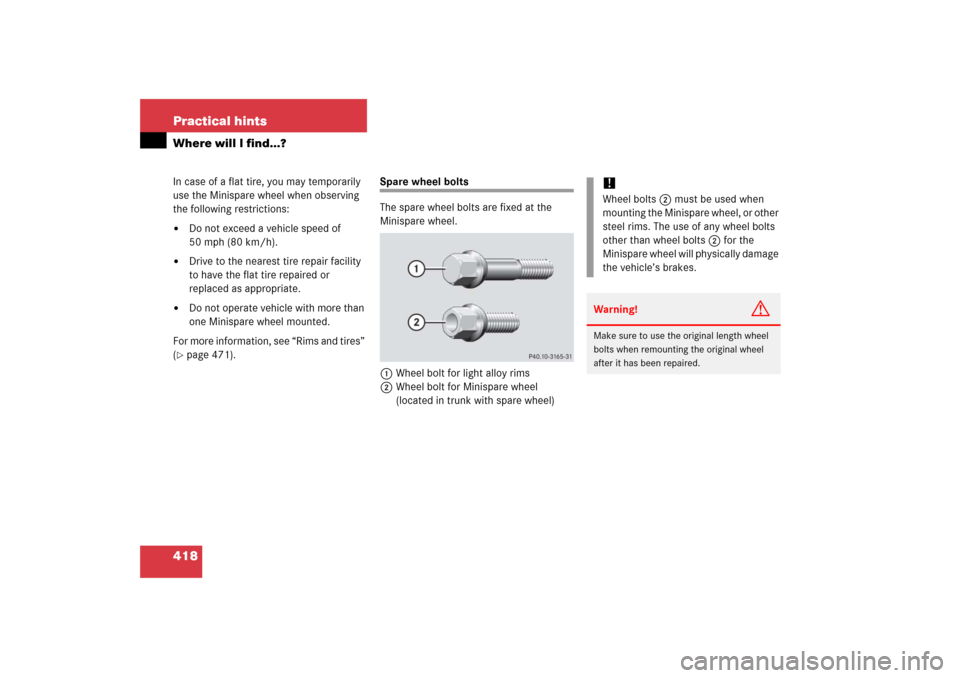
Spare wheel bolts
The spare wheel bolts are fixed at the
Minispare wheel.
1Wheel bolt for light alloy rims
2Wheel bolt for Minispare wheel
(located in trunk with spare wheel)
!Wheel bolts2 must be used when
mounting the Minispare wheel, or other
steel rims. The use of any wheel bolts
other than wheel bolts2 for the
Minispare wheel will physically damage
the vehicle’s brakes.Warning!
G
Make sure to use the original length wheel
bolts when remounting the original wheel
after it has been repaired.
Page 422 of 514
421 Practical hints
Unlocking/locking in an emergency
1Locking�
Insert the mechanical key into the
driver’s door lock until it stops.
�
Turn the mechanical key clockwise to
position1.
The driver’s door is locked.
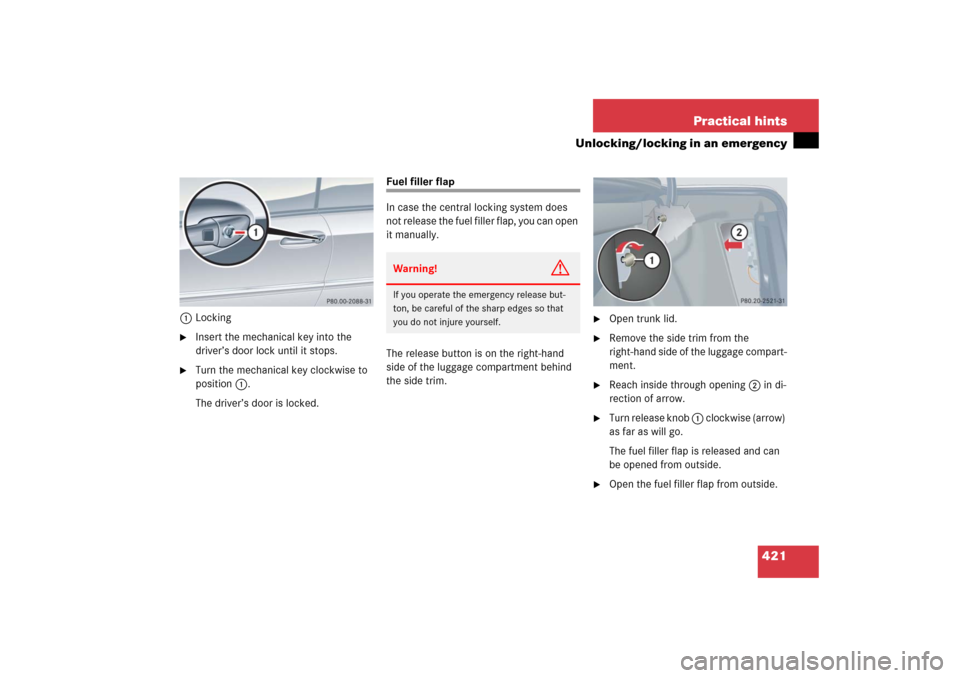
Fuel filler flap
In case the central locking system does
not release the fuel filler flap, you can open
it manually.
The release button is on the right-hand
side of the luggage compartment behind
the side trim.
�
Open trunk lid.
�
Remove the side trim from the
right-hand side of the luggage compart-
ment.
�
Reach inside through opening2 in di-
rection of arrow.
�
Turn release knob 1 clockwise (arrow)
as far as will go.
The fuel filler flap is released and can
be opened from outside.
�
Open the fuel filler flap from outside.
Warning!
G
If you operate the emergency release but-
ton, be careful of the sharp edges so that
you do not injure yourself.
Page 424 of 514

423 Practical hints
Opening/closing in an emergency
�Opening/closing in an emergency
Operating roll bars manually
Releasing roll bars manually
If the roll bar system is malfunctioning, you
can release the roll bars manually.
�
Close the soft top (
�page 257).
�
Open the trunk (
�page 108).
�
Fold back the luggage cover
(�page 262).
�
Take hex wrench out of its storage
location in the storage well casing
(�page 413).1Perforation
�
Push hex wrench through
perforation1 in trim of rear wall in
trunk.
Warning!
G
If the yellow roll bar warning lamp in
the clock does not go out after starting the
engine, or if it comes on while driving, then
the roll bar system is not operating properly
and may not activate in an accident. In this
case, raise the roll bars manually before
continuing to drive.
For safety reasons drive only with the roll
bars raised until the malfunction is repaired.
Have your vehicle checked at an authorized
Mercedes-Benz Center.
iWith the roll bars released, the soft top
cannot be operated using the soft top
switch and the rear head restraints
cannot be lowered using the rear head
restraint lowering switch.
Warning!
G
Make sure no one is located in the roll bar’s
path of motion while the next steps are be-
ing carried out.
When the roll bar is manually released, the
rear head restraints and the roll bar under-
neath shoot up almost instantaneously.
��