Page 180 of 514

179 Controls in detail
Automatic transmission
Activating manual shift program�
Press program mode selector
switch1 repeatedly until the
M for
manual program modeM appears in
the multifunction display.
The transmission switches to the
manual program modeM. Automatic
shifting is switched off. The gear range
is not limited.
You can change the gears manually when
the gear selector lever is in positionD. You
can upshift or downshift through the gears
in succession.Upshifting
�
Briefly press the gear selector lever to
the right in theD+direction.
or
�
Briefly press button2 on the right
side of the steering wheel
(�page 176).
The transmission shifts to the next
higher gear.
If, instead of the manual program mode
symbolM, thepsymbol appears in the
multifunction display (
�page 167), shift to
the next higher gear. The fuel supply will
otherwise be interrupted to prevent the
engine from overrevving.
iFor information on automatic program
modesC orS, see “Automatic shift
program” (
�page 172), “Gear selector
lever one-touch gearshifting”
(
�page 173), and “Steering wheel
gearshift control one-touch gearshift-
ing” (�page 174).
iThe manual program modeM will not
be stored. When the engine is turned
off with the manual program modeM
selected, the transmission will go to
the automatic program mode (CorS)
when the engine is restarted.!In the manual program modeM, the
transmission will not upshift, even if
the engine has reached its overrevving
range. Shift up to the next gear before
the engine has reached its overrevving
range. Make absolutely certain that the
engine speed does not reach the red
marking on the tachometer
(�page 24). Otherwise the engine
could be damaged which is not covered
by the Mercedes-Benz Limited
Warranty.
Page 213 of 514
 and the
function buttons (left side of radio panel)
are re")
212 Controls in detailAudio systemButton and soft key operation
In these instructions, the alphanumeric
keypad (right side of radio panel) and the
function buttons (left side of radio panel)
are referred to as “buttons”. The four keys
below the display panel are referred to as
“soft keys”.
Operation
Switching the unit on/off
Switching on�
Turn the SmartKey in the starter switch
to position 1 or 2.
�
If the audio system was on as you
removed the SmartKey from the starter
switch, the audio system will
automatically come back on as you
turn the SmartKey to position 1 or 2.
or
�
Press M button.Switching off
�
Remove SmartKey from starter switch.
or
�
Press M button.
!Do not press directly in the display
face. Otherwise, the display will be
damaged.
iIf the radio is switched on without the
key in the starter switch, it will
automatically switch off again after
approx. 30 minutes.
If your vehicle is equipped with a
telephone, the display may prompt you
to enter your PIN (GSM network) or
code (TDMA or CDMA network).iShould excessively high temperatures
occur while the audio system is being
operated, the display will dim. If tem-
peratures continue to rise,
HIGH TEMP
will appear in the display, after which
the audio system will be switched off
for a cooling-down period.
Page 228 of 514

227 Controls in detail
Audio system
CD mode
Safety precautions
General notes
The system may not be able to play audio
CDs with copy protection.
Playing copied CDs may cause
malfunctions during playback.Warning!
G
The single CD player and the CD changer*
are Class 1 laser products. There is a danger
of invisible laser radiation if the housing is
opened or damaged.
Do not open the housing. The single CD
player and the CD changer* do not contain
any parts that can be serviced by the user.
For safety reasons, have any service work
which may be necessary performed only by
qualified personnel.
Warning!
G
In order to avoid distraction which could
lead to an accident, the driver should insert
CDs with the vehicle at a standstill and oper-
ate the audio system only if permitted by
road, weather and traffic conditions.
Bear in mind that at a speed of just 30 mph
(approximately 50 km/h), your car covers a
distance of 44 feet (approximately 14 m) ev-
ery second.
!If you affix stickers to the CDs, they can
become warped due to the heat that
develops in the CD drive or CD chang-
er*.
In certain situations, the CDs can then
no longer be ejected and cause dam-
age to the drive. Such damage is not
covered by the Mercedes-Benz Limited
Warranty.!Your CD drive or CD changer* has been
designed to play CDs which corre-
spond to the EN 60908 standard. You
can therefore only use CDs with a max-
imum thickness of 1.3 mm.
If you insert thicker data carriers, e.g.
ones that have data on both sides (one
side with DVD data, the other side with
audio data), they cannot be ejected and
will damage the drive.
Page 229 of 514

228 Controls in detailAudio systemDo not use CDs with an eight cm diameter,
not even with a CD adapter. Attempting to
play CDs with an eight cm diameter or
playing such CDs with an adapter may
cause damage to the CD drive. Such dam-
age is not covered by the Mercedes-Benz
Limited Warranty.
Should excessively high or low tempera-
tures occur while in CD changer mode*, CD TEMP
will appear in the display, and the
CD will be muted until the temperature has
reached an acceptable level for the system
to continue operation.
The single CD player and the CD changer*
play audio CDs.
Tips on handling CDs
�
Handle CDs carefully to prevent inter-
ference during playback.
�
Avoid scratches, fingerprints and dust
on the CDs.
�
Do not write on CDs or apply any labels
or other material to them.
�
Clean CDs from time to time with a
commercially available cleaning cloth.
Never wipe the CD in a circular motion;
instead, wipe it in a straight line start-
ing in the center and moving outward.
Do not use solvents, anti-static sprays,
etc. for cleaning.
�
Replace the CD in its case after use.
�
Protect CDs from heat and direct sun-
light.
Operating the single CD player in the
audio system unit
Loading a CD
The single CD player in the audio system
unit has capacity for one CD. The CD slot
for loading the drive is located underneath
the soft keys.
�
Make sure the system is switched on.
�
Insert CD into CD slot. The label side of
the CD must face upwards.The system automatically pulls the CD
into the CD slot. The audio CD begins
to play.
!If a CD is already loaded, it must be
ejected before inserting a new CD. In-
serting a second CD in the slot with an-
other CD still loaded will cause damage
to the CD drive not covered by the
Mercedes-Benz Limited Warranty. iIf a CD has been inserted incorrectly or
cannot be read,
WRONG CD0
will appear
in the display.
Page 256 of 514

255 Controls in detail
Soft top
�Soft top
Opening and closing the soft top
For safety reasons, the soft top can only be
opened and closed when the vehicle is
standing still.Warning!
G
Before operating the switch for the soft top,
make sure no persons can be injured by the
moving parts (roll bars, soft top frame, and
soft top compartment cover).
Hands must never be placed near the roll
bar, soft top frame, upper windshield area,
shelf behind roll bar, or soft top storage
compartment while the soft top is being
raised or lowered. Serious personal injury
may occur.
If potential danger exists, release the soft
top switch. This immediately interrupts the
raising or lowering procedure. You then can
operate the soft top switch to raise or lower
the soft top away from the danger zone.
Warning!
G
When leaving the vehicle, always remove the
SmartKey or SmartKey with KEYLESS-GO
*
from the starter switch, take it with you, and
lock the vehicle. Do not leave children unat-
tended in the vehicle, or with access to an
unlocked vehicle. Unsupervised use of vehi-
cle equipment can cause an accident
and/or serious personal injury.
!Never sit or place heavy objects on the
rear shelf. Doing so could cause dam-
age to the soft top and the rear shelf.
!When opening and closing the soft top,
make sure:�
there is sufficient clearance for the
soft top to move up
�
the luggage cover is engaged in
place (
�page 262)
�
the trunk is only loaded to the
height of the luggage cover
�
the luggage/cargo does not push
the closed luggage cover up
�
the trunk lid is closed
�
nothing is placed on the soft top
compartment cover
�
the outside temperature is above
+5°F (-15°C)
Otherwise the soft top and other parts
of the vehicle could be damaged.
Page 258 of 514
257 Controls in detail
Soft top
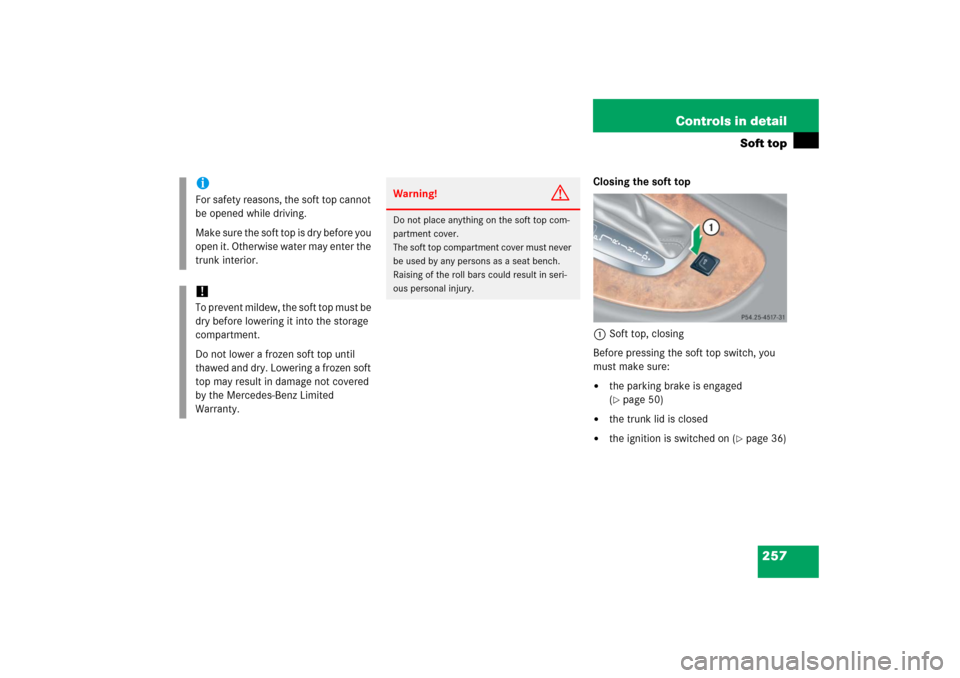
Closing the soft top
1Soft top, closing
Before pressing the soft top switch, you
must make sure:�
the parking brake is engaged
(�page 50)
�
the trunk lid is closed
�
the ignition is switched on (
�page 36)
iFor safety reasons, the soft top cannot
be opened while driving.
Make sure the soft top is dry before you
open it. Otherwise water may enter the
trunk interior.!To prevent mildew, the soft top must be
dry before lowering it into the storage
compartment.
Do not lower a frozen soft top until
thawed and dry. Lowering a frozen soft
top may result in damage not covered
by the Mercedes-Benz Limited
Warranty.
Warning!
G
Do not place anything on the soft top com-
partment cover.
The soft top compartment cover must never
be used by any persons as a seat bench.
Raising of the roll bars could result in seri-
ous personal injury.
Page 263 of 514
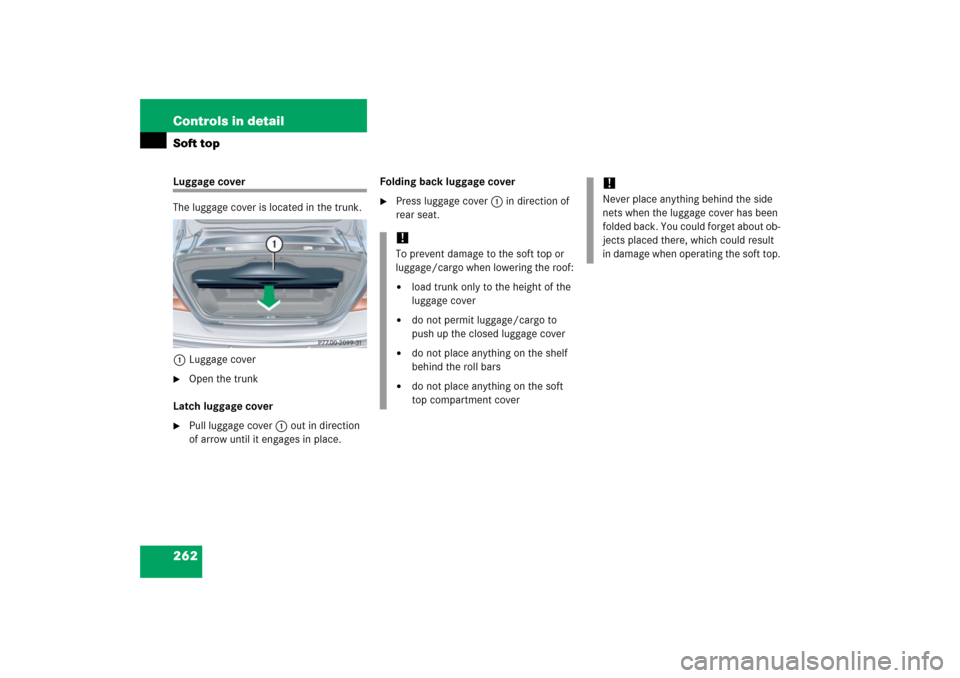
262 Controls in detailSoft topLuggage cover
The luggage cover is located in the trunk.
1Luggage cover�
Open the trunk
Latch luggage cover
�
Pull luggage cover1 out in direction
of arrow until it engages in place.Folding back luggage cover
�
Press luggage cover1 in direction of
rear seat.!To prevent damage to the soft top or
luggage/cargo when lowering the roof:�
load trunk only to the height of the
luggage cover
�
do not permit luggage/cargo to
push up the closed luggage cover
�
do not place anything on the shelf
behind the roll bars
�
do not place anything on the soft
top compartment cover
!Never place anything behind the side
nets when the luggage cover has been
folded back. You could forget about ob-
jects placed there, which could result
in damage when operating the soft top.
Page 265 of 514
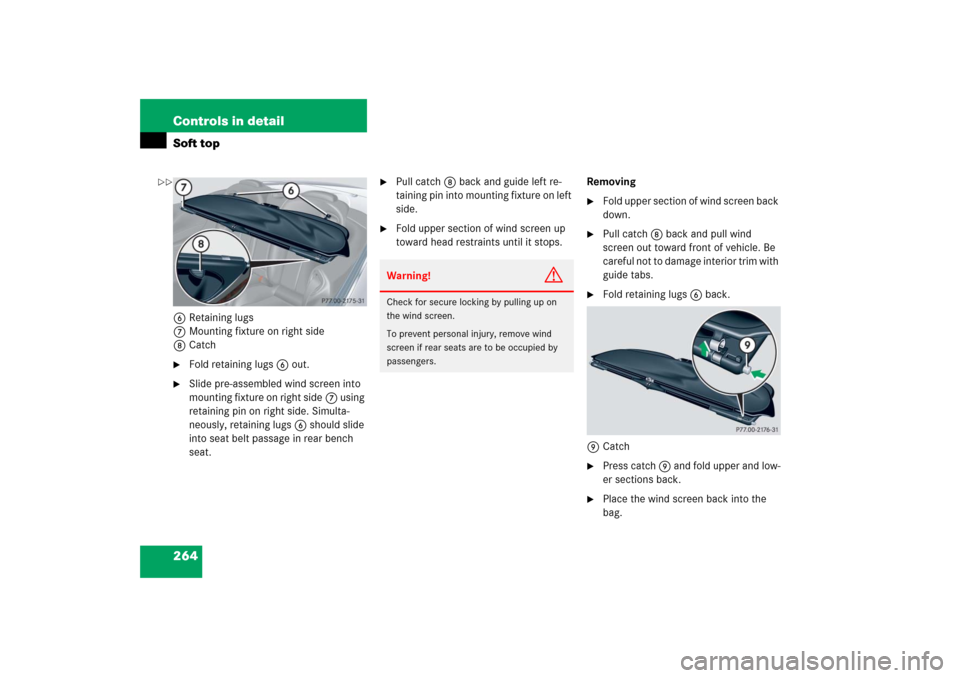
264 Controls in detailSoft top6Retaining lugs
7Mounting fixture on right side
8Catch�
Fold retaining lugs6 out.
�
Slide pre-assembled wind screen into
mounting fixture on right side7 using
retaining pin on right side. Simulta-
neously, retaining lugs6 should slide
into seat belt passage in rear bench
seat.
�
Pull catch8 back and guide left re-
taining pin into mounting fixture on left
side.
�
Fold upper section of wind screen up
toward head restraints until it stops.Removing
�
Fold upper section of wind screen back
down.
�
Pull catch8 back and pull wind
screen out toward front of vehicle. Be
careful not to damage interior trim with
guide tabs.
�
Fold retaining lugs6 back.
9Catch
�
Press catch 9 and fold upper and low-
er sections back.
�
Place the wind screen back into the
bag.
Warning!
G
Check for secure locking by pulling up on
the wind screen.
To prevent personal injury, remove wind
screen if rear seats are to be occupied by
passengers.
��