Page 412 of 489
411 Practical hints
Replacing SmartKey batteries
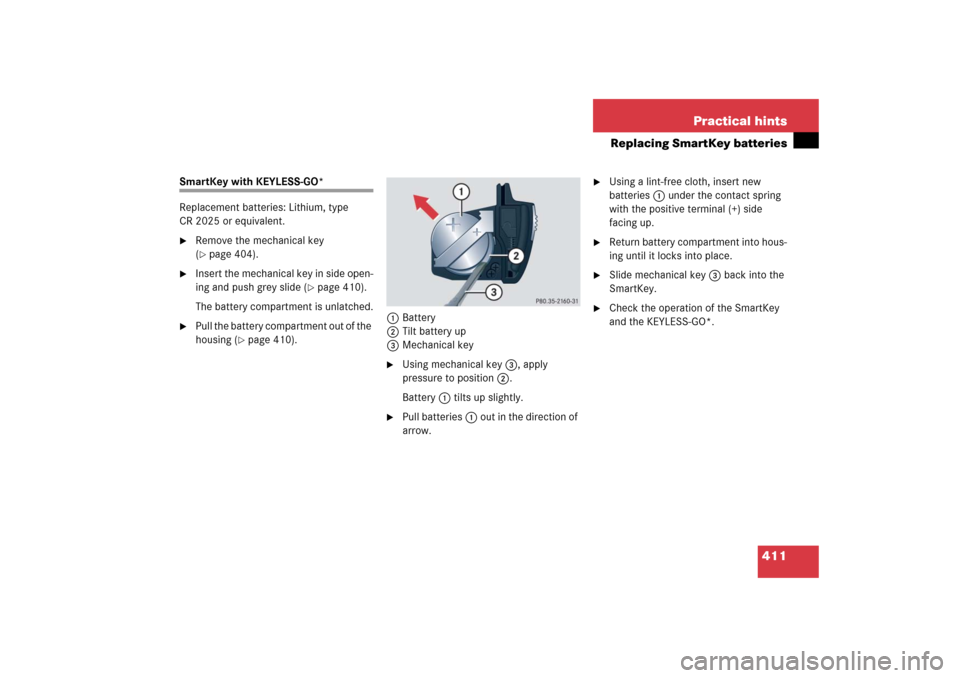
SmartKey with KEYLESS-GO*
Replacement batteries: Lithium, type
CR 2025 or equivalent.�
Remove the mechanical key
(�page 404).
�
Insert the mechanical key in side open-
ing and push grey slide (
�page 410).
The battery compartment is unlatched.
�
Pull the battery compartment out of the
housing (
�page 410).1Battery
2Tilt battery up
3Mechanical key
�
Using mechanical key3, apply
pressure to position2.
Battery1 tilts up slightly.
�
Pull batteries1 out in the direction of
arrow.
�
Using a lint-free cloth, insert new
batteries1 under the contact spring
with the positive terminal (+) side
facing up.
�
Return battery compartment into hous-
ing until it locks into place.
�
Slide mechanical key 3 back into the
SmartKey.
�
Check the operation of the SmartKey
and the KEYLESS-GO*.
Page 427 of 489

426 Practical hintsBatteryThe battery is located in the engine
compartment on the right hand side.
1Clamps
Removing filter box:�
Release clamps1.
�
Remove filter box.
Installing filter box:
�
Insert filter box properly.
�
Secure it with clamps1.
Warning!
G
Failure to follow these instructions can re-
sult in severe injury or death.
Observe all safety instructions and
precautions when handling automotive
batteries (
�page 315).
Never lean over batteries while connecting,
you might get injured.
Battery fluid contains sulfuric acid. Do not
allow this fluid to come in contact with eyes,
skin or clothing. In case it does, immediately
flush affected area with water and seek
medical help if necessary.
A battery will also produce hydrogen gas,
which is flammable and explosive. Keep
flames or sparks away from battery, avoid
improper connection of jumper cables,
smoking, etc.
!Never loosen or detach battery termi-
nal clamps while the engine is running
or the SmartKey is in the starter switch.
Otherwise the alternator and other
electronic components could be se-
verely damaged.
Have the battery checked regularly by
an authorized Mercedes-Benz Center.
Refer to Maintenance Booklet for
maintenance intervals or contact an
authorized Mercedes-Benz Center for
further information.
Page 428 of 489

427 Practical hints
Battery
2Negative terminal
3Positive terminal cover
Disconnecting the battery
�
Depress the parking brake pedal.
�
Make sure gear selector lever is set to
positionP.
�
Turn off all electrical consumers.
�
Remove SmartKey from starter switch.
Vehicles with KEYLESS-GO*:�
Press the start / stop button until
the engine shuts off.
�
Open the driver’s door.
�
Open the hood (
�page 308).
�
Remove the filter box (
�page 426).
�
Read and observe safety instructions
and precautions (
�page 426).
�
Disconnect the battery negative lead
from negative terminal2.
�
Remove cover3 from the positive ter-
minal.
�
Disconnect the battery positive lead.
Warning!
G
Do not place metal objects on the battery as
this could result in a short circuit.
Use leak-proof battery only to avoid the risk
of acid burns in the event of an accident.
Warning!
G
With a disconnected battery�
you will no longer be able to turn the
SmartKey in the starter switch and
pressing the KEYLESS-GO* start/stop
button on the gear selector lever will
have no effect
�
the gear selector lever will remain
locked in positionP!Always disconnect the battery in the
order described below. Otherwise the
vehicle’s electronics can be damaged.
Page 430 of 489

429 Practical hints
Battery
Reconnecting the battery�
Turn off all electrical consumers.
�
Remove SmartKey from starter switch.
Vehicles with KEYLESS-GO*:�
Open the driver’s door.
�
Connect the battery positive lead and
fasten its cover 3.
�
Connect the battery negative lead 2.
�
Reinstall the filter box (
�page 426).Batteries contain materials that can harm
the environment if disposed of improperly.
Large 12-volt storage batteries contain
lead. Recycling of batteries is the preferred
method of disposal. Many states require
sellers of batteries to accept old batteries
for recycling.
!Always connect the battery in the order
described below. Otherwise the vehi-
cle’s electronics can be damaged.!Never invert the terminal connections!
iThe following procedures must be
carried out following any interruption of
battery power (e.g. due to reconnect-
ing):�
Set the clock (
�page 157).
Vehicles with COMAND*:
see COMAND operator’s manual.
�
Synchronize the side windows
(�page 248).
�
Synchronize the tilt/sliding
sunroof* (
�page 253).
Page 435 of 489
434 Practical hintsTowing the vehicle
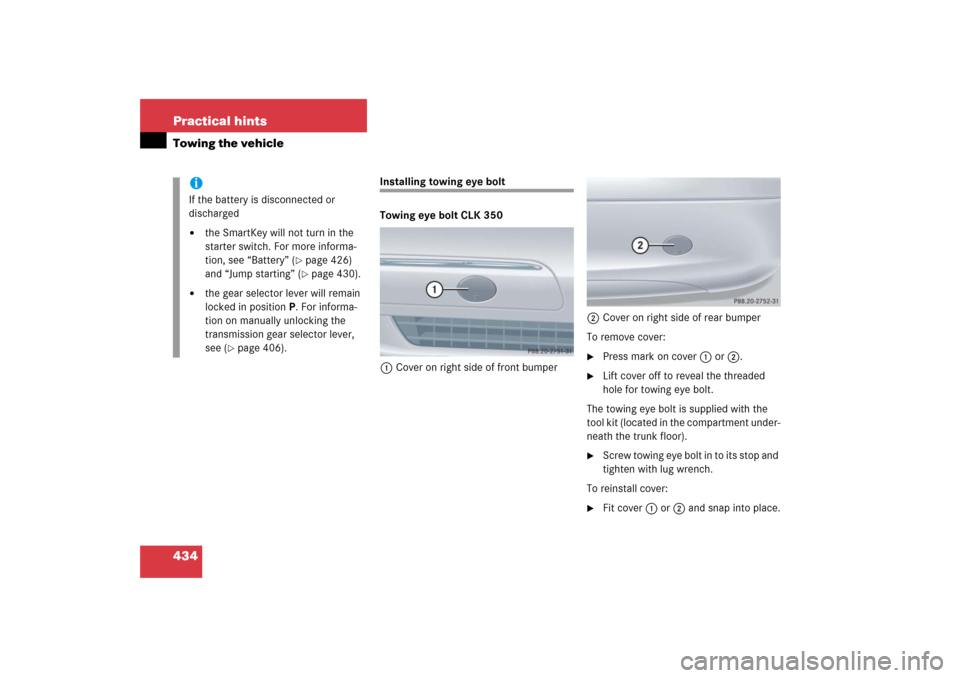
Installing towing eye bolt
Towing eye bolt CLK 350
1Cover on right side of front bumper2Cover on right side of rear bumper
To remove cover:
�
Press mark on cover 1 or 2.
�
Lift cover off to reveal the threaded
hole for towing eye bolt.
The towing eye bolt is supplied with the
tool kit (located in the compartment under-
neath the trunk floor).
�
Screw towing eye bolt in to its stop and
tighten with lug wrench.
To reinstall cover:
�
Fit cover 1 or 2 and snap into place.
iIf the battery is disconnected or
discharged�
the SmartKey will not turn in the
starter switch. For more informa-
tion, see “Battery” (
�page 426)
and “Jump starting” (�page 430).
�
the gear selector lever will remain
locked in positionP. For informa-
tion on manually unlocking the
transmission gear selector lever,
see (
�page 406).
Page 469 of 489
 179
Gear ranges 175
Gear selector leve")
468 IndexAutomatic locking when driving 120
Automatic shift program 176
Automatic transmission 170
Accelerator position 174
Emergency operation
(Limp-Home Mode) 179
Gear ranges 175
Gear selector lever 48, 170
Gear selector lever position 170, 172
Gear selector lever,
One-touch gearshifting 177
Gear shifting malfunctions 179
Kickdown 174
Manual (One touch) gearshifting 177
One-touch gearshifting, Steering
wheel gearshift control 178
Shift program mode
selector switch 176
Starting engine 48
Transmission fluid level 313
Automatic Transmission Fluid see ATFB
Backrest 265
Seat, Multicontour* 125
Seat, Power 38
Backup lamps
Messages in display 393
Replacing bulbs 412, 413
Bar 342
BAS 89, 461
Batteries, SmartKey
Changing 410
Checking battery condition 102
Batteries, SmartKey with KEYLESS-GO*
Changing 411
Checking battery condition 108
Battery, Vehicle 315, 426
Charging 428
Connecting 429
Disconnecting 427
Installing 428
Jump starting 430
Messages in display 382
Removing 428Bead 342
Beverage holder see Cup holder
Bi-Xenon headlamps* see Headlamps
Block heater (Canada only) 347
Bolts, Spare wheel 403
Brake Assist System see BAS
Brake fluid 454
Checking 307
Message in display 383
Brake lamp
Cleaning lenses 355
High mounted 413
Message in display 391
Replacing bulbs 413, 417
Brake pads
Message in display 383
Brakes 296
Warning lamp 361
Break-in period 294
Bulbs, replacing see Replacing bulbs
Page 473 of 489

472 IndexE
Easy-entry/exit feature 42, 164
Electrical fuses see Fuses
Electrical outlet 277
Electrical system, Technical data 450
Electronic Stability Program see ESP
®
Emergency call system* 279
Emergency calls
911 calls 244
Tele Aid calls 281, 282
Emergency operation
(Limp-Home Mode) 179
Emergency operations
Active head restraints, Resetting 408
Center console,
Indicator lamps 368–369
Gear selector lever, Unlocking 406
Instrument cluster,
Indicator lamps 360–367
Power tilt/sliding sunroof*,
Manual operation 407
Remote door unlock 286
Trunk lid, Releasing from inside 118
Trunk lid, Unlocking 405
Unlocking/locking the vehicle 404Emergency tensioning device see ETD
Emergency, In case of
Battery, Jump starting 430
First aid kit 398
Flat tire, Changing 420
Fuses 436
Hazard warning flasher 137
Roadside Assistance 12, 282
Towing the vehicle 432
Emission control 303
Emission control information label 442
Emission control vacuum
line routing diagram label 442
Emission system warranties 10
Engine
Belt layout 443
Block heater (Canada only) 347
Break-in recommendations 294
Cleaning 353
Compartment 308
Malfunction indicator lamp 25, 362
Maximum engine speed 444
Message in display 384
Number 442, 462
Starting 48
Starting difficulties 50Starting with KEYLESS-GO* 49
Starting with SmartKey 49
Technical data 444
Turning off 58
Turning off with KEYLESS-GO* 58
Turning off with SmartKey 58
Engine coolant see Coolant
Engine oil 309, 454
Adding 312, 454
Additives 454
Changing 312, 454
Checking level 307, 310
Checking level (Dipstick) 311
Consumption 309
Filler cap 313
Filler neck 313
Messages in display 310, 388
Viscosity 462
Engine oil level 307, 310
ESP
®
90, 462
Messages in display 374–375
Warning lamp 365
ETD 72, 462
Safety guidelines 66
Exterior rear view mirrors 43, 181
Parking position 164, 182
Page 476 of 489
 412
Replacing bulbs (Halogen) 412, 414
Replacing bulbs for
high beam flasher (Bi-Xenon*) 416
Sw")
475 Index
High beam headlamps 135
Indicator lamp 25
Messages in display 392
Replacing bulbs (Bi-Xenon*) 412
Replacing bulbs (Halogen) 412, 414
Replacing bulbs for
high beam flasher (Bi-Xenon*) 416
Switching on 52, 132
High mounted brake lamp 413
Hood 308
Message in display 390
Horn 23
HVAC see Climate control system
Hydroplaning 299
I
Identification labels 442
Identification number, Vehicle (VIN) 442
Ignition
with KEYLESS-GO* 36
with SmartKey 34
Immobilizer 93
Indicator lamps see
Lamps, indicator and warning
Infant and child restraint systems see
Children in the vehicleInflation pressure see
Tires,Inflation pressure
Inside door handle 30, 110
Instrument cluster 24, 140, 463
Cleaning 357
Illumination brightness 140
Lamps in 360–367
Messages in display see
Multifunction display messages
Multifunction display 144
Instrument lighting see Instrument cluster,
Illumination brightness
Instrument panel see Instrument cluster
Instruments and controls see Cockpit
Interior lighting 138
Delayed shut-off 163
Interior rear view mirror 43, 181
Antiglare position 180
Auto-dimming 181
Interior storage spaces see
Storage compartments
J
Jack 398
Jacking up the vehicle 421
Jump starting 430K
Key, Mechanical 404
Key, SmartKey 98
Batteries 102, 108
Battery check lamp 101, 107
Changing batteries 410
Factory setting 100, 101
Ignition 34
Locking/unlocking 32, 60, 98
Locking/unlocking,
Global setting 100
Locking/unlocking,
Selective setting 101
Loss of 102, 110
Message in display 390
Opening and closing the
power tilt/sliding sunroof* 252
Opening and closing the
power windows 249
Positions in starter switch 34
Remote control 98
SmartKey with KEYLESS-GO* 103
Starting the engine 49
Turning off the engine 58
Unlocking/opening trunk lid 102