Page 403 of 489
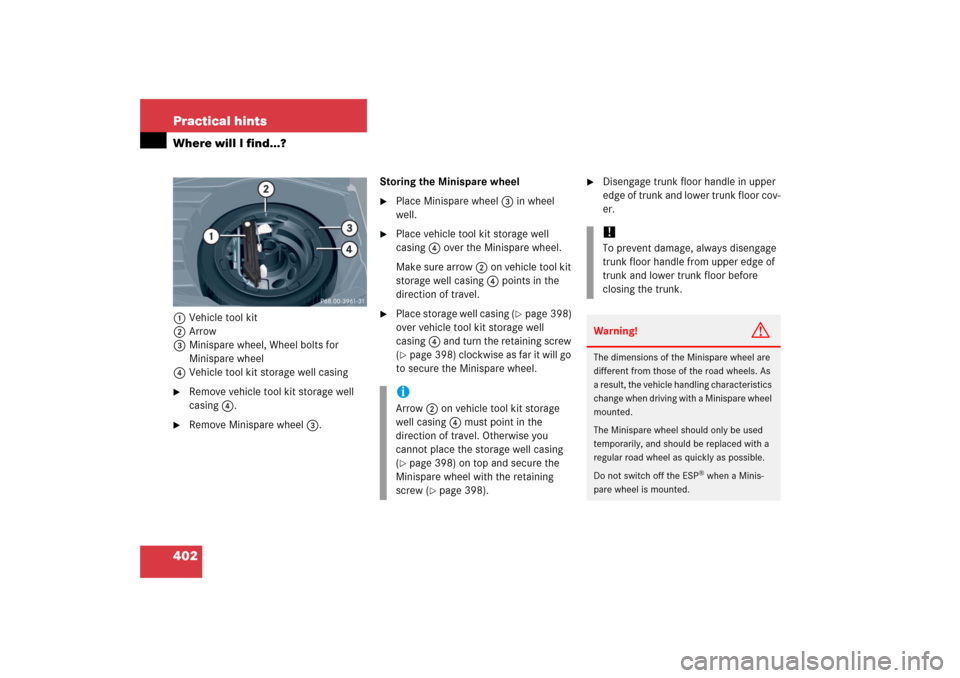
402 Practical hintsWhere will I find...?1Vehicle tool kit
2Arrow
3Minispare wheel, Wheel bolts for
Minispare wheel
4Vehicle tool kit storage well casing�
Remove vehicle tool kit storage well
casing4.
�
Remove Minispare wheel3.Storing the Minispare wheel
�
Place Minispare wheel3 in wheel
well.
�
Place vehicle tool kit storage well
casing4 over the Minispare wheel.
Make sure arrow2 on vehicle tool kit
storage well casing4 points in the
direction of travel.
�
Place storage well casing (
�page 398)
over vehicle tool kit storage well
casing4 and turn the retaining screw
(
�page 398) clockwise as far it will go
to secure the Minispare wheel.
�
Disengage trunk floor handle in upper
edge of trunk and lower trunk floor cov-
er.
iArrow2 on vehicle tool kit storage
well casing4 must point in the
direction of travel. Otherwise you
cannot place the storage well casing
(�page 398) on top and secure the
Minispare wheel with the retaining
screw (
�page 398).
!To prevent damage, always disengage
trunk floor handle from upper edge of
trunk and lower trunk floor before
closing the trunk.Warning!
G
The dimensions of the Minispare wheel are
different from those of the road wheels. As
a result, the vehicle handling characteristics
change when driving with a Minispare wheel
mounted.
The Minispare wheel should only be used
temporarily, and should be replaced with a
regular road wheel as quickly as possible.
Do not switch off the ESP
® when a Minis-
pare wheel is mounted.
Page 405 of 489
404 Practical hintsUnlocking/locking in an emergencyUnlocking the vehicle
If you are unable to unlock the vehicle with
the SmartKey or KEYLESS-GO*, open the
driver’s door and the trunk using the
mechanical key.
1Mechanical key locking tab
2Mechanical key
�
Move locking tab1 in the direction of
arrow.
�
Slide mechanical key2 out of the
housing.Unlocking the driver’s door
1Unlocking
�
Insert the mechanical key into the
driver’s door lock until it stops.
�
Turn the mechanical key counterclock-
wise to position1.
The driver’s door is unlocked.
iUnlocking and opening the driver’s
door and/or the trunk with the
mechanical key will trigger the
anti-theft alarm system.
To cancel the alarm, do one of the
following:�
Press button Œ or ‹on the
SmartKey.
�
Insert the SmartKey in the starter
switch.
Vehicles with KEYLESS-GO*
�
Pull the outside door handle.
�
Press the KEYLESS-GO* start/stop
button (
�page 35).
Page 406 of 489
405 Practical hints
Unlocking/locking in an emergency
Unlocking the trunk
A minimum height clearance of 5.71 ft
(1.74 m) is required to open the trunk lid.
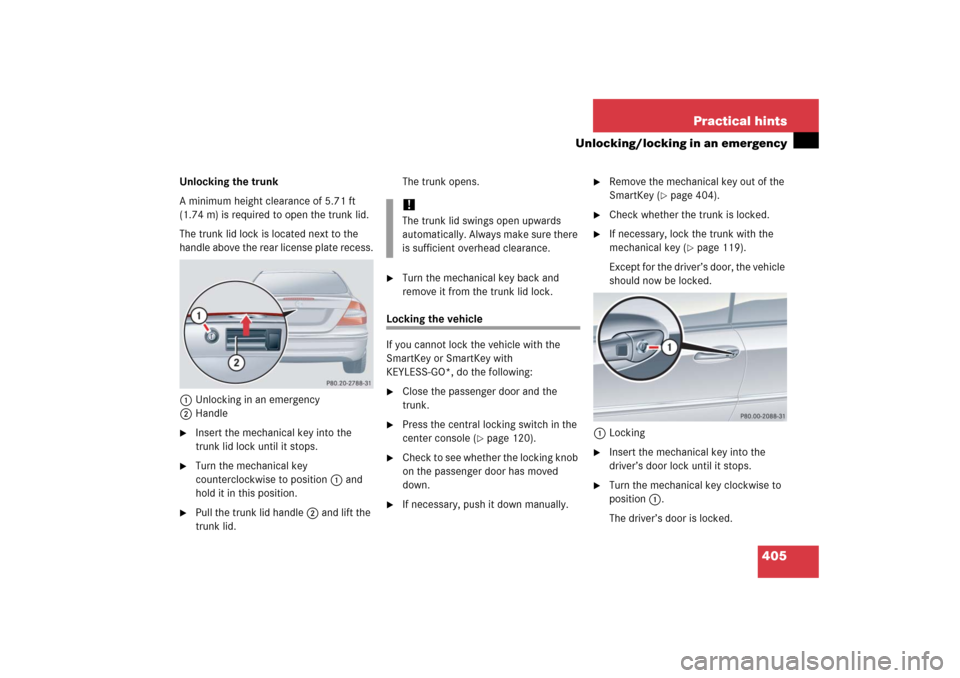
The trunk lid lock is located next to the
handle above the rear license plate recess.
1Unlocking in an emergency
2Handle�
Insert the mechanical key into the
trunk lid lock until it stops.
�
Turn the mechanical key
counterclockwise to position1 and
hold it in this position.
�
Pull the trunk lid handle2 and lift the
trunk lid.The trunk opens.
�
Turn the mechanical key back and
remove it from the trunk lid lock.
Locking the vehicle
If you cannot lock the vehicle with the
SmartKey or SmartKey with
KEYLESS-GO*, do the following:�
Close the passenger door and the
trunk.
�
Press the central locking switch in the
center console (
�page 120).
�
Check to see whether the locking knob
on the passenger door has moved
down.
�
If necessary, push it down manually.
�
Remove the mechanical key out of the
SmartKey (
�page 404).
�
Check whether the trunk is locked.
�
If necessary, lock the trunk with the
mechanical key (
�page 119).
Except for the driver’s door, the vehicle
should now be locked.
1Locking
�
Insert the mechanical key into the
driver’s door lock until it stops.
�
Turn the mechanical key clockwise to
position1.
The driver’s door is locked.
!The trunk lid swings open upwards
automatically. Always make sure there
is sufficient overhead clearance.
Page 408 of 489
407 Practical hints
Opening/closing in an emergency
�Opening/closing in an emergency
Power tilt/sliding sunroof*
You can open or close the tilt/sliding
sunroof manually should an electrical
malfunction occur.
The tilt/sliding sunroof drive is located
behind the lens 1 of the interior overhead
light.�
Remove SmartKey from the starter
switch.
�
Pry off lens1 using a flat blade
screwdriver.
�
Slide both locking tabs2 in the direc-
tion of arrows.
�
Lower the rear of the cover and
remove.
�
Remove the cover.
�
Take the crank 3 out of the Operator’s
Manual pouch.
�
Insert crank3 through hole on the left
side.
�
Turn crank3 clockwise to:�
slide sunroof closed
�
raise sunroof at the rear
�
Turn crank3 counterclockwise to:�
slide sunroof open
�
lower sunroof at the rear
iDo not disconnect electrical
connectors.
iTurn crank3 slowly and smoothly.
The tilt/sliding sunroof must be
synchronized after being operated
manually (
�page 253).
Page 415 of 489
414 Practical hintsReplacing bulbsReplacing bulbs for front lamps
Before you start to replace a bulb for a
front lamp, do the following first:�
Turn the exterior lamp switch to
positionM (
�page 131).
�
Open the hood (
�page 308).
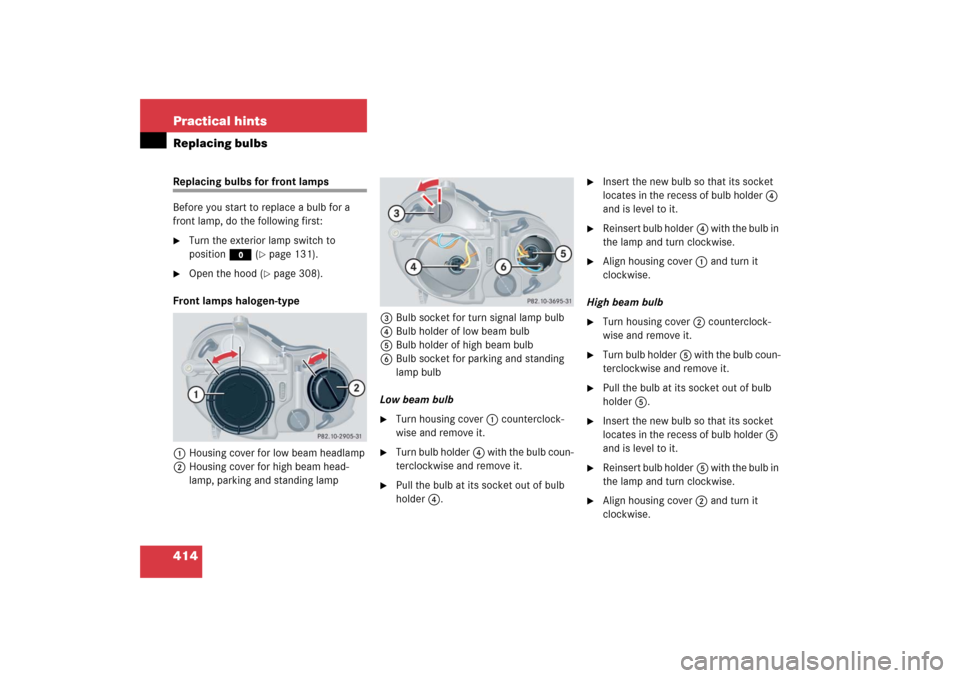
Front lamps halogen-type
1Housing cover for low beam headlamp
2Housing cover for high beam head-
lamp, parking and standing lamp3Bulb socket for turn signal lamp bulb
4Bulb holder of low beam bulb
5Bulb holder of high beam bulb
6Bulb socket for parking and standing
lamp bulb
Low beam bulb
�
Turn housing cover1 counterclock-
wise and remove it.
�
Turn bulb holder4 with the bulb coun-
terclockwise and remove it.
�
Pull the bulb at its socket out of bulb
holder4.
�
Insert the new bulb so that its socket
locates in the recess of bulb holder4
and is level to it.
�
Reinsert bulb holder4 with the bulb in
the lamp and turn clockwise.
�
Align housing cover1 and turn it
clockwise.
High beam bulb
�
Turn housing cover2 counterclock-
wise and remove it.
�
Turn bulb holder5 with the bulb coun-
terclockwise and remove it.
�
Pull the bulb at its socket out of bulb
holder5.
�
Insert the new bulb so that its socket
locates in the recess of bulb holder5
and is level to it.
�
Reinsert bulb holder5 with the bulb in
the lamp and turn clockwise.
�
Align housing cover2 and turn it
clockwise.
Page 416 of 489
415 Practical hints
Replacing bulbs
Front turn signal lamp bulb�
Turn bulb socket3 counterclockwise
and remove it.
�
Press gently onto the bulb and turn
counterclockwise out of bulb
socket3.
�
Press the new bulb gently into bulb
socket3 and turn clockwise until it
engages.
�
Place bulb socket3 back into the
lamp and turn it clockwise.
Parking and standing lamp bulb
�
Turn housing cover2 counterclock-
wise and remove it.
�
Pull out bulb socket6 with the bulb.
�
Pull the bulb out of the bulb socket6.
�
Press the new bulb into bulb socket6.
�
Press bulb socket6 back into the
lamp.
�
Align housing cover2 and turn it
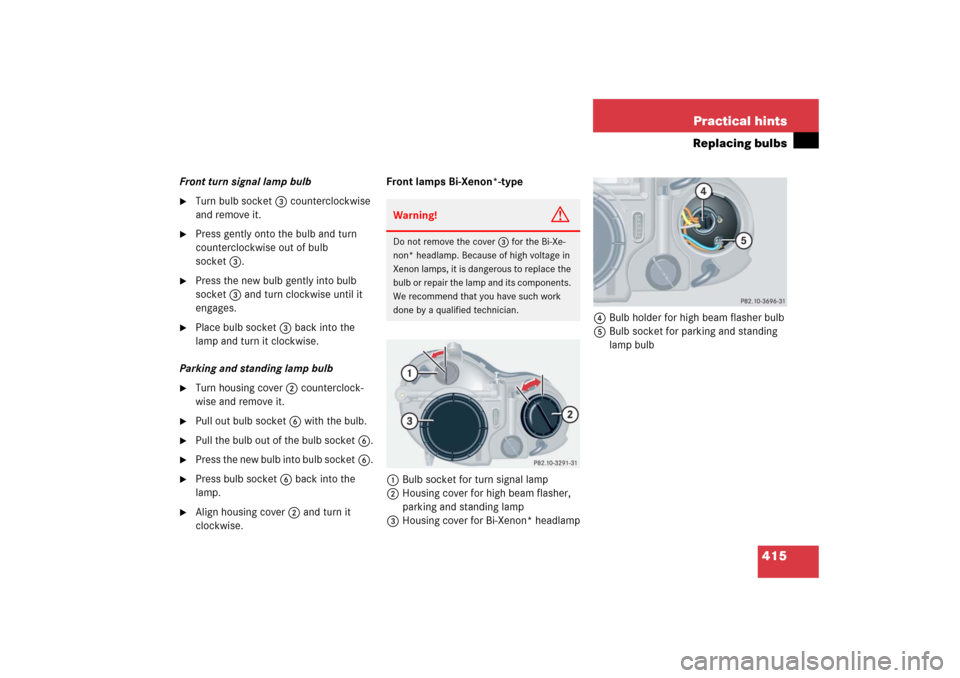
clockwise.Front lamps Bi-Xenon*-type
1Bulb socket for turn signal lamp
2Housing cover for high beam flasher,
parking and standing lamp
3Housing cover for Bi-Xenon* headlamp4Bulb holder for high beam flasher bulb
5Bulb socket for parking and standing
lamp bulb
Warning!
G
Do not remove the cover 3 for the Bi-Xe-
non* headlamp. Because of high voltage in
Xenon lamps, it is dangerous to replace the
bulb or repair the lamp and its components.
We recommend that you have such work
done by a qualified technician.
Page 417 of 489

416 Practical hintsReplacing bulbsHigh beam bulb for high beam flasher�
Turn housing cover2 counterclock-
wise and remove it.
�
Turn bulb holder4 with the bulb coun-
terclockwise and remove it.
�
Pull the bulb at its socket out of bulb
holder4.
�
Insert the new bulb so that its socket
locates in the recess of bulb holder4
and is level to it.
�
Reinsert bulb holder4 with the bulb in
the lamp and turn clockwise.
�
Align housing cover2 and turn it
clockwise.Front turn signal lamp bulb
�
Turn bulb socket1 counterclockwise
and remove it.
�
Press gently onto the bulb and turn
counterclockwise out of bulb
socket1.
�
Press the new bulb gently into bulb
socket1 and turn clockwise until it
engages.
�
Place bulb socket1 back into the
lamp and turn it clockwise.
Parking and standing lamp bulb
�
Turn housing cover2 counterclock-
wise and remove it.
�
Pull out bulb socket5 with the bulb.
�
Pull the bulb out of the bulb socket5.
�
Press the new bulb into bulb socket5.
�
Press bulb socket5 back into the
lamp.
�
Align housing cover2 and turn it
clockwise.Additional turn signal lamps
The additional turn signal lamps in the ex-
terior rear view mirrors have LEDs.
If a malfunction occurs or LEDs fail to func-
tion, the entire turn signal unit must be re-
placed. Have the additional turn signal unit
replaced by an authorized Mercedes-Benz
Center.
Front side marker lamp
Since replacing the side marker lamp bulbs
is a technically highly demanding process,
we recommend you have the side marker
lamp bulbs replaced by an authorized
Mercedes-Benz Center.
Page 418 of 489
417 Practical hints
Replacing bulbs
Replacing bulbs for rear lamps
Before you start to replace a bulb for a rear
lamp, do the following first:�
Turn the exterior lamp switch to
positionM (
�page 131).
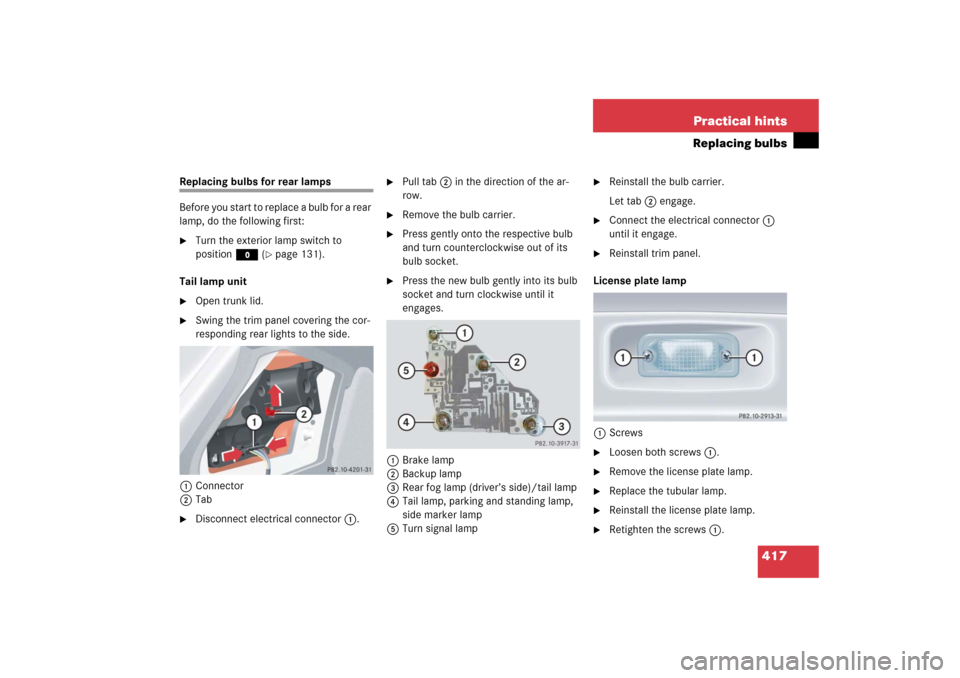
Tail lamp unit
�
Open trunk lid.
�
Swing the trim panel covering the cor-
responding rear lights to the side.
1Connector
2Tab
�
Disconnect electrical connector1.
�
Pull tab2 in the direction of the ar-
row.
�
Remove the bulb carrier.
�
Press gently onto the respective bulb
and turn counterclockwise out of its
bulb socket.
�
Press the new bulb gently into its bulb
socket and turn clockwise until it
engages.
1Brake lamp
2Backup lamp
3Rear fog lamp (driver’s side)/tail lamp
4Tail lamp, parking and standing lamp,
side marker lamp
5Turn signal lamp
�
Reinstall the bulb carrier.
Let tab2 engage.
�
Connect the electrical connector1
until it engage.
�
Reinstall trim panel.
License plate lamp
1Screws
�
Loosen both screws1.
�
Remove the license plate lamp.
�
Replace the tubular lamp.
�
Reinstall the license plate lamp.
�
Retighten the screws1.