Page 191 of 489
Setting the temperature
Use temperature controls2 and3
(�page 187) to separately adjust the air
temperature on each side of the passenger
compartment.")
190 Controls in detailClimate control (CLK 350)Setting the temperature
Use temperature controls2 and3
(�page 187) to separately adjust the air
temperature on each side of the passenger
compartment. You should raise or lower
the temperature setting in small incre-
ments, preferably starting at 72°F (22°C).
The climate control will adjust to the set
temperature as fast as possible.
Increasing
�
Turn temperature control2
and/or3 (
�page 187) slightly clock-
wise.
The climate control system will corre-
spondingly adjust the interior air tem-
perature.Decreasing
�
Turn temperature control2
and/or3 (
�page 187) slightly coun-
terclockwise.
The climate control system will corre-
spondingly adjust the interior air tem-
perature.
Adjusting air distribution
Use air distribution control4
(�page 187) to adjust the air distribution.
The following symbols are located on the
controls:
�
Press buttonU (
�page 187).
The indicator lamp on the button goes
out. The automatic air distribution is
switched off. The air distribution is
controlled according to the selected
control setting
�
Turn air distribution control 4
(�page 187) to the desired symbol.
iIf you turn the temperature control fully
clockwise for one side of the vehicle,
you are increasing the temperature for
the other side of the vehicle as well.
iIf you turn the temperature control fully
counterclockwise for one side of the
vehicle, you are decreasing the temper-
ature for the other side of the vehicle
as well.
Symbol
Function
a
Directs air through the center,
side and rear passenger
compartment air vents
Z
Directs air to the windshield
and the side defroster vents
b
Directs air into the entire
vehicle interior
Y
Directs air to the footwells
Page 306 of 489

305 Operation
At the gas station
�At the gas station
Refueling
The fuel filler flap is located on the
right-hand side of the vehicle towards the
rear. Locking/unlocking the vehicle with
the SmartKey or the SmartKey with
KEYLESS-GO* automatically locks/un-
locks the fuel filler flap.1To open the fuel filler flap
2To insert the fuel filler cap
�
Turn the engine off�
by turning the SmartKey to
position0. Remove the SmartKey
from the starter switch.
�
by pressing the KEYLESS-GO*
start/stop button. Open the driv-
er’s door (with driver’s door open,
starter switch is now in position0,
same as with SmartKey removed
from starter switch).
�
Open the fuel filler flap by pushing at
the point indicated by the arrow 1.
The fuel filler flap springs open.
�
Turn fuel cap counterclockwise and
hold on to it until possible pressure is
released.
Warning!
G
Gasoline is highly flammable and poisonous.
It burns violently and can cause serious inju-
ry. Whenever you are around gasoline, avoid
inhaling fumes and skin contact, extinguish
all smoking materials. Never allow sparks,
flame or smoking materials near gasoline!
Failure to remove the fuel cap slowly could
result in personal injury.
iIn cases where the central locking sys-
tem is not releasing the fuel filler flap,
or the opening mechanism is clamping,
notify Roadside Assistance or an au-
thorized Mercedes-Benz Center.
��
Page 307 of 489

306 OperationAt the gas station�
Take off cap and set it in the direction
of arrow 2 in the recess on the fuel fill-
er flap.
To prevent fuel vapors from escaping
into open air, fully insert filler nozzle
unit.
�
Only fill your tank until the filler nozzle
unit cuts out – do not top up or
overfill.
�
Replace fuel cap by turning it clockwise
until it audibly engages.
�
Close fuel filler flap.Warning!
G
Overfilling of the fuel tank may create
pressure in the system which could cause a
gas discharge. This could cause the gas to
spray back out when removing the fuel
pump nozzle, which could cause personal
injury.
iOnly use premium unleaded gasoline
with a minimum Posted Octane Rating
of 91 (average of 96 RON / 86 MON).
Information on gasoline quality can
normally be found on the fuel pump.
For more information on gasoline, see
“Premium unleaded gasoline”
(�page 455) or the Factory Approved
Service Products pamphlet.
iLeaving the engine running and the fuel
cap open can cause theú malfunc-
tion indicator lamp (USA only) or
the± malfunction indicator lamp
(Canada only) to illuminate.
More information can be found in the
“Practical hints” section (
�page 362).
��
Page 315 of 489

314 OperationEngine compartmentCoolant
The engine coolant is a mixture of water
and anticorrosion/antifreeze. To check
the coolant level, the vehicle must be
parked on level ground and the engine
must be cool.
The coolant expansion tank is located on
the passenger side of the engine
compartment.
1Coolant expansion tank
2Cap
�
Using a rag, turn cap 2 slowly
approximately one half turn counter-
clockwise to release any excess pres-
sure.
�
Continue turning the cap 2 counter-
clockwise and remove it.
The coolant level is correct if the level
�
for cold coolant: reaches the marking
(plastic bridge) inside the reservoir
�
for warm coolant: is approx. 0.6 in
(1.5 cm) higher
�
Add coolant as required.
�
Replace and tighten cap 2.
More information on coolant can be found
in the “Technical data” section
(
�page 457).
Warning!
G
In order to avoid any possibly serious burns:�
Use extreme caution when opening the
hood if there are any signs of steam or
coolant leaking from the cooling system,
or if the coolant temperature indicator
indicates that the coolant is overheated.
�
Do not remove pressure cap on coolant
reservoir if the coolant temperature is
above 158°F (70°C). Allow the coolant
to cool down before removing cap. The
coolant reservoir contains hot fluid and
is under pressure.
�
Using a rag, slowly open the cap approx-
imately
1/2 turn to relieve excess pres-
sure. If opened immediately, scalding
hot fluid and steam will be blown out un-
der pressure.
�
Do not spill antifreeze on hot engine
parts. Antifreeze contains ethylene gly-
col which may burn if it comes into con-
tact with hot engine parts.
Page 399 of 489
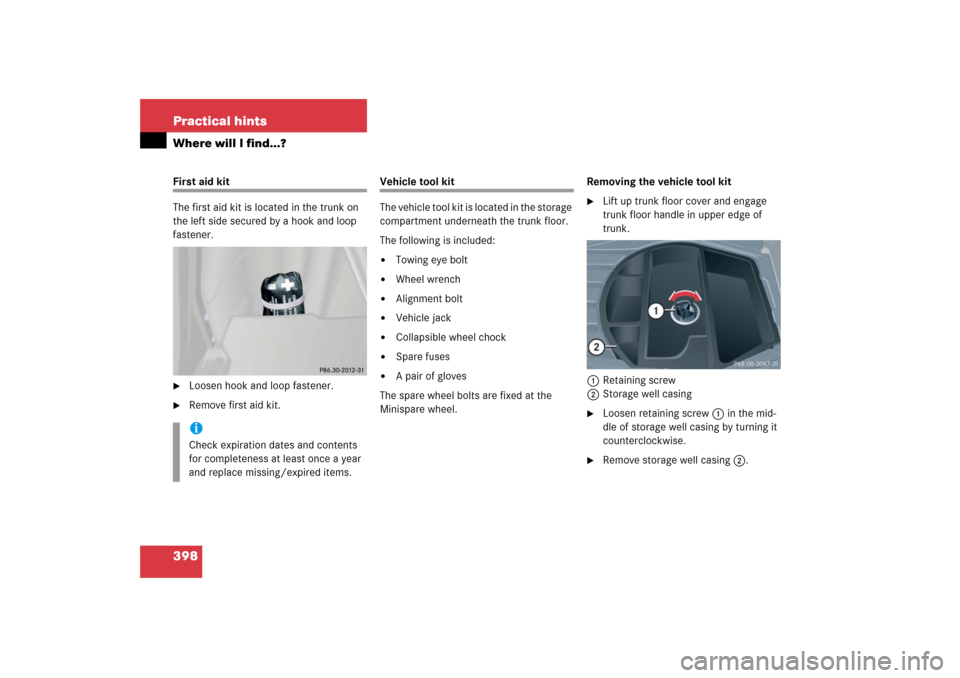
398 Practical hintsWhere will I find...?First aid kit
The first aid kit is located in the trunk on
the left side secured by a hook and loop
fastener.�
Loosen hook and loop fastener.
�
Remove first aid kit.
Vehicle tool kit
The vehicle tool kit is located in the storage
compartment underneath the trunk floor.
The following is included:�
Towing eye bolt
�
Wheel wrench
�
Alignment bolt
�
Vehicle jack
�
Collapsible wheel chock
�
Spare fuses
�
A pair of gloves
The spare wheel bolts are fixed at the
Minispare wheel.Removing the vehicle tool kit
�
Lift up trunk floor cover and engage
trunk floor handle in upper edge of
trunk.
1Retaining screw
2Storage well casing
�
Loosen retaining screw1 in the mid-
dle of storage well casing by turning it
counterclockwise.
�
Remove storage well casing2.
iCheck expiration dates and contents
for completeness at least once a year
and replace missing/expired items.
Page 400 of 489
399 Practical hints
Where will I find...?
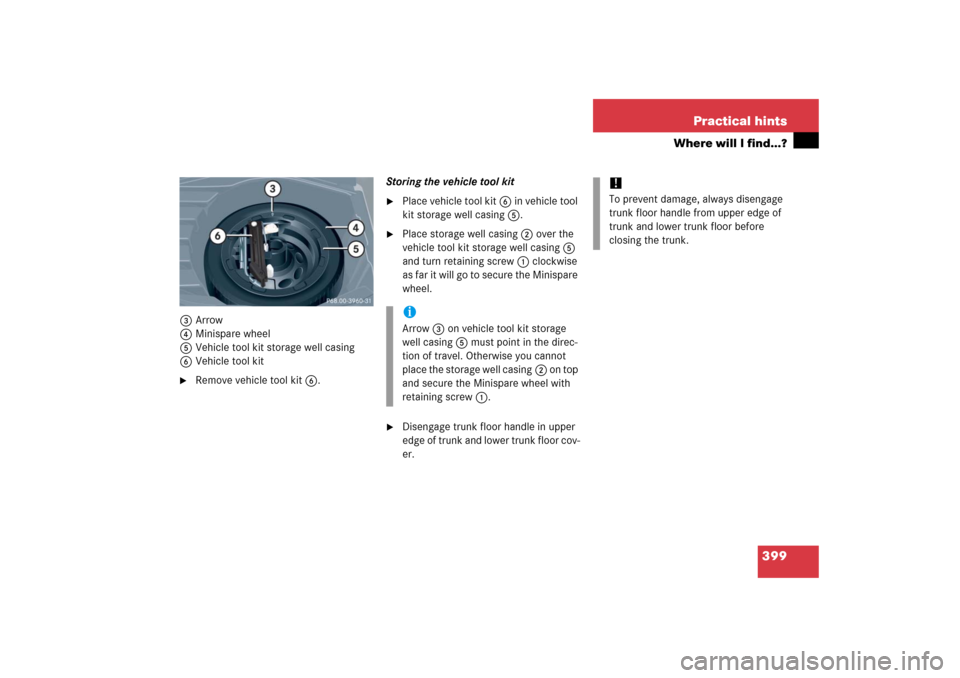
3Arrow
4Minispare wheel
5Vehicle tool kit storage well casing
6Vehicle tool kit�
Remove vehicle tool kit6.Storing the vehicle tool kit
�
Place vehicle tool kit6 in vehicle tool
kit storage well casing5.
�
Place storage well casing2 over the
vehicle tool kit storage well casing5
and turn retaining screw1 clockwise
as far it will go to secure the Minispare
wheel.
�
Disengage trunk floor handle in upper
edge of trunk and lower trunk floor cov-
er.iArrow3 on vehicle tool kit storage
well casing5 must point in the direc-
tion of travel. Otherwise you cannot
place the storage well casing2 on top
and secure the Minispare wheel with
retaining screw1.
!To prevent damage, always disengage
trunk floor handle from upper edge of
trunk and lower trunk floor before
closing the trunk.
Page 401 of 489

400 Practical hintsWhere will I find...?Vehicle jackThe vehicle jack is located in the storage
compartment underneath the trunk floor.
Storage position�
Remove vehicle jack from its
compartment.
�
Turn crank handle in direction of arrow
as far as it will go.
Operational position�
Turn crank handle clockwise.
Before storing the vehicle jack in its
compartment:
�
It should be fully collapsed.
�
The handle must be folded in (storage
position).
Warning!
G
The jack is designed exclusively for jacking
up the vehicle at the jack take-up brackets
built into both sides of the vehicle. To help
avoid personal injury, use the jack only to lift
the vehicle during a wheel change. Never
get beneath the vehicle while it is supported
by the jack. Keep hands and feet away from
the area under the lifted vehicle. Always
firmly set parking brake and block wheels
before raising vehicle with jack.
Do not disengage parking brake while the
vehicle is raised. Be certain that the jack is
always vertical (plumb line) when in use,
especially on hills. Always try to use the jack
on level surface. Make sure the jack arm is
fully seated in the jack take-up bracket.
Always lower the vehicle onto sufficient
capacity jackstands before working under
the vehicle.
Page 402 of 489
401 Practical hints
Where will I find...?
Setting up the collapsible wheel chock
The collapsible wheel chock serves to
additionally secure the vehicle, e.g. while
changing the wheel.
1Tilt the plate upward
2Fold the lower plate outward
3Insert the plate
�
Tilt both plates upward1.
�
Fold the lower plate outward2.
�
Guide the tabs of the lower plate all the
way into the openings of the base
plate3.
Minispare wheel
The Minispare wheel is located in the
storage compartment underneath the
trunk floor.
Removing the Minispare wheel�
Lift up trunk floor cover and engage
trunk floor handle in upper edge of
trunk.
�
Loosen the retaining screw in the mid-
dle of storage well casing by turning it
counterclockwise (
�page 398).
�
Remove the storage well casing
(�page 398).