Page 399 of 489
398 Practical hintsWhere will I find...?First aid kit
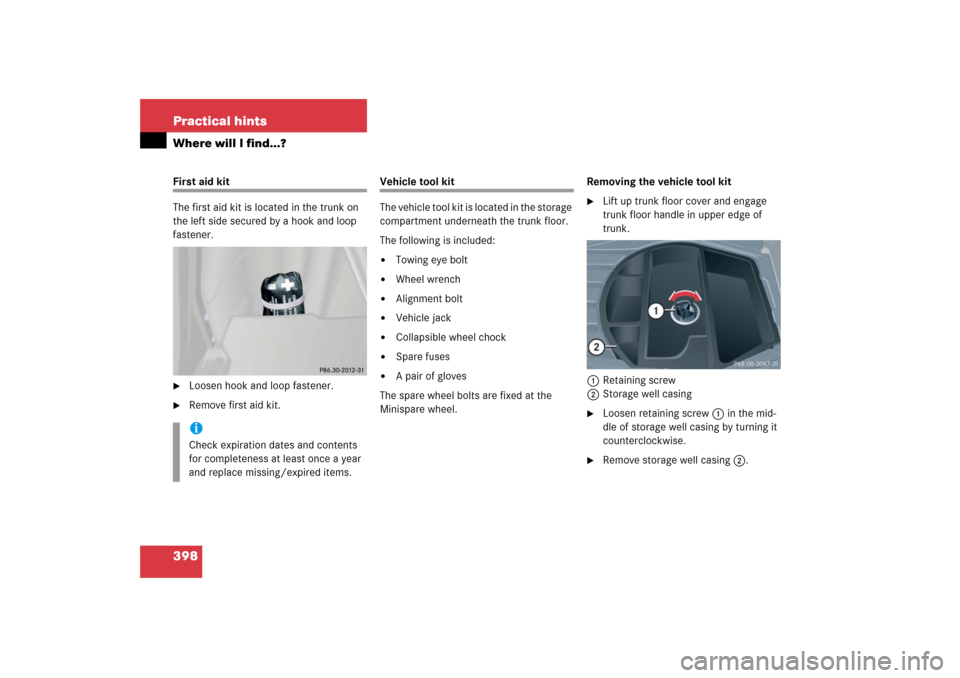
The first aid kit is located in the trunk on
the left side secured by a hook and loop
fastener.�
Loosen hook and loop fastener.
�
Remove first aid kit.
Vehicle tool kit
The vehicle tool kit is located in the storage
compartment underneath the trunk floor.
The following is included:�
Towing eye bolt
�
Wheel wrench
�
Alignment bolt
�
Vehicle jack
�
Collapsible wheel chock
�
Spare fuses
�
A pair of gloves
The spare wheel bolts are fixed at the
Minispare wheel.Removing the vehicle tool kit
�
Lift up trunk floor cover and engage
trunk floor handle in upper edge of
trunk.
1Retaining screw
2Storage well casing
�
Loosen retaining screw1 in the mid-
dle of storage well casing by turning it
counterclockwise.
�
Remove storage well casing2.
iCheck expiration dates and contents
for completeness at least once a year
and replace missing/expired items.
Page 422 of 489
.
�
Take the wheel wrench, alignment bolt,
collapsible wheel chock, and t")
421 Practical hints
Flat tire
Mounting the Minispare wheel
Preparing the vehicle
Prepare the vehicle as described
(�page 420).
�
Take the wheel wrench, alignment bolt,
collapsible wheel chock, and the jack
out of the trunk (
�page 398).
�
Take the Minispare wheel and wheel
bolts out of the trunk (
�page 401).Lifting the vehicle
�
Prevent the vehicle from rolling away
by blocking wheels with wheel chocks
or other sizeable objects.
One wheel chock is included with the
vehicle tool kit (
�page 398).
When changing wheel on a level surface:
�
Place the wheel chock in front of and
another sizeable object behind the
wheel that is diagonally opposite to the
wheel being changed.
Always try lifting the vehicle using the jack
on a level surface. However, should
circumstances require you to do so on a
hill, place the wheel chock and the other
sizeable object as follows:
�
Place the wheel chock and another
sizeable object on the downhill side
blocking both wheels of the axle not
being worked on.
Warning!
G
The jack is designed exclusively for jacking
up the vehicle at the jack take-up brackets
built into both sides of the vehicle. To help
avoid personal injury, use the jack only to lift
the vehicle during a wheel change. Never
get beneath the vehicle while it is supported
by the jack. Keep hands and feet away from
the area under the lifted vehicle. Always
firmly set parking brake and block wheels
before raising vehicle with jack.
Do not disengage parking brake while the
vehicle is raised. Be certain that the jack is
always vertical (plumb line) when in use,
especially on hills. Always try to use the jack
on level surface. Make sure the jack arm is
fully seated in the jack take-up bracket.
Always lower the vehicle onto sufficient
capacity jackstands before working under
the vehicle.
Page 424 of 489

423 Practical hints
Flat tire
Removing the wheel
1Alignment bolt�
Unscrew upper-most wheel bolt and
remove.
�
Replace this wheel bolt with alignment
bolt1 supplied in the tool kit.
�
Remove the remaining bolts.
�
Remove the wheel.Mounting the spare wheel
1Wheel bolt for light alloy rims
2Wheel bolt for Minispare wheel,
(located in trunk with Minispare wheel)
�
Clean contact surfaces of wheel and
wheel hub.
!Do not place wheel bolts in sand or dirt.
This could result in damage to the bolts
and wheel hub threads.
!Wheel bolts2 must be used when
mounting the Minispare wheel. The use
of any wheel bolts other than wheel
bolts2 for the Minispare wheel will
physically damage the vehicle’s
brakes.
!To avoid paint damage, place wheel flat
against hub and hold it there while
installing first wheel bolt.Warning!
G
Always replace wheel bolts that are
damaged or rusted.
Never apply oil or grease to wheel bolts.
Damaged wheel hub threads should be
repaired immediately. Do not continue to
drive under these circumstances! Contact
an authorized Mercedes-Benz Center or call
Roadside Assistance.
Incorrect wheel bolts or improperly tight-
ened wheel bolts can cause the wheel to
come off. This could cause an accident.
Make sure to use the correct wheel bolts.
��
Page 425 of 489
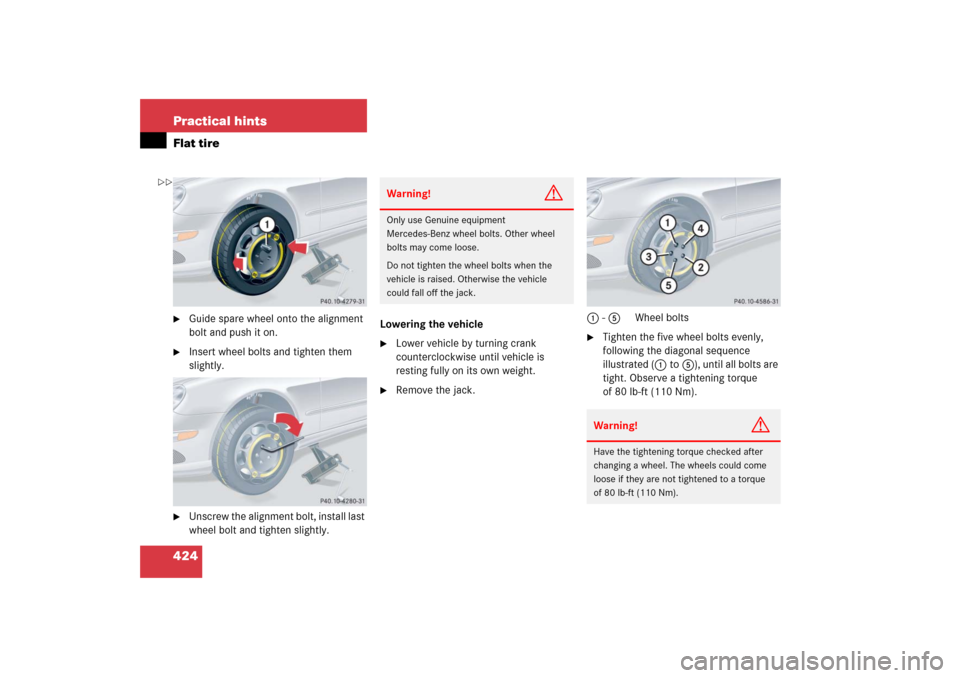
424 Practical hintsFlat tire�
Guide spare wheel onto the alignment
bolt and push it on.
�
Insert wheel bolts and tighten them
slightly.
�
Unscrew the alignment bolt, install last
wheel bolt and tighten slightly.Lowering the vehicle
�
Lower vehicle by turning crank
counterclockwise until vehicle is
resting fully on its own weight.
�
Remove the jack.1 - 5Wheel bolts
�
Tighten the five wheel bolts evenly,
following the diagonal sequence
illustrated (1to5), until all bolts are
tight. Observe a tightening torque
of 80 lb-ft (110 Nm).
Warning!
G
Only use Genuine equipment
Mercedes-Benz wheel bolts. Other wheel
bolts may come loose.
Do not tighten the wheel bolts when the
vehicle is raised. Otherwise the vehicle
could fall off the jack.
Warning!
G
Have the tightening torque checked after
changing a wheel. The wheels could come
loose if they are not tightened to a torque
of 80 lb-ft (110 Nm).
��
Page 462 of 489

Prevents the wheels from locking up
during braking so that the vehicle can
continue to be steered.
Alignment bolt
Metal pin with thread. The center")
461 Technical terms
ABS
(A
ntilock B
rake S
ystem)
Prevents the wheels from locking up
during braking so that the vehicle can
continue to be steered.
Alignment bolt
Metal pin with thread. The centering
pin is an aid used when changing a tire
to align the wheel with the wheel hub.
Accessory weight
(
�page 342)
Air pressure
(�page 342)
Aspect ratio
(�page 342)
Bar
(�page 342)
BAS
(Brake A
ssist S
ystem)
System for potentially reducing braking
distances in emergency braking situa-
tions. The system is activated when it
senses an emergency based on how
fast the brake is applied.Bead
(
�page 342)
Bi-Xenon headlamps*
Headlamps which use an electric arc as
the light source and produce a more in-
tense light than filament headlamps.
Bi-Xenon headlamps produce low
beam and high beam.
CAC
(Customer A
ssistance C
enter)
Mercedes-Benz customer service cen-
ter, which can help you with any ques-
tions about your vehicle and provide
assistance in the event of a break-
down.
CAN system
(C
ontroller A
rea N
etwork)
Data bus network serving to control ve-
hicle functions such as door locking or
windshield wiping.Cockpit
All instruments, switches, buttons and
indicator/warning lamps in the passen-
ger compartment needed for vehicle
operation and monitoring.
Cold tire inflation pressure
(
�page 342)
COMAND
(Cockpit M
anagement and D
ata Sys-
tem)
Information and operating center for
vehicle sound and communications
systems, including the radio and the
navigation system, as well as other op-
tional equipment (CD changer, tele-
phone, etc.).
Control system
The control system is used to call up
vehicle information and to change
component settings. Information and
messages appear in the multifunction
display. The driver uses the buttons on
the multifunction steering wheel to
navigate through the system and to ad-
just settings.