Page 87 of 473

86 Safety and Security
Driving safety systems
Switching off the ESP®
To improve the vehicle’s traction, turn off
the ESP® in driving situations where it
would be advantageous to have the drive
wheels spin and thus cut into surfaces for
better grip such as:
�when driving with snow chains
�in deep snow
�in sand or gravelWhen you switch off the ESP
®
�the ESP® does not stabilize the vehicle
�the engine output is not limited, which
allows the drive wheels to spin and
thus cut into surfaces for better grip
�the traction control will still brake a
spinning wheel
�the ESP® continues to operate when
you are brakingThe switch is located on the upper part of
the center console.
1ESP
® switch (off/on)
�With the engine running, Press
switch1.
The ESP
® warning lampv in the
speedometer comes on.
The ESP
® is deactivated.
Warning!G
The ESP® should not be switched off during
normal driving other than in the circum-
stances described below. Disabling of the
system will reduce vehicle stability in stan-
dard driving maneuvers.
Do not switch off the ESP
® when a Minis-
pare wheel or a collapsible tire is mounted.
!
Turn on the ESP® immediately if the
aforementioned circumstances do not
apply anymore.
i
When the ESP® is switched off and one
or more drive wheels are spinning, the
ESP
® warning lampv in the speed-
ometer flashes. However, the ESP® will
then not stabilize the vehicle.
Page 89 of 473

88 Safety and Security
Anti-theft systems
Immobilizer
The immobilizer prevents unauthorized
persons from starting your vehicle.
Activating
�Remove the SmartKey from the starter
switch.
Deactivating
�Switch on the ignition (�page 33).
Anti-theft alarm system*
Once the alarm system has been armed, a
visual and audible alarm is triggered when
someone opens
�a door
�the trunk
�the hood
The alarm will stay on even if the activating
element (e. g. a door) is immediately
closed.
The alarm system will also be triggered
when
�someone attempts to raise the vehicle
(only vehicles with tow-away alarm)
�opening the vehicle with the
mechanical key
�someone opens a door from the inside
�someone opens the trunk with the
emergency release button
i
Starting the engine will also deactivate
the immobilizer.
In case the engine cannot be started
(yet the vehicle’s battery is charged),
the system is not operational. Contact
an authorized Mercedes-Benz Center
or call 1-800-FOR-MERCedes (in the
USA), or 1-800-387-0100 (in Canada).
i
If the alarm stays on for more than
30 seconds, a call to the Response
Center is initiated automatically by the
Tele Aid system* (
�page 264)
provided Tele Aid service was
subscribed to and properly activated,
and that necessary cellular service and
GPS coverage are available.
Page 109 of 473
108 Controls in detail
Seats
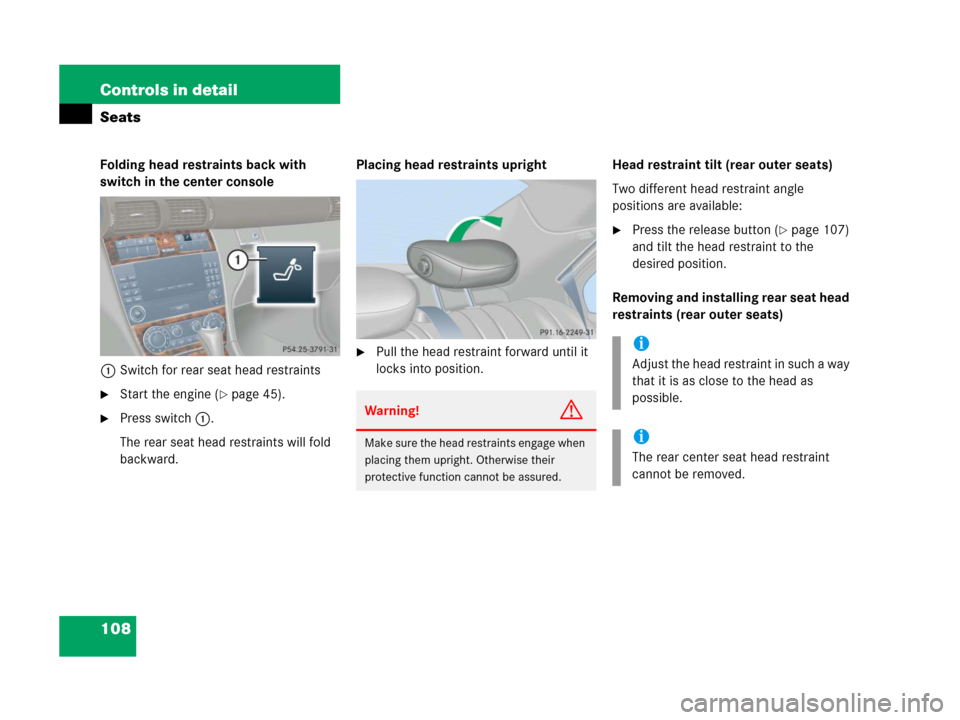
Folding head restraints back with
switch in the center console
1Switch for rear seat head restraints
�Start the engine (�page 45).
�Press switch1.
The rear seat head restraints will fold
backward.Placing head restraints upright
�Pull the head restraint forward until it
locks into position.Head restraint tilt (rear outer seats)
Two different head restraint angle
positions are available:
�Press the release button (�page 107)
and tilt the head restraint to the
desired position.
Removing and installing rear seat head
restraints (rear outer seats)
Warning!G
Make sure the head restraints engage when
placing them upright. Otherwise their
protective function cannot be assured.
i
Adjust the head restraint in such a way
that it is as close to the head as
possible.
i
The rear center seat head restraint
cannot be removed.
Page 116 of 473

115 Controls in detail
Lighting
Manual headlamp mode
The low beam headlamps and the parking
lamps can be switched on and off with the
exterior lamp switch.
Automatic headlamp mode
The following lamps switch on and off
automatically depending on the brightness
of the ambient light:
�Low beam headlamps
�Tail and parking lamps
�License plate lamps
�Side marker lamps
�Turn the exterior lamp switch to
positionU.
With the SmartKey in starter switch
position1, only the parking lamps will
switch on and off automatically.
When the engine is running, the low
beam headlamps, the tail and parking
lamps, the license plate lamps, and the
side marker lamps will switch on and
off automatically.
i
With the SmartKey removed from the
starter switch and the driver’s door
open, a warning sounds if the parking
lamps or low beam headlamps are
switched on.
The message
Switch off lights.
appears in the multifunction display
Warning!G
If the exterior lamp switch is set toU,
�the headlamps may switch off unexpect-
edly when the system senses bright
ambient light, for example light from
oncoming traffic.
�the headlamps will not be automatically
switched on under foggy conditions.
To minimize risk to you and to others,
activate headlamps by turning exterior lamp
switch toB when driving or when traffic
and / or ambient lighting conditions require
you to do so.
In low ambient lighting conditions, only
switch from positionU toB with the
vehicle at a standstill in a safe location.
Switching fromU toB will briefly
switch off the headlamps. Doing so while
driving in low ambient lighting conditions
may result in an accident.
The automatic headlamp feature is only an
aid to the driver. The driver is responsible for
the operation of the vehicle’s lights at all
times.
Page 117 of 473

116 Controls in detail
Lighting
Daytime running lamp mode
�Turn the exterior lamp switch to
positionM orU.
When the engine is running, the low beam
headlamps are switched on.
In low ambient light conditions, the
following lamps will switch on additionally:
�Tail and parking lamps
�License plate lamps
�Side marker lamps
For nighttime driving you should turn the
exterior lamp switch to positionB to
permit activation of the high beam head-
lamps.Canada only:
The daytime running lamp mode is manda-
tory and therefore in a constant mode.
When the engine is running, and you shift
from a driving position to positionN orP,
the low beam headlamps will switch off
with a three-minute delay.
When the engine is running, and you
�turn the exterior lamp switch to
positionC, the parking lamps
switch on additionally.
�turn the exterior lamp switch to
positionB, the manual headlamp
mode has priority over the daytime
running lamp mode.
The corresponding exterior lamps
switch on (
�page 114).USA only:
By default, the daytime running lamp mode
is deactivated. Activate the daytime
running lamp mode using the control
system, see “Set daytime running lamp
mode (USA only)” (
�page 144).
When the engine is running, and you turn
the exterior lamp switch to positionC
orB, the manual headlamp mode has
priority over the daytime running lamp
mode.
The corresponding exterior lamps switch
on (
�page 114).
i
With the daytime running lamp mode
activated and the exterior lamp switch
in positionM, the high beam head-
lamps cannot be switched on.
The high beam flasher is available at all
times.
Page 121 of 473

120 Controls in detail
Lighting
Interior lighting
The controls are located in the overhead
control panel.
1Rear interior lights on/off
2Right front reading lamp on/off
3Rocker switch for automatic control
system
4Left front reading lamp on/offDeactivating automatic control
�Press the= symbol on rocker
switch3.
The interior lighting remains switched
off in darkness, even when you
�unlock the vehicle
�open a door
�remove the SmartKey from the
starter switchActivating automatic control
�Press rocker switch3 to center
position.
The interior lighting switches on in
darkness, when you
�unlock the vehicle
�open a door
�remove the SmartKey from the
starter switch
The interior lighting switches off after a
preset time (
�page 147).
!
Leaving an interior light switch in the
ON position for extended periods of
time with the engine turned off could
result in a discharged battery.
i
If the door remains open, the interior
lamps switch off automatically after
approximately 5 minutes, when the
SmartKey is removed or in starter
switch position0.
An interior lamp switched on manually
does not go out automatically.
Page 124 of 473
.
Trip odometer
�Make sure you are viewing")
123 Controls in detail
Instrument cluster
Coolant temperature gauge
The coolant temperature gauge is on the
left side in the instrument cluster
(
�page 24).
Trip odometer
�Make sure you are viewing the trip
odometer and main odometer in the
multifunction display (
�page 125).
�If it is not displayed, press buttonè
orÿ on the multifunction steering
wheel (
�page 126) until the trip
odometer appears in the multifunction
display.
�Press and hold the reset button in the
instrument cluster (
�page 122) until
the trip odometer is reset.
Warning!G
�Driving when your engine is badly
overheated can cause some fluids which
may have leaked into the engine
compartment to catch fire. You could be
seriously burned.
�Steam from an overheated engine can
cause serious burns and can occur just
by opening the hood. Stay away from
the engine if you see or hear steam com-
ing from it.
Turn off the engine, get out of the vehicle
and do not stand near the vehicle until the
engine has cooled down.
!
Excessive coolant temperature triggers
a warning in the multifunction display
(
�page 368).
The engine should not be operated with
the coolant temperature above 248°F
(120°C). Doing so may cause serious
engine damage which is not covered by
the Mercedes-Benz Limited Warranty.
i
During severe operating conditions,
e.g. stop-and-go traffic, the coolant
temperature may rise close to 248°F
(120°C).
Page 125 of 473
 denotes excessive engine
speed.
To help protect the engine, the fuel supply
is interrupted if the")
124 Controls in detail
Instrument cluster
Tachometer
The red marking on the tachometer
(
�page 24) denotes excessive engine
speed.
To help protect the engine, the fuel supply
is interrupted if the engine is operated
within the red marking.
Outside temperature indicator
The outside temperature is indicated in the
multifunction display (
�page 125).The temperature sensor is located in the
front bumper area. Due to its location, the
sensor can be affected by road or engine
heat during idling or slow driving. There-
fore, the accuracy of the displayed temper-
ature can only be verified by comparison to
a thermometer placed next to the sensor,
not by comparison to external displays
(e.g. bank signs, etc.).
When moving the vehicle into colder ambi-
ent temperatures (e.g. when leaving your
garage), you will notice a delay before the
lower temperature is displayed.
A delay also occurs when ambient temper-
atures rise. This prevents inaccurate tem-
perature indications caused by heat
radiated from the engine during idling or
slow driving.
!
Avoid driving at excessive engine
speeds, as it may result in serious
engine damage that is not covered by
the Mercedes-Benz Limited Warranty.
Warning!G
The outside temperature indicator is not de-
signed to serve as an ice-warning device and
is therefore unsuitable for that purpose.
Indicated temperatures just above the freez-
ing point do not guarantee that the road sur-
face is free of ice. The road may still be icy,
especially in wooded areas or on bridges.