Page 365 of 473

364 Practical hints
What to do if …
Display messagePossible cause/consequencePossible solution
Run Flat Indicator
inactive
The Run Flat Indicator* is malfunc-
tioning.�Have the Run Flat Indicator* checked by an
authorized Mercedes-Benz Center.
Check tires
Then reactivate
Run Flat Indicator
There was a warning message about
a loss in tire inflation pressure and
the Run Flat Indicator* has not been
reactivated yet.�Make sure that the correct tire inflation pressure
is set for each tire.
�Then reactivate the Run Flat Indicator*.
Run Flat Indicator
unavailable
The Run Flat Indicator* has been
switched off due to an error.�Have the Run Flat Indicator* checked by an
authorized Mercedes-Benz Center.
Tire pressure
Check tires
The Run Flat Indicator* indicates
that the pressure is too low in one or
more tires.�Carefully bring the vehicle to a halt, avoiding
abrupt steering and braking maneuvers. Observe
the traffic situation around you.
�Check and adjust the tire inflation pressure as
required (
�page 317).
�If necessary, change the wheel (�page 404).
�Reactivate the Run Flat Indicator* after adjusting
the tire inflation pressure values (
�page 319).
Warning!G
Do not drive with a flat tire. A flat tire affects
the ability to steer or brake the vehicle.
You may lose control of the vehicle. Contin-
ued driving with a flat tire will cause exces-
sive heat build-up and possibly a fire.
Page 379 of 473
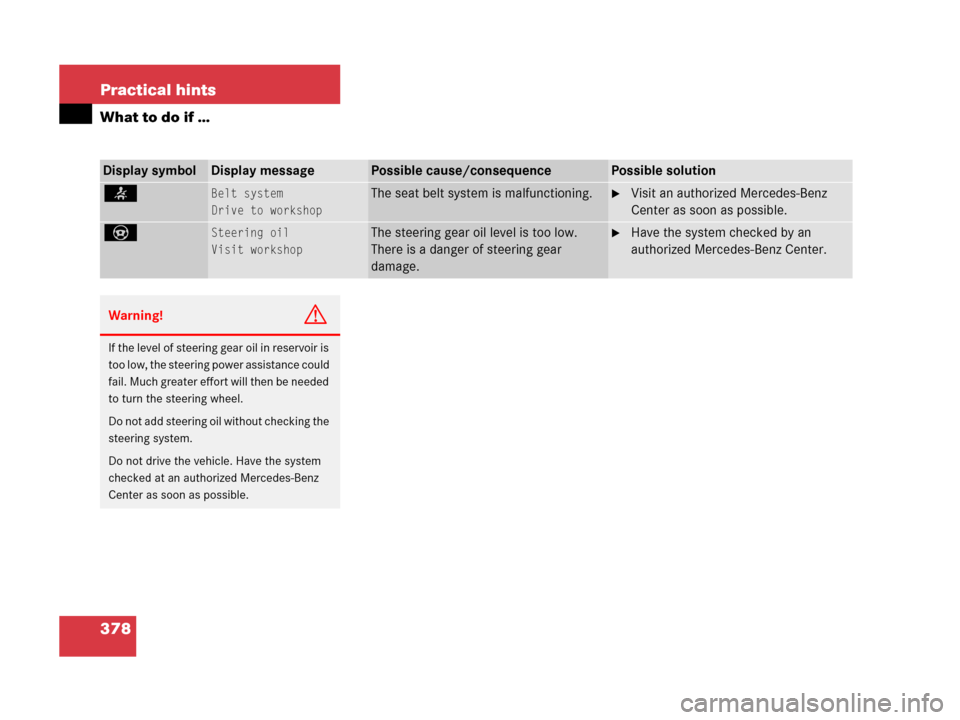
378 Practical hints
What to do if …
Display symbolDisplay messagePossible cause/consequencePossible solution
Drive to workshopThe seat belt system is malfunctioning.�Visit an authorized Mercedes-Benz
Center as soon as possible.
_Steering oil
Visit workshopThe steering gear oil level is too low.
There is a danger of steering gear
damage.�Have the system checked by an
authorized Mercedes-Benz Center.
Warning!G
If the level of steering gear oil in reservoir is
too low, the steering power assistance could
fail. Much greater effort will then be needed
to turn the steering wheel.
Do not add steering oil without checking the
steering system.
Do not drive the vehicle. Have the system
checked at an authorized Mercedes-Benz
Center as soon as possible.
Page 380 of 473

379 Practical hints
What to do if …
Display symbolDisplay messagePossible cause/consequencePossible solution
KClose slid./pop-up
sunroofYou have opened the driver’s door with
the SmartKey removed from the starter
switch and the sliding portion of the
tilt/sliding sunroof open.�Close the tilt/sliding sunroof
(
�page 242).
JClose slid./pop-up
sunroofYou have opened the driver’s door with
the SmartKey removed from the starter
switch and the tilting portion of the
tilt/sliding sunroof open.�Close the tilt/sliding sunroof
(
�page 242).
LTele Aid malfunction.
Drive to workshopOne or more main functions of the Tele
Aid system* are malfunctioning.�Have the Tele Aid system* checked by
an authorized Mercedes-Benz Center.
tFunction unavailableThis display appears if buttont
ors on the multifunction steering
wheel is pressed and the vehicle is not
equipped with a telephone*.
ÊTrunk openYou are attempting to drive with the trunk
open.�Close the trunk.
WWasher fluid
please refillThe fluid level has dropped to
about1/3of total reservoir capacity.
�Add washer fluid (�page 304).
Page 381 of 473
380 Practical hints
Where will I find ...?
First aid kit
The first aid kit is located in the trunk on
the left side secured by a hook and loop
fastener.
1First aid kit
2Hook and loop fastener
�Unfasten hook and loop fastener2.
�Remove first aid kit1.
Vehicle tool kit
The vehicle tool kit is located in the storage
compartment underneath the trunk floor.
The following is included:
�Towing eye bolt
�Wheel wrench
�Alignment bolt
�Vehicle jack
�Spare fuses
�Valve extractor
�Protective wrap
�Collapsible wheel chock
�A pair of gloves Removing the vehicle tool kit
�Lift up trunk floor cover and engage
trunk floor handle in upper edge of
trunk.
1Spare wheel with collapsible tire
2Vehicle tool kit (under collapsible tire)
3Retaining screw
�Loosen retaining screw3 by turning it
counterclockwise.
�Remove collapsible tire1.
�Remove vehicle tool kit2.
i
Check expiration dates and contents
for completeness at least once a year
and replace missing/expired items.
Page 382 of 473

381 Practical hints
Where will I find ...?
1Vehicle jack
2Collapsible wheel chock and spare
wheel bolts
3Towing eye bolt
4Alignment bolt
5Wheel wrench
6Spare fuses and valve extractor
7Electric air pumpVehicle jackThe vehicle jack is located in the storage
compartment underneath the trunk floor.
Storage position
�Turn crank handle in the direction of ar-
row as far as it will go.
Warning!G
The jack is designed exclusively for jacking
up the vehicle at the jack take-up brackets
built into both sides of the vehicle. To help
avoid personal injury, use the jack only to lift
the vehicle during a wheel change. Never
get beneath the vehicle while it is supported
by the jack. Keep hands and feet away from
the area under the lifted vehicle. Always
firmly set parking brake and block wheels
before raising vehicle with jack.
Do not disengage parking brake while the
vehicle is raised. Be certain that the jack is
always vertical (plumb line) when in use,
especially on hills. Always try to use the jack
on level surface. Make sure the jack arm is
fully seated in the jack take-up bracket.
Always lower the vehicle onto sufficient
capacity jackstands before working under
the vehicle.
Page 383 of 473
382 Practical hints
Where will I find ...?
�Turn crank handle clockwise.
Before storing the vehicle jack in its
compartment:
�It should be fully collapsed.
�The handle must be folded in (storage
position).Setting up the collapsible wheel chock
The collapsible wheel chock serves to
additionally secure the vehicle, e.g. while
changing the wheel.
1Tilt the plate upward
2Fold the lower plate outward
3Insert the plate
�Tilt both plates upward1.
�Fold the lower plate outward2.
�Guide the tabs of the lower plate all the
way into the openings of the base
plate3.
Page 384 of 473

383 Practical hints
Where will I find ...?
Spare wheel
The spare wheel with collapsible tire is lo-
cated in the storage compartment under-
neath the trunk floor.
�Lift up trunk floor cover and engage
trunk floor handle in upper edge of
trunk.
1Spare wheel with collapsible tire
2Vehicle tool kit (under collapsible tire)
3Retaining screwRemoving the spare wheel
�Loosen retaining screw3 by turning it
counterclockwise.
�Remove spare wheel1.
Storing the spare wheel
If you wish to store the spare wheel after
use, carry out the following steps.
Otherwise the spare wheel will not fit the
storage compartment.
�Unscrew the valve cap from the valve
of the collapsible tire.
�Take the valve extractor from the
vehicle tool kit (
�page 381).
�Unscrew the valve insert from the valve
and allow the air to escape.
�Screw the valve insert back into the
valve.
�Screw the valve cap back on the valve.
�Pull the protective wrap provided with
the vehicle tool kit over the spare
wheel.
�Store the spare wheel and the valve ex-
tractor in the storage compartment un-
derneath the trunk floor.
!
Make sure the spare wheel is dry when
storing it.
i
It may take a few minutes for the col-
lapsible tire to deflate completely.
��
Page 385 of 473

384 Practical hints
Where will I find ...?
�Pierce the protective wrap with
retaining screw3.
�Secure the spare wheel by turning re-
taining screw3 clockwise.In case of a flat tire, you may temporarily
use the spare wheel with collapsible tire
when observing the following restrictions:
�Do not exceed a vehicle speed of
50 mph (80 km/h).
�Drive to the nearest tire repair facility
to have the flat tire repaired or
replaced as appropriate.
�Do not operate vehicle with more than
one spare wheel mounted.
For more information, see “Rims and Tires”
(
�page 429).
!
To prevent damage, always disengage
trunk floor handle from upper edge of
trunk and lower trunk floor before
closing the trunk.
Warning!G
The dimensions of the spare wheel with
collapsible tire are different from those of
the road wheels. As a result, the vehicle han-
dling characteristics change when driving
with a spare wheel mounted.
The spare wheel with collapsible tire should
only be used temporarily, and should be re-
placed with a regular road wheel as quickly
as possible.
��