Page 305 of 601
AUDIO
284(b) Manual program selection
“Program” button: Push the “” or “” (DISC/CH/PROG)
button to select the other side of a cassette tape. The screen
indicates which side is currently selected. (“
” indicates the
top side, “” indicates the bottom side.)
“Rewind” button: Push the “” (TUNE/TRACK) button to
rewind a tape. “REW” appears on the display.
To stop rewinding, push the same button.
“Fast forward” button: Push the “
” (TUNE/TRACK) button
to fast forward a cassette tape. “FF” appears on the display.
To stop fast forwarding, push the same button.
Page 306 of 601

AUDIO
285
(c) Automatic program selection
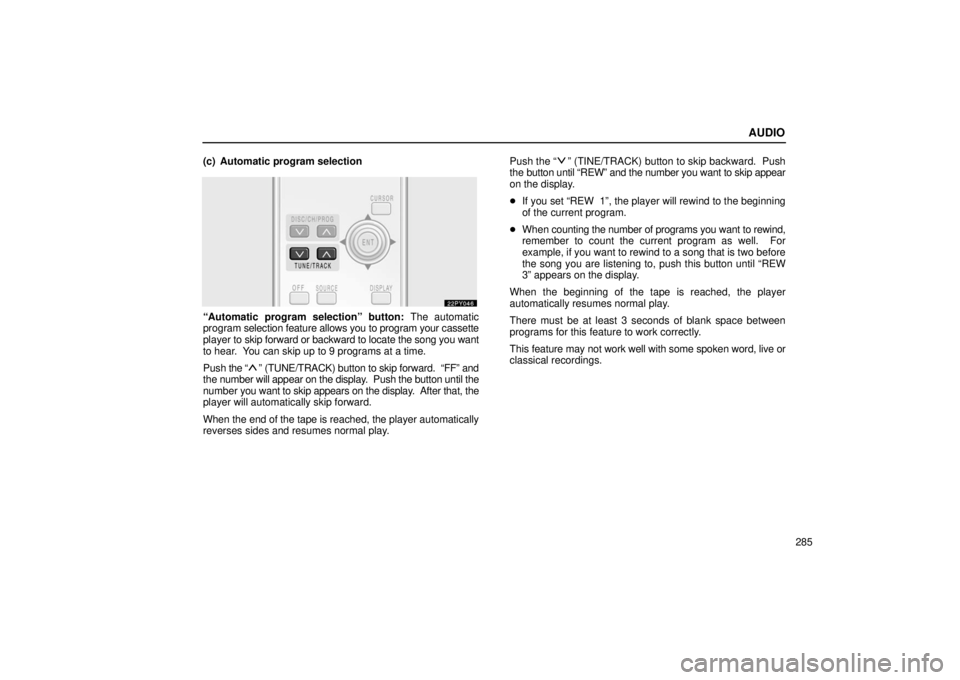
“Automatic program selection” button:
The automatic
program selection feature allows you to program your cassette
player to skip forward or backward to locate the song you want
to hear. You can skip up to 9 programs at a time.
Push the “
” (TUNE/TRACK) button to skip forward. “FF” and
the number will appear on the display. Push the button until the
number you want to skip appears on the display. After that, the
player will automatically skip forward.
When the end of the tape is reached, the player automatically
reverses sides and resumes normal play. Push the “
” (TINE/TRACK) button to skip backward. Push
the button until “REW” and the number you want to skip appear
on the display.
� If you set “REW 1”, the player will rewind to the beginning
of the current program.
� When counting the number of programs you want to rewind,
remember to count the current program as well. For
example, if you want to rewind to a song that is two before
the song you are listening to, push this button until “REW
3” appears on the display.
When the beginning of the tape is reached, the player
automatically resumes normal play.
There must be at least 3 seconds of blank space between
programs for this feature to work correctly.
This feature may not work well with some spoken word, live or
classical recordings.
Page 307 of 601
AUDIO
286
CD player operation
(a) Playing a CD
Using joy stick and the “ENT” button to select the CD
mode.
“CD” appears on the display.
The CDs set in the player are played continuously, starting with
the last CD you inserted. The CD number of the CD currently
being played, the track number and the time from the beginning
of the program appear on the display.
When play of one CD ends, the first track of the following CD
starts. When play of the final CD ends, play of the first CD
starts again.
The player will skip any empty CD trays. (b) Selecting a desired CD
Searching for a desired CD:
Push the “” and “”
(DISC/CH/PROG) button to select the CD number.
Push the button several times until the desired CD number
appears on the display. When you release the button, the
player will start playing the selected CD from the first track.
Page 318 of 601

AUDIO
297
DVD video/DVD audio player operation
NOTE: The playback condition of some DVD discs may be
determined by a DVD software producer . This DVD player
plays a disc as the software producer intended. So, some
functions may not work properly. Be sure to read the
instruction manual for the DVD disc separately provided.
For the detailed information about DVD video discs, see
“DVD video disc information” on page 326.
Precautions for DVD video discs
When recording on a DVD video, DVD audio, video CD or
audio tracks may not record in some cases while the menu is
displayed. As audio will not play in this case, verify that the
video tracks are playing and then activate playback.
When playback of a disc is completed:
� If an audio CD is playing, the first track starts.
� If a DVD video, DVD audio or video CD is playing, playback
will stop or the menu screen will be displayed.
The title/chapter number and playback time display may not
appear while playing back certain DVD video discs.CAUTION
Conversational speech on some DVDs is recorded at a
low volume to emphasize the impact of sound effects.
If you adjust the volume assuming that the
conversations represent the maximum volume level
available for the DVD, you may be startled by louder
sound effects or when you change to a different audio
source. Loud sounds may have a significant impact on
the human body or pose a driving hazard. Keep this in
mind when you adjust the volume.
Page 323 of 601
AUDIO
302To display the searching title (DVD video) or group (DVD
audio) screen, push the “Search” switch on
the screen or
the “SEARCH” button on the remote control.
�1For DVD video2For DVD audio
DVD video: Select the title number by using the “�”, “+”
and “+10” switches and push the “Enter” switch to enter
the number. The player starts playing disc for that title
number. The selected title number will appear on the
screen.
Push the “Back” switch to return to the menu screen.
DVD audio: Enter the group number by using the “�” and
“+” switches. The selected group number will appear on
the screen. Push the “Enter” switch. The player starts
playing the disc from the entered group number.
Push the “Back” switch to return to the previous screen.
Page 335 of 601
AUDIO
314(q) Setting the display mode
Each time you push the “Display Mode” switch on the
“Setup
Menu 2” screen, the display mode is changed from
wide mode to auto mode. (r) Language code list
Code
Language
1001Japanese
0514English
0618French
0405German
0920Italian
0519Spanish
2608Chinese
1412Dutch
1620Portuguese
1922Swedish
1821Russian
111 5Korean
0512Greek
0101Afar
0102Abkhazian
0106Afrikaans
0113Amharic
0118Arabic
0119Assamese
0125Aymara
Page 339 of 601
AUDIO
318(s) Selecting the chapter/track
To select the chapter/track, push the “” or “”
(TUNE/TRACK) button on the remote control until the
number of the chapter/track you want to select appears on
the screen. (t) Using the control screen�1For DVD video2For DVD audio
When playing a disc, push the “DVD” button on the remote
control. The control screen will appear on the screen.
Details of the specific switches, controls and features are
described below.
“PICTURE” switch: Push the “PICTURE” switch to turn off the
control screen and return to the picture previously displayed.
“RPT” switch (DVD aud io only): Push the “RPT” switch while
the track is playing. When the track ends, it will automatically
replay. To turn off the repeat feature, push this switch again.
“RAND” switch (DVD audio only): Push the “RAND” switch.
The player will play the tracks on the disc in random order. To
turn off the random feature, push this switch again.
Page 340 of 601
AUDIO
319
“SCAN”
switch (DVD audio only): Push the “SCAN” switch.
The player will scan all the tracks on the disc you are listening
to. To stop scanning, push this switch again. If the player
scanned all the tracks on the disc, it will stop scanning.
“
” and “” switches: Push and hold the “” or
“
” switch to fast forward or reverse a disc. When you
release the switch, the DVD player will resume playing. (u) Error messages
If the player malfunctions, your audio system will display
following error messages.
If “DISC CHECK” appears on the screen:
It indicates that the
disc is dirty, damaged or it was inserted upside down. Clean
the disc or insert it correctly.
If “REGION CODE ERROR” appears on the screen: It
indicates that the DVD region code is not set properly.
If “DVD ERROR” appears on the screen: There is a problem
inside the player. Eject the disc. Set the disc again.
If the malfunction still exists, take your vehicle to your Lexus
dealer.