Page 216 of 442

AUDIO
ccii
1Ejecting a CD
(See page ccxii for details.)
2Function buttons
1 — 6: Station selector buttons
(See page ccviii for details.)
SCAN: Scan tuning
(See page ccix for details.)
P.SCAN: Preset scan tuning
(See page ccix for details.)
3Display of functions in TAPE or CD mode
:DOLBY NR
(See page ccx for details.)
�� : Rewinding or reversing
(See page ccx or ccxvi for details.)
�� : Fast forwarding
(See page ccx or ccxvi for details.)
RPT: Automatic repeat
(See page ccxi or ccxvi for details.)
:CD selection
(See page ccxiv for details.)
RAND: Random access
(See page ccxvii for details.)
SCAN: Scan selection
(See page ccxv for details.)
4CD slot
(See page ccxii for details.)
5Automatic Sound Levelizer (ASL)/Mute
(See page cciv or ccvi for details.)
6TUNE/AUDIO CONTROL knob
(See page ccv for details.)
7 ��:Side change
(See page ccx for details.)
8Mode selectors
(See page cciv for details.)
9Stopping and ejecting a cassette tape
(See page ccix for details.)
10Turning the system on and adjusting the volume
(See page cciii for details.)
11Cassette tape slot
(See page ccix for details.)
12Radio mode: Seek tuning
(See page ccviii for details.)
TAPE mode: Direct access to a desired program
(See page ccxi for details.)
CD mode: Direct access to a desired program
(See page ccxvi for details.)
Page 222 of 442

AUDIO
ccviii(b) Presetting a station
1. Tune in the desired station.
2. Push one of the station selector buttons (1 — 6) and
hold it until a beep is heard. This sets the station to the
button and the button number (1 — 6) appears on the
display.
Each
button can store one AM station and two FM stations. To
change the preset station to a different one, follow the same
procedure.
The preset station memory is cancelled when the power
source is interrupted by battery disconnection or a blown fuse. (c) Selecting a station
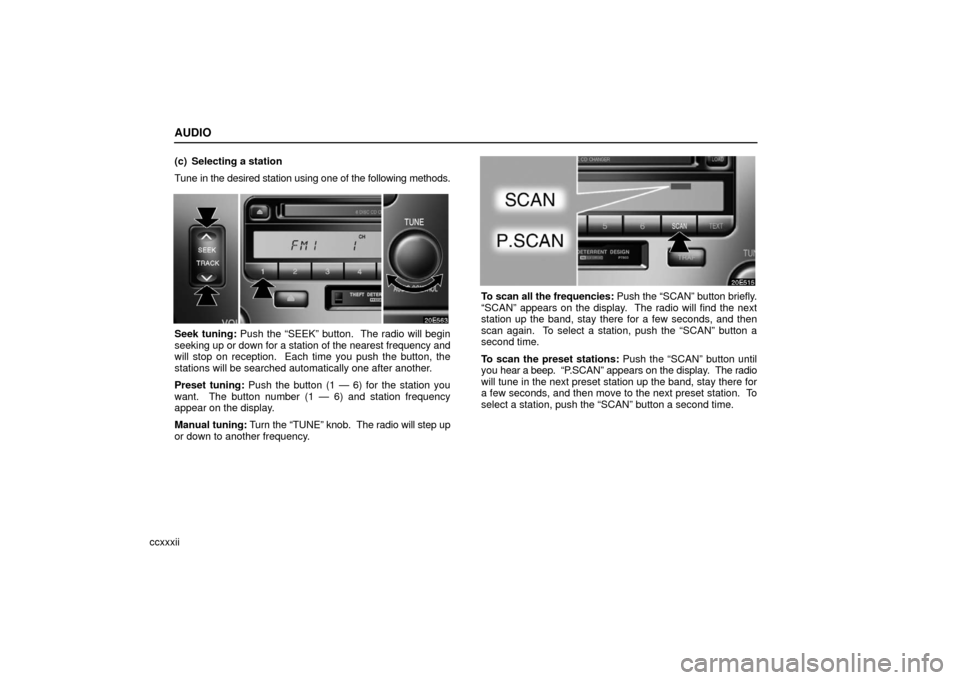
Tune in the desired station using one of the following methods.
Seek tuning: Push the “SEEK” button. The radio will begin
seeking up
or down for a station of the nearest frequency and
will stop on reception. Each time you push the button, the
stations will be searched automatically one after another.
Preset tuning: Push the button (1 — 6) for the station you
want. The button number (1 — 6) and station frequency
appear on the display.
Manual tuning: Turn the “TUNE” knob. The radio will step up
or down to another frequency.
Page 223 of 442

AUDIO
ccix
To scan all the frequencies: Push the “SCAN” button briefly.
“SCAN” appears on the display. The radio will find the next
station up the band, stay there for a few seconds, and then
scan again. To select a station, push the “SCAN” button a
second time.
To scan the preset stations: Push the “P.SCAN” button.
“P.SCAN” appears on the display. The radio will tune in the
next preset station up the band, stay there for a few seconds,
and then move to the next preset station. To select a station,
push the “P.SCAN” button a second time.
Cassette tape player operation
(a) Playing a cassette tape
When you insert a cassette tape, the exposed tape should
face to the right.
The player will automatically start when you insert a cassette
tape. At this time, “TAPE” appears on the display.
If a metal or chrome equivalent cassette tape is put in the
cassette player, the player will automatically recognize it and
“METAL” appears on the display.
To stop or eject the cassette tape, push the “EJECT” button.
Auto�reverse feature: After the cassette player reaches the
end of a tape, it automatically reverses and begins to play the
other side, regardless of whether the cassette was playing or
fast forwarding.
Page 231 of 442

AUDIO
ccxvii
(g) Random playing
“RAND” button: There are 2 random features — you can
either
listen to the tracks on all the CDs in the player in random
order, or only listen to the tracks on a specific CD in random
order.
Random playing for the tracks on a CD: Push the “RAND”
button briefly. “RAND” will appear on the display and play the
CD you are listening to in random order.
Random playing for all the tracks in the CD changer (with
a CD changer only): Push the “RAND” button and hold it until
you hear a beep. “D.RAND” will appear on the display and the
player will perform all the tracks on all the CDs in the changer
in random order. To turn off the random feature, push “RAND”
a second time.
When a track is skipped or the system is inoperative, push the
button to reset. (h) If the player malfunctions
If the player or another unit equipped with the player
malfunctions, your audio system will display following error
messages.
If “WAIT” appears on the display:
It indicates that the inside
of the player unit may be too hot due to the very high ambient
temperature. Remove the CD from the player and allow the
player to cool down.
If “ERROR 1” appears on the display: It indicates that the CD
is dirty, damaged, or it was inserted up− side down. Clean the
CD or insert it correctly.
If “ERROR 3” or “ERROR 4” appears on the display: It
indicates there is a trouble inside the system. Eject the CD.
If the malfunction is not rectified: Take your vehicle to your
Lexus dealer.
Page 232 of 442

AUDIO
ccxviii
Audio remote controls
The switches are installed on the left side of the steering wheel.
“MODE” switch: Use this switch to turn on or off the audio
system, or change the audio mode.
�To turn on the system, push the switch briefly. To turn off the
system, push and hold the switch until you hear a beep.
� To change the audio mode, turn on the system and push the
switch briefly. If a tape or CD is not inserted, the “T APE” or
“CD” mode is skipped.
“�
+” switch: Use this switch to adjust the volume.
To increase the volume, push the “+” side. To decrease the
volume, push the “–” side. The volume continues to increase
or decrease while the switch is being pressed. (a) When the radio mode is selected
“
” switch: Use this switch for seek tuning or to select a
preset station.
� To select a preset station, push this switch briefly. The
station you assigned to a switch on the audio system will be
selected.
� To seek a station, push and hold this switch until you hear
a beep. The radio will begin seeking up or down for a station,
and will stop on reception.
(b) When the “TAPE” mode is selected
“
” switch: Use this switch to fast forward or rewind the
tape or for automatic program selection.
� To skip forward or reward for automatic program selection,
push this switch briefly. When automatically selecting a
program, you can skip up to 9 programs at a time. See page
ccxi for details.
� To fast forward or rewind the tape, push this switch until you
hear a beep. To stop fast forwarding or rewinding, push the
same side on the switch briefly.
Page 245 of 442
AUDIO
ccxxxi
Turn this knob to the right to step up the station band or
to the left to step down.
Your radio automatically changes to stereo reception when a
stereo broadcast is received. “ST” appears on the display. If
the signal becomes weak, the radio reduces the amount of
channel separation to prevent the weak signal from creating
noise. If the signal becomes extremely weak, the radio
switches from stereo to mono reception. In this case, “ST”
disappears from the display.(b) Presetting a station
1. Tune in the desired station.
2. Push one of the station selector buttons (1 — 6) and
hold it until a beep is heard. This sets the station to the
button and the button number (1 — 6) appears on the
display.
Each
button can store one AM station and two FM stations. To
change the preset station to a different one, follow the same
procedure.
The preset station memory is cancelled when the power
source is interrupted by battery disconnection or a blown fuse.
Page 246 of 442

AUDIO
ccxxxii(c) Selecting a station
Tune in the desired station using one of the following methods.
Seek tuning: Push the “SEEK” button. The radio will begin
seeking up
or down for a station of the nearest frequency and
will stop on reception. Each time you push the button, the
stations will be searched automatically one after another.
Preset tuning: Push the button (1 — 6) for the station you
want. The button number (1 — 6) and station frequency
appear on the display.
Manual tuning: Turn the “TUNE” knob. The radio will step up
or down to another frequency.
To scan all the frequencies: Push the “SCAN” button briefly.
“SCAN” appears on the display. The radio will find the next
station up the band, stay there for a few seconds, and then
scan again. To select a station, push the “SCAN” button a
second time.
To scan the preset stations: Push the “SCAN” button until
you hear a beep. “P .SCAN” appears on the display . The radio
will tune in the next preset station up the band, stay there for
a few seconds, and then move to the next preset station. To
select a station, push the “SCAN” button a second time.
Page 250 of 442

AUDIO
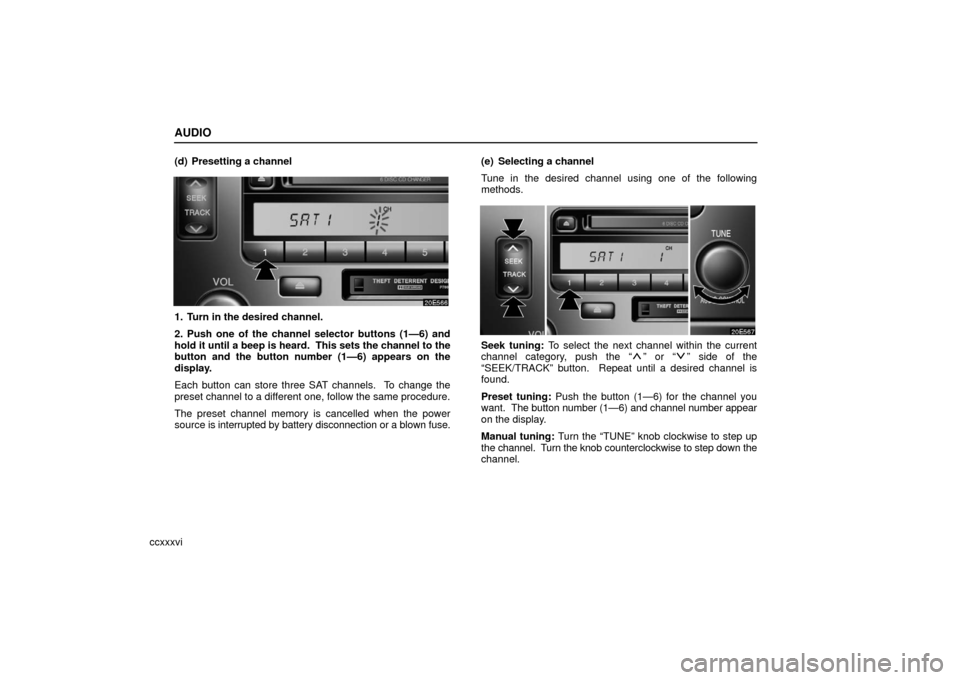
ccxxxvi(d) Presetting a channel
1. Turn in the desired channel.
2. Push one of the channel selector buttons (1—6) and
hold it until a beep is heard. This sets the channel to the
button and the button number (1—6) appears on the
display.
Each button can store three SAT channels. To change the
preset channel to a different one, follow the same procedure.
The preset channel memory is cancelled when the power
source is interrupted by battery disconnection or a blown fuse.
(e) Selecting a channel
Tune in the desired channel using one of the following
methods.
Seek tuning: To select the next channel within the current
channel category, push the “” or “” side of the
“SEEK/TRACK” button. Repeat until a desired channel is
found.
Preset tuning: Push the button (1—6) for the channel you
want. The button number (1—6) and channel number appear
on the display.
Manual tuning: Turn the “TUNE” knob clockwise to step up
the channel. Turn the knob counterclockwise to step down the
channel.