2006 JEEP LIBERTY child restraint
[x] Cancel search: child restraintPage 66 of 424

kits or retro-fit kits. You are urged to take advantage of all
the available attachments provided with your child re-
straint in any vehicle.
NOTE: When using the LATCH attaching system to
install a child restraint, please ensure that all seat belts
not being used for occupant restraints are stowed and out
of reach of children. It is recommended that before
installing the child restraint, buckle the seat belt so the
seat belt is tucked behind the child restraint and out of
reach. If the buckled seat belt interferes with the child
restraint installation, instead of tucking the seat belt
behind the child restraint, route the seat belt through the
child restraint belt path and then buckle it. This should
stow the seat belt out of the reach of an inquisitive child.
Remind all children in the vehicle that the seat belts are
not toys and should not be played with, and never leave
your child unattended in the vehicle. All three rear seating positions have lower anchorages
that are capable of accommodating LATCH-compatible
child seats having flexible, webbing-mounted lower at-
tachments. Child seats with fixed lower attachments
must be installed in the outboard positions only. Regard-
less of the specific type of lower attachment,
NEVER
install LATCH-compatible child seats such that two seats
share a common lower anchorage. If installing child seats
in adjacent rear-seating positions or if your child re-
straints are not LATCH-compatible, install the restraints
using the vehicle’s seat belts.
Installing the LATCH-Compatible Child Restraint
System
We urge that you carefully follow the directions of the
manufacturer when installing your child restraint. Not all
child restraint systems will be installed as described here.
Again, carefully follow the installation instructions that
were provided with the child restraint system.
66 THINGS TO KNOW BEFORE STARTING YOUR VEHICLE
Page 67 of 424
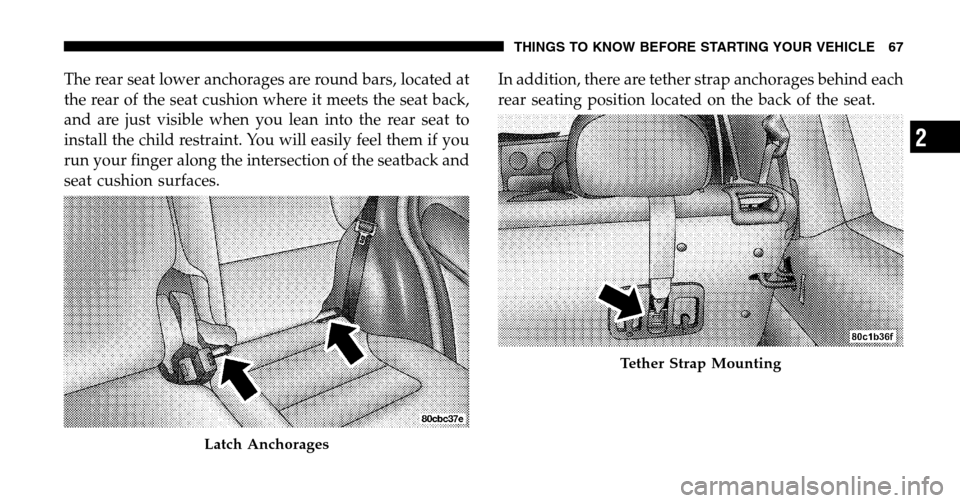
The rear seat lower anchorages are round bars, located at
the rear of the seat cushion where it meets the seat back,
and are just visible when you lean into the rear seat to
install the child restraint. You will easily feel them if you
run your finger along the intersection of the seatback and
seat cushion surfaces. In addition, there are tether strap anchorages behind each
rear seating position located on the back of the seat.
Latch Anchorages
Tether Strap Mounting
THINGS TO KNOW BEFORE STARTING YOUR VEHICLE 67
2
Page 68 of 424
Many, but not all restraint systems will be equipped with
separate straps on each side, with each having a hook or
connector for attachment to the lower anchorage and a
means of adjusting the tension in the strap. Forward-
facing toddler restraints and some rear-facing infant
restraints will also be equipped with a tether strap, a
hook for attachment to the tether strap anchorage and a
means of adjusting the tension of the strap.
You will first loosen the adjusters on the lower straps and
on the tether strap so that you can more easily attach the
hooks or connectors to the vehicle anchorages. Next
attach the lower hooks or connectors over the top of the
anchorage bars, pushing aside the seat cover material.
Then lift the tether anchorage cover directly behind the
seat where you are placing the child restraint and attach
the tether strap to the anchorage, being careful to route
the tether strap to provide the most direct path between
the anchor and the child restraint. If your vehicle is
equipped with adjustable rear head restraints, raise the head restraint and, route the tether strap under the head
restraint and between the two posts. Finally, tighten all
three straps as you push the child restraint rearward and
downward into the seat, removing slack in the straps
according to the child restraint manufacturer’s instruc-
tions.
WARNING!
Improper installation of a child restraint to the
LATCH anchorages can lead to failure of an infant or
child restraint. The child could be badly injured or
killed. Follow the manufacturer’s directions exactly
when installing an infant or child restraint.
68 THINGS TO KNOW BEFORE STARTING YOUR VEHICLE
Page 69 of 424
Installing Child Restraints Using the Vehicle Seat
Belt
The passenger seat belts are equipped with either cinch-
ing latch plates or automatic locking retractors, which are
designed to keep the lap portion tight around the child
restraint so that it is not necessary to use a locking clip. If
the seat belt has a cinching latch plate, pulling up on the
shoulder portion of the lap/shoulder belt will tighten the
belt. The cinching latch plate will keep the belt tight,
however, any seat belt system will loosen with time, so
check the belt occasionally and pull it tight if necessary.
If the seat belt has a automatic locking retractor, it will
have a distinctive label. Pull the belt from the retractor
until there is enough to allow you to pass through the
child restraint and slide the latch plate into the buckle.
Then, pull the belt until it is all extracted from the
retractor. Allow the belt to return to the retractor, pulling on the excess webbing to tighten the lap portion about
the child restraint. Refer to “Automatic Locking Mode”
earlier in this section.
In the rear seat, you may have trouble tightening the
lap/shoulder belt on the child restraint because the
buckle or latch plate is too close to the belt path opening
on the restraint. Disconnect the latch plate from the
buckle and twist the short buckle-end belt several times
to shorten it. Insert the latch plate into the buckle with the
release button facing out.
If the belt still can’t be tightened, or if by pulling and
pushing on the restraint loosens the belt, you may need
to do something more. Disconnect the latch plate from
the buckle, turn the buckle around, and insert the latch
plate into the buckle again. If you still can’t make the
child restraint secure, try a different seating position.
THINGS TO KNOW BEFORE STARTING YOUR VEHICLE 69
2
Page 70 of 424
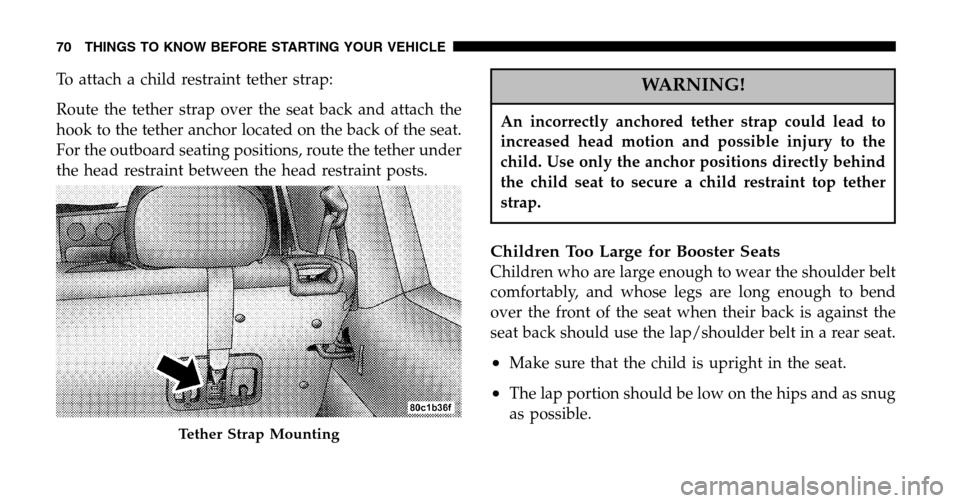
To attach a child restraint tether strap:
Route the tether strap over the seat back and attach the
hook to the tether anchor located on the back of the seat.
For the outboard seating positions, route the tether under
the head restraint between the head restraint posts.WARNING!
An incorrectly anchored tether strap could lead to
increased head motion and possible injury to the
child. Use only the anchor positions directly behind
the child seat to secure a child restraint top tether
strap.
Children Too Large for Booster Seats
Children who are large enough to wear the shoulder belt
comfortably, and whose legs are long enough to bend
over the front of the seat when their back is against the
seat back should use the lap/shoulder belt in a rear seat.
•Make sure that the child is upright in the seat.
•The lap portion should be low on the hips and as snug
as possible.
Tether Strap Mounting
70 THINGS TO KNOW BEFORE STARTING YOUR VEHICLE
Page 113 of 424
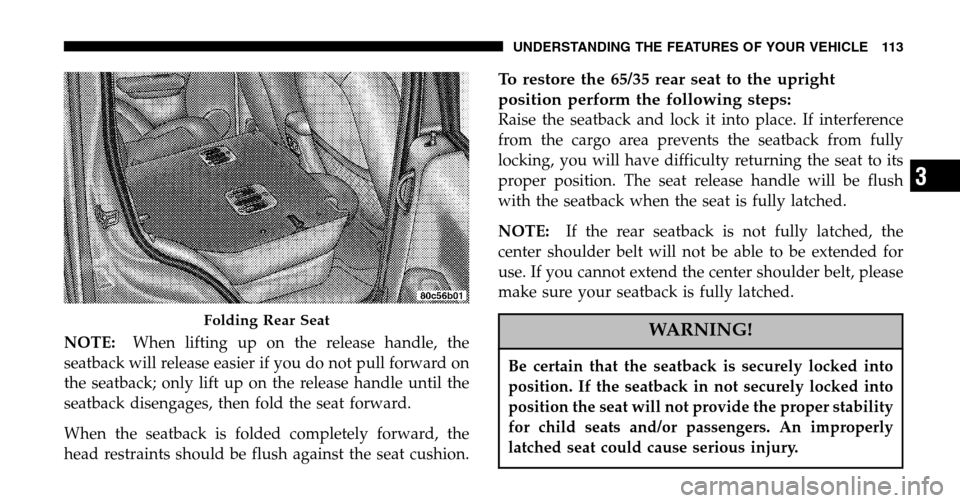
NOTE:When lifting up on the release handle, the
seatback will release easier if you do not pull forward on
the seatback; only lift up on the release handle until the
seatback disengages, then fold the seat forward.
When the seatback is folded completely forward, the
head restraints should be flush against the seat cushion.
To restore the 65/35 rear seat to the upright
position perform the following steps:
Raise the seatback and lock it into place. If interference
from the cargo area prevents the seatback from fully
locking, you will have difficulty returning the seat to its
proper position. The seat release handle will be flush
with the seatback when the seat is fully latched.
NOTE: If the rear seatback is not fully latched, the
center shoulder belt will not be able to be extended for
use. If you cannot extend the center shoulder belt, please
make sure your seatback is fully latched.
WARNING!
Be certain that the seatback is securely locked into
position. If the seatback in not securely locked into
position the seat will not provide the proper stability
for child seats and/or passengers. An improperly
latched seat could cause serious injury.
Folding Rear Seat
UNDERSTANDING THE FEATURES OF YOUR VEHICLE 113
3
Page 404 of 424

Caution, Exhaust Gas................... 72,147
CD (Compact Disc) Changer .............189,199
CD (Compact Disc) Player .........185,187,191,194
CD (Compact Disc) Player Maintenance ........ 207
Cellular Phone ........................ 83,207
Center High Mounted Stop Light ............ 361
Chains, Tire ............................ 274
Changing A Flat Tire ..................... 302
Charging System Light .................... 175
Chart, Tire Sizing ........................ 254
Check Engine Light (Malfunction Indicator Light) . 317
Child Restraint ...................... 61,66,69
Child Restraint Tether Anchors .............65,66
Child Safety Locks ........................ 21
Climate Control ......................... 208
Clock ................................ 183
Clutch Interlocking Ignition System ........217,226
Command-Trac Operation .................. 234
Compact Disc (CD) Maintenance ............. 207 Compass
.............................. 143
Compass Calibration ..................... 143
Compass Variance ....................... 144
Computer, Trip/Travel .................... 141
Console, Overhead ....................... 135
Contract, Service ........................ 396
Converter, Catalytic ...................... 324
Cool Down, Turbo ....................... 220
Cooling System ......................... 332
Adding Coolant (Antifreeze) .............. 334
Coolant Capacity ...................... 362
Coolant Level ......................... 335
Disposal of Used Coolant ................ 335
Drain, Flush, and Refill .................. 332
Inspection ........................... 332
Points to Remember .................... 336
Pressure Cap ......................... 334
Radiator Cap ......................... 334
Selection of Coolant (Antifreeze) .........333,362
404 INDEX
Page 414 of 424

Windows............................. 32
Pregnant Women and Seat Belts .............. 46
Preparation for Jacking .................... 304
Pretensioners Seat Belts ............................. 44
Programmable Electronic Features ............ 138
Programming Transmitters (Remote Keyless Entry) . 25
Radial Ply Tires ......................... 264
Radio Broadcast Signals ................... 183
Radio Operation ...................... 185,207
Radio, Satellite .......................... 201
Radio (Sound Systems) .................185,191
Rear Axle (Differential) .................243,343
Rear Swing Gate ......................... 29
Rear Window Defroster ................... 163
Rear Window Features .................... 162
Rear Wiper/Washer ...................... 162
Rearview Mirrors ........................ 79 Reclining Front Seats
..................... 107
Recreational Towing ...................... 294
Shifting into Transfer Case Neutral (N) ....... 295
Shifting out of Transfer Case Neutral (N) ..... 296
Reformulated Gasoline .................... 277
Refrigerant ............................ 328
Reminder, Lights On ..................... 118
Reminder, Seat Belt ....................... 45
Remote CD Changer ..................... 199
Remote Keyless Entry (RKE) ................. 22
Remote Sound System (Radio) Controls ........ 205
Replacement Keys ........................ 15
Replacement Parts ....................... 318
Replacement Tires ....................... 266
Reporting Safety Defects ................... 397
Re-Priming Diesel Fuel System .............. 222
Restraint, Head ......................... 108
Restraints, Child ......................... 61
Restraints, Infant ......................... 62
414 INDEX