Page 3366 of 3383

REAR WIPER AND WASHER SYSTEMWW-39
C
DE
F
G H
I
J
L
M A
B
WW
Revision: November 2009 2006 QX56
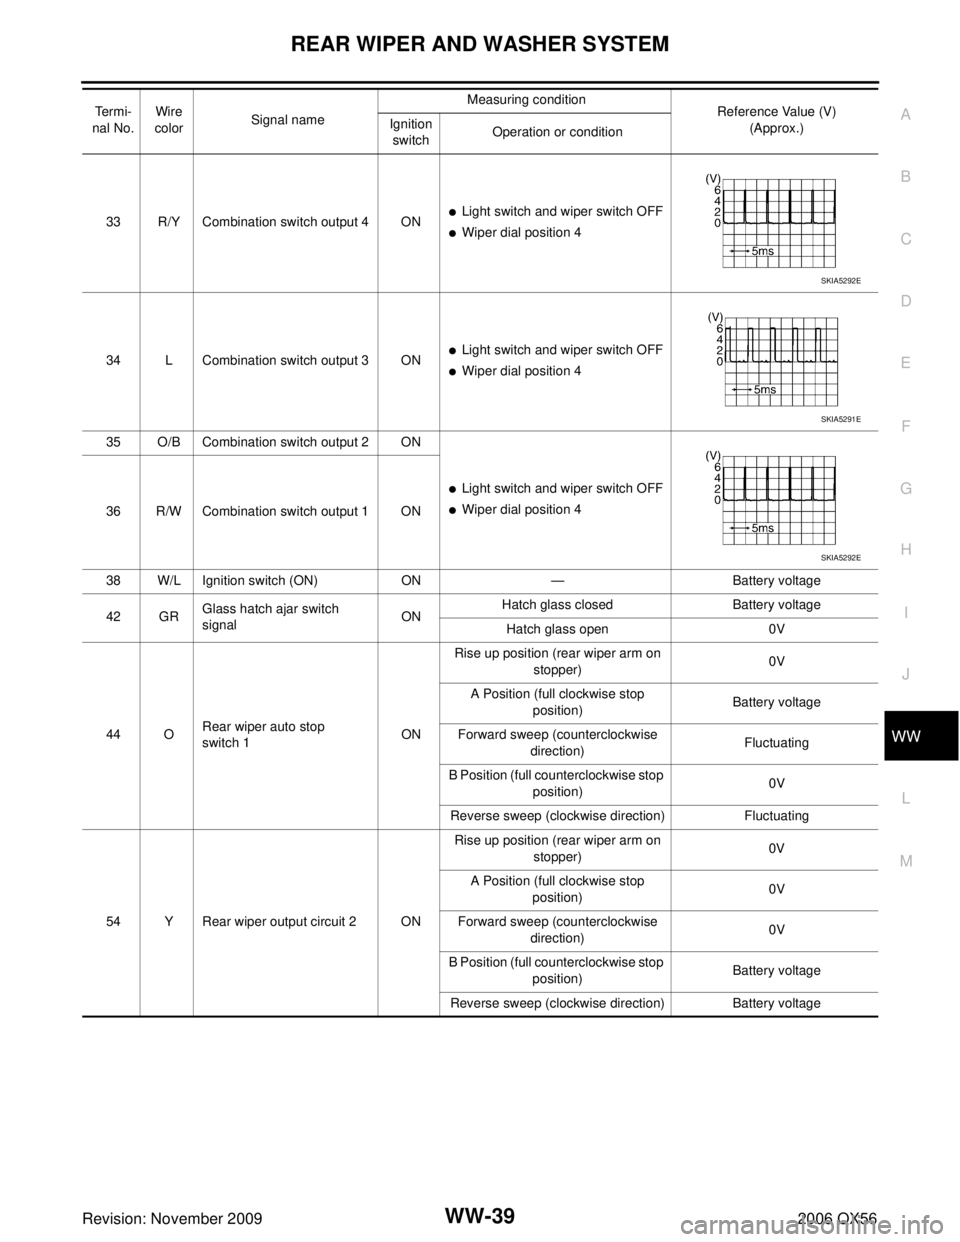
33 R/Y Combination switch output 4 ON�Light switch and wiper switch OFF
�Wiper dial position 4
34 L Combination switch output 3 ON
�Light switch and wiper switch OFF
�Wiper dial position 4
35 O/B Combination switch output 2 ON
�Light switch and wiper switch OFF
�Wiper dial position 4
36 R/W Combination switch output 1 ON
38 W/L Ignition switch (ON) ON— Battery voltage
42 GR Glass hatch ajar switch
signal ONHatch glass closed
Battery voltage
Hatch glass open 0V
44 O Rear wiper auto stop
switch 1 ONRise up position (rear wiper arm on
stopper) 0V
A Position (full clockwise stop position) Battery voltage
Forward sweep (counterclockwise direction) Fluctuating
B Position (full counterclockwise stop position) 0V
Reverse sweep (clockwise direction) Fluctuating
54 Y Rear wiper output circuit 2 ON Rise up position (rear wiper arm on
stopper) 0V
A Position (full clockwise stop position) 0V
Forward sweep (counterclockwise direction) 0V
B Position (full counterclockwise stop position) Battery voltage
Reverse sweep (clockwise direction) Battery voltage
Te r m i -
nal No. Wire
color Signal name Measuring condition
Reference Value (V)
(Approx.)
Ignition
switch Operation or condition
SKIA5292E
SKIA5291E
SKIA5292E
Page 3367 of 3383

WW-40
REAR WIPER AND WASHER SYSTEM
Revision: November 20092006 QX56
How to Proceed With Trouble DiagnosisEKS00BEF
1. Confirm the symptoms and customer complaint.
2. Understand operation description and function description. Refer to WW-32, "
System Description" .
3. Perform the Preliminary Check. Refer to WW-40, "
Preliminary Inspection" .
4. Check symptom and repair or replace the cause of malfunction.
5. Does the rear wiper operate normally? If YES: GO TO 6. If NO: GO TO 4.
6. Inspection End.
Preliminary InspectionEKS00BEG
INSPECTION FOR POWER SUPPLY AND GROUND CIRCUIT
Inspection procedure
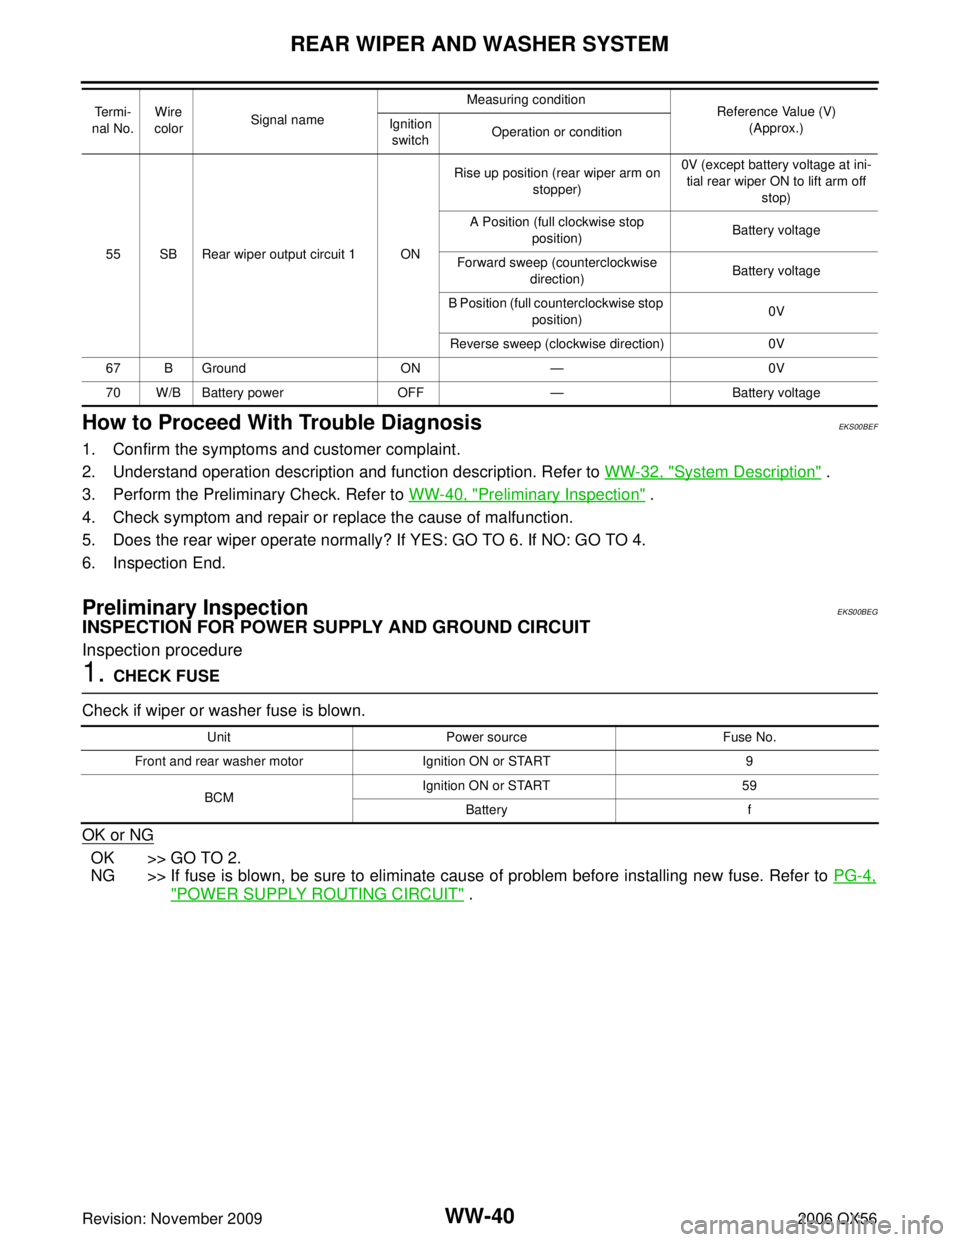
1. CHECK FUSE
Check if wiper or washer fuse is blown.
OK or NG
OK >> GO TO 2.
NG >> If fuse is blown, be sure to eliminate cause of problem before installing new fuse. Refer to PG-4,
"POWER SUPPLY ROUTING CIRCUIT" .
55 SB Rear wiper output circuit 1 ONRise up position (rear wiper arm on
stopper) 0V (except battery voltage at ini-
tial rear wiper ON to lift arm off
stop)
A Position (full clockwise stop position) Battery voltage
Forward sweep (counterclockwise direction) Battery voltage
B Position (full counterclockwise stop position) 0V
Reverse sweep (clockwise direction) 0V
67 B Ground ON— 0V
70 W/B Battery power OFF— Battery voltage
Te r m i -
nal No. Wire
color Signal name Measuring condition
Reference Value (V)
(Approx.)
Ignition
switch Operation or condition
Unit
Power source Fuse No.
Front and rear washer motor Ignition ON or START 9
BCM Ignition ON or START
59
Battery f
Page 3373 of 3383

WW-46
REAR WIPER AND WASHER SYSTEM
Revision: November 20092006 QX56
7. CHECK COMBINATION SWITCH INPUT SIGNAL
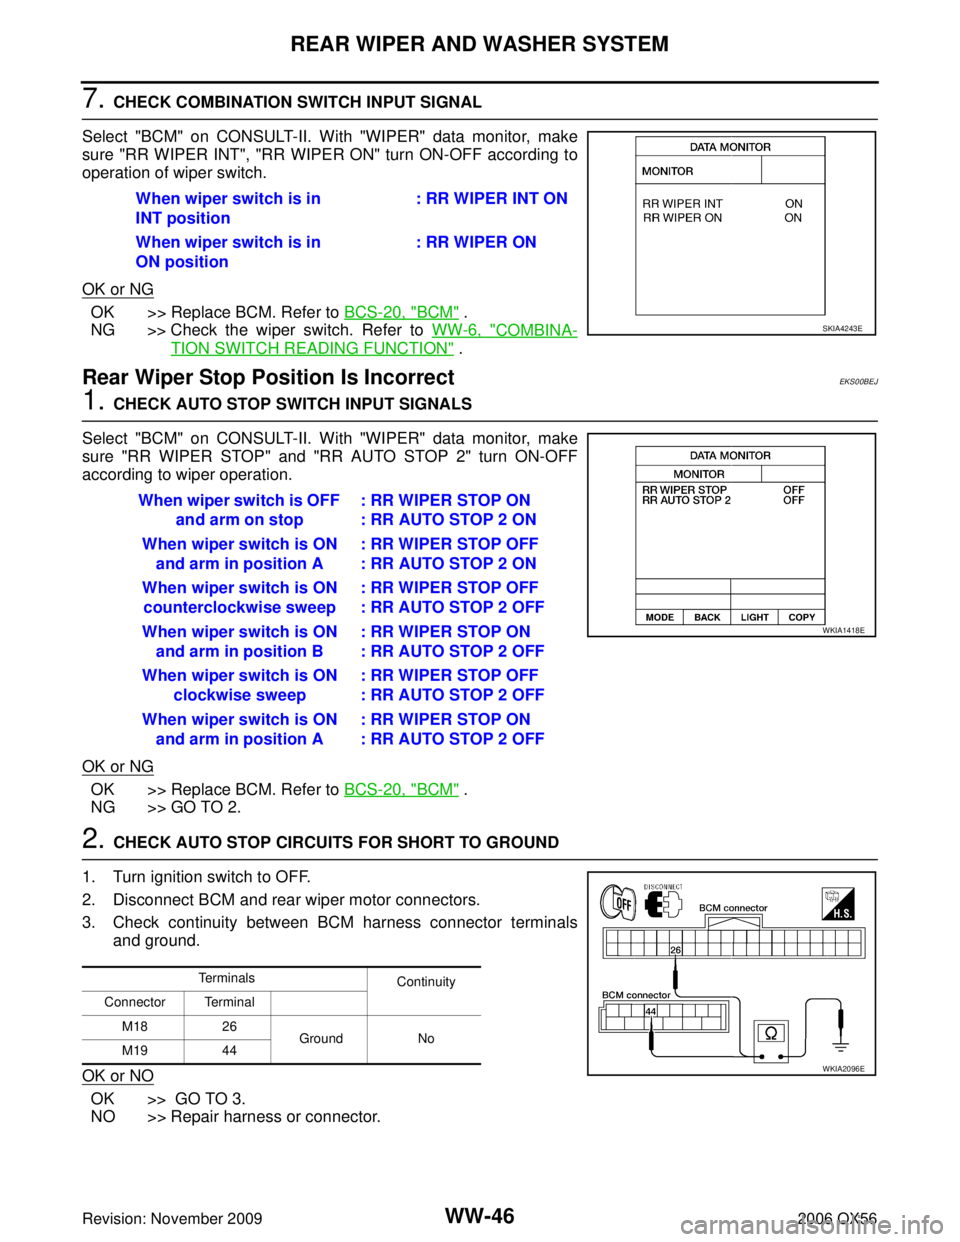
Select "BCM" on CONSULT-II. With "WIPER" data monitor, make
sure "RR WIPER INT", "RR WIPER ON" turn ON-OFF according to
operation of wiper switch.
OK or NG
OK >> Replace BCM. Refer to BCS-20, "BCM" .
NG >> Check the wiper switch. Refer to WW-6, "
COMBINA-
TION SWITCH READING FUNCTION" .
Rear Wiper Stop Position Is IncorrectEKS00BEJ
1. CHECK AUTO STOP SWITCH INPUT SIGNALS
Select "BCM" on CONSULT-II. With "WIPER" data monitor, make
sure "RR WIPER STOP" and "RR AUTO STOP 2" turn ON-OFF
according to wiper operation.
OK or NG
OK >> Replace BCM. Refer to BCS-20, "BCM" .
NG >> GO TO 2.
2. CHECK AUTO STOP CIRCUITS FOR SHORT TO GROUND
1. Turn ignition switch to OFF.
2. Disconnect BCM and rear wiper motor connectors.
3. Check continuity between BCM harness connector terminals and ground.
OK or NO
OK >> GO TO 3.
NO >> Repair harness or connector. When wiper switch is in
INT position
: RR WIPER INT ON
When wiper switch is in
ON position : RR WIPER ON
SKIA4243E
When wiper switch is OFF
and arm on stop : RR WIPER STOP ON
: RR AUTO STOP 2 ON
When wiper switch is ON and arm in position A : RR WIPER STOP OFF
: RR AUTO STOP 2 ON
When wiper switch is ON counterclockwise sweep : RR WIPER STOP OFF
: RR AUTO STOP 2 OFF
When wiper switch is ON and arm in position B : RR WIPER STOP ON
: RR AUTO STOP 2 OFF
When wiper switch is ON clockwise sweep : RR WIPER STOP OFF
: RR AUTO STOP 2 OFF
When wiper switch is ON and arm in position A : RR WIPER STOP ON
: RR AUTO STOP 2 OFF
WKIA1418E
Terminals
Continuity
Connector Terminal
M18 26
Ground No
M19 44
WKIA2096E
Page 3377 of 3383

WW-50
REAR WIPER AND WASHER SYSTEM
Revision: November 20092006 QX56
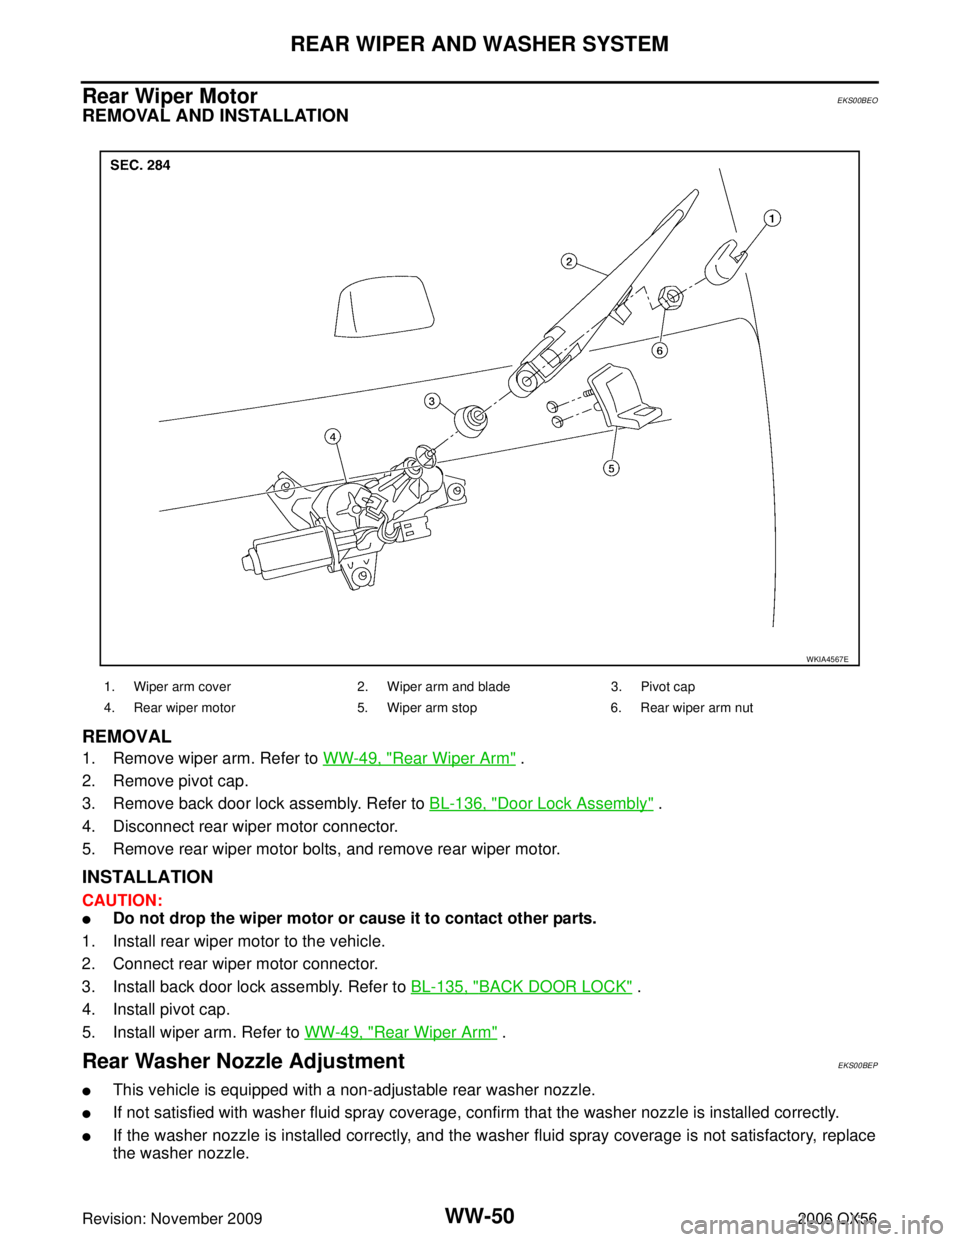
Rear Wiper Motor EKS00BEO
REMOVAL AND INSTALLATION
REMOVAL
1. Remove wiper arm. Refer to WW-49, "Rear Wiper Arm" .
2. Remove pivot cap.
3. Remove back door lock assembly. Refer to BL-136, "
Door Lock Assembly" .
4. Disconnect rear wiper motor connector.
5. Remove rear wiper motor bolts, and remove rear wiper motor.
INSTALLATION
CAUTION:
�Do not drop the wiper motor or cause it to contact other parts.
1. Install rear wiper motor to the vehicle.
2. Connect rear wiper motor connector.
3. Install back door lock assembly. Refer to BL-135, "
BACK DOOR LOCK" .
4. Install pivot cap.
5. Install wiper arm. Refer to WW-49, "
Rear Wiper Arm" .
Rear Washer Nozzle AdjustmentEKS00BEP
�This vehicle is equipped with a non-adjustable rear washer nozzle.
�If not satisfied with washer fluid spray coverage, confirm that the washer nozzle is installed correctly.
�If the washer nozzle is installed correctly, and the washer fluid spray coverage is not satisfactory, replace
the washer nozzle.
WKIA4567E
1. Wiper arm cover 2. Wiper arm and blade 3. Pivot cap
4. Rear wiper motor 5. Wiper arm stop 6. Rear wiper arm nut