Page 2502 of 3383
TURN SIGNAL AND HAZARD WARNING LAMPSLT-95
C
DE
F
G H
I
J
L
M A
B
LT
Revision: November 2009 2006 QX56
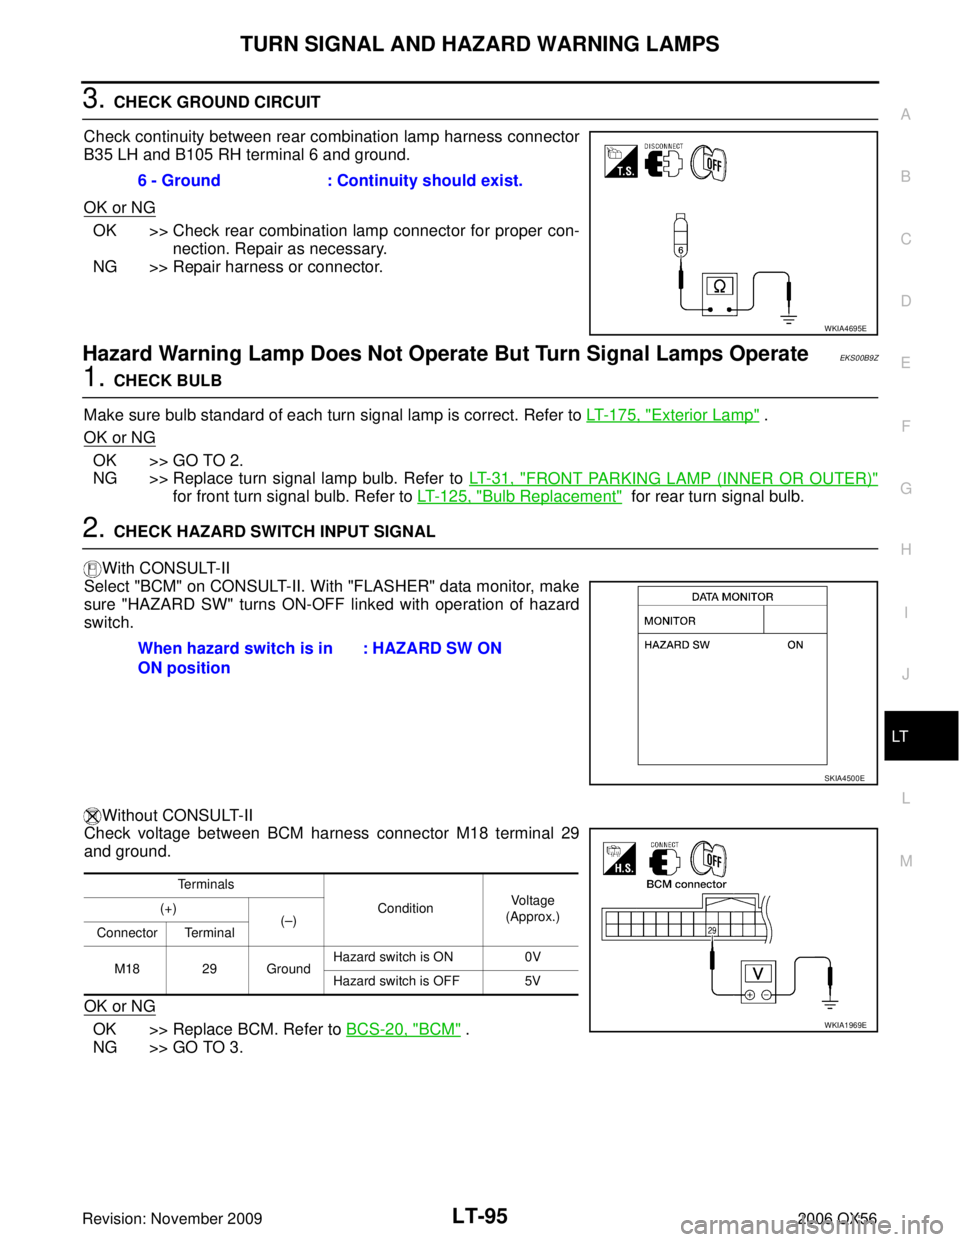
3. CHECK GROUND CIRCUIT
Check continuity between rear combination lamp harness connector
B35 LH and B105 RH terminal 6 and ground.
OK or NG
OK >> Check rear combination lamp connector for proper con- nection. Repair as necessary.
NG >> Repair harness or connector.
Hazard Warning Lamp Does Not Operate But Turn Signal Lamps OperateEKS00B9Z
1. CHECK BULB
Make sure bulb standard of each turn signal lamp is correct. Refer to LT- 1 7 5 , "
Exterior Lamp" .
OK or NG
OK >> GO TO 2.
NG >> Replace turn signal lamp bulb. Refer to LT- 3 1 , "
FRONT PARKING LAMP (INNER OR OUTER)"
for front turn signal bulb. Refer to LT- 1 2 5 , "Bulb Replacement" for rear turn signal bulb.
2. CHECK HAZARD SWITCH INPUT SIGNAL
With CONSULT-II
Select "BCM" on CONSULT-II. With "FLASHER" data monitor, make
sure "HAZARD SW" turns ON-OFF linked with operation of hazard
switch.
Without CONSULT-II
Check voltage between BCM harness connector M18 terminal 29
and ground.
OK or NG
OK >> Replace BCM. Refer to BCS-20, "BCM" .
NG >> GO TO 3. 6 - Ground : Continuity should exist.
WKIA4695E
When hazard switch is in
ON position
: HAZARD SW ON
SKIA4500E
Terminals
ConditionVo l ta g e
(Approx.)
(+)
(– )
Connector Terminal
M18 29 Ground Hazard switch is ON
0V
Hazard switch is OFF 5V
WKIA1969E
Page 2504 of 3383
TURN SIGNAL AND HAZARD WARNING LAMPSLT-97
C
DE
F
G H
I
J
L
M A
B
LT
Revision: November 2009 2006 QX56
Bulb ReplacementEKS00BA1
TURN SIGNAL LAMP (FRONT)
Removal
1. Remove front fog lamp. Refer to LT- 7 9 , "Removal and Installation" .
2. Twist turn signal socket and remove from front fog lamp.
3. Remove turn signal bulb from socket.
Installation
Installation is in the reverse order of removal.
TURN SIGNAL LAMP (REAR)
Refer to LT- 1 2 5 , "Bulb Replacement" .
Removal and InstallationEKS00BA3
FRONT TURN SIGNAL LAMP
Refer to LT- 7 9 , "Removal and Installation" .
REAR TURN SIGNAL LAMP
Refer to LT- 1 2 5 , "Removal and Installation" .
Page 2515 of 3383
LT-108
STOP LAMP
Revision: November 20092006 QX56
Bulb ReplacementEKS00BAF
HIGH-MOUNTED STOP LAMP
The high-mounted stop lamp bulbs are not serviceable.
STOP LAMP
The stop lamp bulbs are not serviceable separately. Replace rear combination lamp. Refer to LT- 1 2 5 ,
"Removal and Installation" .
Removal and InstallationEKS00GDP
HIGH_MOUNTED STOP LAMP
Removal
1. Remove back door upper finisher.
2. Remove 2 nuts and remove high-mounted stop lamp.
Installation
Installation is in the reverse order of removal.
STOP LAMP
Refer to LT- 1 2 5 , "Removal and Installation" .
WKIA1397E
Page 2517 of 3383
LT-110
BACK-UP LAMP
Revision: November 20092006 QX56
Bulb ReplacementEKS00BAI
BACK-UP LAMP
Removal
1. Remove back door lower finisher. Refer to EI-42, "Removal and Installation" .
2. Turn bulb socket counterclockwise and remove it from the lamp housing.
3. Pull bulb from socket.
INSTALLATION
Installation is in the reverse order of removal.
Removal and InstallationEKS00BAJ
BACK-UP LAMP
Removal
1. Remove license lamp finisher. Refer to EI-24, "Removal and Installation" .
2. Carefully release tabs to remove back up lamp housing from license plate finisher.
Installation
Installation is in the reverse order of removal.
WKIA1898E
Page 2530 of 3383
PARKING, LICENSE PLATE AND TAIL LAMPSLT-123
C
DE
F
G H
I
J
L
M A
B
LT
Revision: November 2009 2006 QX56
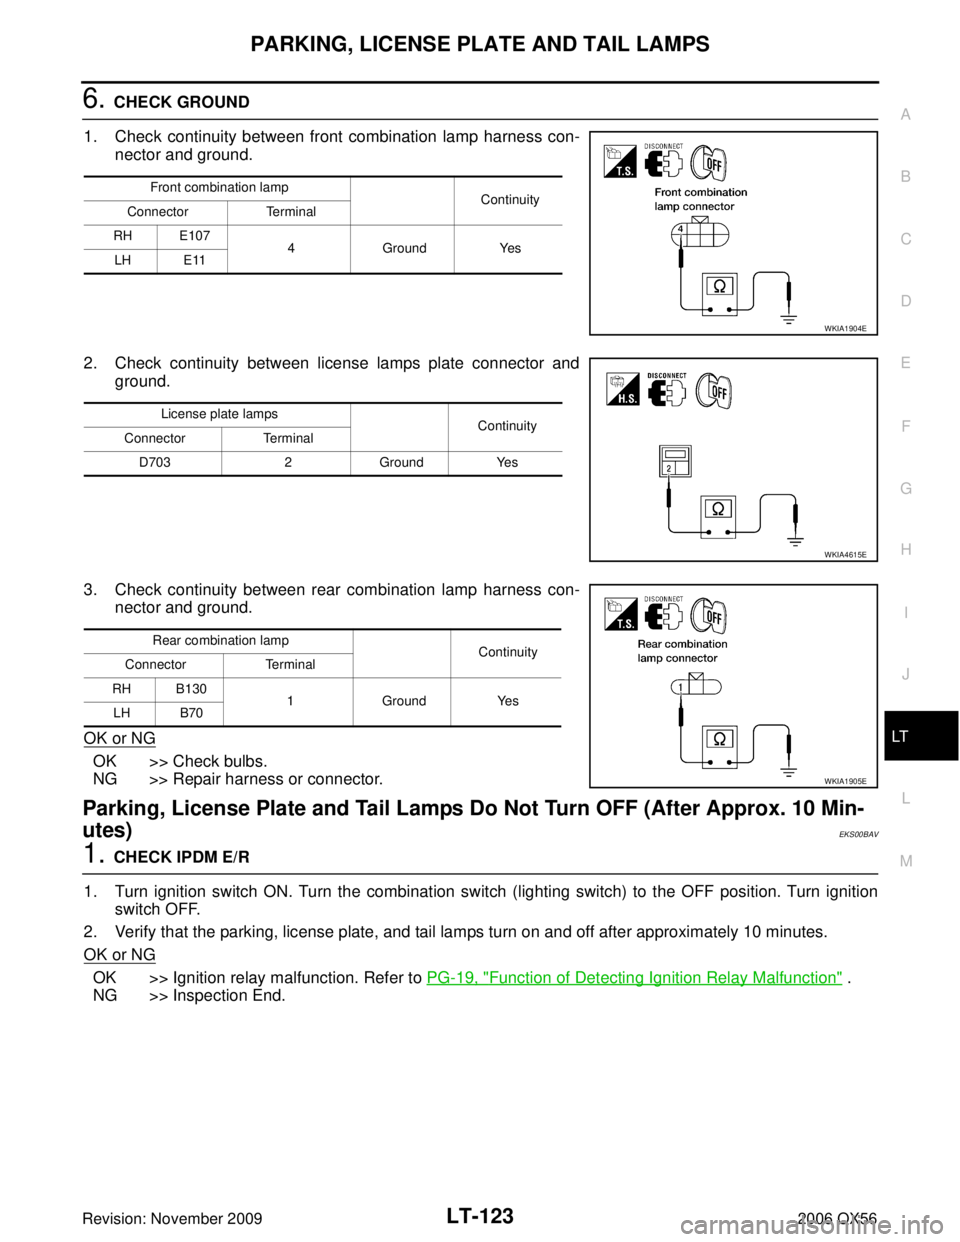
6. CHECK GROUND
1. Check continuity between front combination lamp harness con- nector and ground.
2. Check continuity between license lamps plate connector and ground.
3. Check continuity between rear combination lamp harness con- nector and ground.
OK or NG
OK >> Check bulbs.
NG >> Repair harness or connector.
Parking, License Plate and Tail Lamps Do Not Turn OFF (After Approx. 10 Min-
utes)
EKS00BAV
1. CHECK IPDM E/R
1. Turn ignition switch ON. Turn the combination switch (lighting switch) to the OFF position. Turn ignition switch OFF.
2. Verify that the parking, license plate, and tail lamps turn on and off after approximately 10 minutes.
OK or NG
OK >> Ignition relay malfunction. Refer to PG-19, "Function of Detecting Ignition Relay Malfunction" .
NG >> Inspection End.
Front combination lamp Continuity
Connector Terminal
RH E107 4Ground Yes
LH E11
WKIA1904E
License plate lamps Continuity
Connector Terminal
D703 2Ground Yes
WKIA4615E
Rear combination lamp
Continuity
Connector Terminal
RH B130 1Ground Yes
LH B70
WKIA1905E
Page 2531 of 3383
LT-124
PARKING, LICENSE PLATE AND TAIL LAMPS
Revision: November 20092006 QX56
Bulb ReplacementEKS00BAW
FRONT PARKING LAMP
Refer to LT- 3 1 , "FRONT PARKING LAMP (INNER OR OUTER)" .
LICENSE PLATE LAMP
Removal
1. Remove back door lower finisher. Refer to LT- 1 2 4 , "LICENSE PLATE LAMP" .
2. Turn bulb socket counterclockwise to remove it.
3. Pull bulb from socket.
Installation
Installation is in the reverse order of removal.
SIDE MARKER LAMP (FRONT)
Refer to LT- 3 1 , "SIDE MARKER LAMP (FRONT)" .
TAIL LAMP
The tail lamp bulbs are not serviceable separately. Replace rear combination lamp. Refer to LT- 1 2 5 , "Removal
and Installation" .
Removal and InstallationEKS00GDQ
FRONT PARKING LAMP
Refer to LT- 3 1 , "Removal and Installation" .
LICENSE PLATE LAMP
Removal
1. Remove back door lower finisher. Refer to EI-42, "Removal and Installation" .
2. Remove license plate lamp screws.
3. Remove license plate lamp.
INSTALLATION
Installation is in the reverse order of removal.
SIDE MARKER LAMP (REAR)
Refer to LT- 1 2 5 , "Removal and Installation" .
TAIL LAMP
Refer to LT- 1 2 5 , "Removal and Installation" .
Page 2532 of 3383
REAR COMBINATION LAMPLT-125
C
DE
F
G H
I
J
L
M A
B
LT
Revision: November 2009 2006 QX56
REAR COMBINATION LAMPPFP:26554
Bulb ReplacementEKS00BAZ
SIDE MARKER LAMP (REAR)
Side marker lamps (rear) are LED's and are not serviceable separately. Replace rear combination lamp. Refer
to LT- 1 2 5 , "
REAR COMBINATION LAMP" .
TAIL LAMP
Tail lamps are LED's and are not serviceable separately. Replace rear combination lamp. Refer to LT- 1 2 5 ,
"Removal and Installation" .
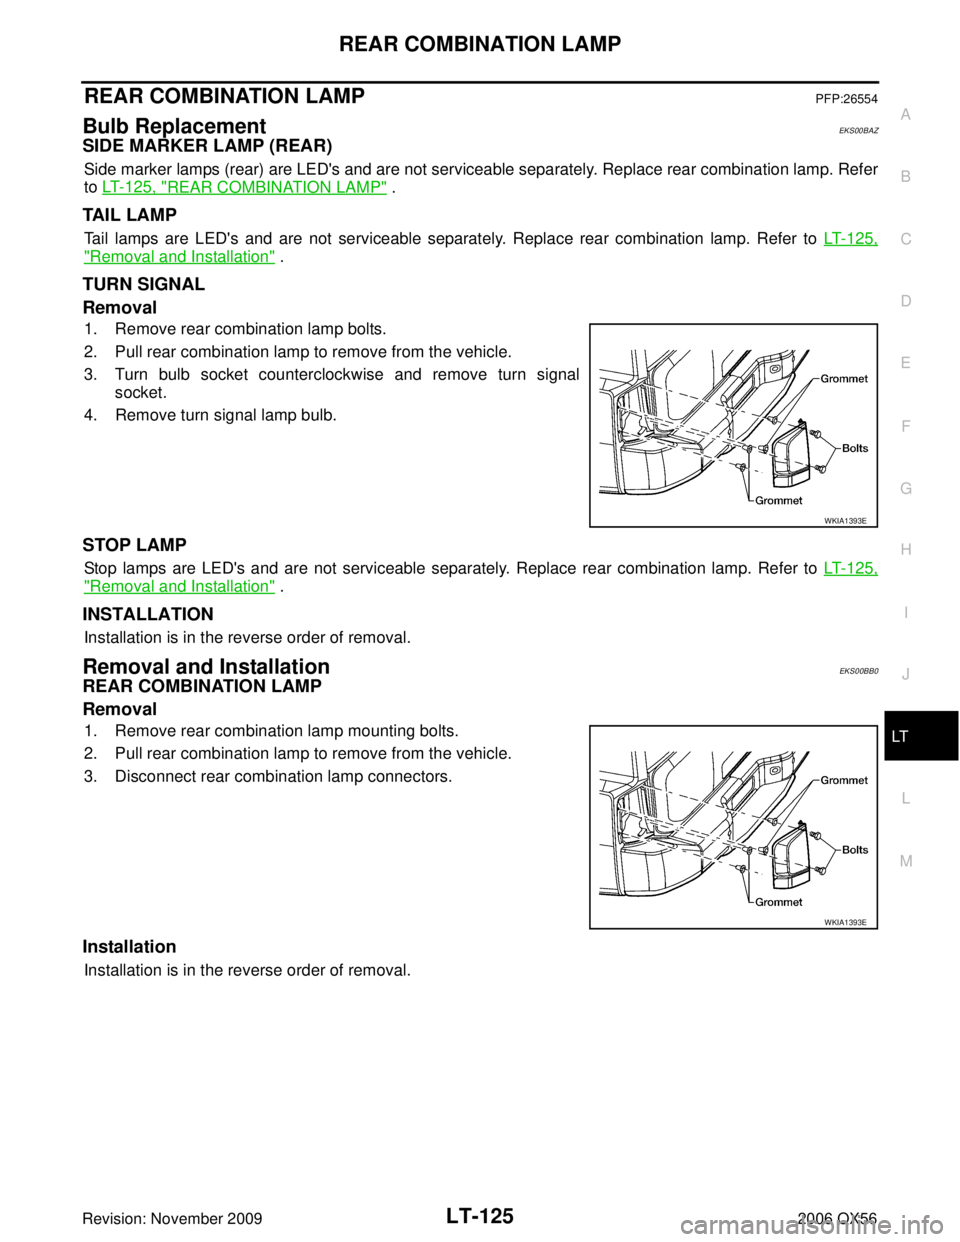
TURN SIGNAL
Removal
1. Remove rear combination lamp bolts.
2. Pull rear combination lamp to remove from the vehicle.
3. Turn bulb socket counterclockwise and remove turn signal
socket.
4. Remove turn signal lamp bulb.
STOP LAMP
Stop lamps are LED's and are not serviceable separately. Replace rear combination lamp. Refer to LT- 1 2 5 ,
"Removal and Installation" .
INSTALLATION
Installation is in the reverse order of removal.
Removal and InstallationEKS00BB0
REAR COMBINATION LAMP
Removal
1. Remove rear combination lamp mounting bolts.
2. Pull rear combination lamp to remove from the vehicle.
3. Disconnect rear combination lamp connectors.
Installation
Installation is in the reverse order of removal.
WKIA1393E
WKIA1393E
Page 2563 of 3383
LT-156
INTERIOR ROOM LAMP
Revision: November 20092006 QX56
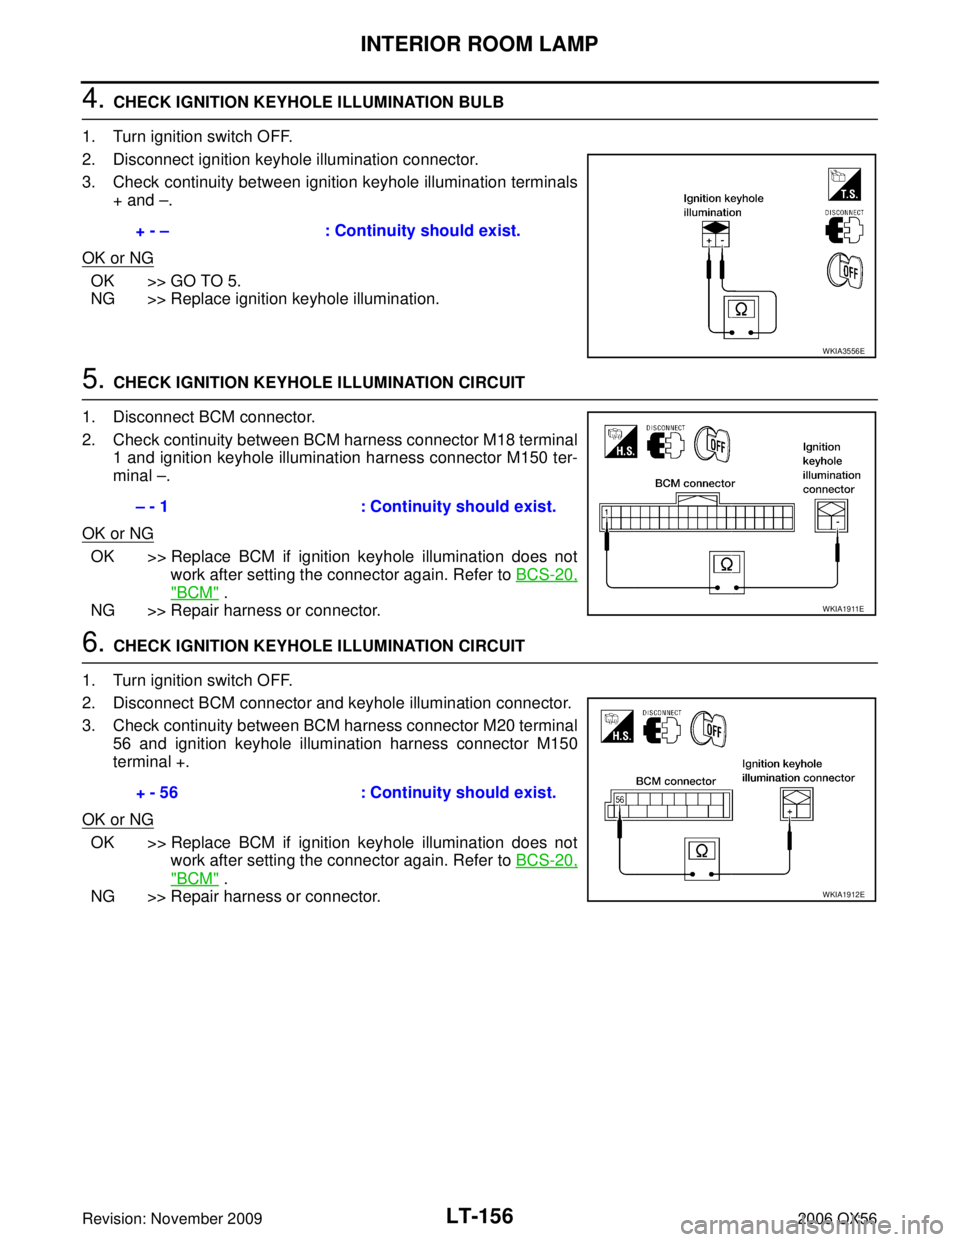
4. CHECK IGNITION KEYHOLE ILLUMINATION BULB
1. Turn ignition switch OFF.
2. Disconnect ignition keyhole illumination connector.
3. Check continuity between ignition keyhole illumination terminals + and –.
OK or NG
OK >> GO TO 5.
NG >> Replace ignition keyhole illumination.
5. CHECK IGNITION KEYHOLE ILLUMINATION CIRCUIT
1. Disconnect BCM connector.
2. Check continuity between BCM harness connector M18 terminal 1 and ignition keyhole illumination harness connector M150 ter-
minal –.
OK or NG
OK >> Replace BCM if ignition keyhole illumination does not work after setting the connector again. Refer to BCS-20,
"BCM" .
NG >> Repair harness or connector.
6. CHECK IGNITION KEYHOLE ILLUMINATION CIRCUIT
1. Turn ignition switch OFF.
2. Disconnect BCM connector and keyhole illumination connector.
3. Check continuity between BCM harness connector M20 terminal 56 and ignition keyhole illumination harness connector M150
terminal +.
OK or NG
OK >> Replace BCM if ignition keyhole illumination does not work after setting the connector again. Refer to BCS-20,
"BCM" .
NG >> Repair harness or connector. + - –
: Continuity should exist.
WKIA3556E
– - 1 : Continuity should exist.
WKIA1911E
+ - 56: Continuity should exist.
WKIA1912E