Page 2703 of 3383

PG-62
HARNESS
Revision: November 20092006 QX56
Wiring Diagram Codes (Cell Codes)EKS00BNE
Use the chart below to find out what each wiring diagram code stands for.
Refer to the wiring diagram code in the alphabetical index to find the location (page number) of each wiring
diagram.
CodeSection Wiring Diagram Name
A/C,A ATC Auto Air Conditioner
A/SUSP RSU Rear Air Suspension
AF1B1 EC Air Fuel Ratio (A/F) Sensor 1 (Bank 1)
AF1B2 EC Air Fuel Ratio (A/F) Sensor 1 (Bank 2)
AF1HB1 EC Air Fuel Ratio (A/F) Sensor 1 (Bank 1)
AF1HB2 EC Air Fuel Ratio (A/F) Sensor 1 (Bank 2)
APPS1 EC Accelerator Pedal Position Sensor
APPS2 EC Accelerator Pedal Position Sensor
APPS3 EC Accelerator Pedal Position Sensor
ASC/BS EC ASCD Brake Switch
ASC/SW EC ASCD Steering Switch
ASCBOF EC ASCD Brake Switch
ASCIND EC ASCD Indicator
A/T AT A/T Assembly
AT/IND DI A/T Indicator Lamp
AUDIO AV Audio
AUT/DP SE Automatic Drive Positioner
AUTO/L LT Auto Light Control
B/CLOS BL Back Door Auto Closure System
BACK/L LT Back-up Lamp
BRK/SW EC Brake Switch
CAN EC CAN Communication Line
CAN LAN CAN System
CHARGE SC Charging System
CHIME DI Warning Chime
CLOCK DI Clock
COOL/F EC Cooling Fan Control
COMBSW LT Combination Switch
COMM AV Audio Visual Communication System
COMPAS DI Compass and Thermometer
D/LOCK BL Power Door Lock
DEF GW Rear Window Defogger
DTRL LT Headlamp - With Daytime Light System
DVD AV DVD Entertainment System
ECM/PW EC ECM Power Supply for Back-Up
ECTS EC Engine Coolant Temperature Sensor
ETC1 EC Electric Throttle Control Function
ETC2 EC Throttle Control Motor Relay
ETC3 EC Throttle Control Motor
F/FOG LT Front Fog Lamp
F/PUMP EC Fuel Pump
FTTS EC Fuel Tank Temperature Sensor
FUELB1 EC Fuel Injection System Bank 1
FUELB2 EC Fuel Injection System Bank 2
H/AIM LT Headlamp Aiming Control
H/PHON AV Hands Free Telephone
H/LAMP LT Headlamp
Page 2705 of 3383
PG-64
HARNESS
Revision: November 20092006 QX56
VEHSECBL Vehicle security (theft warning) system
VENT/V EC EVAP Canister Vent Control Valve
W/ANT AV Audio Antenna
WARN DI Warning Lamps
WINDOW GW Power Window
WIP/R WW Rear Wiper and Washer
WIPER WW Front Wiper and Washer
Page 2790 of 3383

SUNROOFRF-15
C
DE
F
G H
J
K L
M A
B
RF
Revision: November 2009 2006 QX56
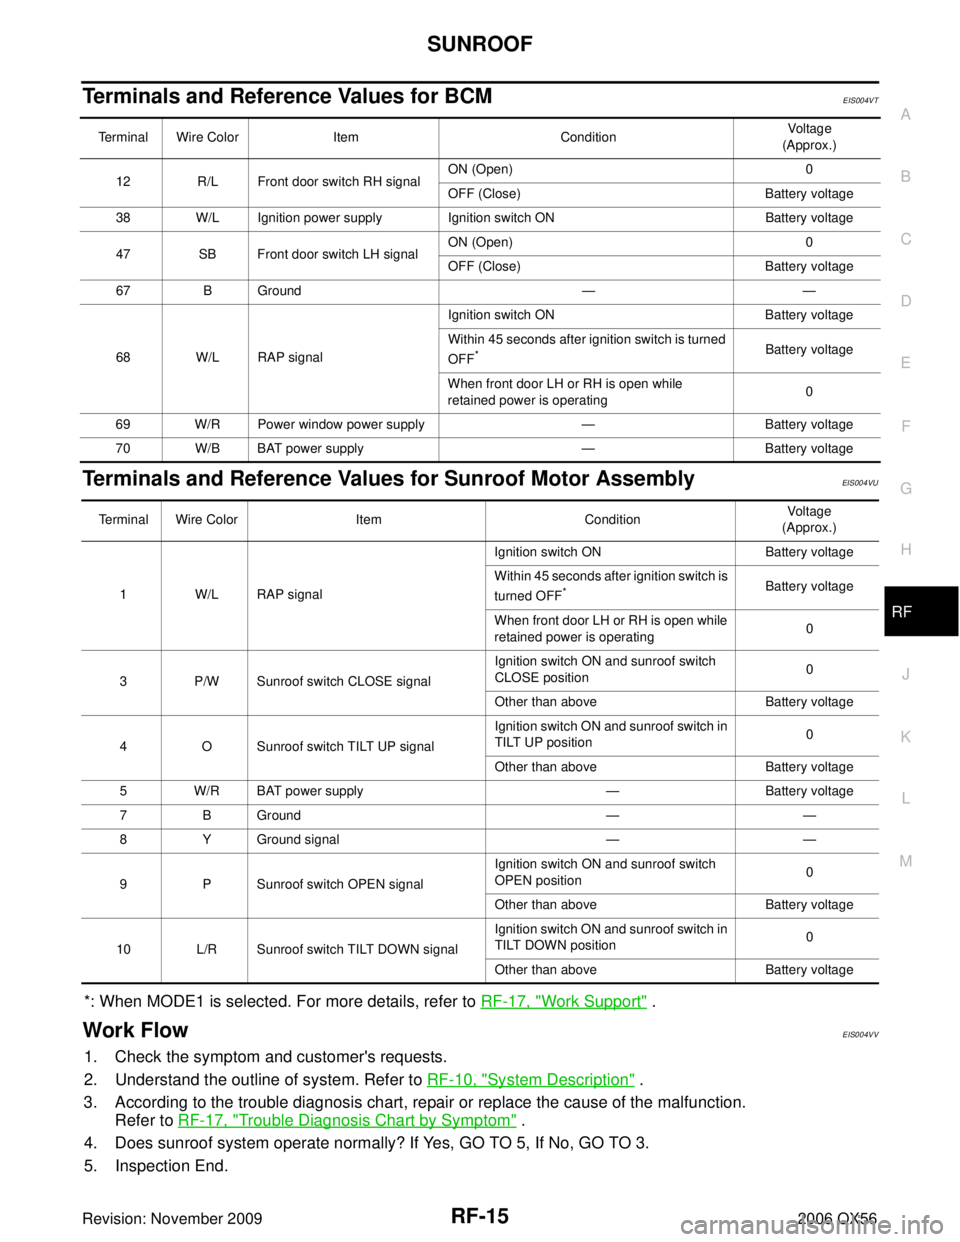
Terminals and Reference Values for BCMEIS004VT
Terminals and Reference Values for Sunroof Motor AssemblyEIS004VU
*: When MODE1 is selected. For more details, refer to RF-17, "Work Support" .
Work FlowEIS004VV
1. Check the symptom and customer's requests.
2. Understand the outline of system. Refer to RF-10, "
System Description" .
3. According to the trouble diagnosis chart, repair or replace the cause of the malfunction. Refer to RF-17, "
Trouble Diagnosis Chart by Symptom" .
4. Does sunroof system operate normally? If Yes, GO TO 5, If No, GO TO 3.
5. Inspection End.
Terminal Wire Color ItemConditionVoltag e
(Approx.)
12 R/L Front door switch RH signal ON (Open)
0
OFF (Close) Battery voltage
38 W/L Ignition power supply Ignition switch ON Battery voltage
47 SB Front door switch LH signal ON (Open)
0
OFF (Close) Battery voltage
67 B Ground ——
68 W/L RAP signal Ignition switch ON
Battery voltage
Within 45 seconds after ignition switch is turned
OFF
* Battery voltage
When front door LH or RH is open while
retained power is operating 0
69 W/R Power window power supply —Battery voltage
70 W/B BAT power supply —Battery voltage
Terminal Wire Color ItemConditionVoltage
(Approx.)
1 W/L RAP signal Ignition switch ON
Battery voltage
Within 45 seconds after ignition switch is
turned OFF
*Battery voltage
When front door LH or RH is open while
retained power is operating 0
3 P/W Sunroof switch CLOSE signal Ignition switch ON and sunroof switch
CLOSE position
0
Other than above Battery voltage
4 O Sunroof switch TILT UP signal Ignition switch ON and sunroof switch in
TILT UP position
0
Other than above Battery voltage
5 W/R BAT power supply —Battery voltage
7 B Ground ——
8 Y Ground signal ——
9 P Sunroof switch OPEN signal Ignition switch ON and sunroof switch
OPEN position
0
Other than above Battery voltage
10 L/R Sunroof switch TILT DOWN signal Ignition switch ON and sunroof switch in
TILT DOWN position
0
Other than above Battery voltage
Page 2792 of 3383

SUNROOFRF-17
C
DE
F
G H
J
K L
M A
B
RF
Revision: November 2009 2006 QX56
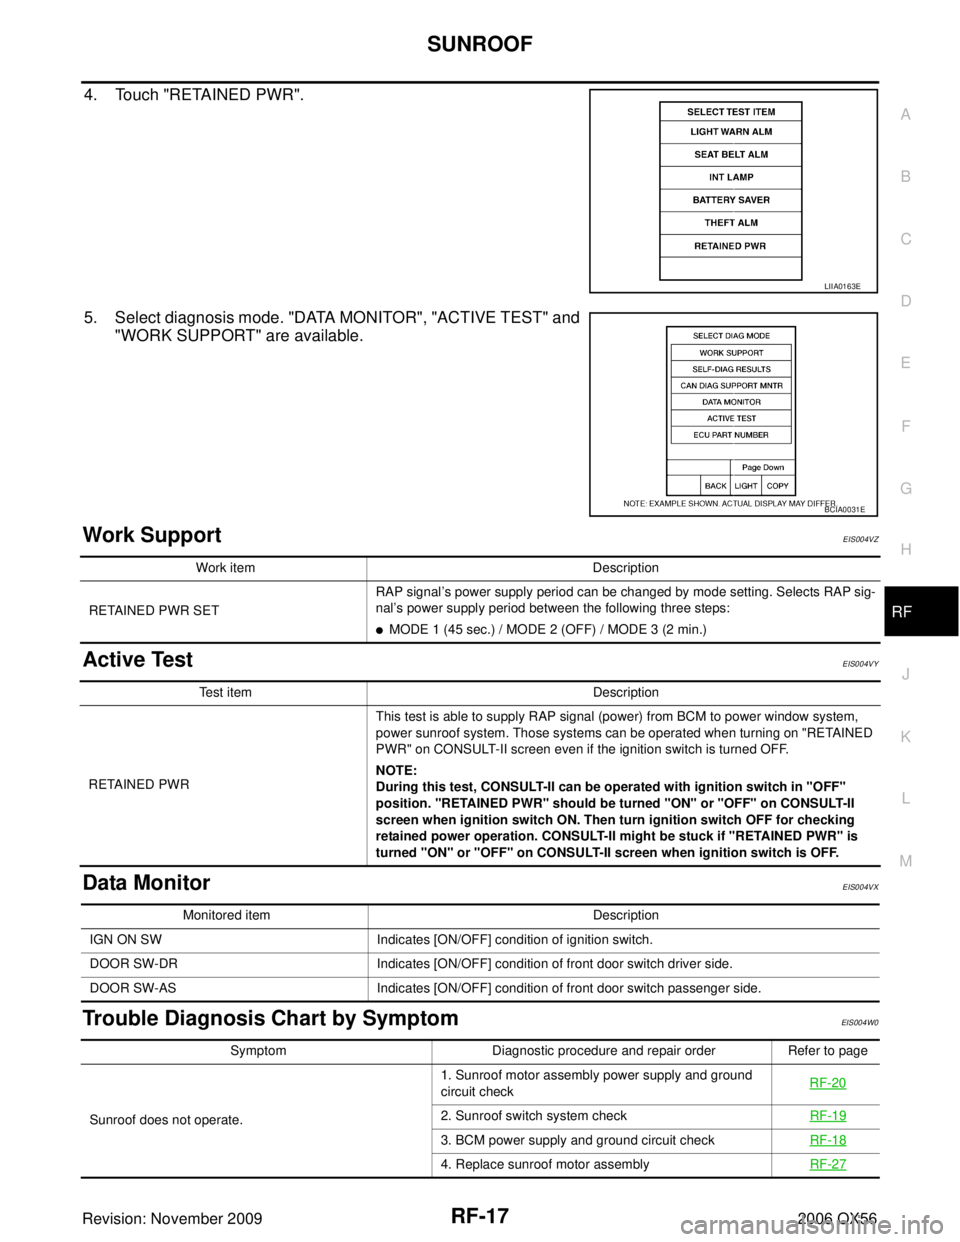
4. Touch "RETAINED PWR".
5. Select diagnosis mode. "DATA MONITOR", "ACTIVE TEST" and
"WORK SUPPORT" are available.
Work Support EIS004VZ
Active TestEIS004VY
Data MonitorEIS004VX
Trouble Diagnosis Chart by SymptomEIS004W0
LIIA0163E
BCIA0031E
Work item Description
RETAINED PWR SET RAP signal
’s power supply period can be changed by mode setting. Selects RAP sig-
nal ’s power supply period between the following three steps:
�MODE 1 (45 sec.) / MODE 2 (OFF) / MODE 3 (2 min.)
Test item Description
RETAINED PWR This test is able to supply RAP signal (power) from BCM to power window system,
power sunroof system. Those systems can be operated when turning on "RETAINED
PWR" on CONSULT-II screen even if the ignition switch is turned OFF.
NOTE:
During this test, CONSULT-II can be operated with ignition switch in "OFF"
position. "RETAINED PWR" should be turned "ON" or "OFF" on CONSULT-II
screen when ignition switch ON. Then turn ignition switch OFF for checking
retained power operation. CONSULT-II might be stuck if "RETAINED PWR" is
turned "ON" or "OFF" on CONSULT-II screen when ignition switch is OFF.
Monitored item
Description
IGN ON SW Indicates [ON/OFF] condition of ignition switch.
DOOR SW-DR Indicates [ON/OFF] condition of front door switch driver side.
DOOR SW-AS Indicates [ON/OFF] condition of front door switch passenger side.
SymptomDiagnostic procedure and repair order Refer to page
Sunroof does not operate. 1. Sunroof motor assembly power supply and ground
circuit check
RF-20
2. Sunroof switch system check
RF-19
3. BCM power supply and ground circuit checkRF-18
4. Replace sunroof motor assemblyRF-27
Page 2924 of 3383

CHARGING SYSTEMSC-19
C
DE
F
G H
I
J
L
M A
B
SC
Revision: November 2009 2006 QX56
Trouble Diagnoses with Battery/Starting/Charging System TesterEKS00B7J
NOTE:
To ensure a complete and thorough diagnosis, the battery, starter and generator test segments must be done
as a set from start to finish.
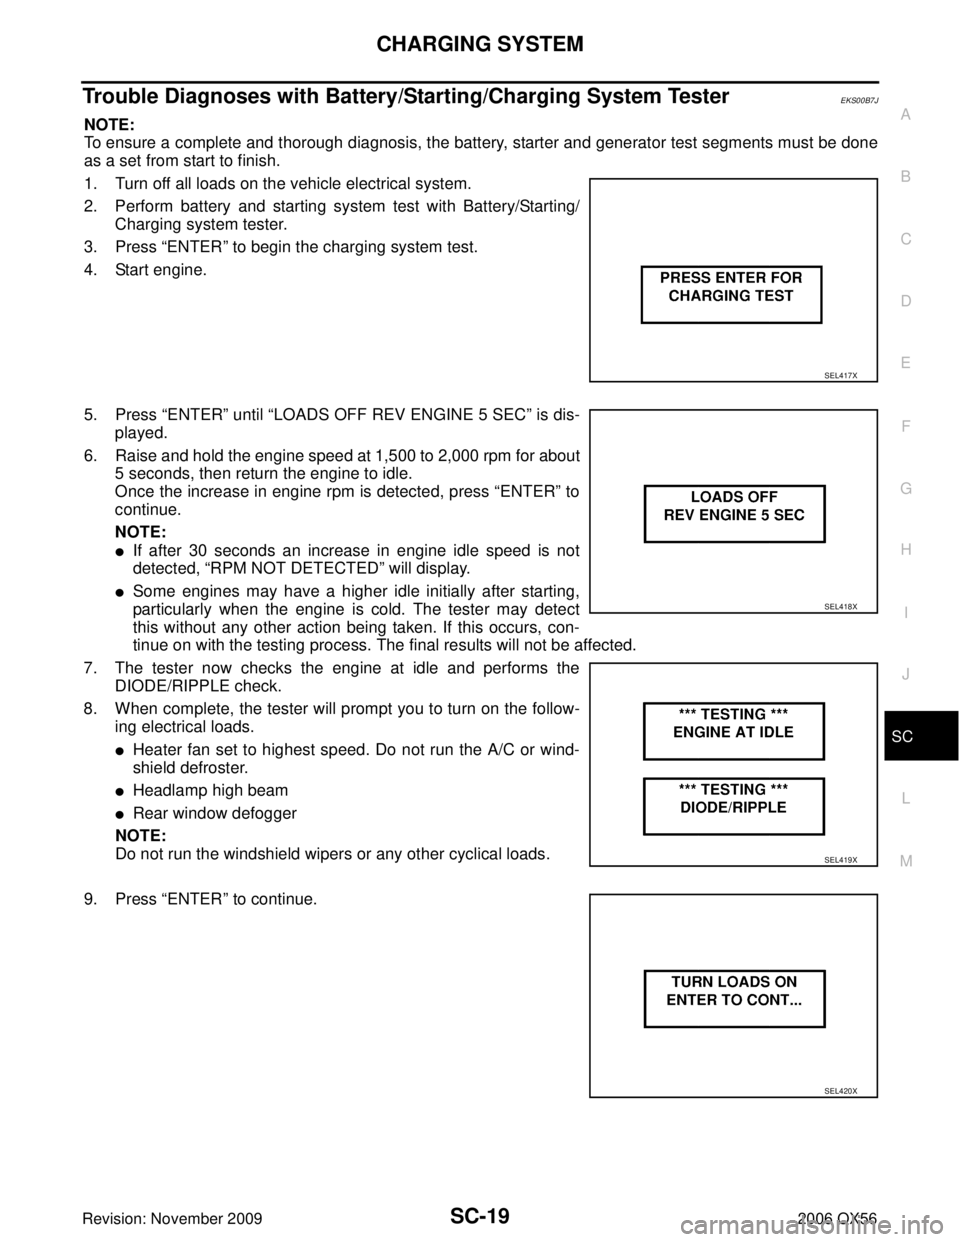
1. Turn off all loads on the vehicle electrical system.
2. Perform battery and starting system test with Battery/Starting/
Charging system tester.
3. Press “ENTER” to begin the charging system test.
4. Start engine.
5. Press “ENTER” until “LOADS OFF REV ENGINE 5 SEC ” is dis-
played.
6. Raise and hold the engine speed at 1,500 to 2,000 rpm for about 5 seconds, then return the engine to idle.
Once the increase in engine rpm is detected, press “ENTER” to
continue.
NOTE:
�If after 30 seconds an increase in engine idle speed is not
detected, “RPM NOT DETECTED” will display.
�Some engines may have a higher idle initially after starting,
particularly when the engine is cold. The tester may detect
this without any other action being taken. If this occurs, con-
tinue on with the testing process. The final results will not be affected.
7. The tester now checks the engine at idle and performs the DIODE/RIPPLE check.
8. When complete, the tester will prompt you to turn on the follow- ing electrical loads.
�Heater fan set to highest speed. Do not run the A/C or wind-
shield defroster.
�Headlamp high beam
�Rear window defogger
NOTE:
Do not run the windshield wipers or any other cyclical loads.
9. Press “ENTER” to continue.
SEL417X
SEL418X
SEL419X
SEL420X