Page 2885 of 3383
RSU-46
HEIGHT SENSOR
Revision: November 20092006 QX56
INSTALLATION
Installation is in the reverse order of removal.
1. Start the engine.
2. Use CONSULT-II to perform "STANDARD HEIGHT LEVEL" work support function.
3. Using data monitor of CONSULT-II, verify "HEIGT CALC" is at 0 mm.
4. Check the vehicle height. Refer to RSU-49, "
Wheelarch Height (Unladen*1 )" . If vehicle height is not
within ± 10 mm (0 ± 0.39 in) of the specification, perform the initialization procedure. Refer to RSU-47,
"Initialization Procedure" .
Page 2886 of 3383

CONTROL UNITRSU-47
C
DF
G H
I
J
K L
M A
B
RSU
Revision: November 2009 2006 QX56
CONTROL UNITPFP:47850
Removal and InstallationEES001HR
REMOVAL
1. Remove the rear LH interior trim panel. Refer to EI-35, "BODY SIDE TRIM" .
2. Disconnect the battery negative terminal.
3. Disconnect the suspension control unit electrical connector.
4. Remove the two bolts and remove the suspension control unit.
INSTALLATION
Installation is in the reverse order of removal.
Initialization ProcedureEES001HS
1. If control unit has been replaced, proceed to step 2. If control unit has not been replaced, use CONSULT- II “CLEAR HEIGHT INI ” work support function to clear initialization flag and value. The CK SUSP warning
lamp should illuminate. Using CONSULT-II “EXHAUST SOLENOID” active test, release the air pressure
from the rear load leveling air suspension system.
2. Roll vehicle forward and backward.
3. Use CONSULT-II “ADJUST HEIGHT INI ” work support function to set initialization condition.
4. Confirm that CK SUSP warning lamp is OFF.
LEIA0100E
Suspension control unit bolts : 6 N·m (0.6 kg-m, 53 in-lb)
Page 2888 of 3383
SERVICE DATA AND SPECIFICATIONS (SDS)RSU-49
C
DF
G H
I
J
K L
M A
B
RSU
Revision: November 2009 2006 QX56
Wheelarch Height (Unladen*1 )EES001HV
Unit: mm (in)
*1: Fuel, engine coolant and engine oil full. Spare tire, jack, hand tools and mats in designated positions.
*2: Verify the vehicle height. If vehicle height is not within ± 10 mm (0.39 in) of the specification, perform the control unit initialization pro-
cedure. Refer to RSU-47, "
Initialization Procedure" .
Suspension type
Air leveling*
2
Applied model2WD 4WD
Front wheelarch height (Hf) 913
(35.94) 931
(36.65)
Rear wheelarch height (Hr) 912
(35.91) 932
(36.69)
LEIA0085E
Page 2892 of 3383
SEAT BELTSSB-3
C
DE
F
G
I
J
K L
M A
B
SB
Revision: November 2009 2006 QX56
SEAT BELTSPFP:86884
Removal and Installation of Front Seat Belt EHS001N0
1. Assist handle2. Assist handle screw cover3. D-ring anchor bolt cover
4. Seat belt buckle 5. Seat belt retractor and belt assem-
bly LH 6. Anchor cover
7. Seat belt pre-tensioner connector 8. Center pillar lower finisher 9. Seat belt anchor
10. Center pillar 11. Center pillar upper finisher12. Seat belt height adjuster
13. Seat belt height adjuster finisher
WHIA0277E
Page 2893 of 3383

SB-4
SEAT BELTS
Revision: November 20092006 QX56
FRONT SEAT BELT RETRACTOR
Removal
CAUTION:
�Before servicing SRS, turn the ignition switch off, disconnect both battery cables and wait at least
3 minutes.
1. Remove the center pillar upper/lower finishers. Refer to EI-35, "
BODY SIDE TRIM" .
2. Remove the seat belt retractor anchor bolts and seat belt retractor and belt assembly.
�On RH side, disconnect the seat belt tension sensor.
3. Disconnect the seat belt pre-tensioner electrical connector. CAUTION:
�For removing pre-tensioner connector, insert a thin
screwdriver (1) wrapped in tape (3) into the notch. Lift the
locking tab to unlock (2), then remove the connector.
�Install the pre-tensioner connector with the locking tab
raised, then push the locking tab into the connector to
lock (4).
Installation
Installation is in the reverse order of removal.
�Install the seat belt retractor and belt assembly upper bolt first.
�Ensure that seat belt height adjuster is locked in the lowest position during installation.
WHIA0278E
WHIA0279E
Page 2895 of 3383
SB-6
SEAT BELTS
Revision: November 20092006 QX56
Removal and Installation of Second Row Seat Belt EHS001N1
1. Seat belt height adjuster2. D-ring anchor bolt cover 3. D-ring anchor
4. Seat belt retractor and belt assem- bly 5. Seat belt buckle
6. Seat belt retractor cover
7. Push pin 8. Seat belt retractor and belt assem-
bly 9. Seat belt bezel
10. Seat belt buckle 11. Seat cushion finisher 12. Seat belt lower anchor
WHIA0281E
Page 2896 of 3383

SEAT BELTSSB-7
C
DE
F
G
I
J
K L
M A
B
SB
Revision: November 2009 2006 QX56
REMOVAL
1. Remove seat belt lower anchor cover and bolt.
2. Remove the D-ring anchor bolt cover and D-ring anchor bolt.
3. Remove the upper and lower luggage area trim. Refer to EI-35, "
BODY SIDE TRIM" .
4. Remove the seat belt guide bolt.
5. Remove seat belt retractor anchor bolt and the seat belt assembly.
6. Remove the seat belt height adjuster assembly.
INSTALLATION
Installation is in the reverse order of removal.
�Ensure that seat belt height adjuster is locked in the lowest position during installation.
SECOND ROW SEAT BELT BUCKLE
Removal
1. Remove the rear bucket seat.
2. Remove the screw and seat cushion inner finisher. Refer to SE-
98, "Second Row Center"
3. Remove the anchor bolt and buckle.
4. Remove the rear bench seat. Refer to SE-98, "
Second Row Outboard" .
5. Remove the seat cushion finisher.
6. Remove the anchor bolt and buckle.
Installation
Installation is in the reverse order of removal.
SECOND ROW SEAT BELT RETRACTOR - BENCH SEAT
Removal
1. Remove seat belt anchor.
2. Remove seat belt bezel.
3. Remove seat back upholstery and foam. Refer to SE-99, "
Disassembly and Assembly" .
4. Remove seat belt retractor cover.
5. Remove bolt and remove seat belt retractor and seat belt assembly.
Installation
Installation is in the reverse order of removal.
WHIA0347E
Page 2898 of 3383
SEAT BELTSSB-9
C
DE
F
G
I
J
K L
M A
B
SB
Revision: November 2009 2006 QX56
INSTALLATION
Installation is in the reverse order of removal.
�Make sure seat belt height adjuster is locked in the lowest position during installation.
�Seat belt anchor base should be flat to the floor during installation and not on the anti-rotation bead.
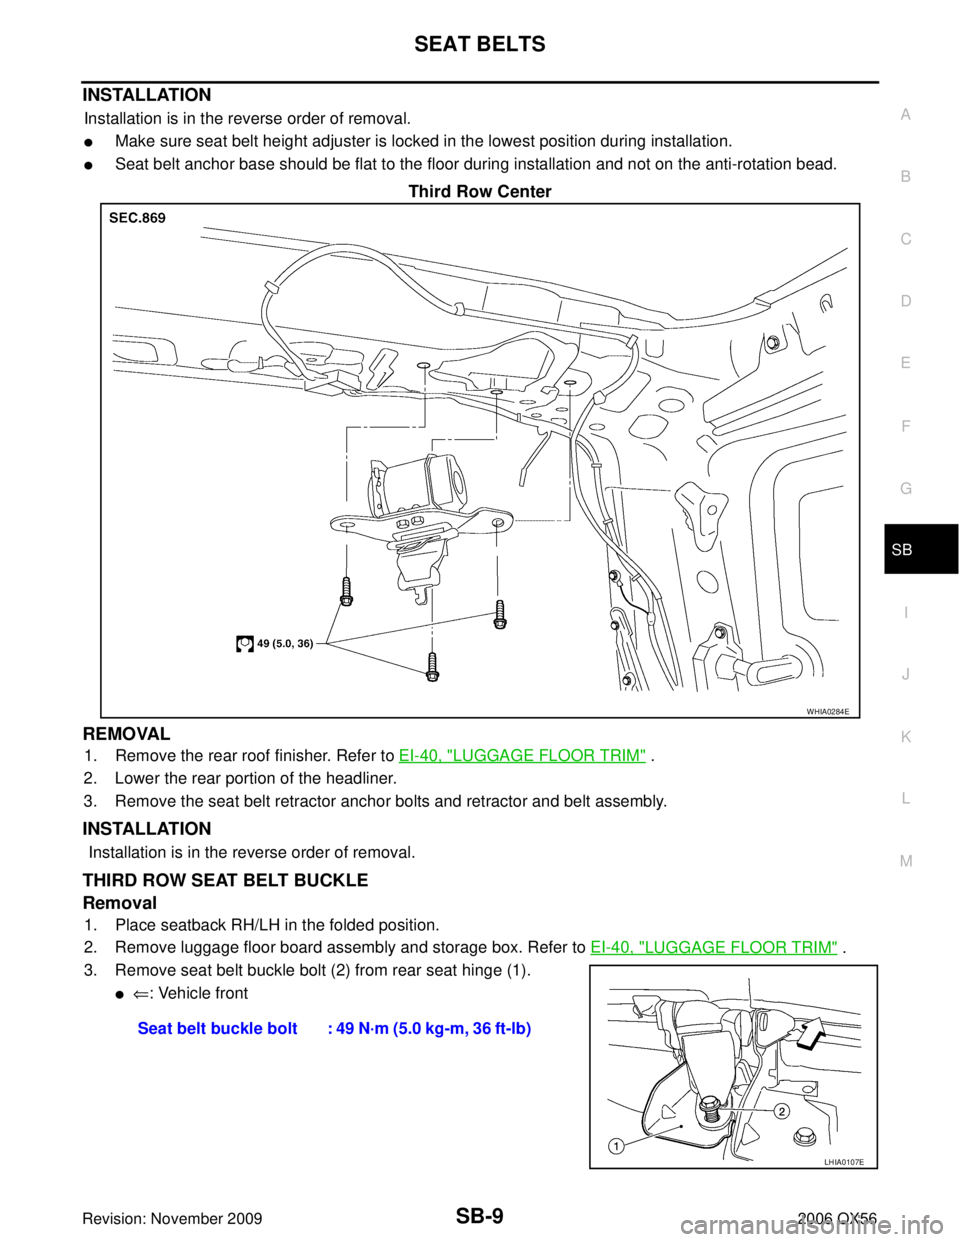
Third Row Center
REMOVAL
1. Remove the rear roof finisher. Refer to EI-40, "LUGGAGE FLOOR TRIM" .
2. Lower the rear portion of the headliner.
3. Remove the seat belt retractor anchor bolts and retractor and belt assembly.
INSTALLATION
Installation is in the reverse order of removal.
THIRD ROW SEAT BELT BUCKLE
Removal
1. Place seatback RH/LH in the folded position.
2. Remove luggage floor board assembly and storage box. Refer to EI-40, "
LUGGAGE FLOOR TRIM" .
3. Remove seat belt buckle bolt (2) from rear seat hinge (1).
�⇐ : Vehicle front
WHIA0284E
Seat belt buckle bolt : 49 N·m (5.0 kg-m, 36 ft-lb)
LHIA0107E

RSU-49
C
DF
G H
I
J
K L
M A
B
RSU
Revision: November 2009 2006 QX56
Wheelarch Height (Unladen*1 )EES001HV
Unit: mm (in)
*1: Fuel, engine coolant and engine oil ful")