2006 INFINITI M35 hood open
[x] Cancel search: hood openPage 2747 of 5621
![INFINITI M35 2006 Factory Service Manual EC-1204
[VK45DE]
DTC P0507 ISC SYSTEM
Revision: 2006 January2006 M35/M45
DTC P0507 ISC SYSTEMPFP:23781
DescriptionNBS005JD
NOTE:
If DTC P0507 is displayed with other DTC, first perform the trouble dia INFINITI M35 2006 Factory Service Manual EC-1204
[VK45DE]
DTC P0507 ISC SYSTEM
Revision: 2006 January2006 M35/M45
DTC P0507 ISC SYSTEMPFP:23781
DescriptionNBS005JD
NOTE:
If DTC P0507 is displayed with other DTC, first perform the trouble dia](/manual-img/42/57023/w960_57023-2746.png)
EC-1204
[VK45DE]
DTC P0507 ISC SYSTEM
Revision: 2006 January2006 M35/M45
DTC P0507 ISC SYSTEMPFP:23781
DescriptionNBS005JD
NOTE:
If DTC P0507 is displayed with other DTC, first perform the trouble diagnosis for the other DTC.
The ECM controls the engine idle speed to a specified level through the fine adjustment of the air, which is let
into the intake manifold, by operating the electric throttle control actuator. The operating of the throttle valve is
varied to allow for optimum control of the engine idling speed. The crankshaft position sensor (POS) detects
the actual engine speed and sends a signal to the ECM.
The ECM controls the electric throttle control actuator so that the engine speed coincides with the target value
memorized in the ECM. The target engine speed is the lowest speed at which the engine can operate steadily.
The optimum value stored in the ECM is determined by taking into consideration various engine conditions,
such as during warming up, deceleration, and engine load (air conditioner, power steering and cooling fan
operation, etc.).
On Board Diagnosis LogicNBS005JE
DTC Confirmation ProcedureNBS005JF
NOTE:
If DTC Confirmation Procedure has been previously conducted, always turn ignition switch OFF and wait
at least 10 seconds before conducting the next test.
If the target idle speed is out of the specified value, perform EC-807, "Idle Air Volume Learning" ,
before conducting DTC Confirmation Procedure. For the target idle speed, refer to the EC-1461,
"SERVICE DATA AND SPECIFICATIONS (SDS)" .
TESTING CONDITION:
Before performing the following procedure, confirm that battery voltage is more than 11V at idle.
Always perform the test at a temperature above 10C (14F).
WITH CONSULT-II
1. Open engine hood.
2. Start engine and warm it up to normal operating temperature.
3. Turn ignition switch OFF and wait at least 10 seconds.
4. Turn ignition switch ON again and select “DATA MONITOR”
mode with CONSULT-II.
5. Start engine and run it for at least 1 minute at idle speed.
6. If 1st trip DTC is detected, go to EC-1205, "
Diagnostic Proce-
dure" .
WITH GST
Follow the procedure “WITH CONSULT-II” above.
DTC No. Trouble diagnosis name DTC detecting condition Possible cause
P0507
0507Idle speed control sys-
tem RPM higher than
expectedThe idle speed is more than the target idle
speed by 200 rpm or more.
Electric throttle control actuator
Intake air leak
PCV system
SEF174Y
Page 3017 of 5621
EI-12
FRONT BUMPER
Revision: 2006 January2006 M35/M45
REMOVAL
1. Fully open hood assembly.
2. Remove screws of front air spoiler and remove front air spoiler.
3. Remove bolts of front undercover and remove undercover. (Figure to illustration C)
4. Remove front side of fender protector (LH/RH). Refer to EI-20, "
FENDER PROTECTOR" .
5. Remove clips of bumper fascia upper side.
6. Remove clips of front grille upper side.
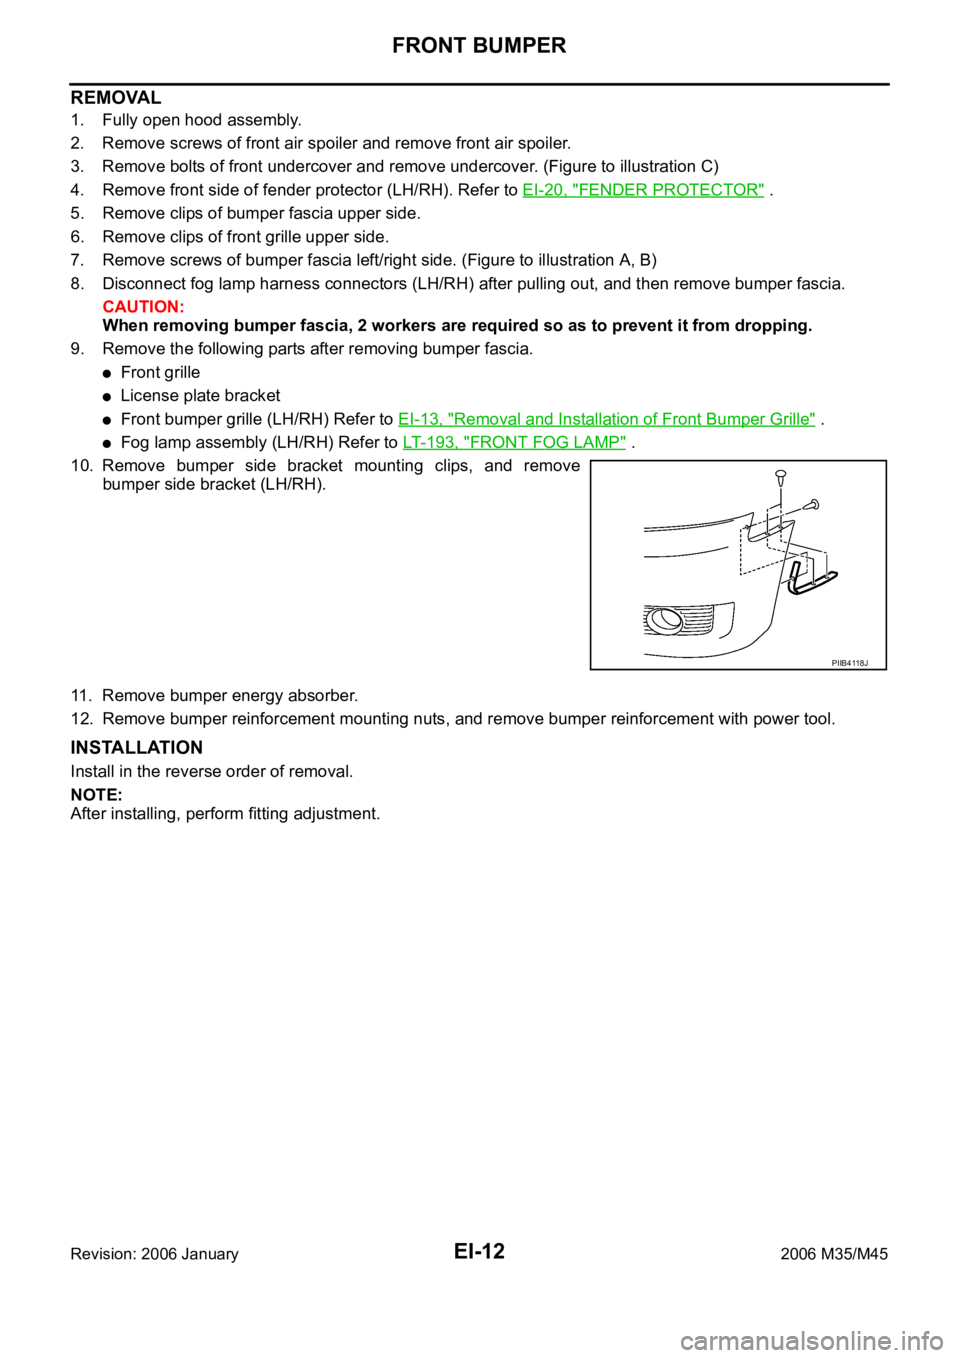
7. Remove screws of bumper fascia left/right side. (Figure to illustration A, B)
8. Disconnect fog lamp harness connectors (LH/RH) after pulling out, and then remove bumper fascia.
CAUTION:
When removing bumper fascia, 2 workers are required so as to prevent it from dropping.
9. Remove the following parts after removing bumper fascia.
Front grille
License plate bracket
Front bumper grille (LH/RH) Refer to EI-13, "Removal and Installation of Front Bumper Grille" .
Fog lamp assembly (LH/RH) Refer to LT- 1 9 3 , "FRONT FOG LAMP" .
10. Remove bumper side bracket mounting clips, and remove
bumper side bracket (LH/RH).
11. Remove bumper energy absorber.
12. Remove bumper reinforcement mounting nuts, and remove bumper reinforcement with power tool.
INSTALLATION
Install in the reverse order of removal.
NOTE:
After installing, perform fitting adjustment.
PIIB4118J
Page 3021 of 5621
EI-16
FRONT GRILLE
Revision: 2006 January2006 M35/M45
FRONT GRILLEPFP:62310
Removal and InstallationNIS0024G
CAUTION:
Apply protection tape around outer circumference of front grille (bumper fascia side).
REMOVAL
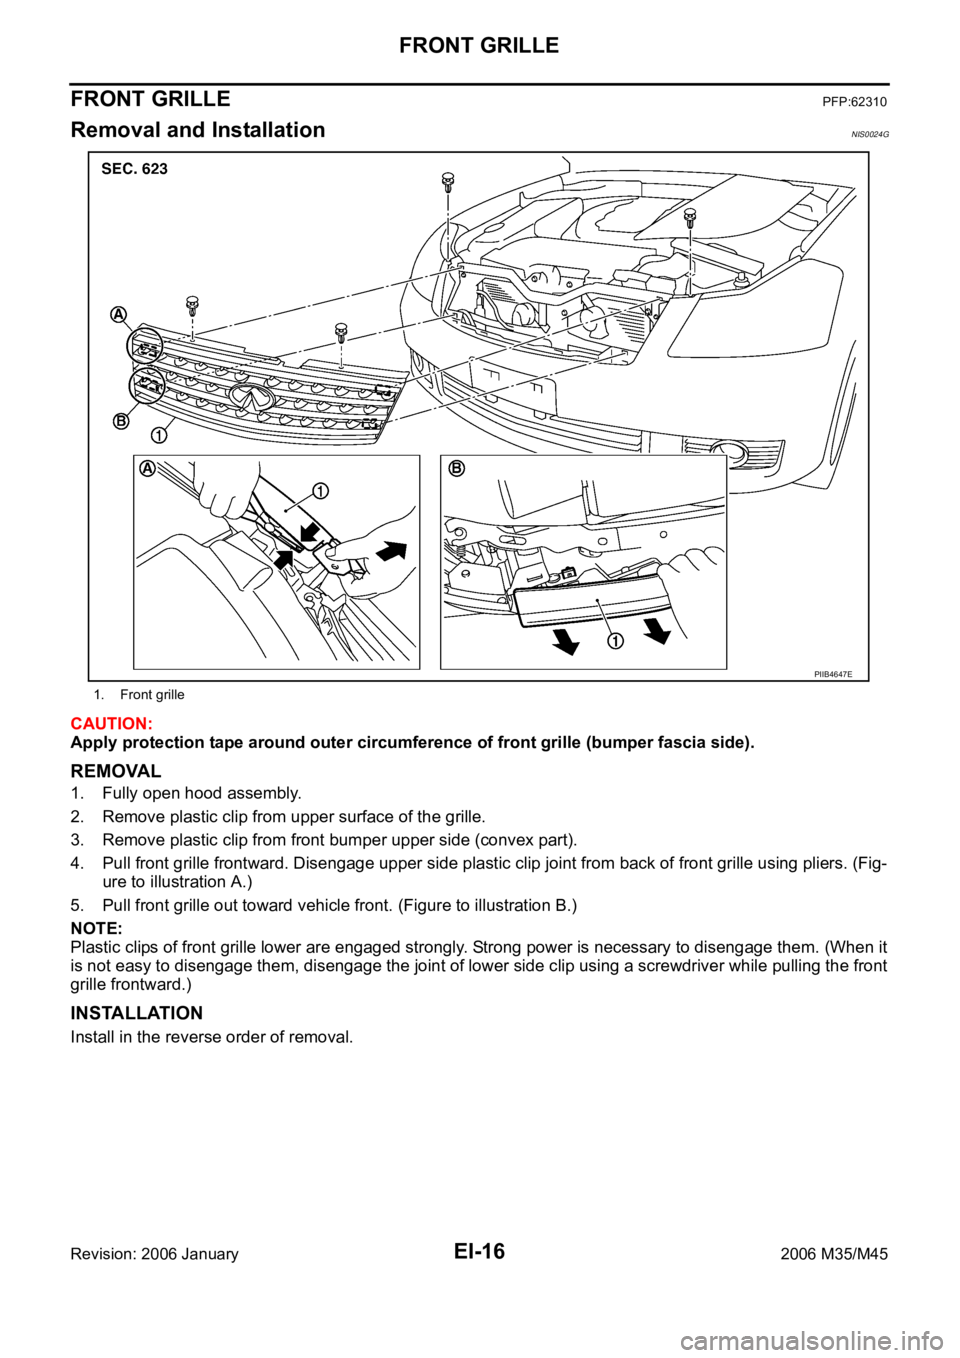
1. Fully open hood assembly.
2. Remove plastic clip from upper surface of the grille.
3. Remove plastic clip from front bumper upper side (convex part).
4. Pull front grille frontward. Disengage upper side plastic clip joint from back of front grille using pliers. (Fig-
ure to illustration A.)
5. Pull front grille out toward vehicle front. (Figure to illustration B.)
NOTE:
Plastic clips of front grille lower are engaged strongly. Strong power is necessary to disengage them. (When it
is not easy to disengage them, disengage the joint of lower side clip using a screwdriver while pulling the front
grille frontward.)
INSTALLATION
Install in the reverse order of removal.
1. Front grille
PIIB4647E
Page 3022 of 5621
HOOD
EI-17
C
D
E
F
G
H
J
K
L
MA
B
EI
Revision: 2006 January2006 M35/M45
HOODPFP:F5100
Removal and InstallationNIS0024H
HOOD TOP MOLDING
Removal
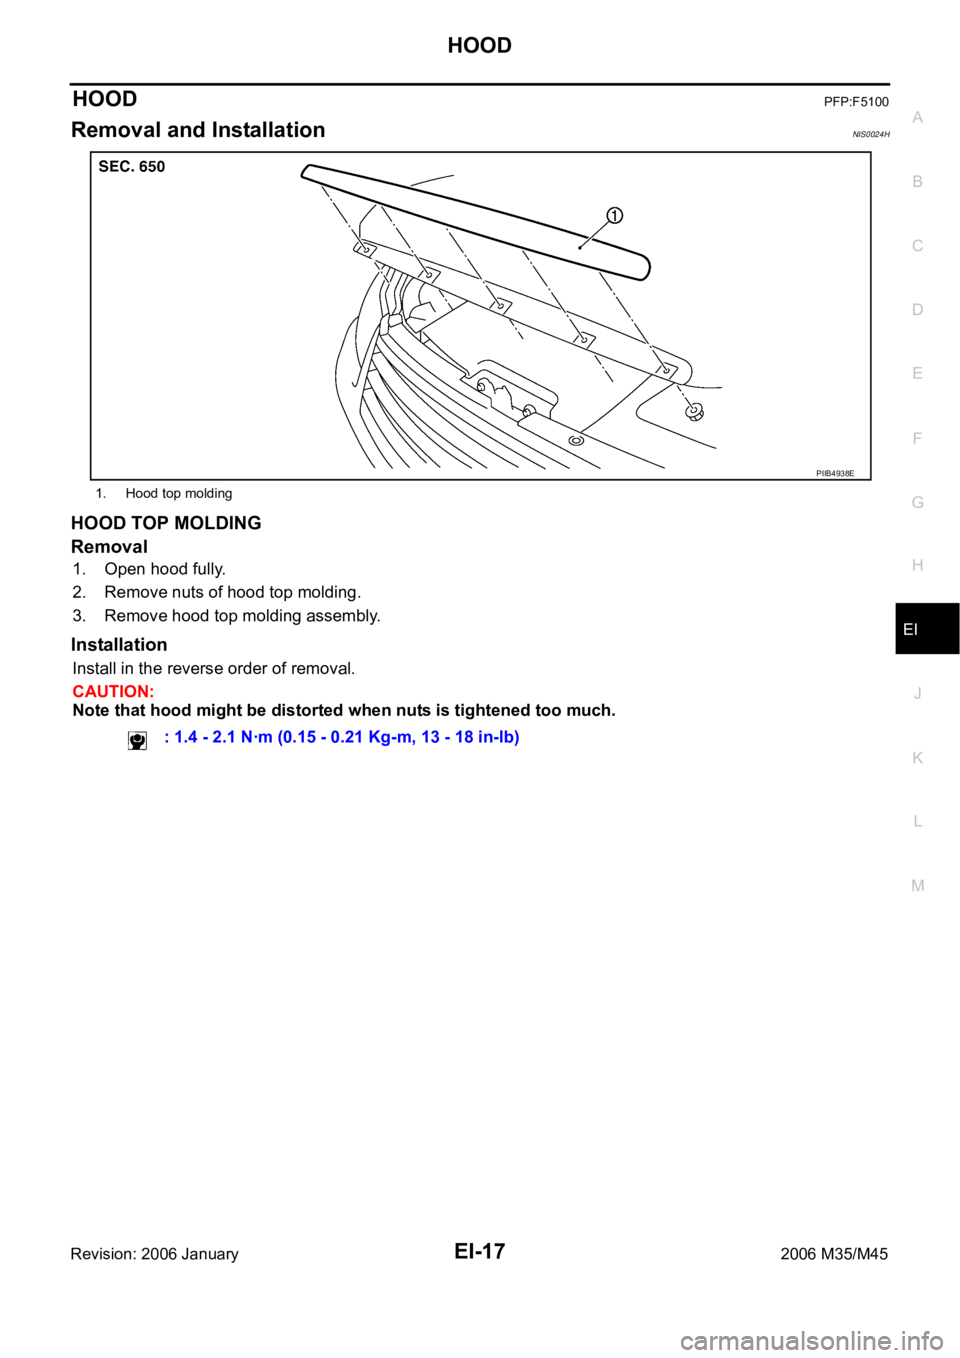
1. Open hood fully.
2. Remove nuts of hood top molding.
3. Remove hood top molding assembly.
Installation
Install in the reverse order of removal.
CAUTION:
Note that hood might be distorted when nuts is tightened too much.
1. Hood top molding
PIIB4938E
: 1.4 - 2.1 Nꞏm (0.15 - 0.21 Kg-m, 13 - 18 in-lb)
Page 3662 of 5621
INSTRUMENT PANEL ASSEMBLY
IP-13
C
D
E
F
G
H
J
K
L
MA
B
IP
Revision: 2006 January2006 M35/M45
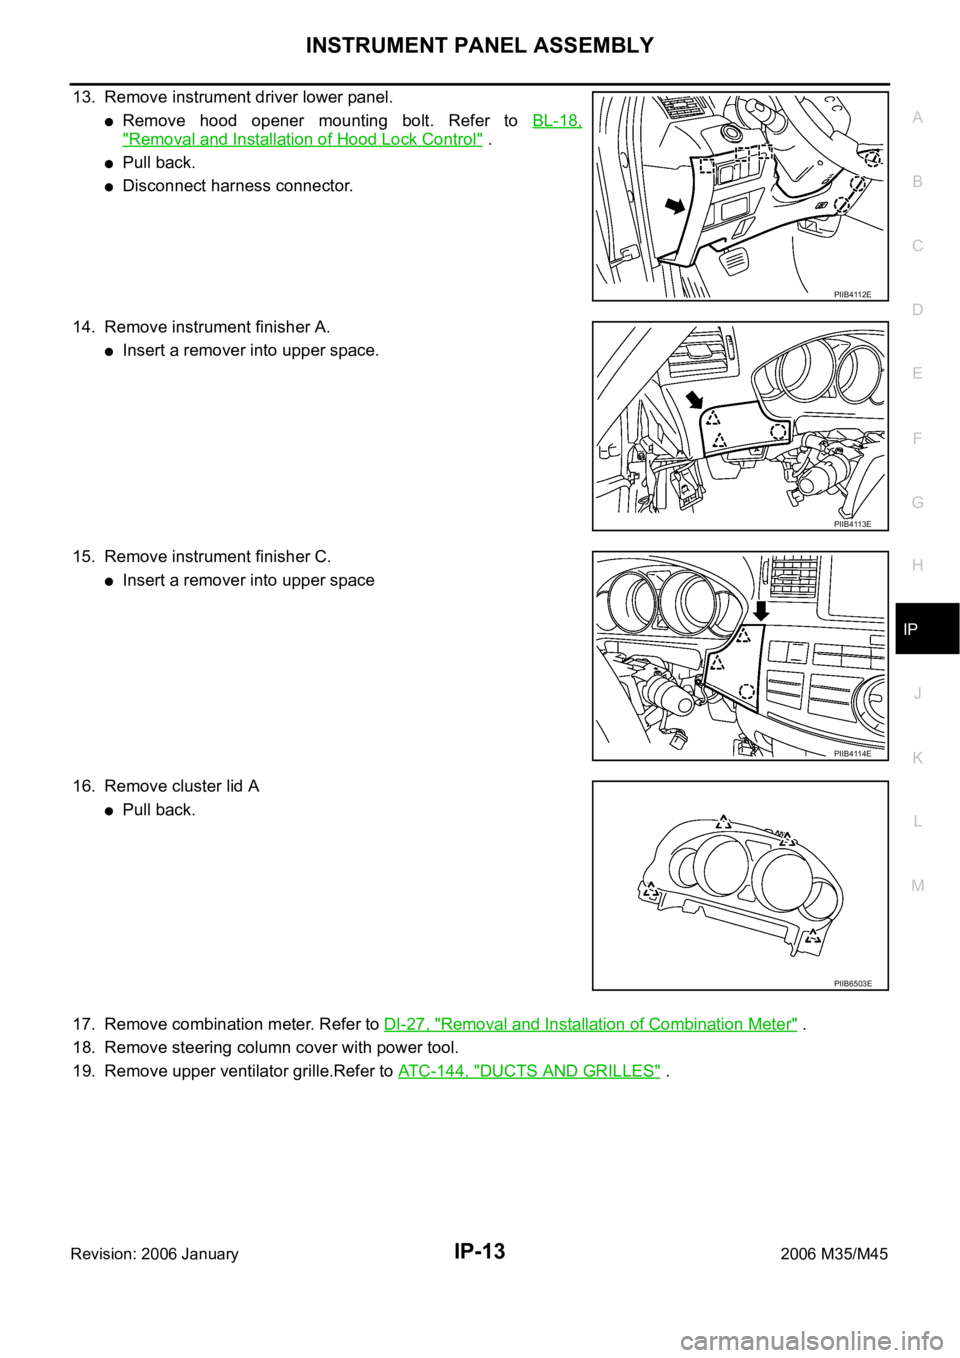
13. Remove instrument driver lower panel.
Remove hood opener mounting bolt. Refer to BL-18,
"Removal and Installation of Hood Lock Control" .
Pull back.
Disconnect harness connector.
14. Remove instrument finisher A.
Insert a remover into upper space.
15. Remove instrument finisher C.
Insert a remover into upper space
16. Remove cluster lid A
Pull back.
17. Remove combination meter. Refer to DI-27, "
Removal and Installation of Combination Meter" .
18. Remove steering column cover with power tool.
19. Remove upper ventilator grille.Refer to ATC-144, "
DUCTS AND GRILLES" .
PIIB4112E
PIIB4113E
PIIB4114E
PIIB6503E
Page 3664 of 5621
INSTRUMENT PANEL ASSEMBLY
IP-15
C
D
E
F
G
H
J
K
L
MA
B
IP
Revision: 2006 January2006 M35/M45
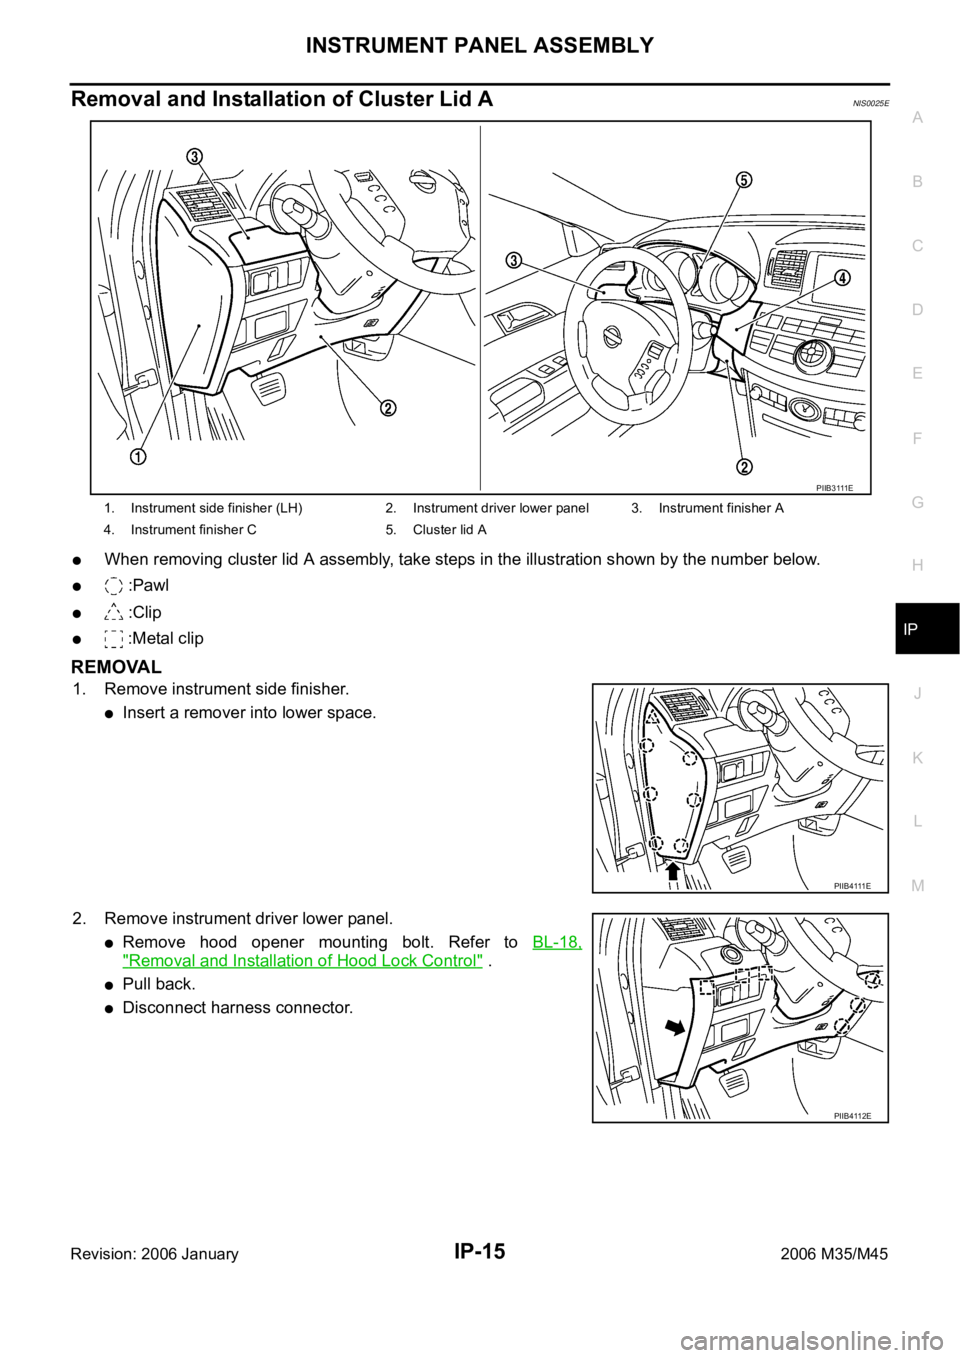
Removal and Installation of Cluster Lid ANIS0025E
When removing cluster lid A assembly, take steps in the illustration shown by the number below.
:Pawl
:Clip
:Metal clip
REMOVAL
1. Remove instrument side finisher.
Insert a remover into lower space.
2. Remove instrument driver lower panel.
Remove hood opener mounting bolt. Refer to BL-18,
"Removal and Installation of Hood Lock Control" .
Pull back.
Disconnect harness connector.
1. Instrument side finisher (LH) 2. Instrument driver lower panel 3. Instrument finisher A
4. Instrument finisher C 5. Cluster lid A
PIIB3111E
PIIB4111E
PIIB4112E
Page 4782 of 5621

GENERAL MAINTENANCE
MA-5
C
D
E
F
G
H
I
J
K
MA
B
MA
Revision: 2006 January2006 M35/M45
OUTSIDE THE VEHICLE
The maintenance items listed here should be performed from time to time, unless otherwise specified.
INSIDE THE VEHICLE
The maintenance items listed here should be checked on a regular basis, such as when performing periodic maintenance, cleaning the
vehicle, etc.ItemReference page
TiresCheck the pressure with a gauge, including the spare, at least once a month
and always prior to a long distance trips. Adjust to the specified pressure if
necessary. Check carefully for damage, cuts or excessive wear.—
Wheel nutsWhen checking the tires, make sure no nuts are missing, and check for any
loose nuts. Tighten if necessary.—
WindshieldClean the windshield on a regular basis. Check the windshield at least every
six months for cracks or other damage. Repair as necessary.—
Tire rotationTires should be rotated every 12,000 km (7,500 miles).MA-35
Wheel alignment and
balanceIf the vehicle pulls to either side while driving on a straight and level road, or if
you detect uneven or abnormal tire wear, there may be a need for wheel align-
ment. If the steering wheel or seat vibrates at normal highway speeds, wheel
balancing may be needed.MA-33,
FSU-6
(2WD),
FSU-23
(AWD)
Windshield wiper
bladesCheck for cracks or wear if they do not wipe properly. —
Doors and engine
hoodCheck that all doors and the engine hood operate smoothly as well as the
trunk lid. Also make sure that all latches lock securely. Lubricate if necessary.
Make sure that the secondary latch keeps the hood from opening when the pri-
mary latch is released.
When driving in areas using road salt or other corrosive materials, check lubri-
cation frequently.MA-38
LampsMake sure that the headlamps, stop lamps, tail lamps, turn signal lamps, and
other lamps are all operating properly and installed securely. Also check head-
lamp aim. Clean the headlamps on a regular basis. —
ItemReference page
Warning lamps and
chimesMake sure that all warning lamps and chimes are operating properly. —
Windshield wiper and
washerCheck that the wipers and washer operate properly and that the wipers do not
streak.—
Windshield defrosterCheck that the air comes out of the defroster outlets properly and in sufficient
quantity when operating the heater or air conditioner.—
Steering wheelCheck that it has the specified play. Be sure to check for changes in the steer-
ing condition, such as excessive play, hard steering or strange noises.
Free play: Less than 35 mm (1.38 in)—
SeatsCheck seat position controls such as seat adjusters, seatback recliner, etc. to
make sure they operate smoothly and that all latches lock securely in every
position. Check that the head restrains move up and down smoothly and that
the locks (if equipped) hold securely in all latched positions. Check that the
latches lock securely for folding-down rear seatbacks.—
Seat beltsCheck that all parts of the seat belt system (e.g. buckles, anchors, adjusters
and retractors) operate properly and smoothly, and are installed securely.
Check the belt webbing for cuts, fraying, wear or damage.MA-39
Accelerator pedalCheck the pedal for smooth operation and make sure the pedal does not catch
or require uneven effort. Keep the floor mats away from the pedal.—
BrakesCheck that the brake does not pull the vehicle to one side when applied. —
Brake pedal and
boosterCheck the pedal for smooth operation and make sure it has the proper dis-
tance under it when depressed fully. Check the brake booster function. Be
sure to keep the floor mats away from the pedal.BR-6
, BR-18
Page 4849 of 5621

PG-22
IPDM E/R (INTELLIGENT POWER DISTRIBUTION MODULE ENGINE ROOM)
Revision: 2006 January2006 M35/M45
DATA MONITOR
Operation Procedure
1. Touch “DATA MONITOR” on “SELECT MONITOR ITEM ” screen.
2. Touch “ALL SIGNALS”, “MAIN SIGNALS” or “SELECTION FROM MENU” on the “DATA MONITOR”
screen.
3. Touch the required monitoring item on “SELECTION FROM MENU”. In “ALL SIGNALS”, all items are
monitored. In “MAIN SIGNALS”, predetermined items are monitored.
4. Touch “START”.
5. Touch “RECORD” while monitoring to record the status of the item being monitored. To stop recording,
touch “STOP”.
All Signals, Main Signals, Selection From Menu
NOTE:
Perform monitoring of IPDM E/R data with the ignition switch ON. When the ignition switch is at ACC, the display may not be cor-
rect.
*1: Only the vehicle with day time light system operates. ALL SIGNALS All items will be monitored.
MAIN SIGNALS Monitor the predetermined item.
SELECTION FROM MENU Select any item for monitoring.
Item nameCONSULT-II
screen displayDisplay or unitMonitor item selection
Description
ALL
SIGNALSMAIN
SIGNALSSELECTION
FROM
MENU
Motor fan request MOTOR FAN REQ 1/2/3/4
Signal status input from ECM
A/C Compressor
requestAC COMP REQ ON/OFF
Signal status input from ECM
Tail & clearance
requestTAIL&CLR REQ ON/OFF
Signal status input from BCM
Headlamp LO
requestHL LO REQ ON/OFF
Signal status input from BCM
Headlamp HI
requestHL HI REQ ON/OFF
Signal status input from BCM
Front fog lamp
request FR FOG REQ ON/OFF
Signal status input from BCM
Front wiper request FR WIP REQSTOP/1LOW/
LOW/HI
Signal status input from BCM
Wiper auto stop WIP AUTO STOP ACT P/STOP P
Output status of IPDM E/R
Wiper protection WIP PROT OFF/BLOCK
Control status of IPDM E/R
Starter request ST RLY REQ ON/OFF
Signal status input from BCM
Ignition relay status IGN RLY ON/OFF
Ignition relay status monitored
with IPDM E/R
Rear window defog-
ger requestRR DEF REQ ON/OFF
Signal status input from BCM
Oil pressure switch OIL P SW OPEN/CLOSE
Signal status input in IPDM E/R
Daytime running
light requestDTRL REQ
*1ON/OFFSignal status input from BCM
Hood switch HOOD SW ON/OFF
Signal status input in IPDM E/R
Theft warning horn
requestTHFT HRN REQ ON/OFF
Signal status input from BCM
Horn chirp HORN CHIRP ON/OFF
Output status of IPDM E/R