2006 INFINITI M35 high beam
[x] Cancel search: high beamPage 4472 of 5621

HEADLAMP (FOR USA) - XENON TYPE -
LT-45
C
D
E
F
G
H
I
J
L
MA
B
LT
Revision: 2006 January2006 M35/M45
HEADLAMP OPERATION
Low Beam Operation
With the lighting switch in 2ND position, the BCM receives input signal requesting the headlamps to illuminate.
This input signal is communicated to the IPDM E/R across the CAN communication lines. The CPU located in
the IPDM E/R controls the headlamp low relay coil, which when energized, directs power
through 15A fuse (No. 76, located in IPDM E/R)
through IPDM E/R terminal 20
to front combination lamp RH terminal 8,
through 15A fuse (No. 86, located in IPDM E/R)
through IPDM E/R terminal 30
to front combination lamp LH terminal 8.
Ground is supplied
to front combination lamp RH terminal 4
to front combination lamp LH terminal 4
through grounds E22 and E43.
With power and ground supplied, low beam headlamps illuminate.
High Beam Operation/Flash-to-Pass Operation
With the lighting switch in 2ND position and placed in HIGH or PASS position, the BCM receives input signal
requesting the headlamp high beams and low beams to illuminate. This input signal is communicated to the
IPDM E/R across the CAN communication lines. The CPU located in the IPDM E/R controls the headlamp
high relay coil and low relay coil, which when energized, directs power
through 15A fuse (No. 76, located in IPDM E/R)
through IPDM E/R terminal 20
to front combination lamp RH terminal 8,
through 15A fuse (No. 86, located in IPDM E/R)
through IPDM E/R terminal 30
to front combination lamp LH terminal 8,
through 10A fuse (No. 72, located in IPDM E/R)
through IPDM E/R terminal 27
to front combination lamp RH terminal 6,
through 10A fuse (No. 74, located in IPDM E/R)
through IPDM E/R terminal 28
to front combination lamp LH terminal 6.
Ground is supplied
to front combination lamp RH terminal 4
to front combination lamp LH terminal 4
to front combination lamp RH terminal 2
to front combination lamp LH terminal 2
through grounds E22 and E43.
With power and ground supplied, the high beam and low beam headlamps illuminate.
The unified meter and A/C amp. that received the high beam request signal by BCM across the CAN commu-
nication makes a high beam indicator lamp turn on in the combination meter.
Page 4473 of 5621

LT-46
HEADLAMP (FOR USA) - XENON TYPE -
Revision: 2006 January2006 M35/M45
COMBINATION SWITCH READING FUNCTION
Refer to BCS-3, "COMBINATION SWITCH READING FUNCTION" .
EXTERIOR LAMP BATTERY SAVER CONTROL
When the combination switch (lighting switch) is in the 2ND position (ON), and the ignition switch is turned
from ON or ACC to OFF, the battery saver control function is activated.
Under this condition, the headlamps remain illuminated for 5 minutes, then the headlamps are turned off.
Exterior lamp battery saver control mode can be changed by the function setting of CONSULT-II.
AUTO LIGHT OPERATION
Refer to LT-116, "System Description" .
XENON HEADLAMP
Xenon type lamps are used for to the low beam headlamps. Xenon bulbs do not use a filament. Instead, they
produce light when a high voltage current is passed between two tungsten electrodes through a mixture of
xenon (an inert gas) and certain other metal halides. In addition to strong lighting power, electronic control of
the power supply gives the headlamps stable quality and tone color.
Followings are some advantages of the xenon type headlamp.
The light produced by the headlamps is white color similar to sunlight that is easy to the eyes.
Light output is nearly double that of halogen headlamps, affording increased area of illumination.
Counter-reflected luminance increases and the contrast enhances on the wet road in the rain. That makes
visibility go up more than the increase of the light volume.
Power consumption is approximately 25 percent less than halogen headlamps, reducing battery load.
CAN Communication System DescriptionNKS003OM
CAN (Controller Area Network) is a serial communication line for real time application. It is an on-vehicle mul-
tiplex communication line with high data communication speed and excellent error detection ability. Many elec-
tronic control units are equipped onto a vehicle, and each control unit shares information and links with other
control units during operation (not independent). In CAN communication, control units are connected with 2
communication lines (CAN H line, CAN L line) allowing a high rate of information transmission with less wiring.
Each control unit transmits/receives data but selectively reads required data only.
CAN Communication UnitNKS003ON
Refer to LAN-34, "CAN Communication Unit" .
Page 4485 of 5621

LT-58
HEADLAMP (FOR USA) - XENON TYPE -
Revision: 2006 January2006 M35/M45
4. Touch “HEAD LAMP” on “SELECT TEST ITEM” screen.
DATA MONITOR
Operation Procedure
1. Touch “HEAD LAMP” on “SELECT TEST ITEM” screen.
2. Touch “DATA MONITOR” on “SELECT DIAG MODE” screen.
3. Touch either “ALL SIGNALS” or “SELECTION FROM MENU” on the “SELECT MONITOR ITEM” screen.
4. When “SELECTION FROM MENU” is selected, touch individual items to be monitored. When “ALL SIG-
NALS” is selected, all the items will be monitored.
5. Touch “START”.
6. Touch “RECORD” while monitoring, then the status of the monitored item can be recorded. To stop
recording, touch “STOP”.
Display Item List
PKIA5226E
ALL SIGNALS Monitors all the signals.
SELECTION FROM MENU Selects items and monitor them.
Monitor item Contents
IGN ON SW “ON/OFF” Displays “IGN position (ON)/OFF, ACC position (OFF)” judged from the ignition switch signal.
ACC ON SW “ON/OFF” Displays “ACC (ON)/OFF, Ignition OFF (OFF)” status judged from ignition switch signal.
KEY ON SW “ON/OFF”Displays “Intelligent Key inserted into key slot (ON)/Intelligent Key removed from key slot
(OFF)” status judged from the key switch signal.
TURN SIGNAL R “ON/OFF” Displays status (turn right: ON/others: OFF) as judged from lighting switch signal.
TURN SIGNAL L “ON/OFF” Displays status (turn left: ON/others: OFF) as judged from lighting switch signal.
HI BEAM SW “ON/OFF”Displays status (high beam switch: ON/others: OFF) of high beam switch judged from lighting
switch signal.
HEAD LAMP SW 1 “ON/OFF”Displays status (headlamp switch 1: ON/others: OFF) of headlamp switch 1 judged from light-
ing switch signal.
HEAD LAMP SW 2 “ON/OFF”Displays status (headlamp switch 2: ON/others: OFF) of headlamp switch 2 judged from light-
ing switch signal.
TAIL LAMP SW “ON/OFF”Displays status (lighting switch 1ST or 2ND position: ON/others: OFF) of lighting switch
judged from lighting switch signal.
AUTO LIGHT SW “ON/OFF”Displays status of the lighting switch as judged from the lighting switch signal. (AUTO position:
ON/other than AUTO position: OFF)
PASSING SW “ON/OFF”Displays status (flash-to-passing switch: ON/others: OFF) of flash-to-passing switch judged
from lighting switch signal.
FR FOG SW “ON/OFF”Displays status (front fog lamp switch: ON/others: OFF) of front fog lamp switch judged from
lighting switch signal.
DOOR SW - DR “ON/OFF”Displays status of the driver door as judged from the driver door switch signal. (door is open:
ON/door is closed: OFF)
DOOR SW - AS “ON/OFF”Displays status of the passenger door as judged from the passenger door switch signal. (door
is open: ON/door is closed: OFF)
DOOR SW - RR “ON/OFF”Displays status of the rear door as judged from the rear door switch (RH) signal. (door is
open: ON/door is closed: OFF)
Page 4488 of 5621

HEADLAMP (FOR USA) - XENON TYPE -
LT-61
C
D
E
F
G
H
I
J
L
MA
B
LT
Revision: 2006 January2006 M35/M45
4. Select the desired part to be diagnosed on the “SELECT DIAG
MODE” screen.
DATA MONITOR
Operation Procedure
1. Touch “DATA MONITOR” on “SELECTION DIAG MODE ” screen.
2. Touch “ALL SIGNALS”, “MAIN SIGNALS” or “SELECTION FROM MENU” on the “SELECT MONITOR
ITEM” screen.
3. When “SELECTION FROM MENU” is selected, touch individual items to be monitored. In “ALL SIG-
NALS”, all items are monitored. In “MAIN SIGNALS”, predetermined items are monitored.
4. Touch “START”.
5. Touch “RECORD” while monitoring to record the status of the item being monitored. To stop recording,
touch “STOP”.
All Signals, Main Signals, Selection From Menu
NOTE:
Perform monitoring of IPDM E/R data with the ignition switch ON. When the ignition switch is at ACC, the display may not be correct.
ACTIVE TEST
Operation Procedure
1. Touch “ACTIVE TEST” on “SELECT DIAG MODE” screen.
2. Touch item to be tested, and check operation.
3. Touch “START”.
4. Touch “STOP” while testing to stop the operation.
BCIA0031E
ALL SIGNALS Monitors all items.
MAIN SIGNALS Monitor the predetermined item.
SELECTION FROM MENU Selects items and monitors them.
Item nameCONSULT-II
screen displayDisplay
or unitMonitor item selection
Description
ALL
SIGNALSMAIN
SIGNALSSELECTION
FROM MENU
Position lights request TAIL&CLR REQ ON/OFF
Signal status input from BCM
Headlamp low beam request HL LO REQ ON/OFF
Signal status input from BCM
Headlamp high beam request HL HI REQ ON/OFF
Signal status input from BCM
Front fog lights request FR FOG REQ ON/OFF
Signal status input from BCM
Test itemCONSULT-II
screen displayDescription
Tail lamp relay output TAIL LAMP Allows tail lamp relay to operate by switching operation ON-OFF at your option.
Headlamp relay (HI, LO) output
LAMPSAllows headlamp relay (HI, LO) to operate by switching operation (OFF, HI ON, LO
ON) at your option (Headlamp high beam repeats ON-OFF every 1 second).
Front fog lamp relay output Allows fog lamp relay to operate by switching operation ON-OFF at your option.
Page 4489 of 5621

LT-62
HEADLAMP (FOR USA) - XENON TYPE -
Revision: 2006 January2006 M35/M45
Headlamp High Beam Does Not Illuminate (Both Sides)NKS003OW
1. CHECK COMBINATION SWITCH INPUT SIGNAL
With CONSULT-II
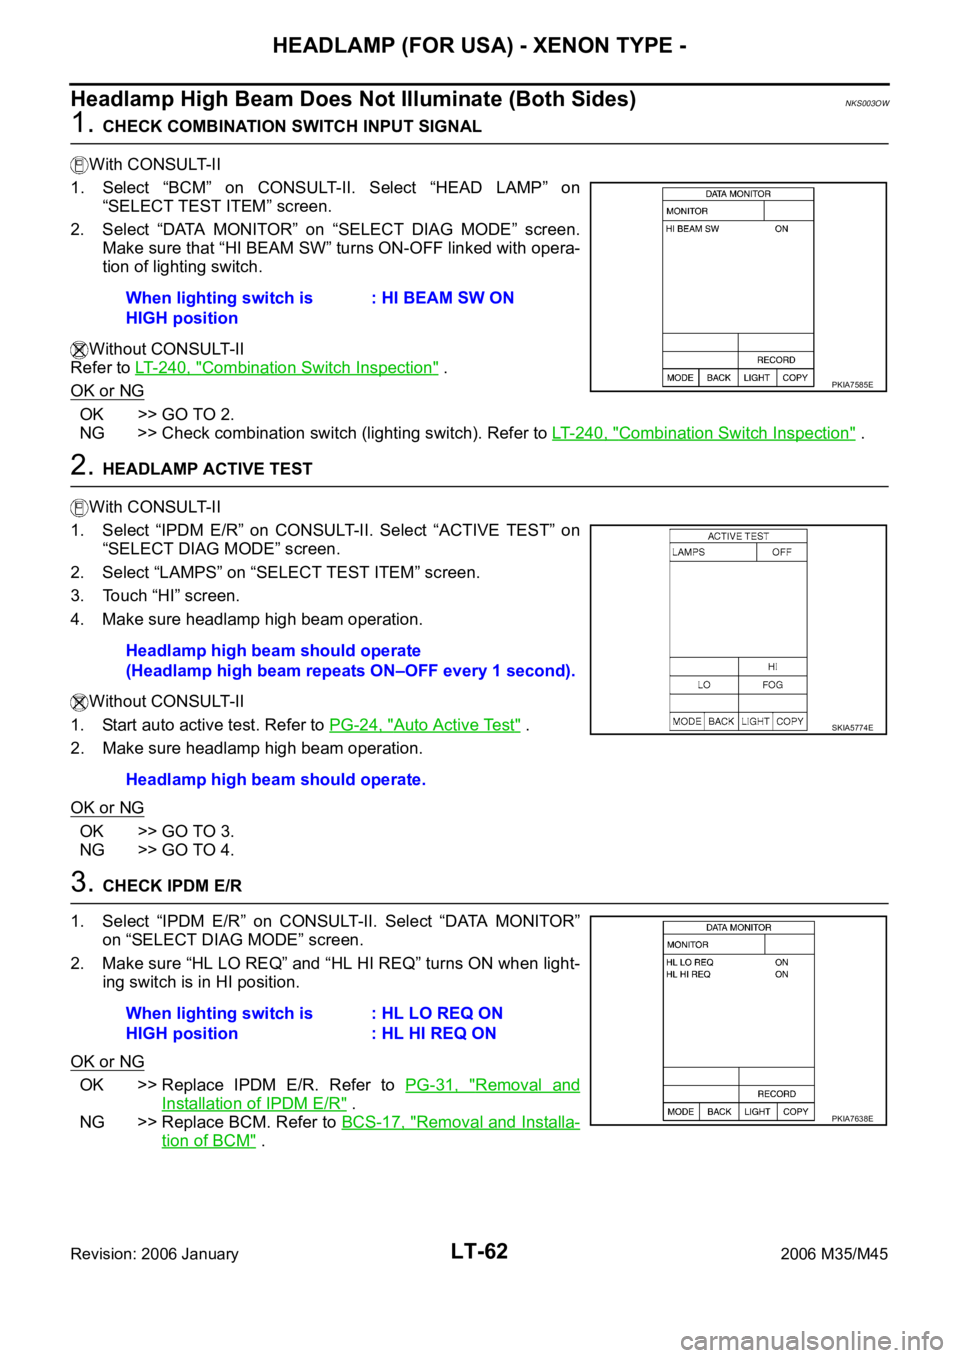
1. Select “BCM” on CONSULT-II. Select “HEAD LAMP” on
“SELECT TEST ITEM” screen.
2. Select “DATA MONITOR” on “SELECT DIAG MODE” screen.
Make sure that “HI BEAM SW” turns ON-OFF linked with opera-
tion of lighting switch.
Without CONSULT-II
Refer to LT- 2 4 0 , "
Combination Switch Inspection" .
OK or NG
OK >> GO TO 2.
NG >> Check combination switch (lighting switch). Refer to LT-240, "
Combination Switch Inspection" .
2. HEADLAMP ACTIVE TEST
With CONSULT-II
1. Select “IPDM E/R” on CONSULT-II. Select “ACTIVE TEST” on
“SELECT DIAG MODE” screen.
2. Select “LAMPS” on “SELECT TEST ITEM” screen.
3. Touch “HI” screen.
4. Make sure headlamp high beam operation.
Without CONSULT-II
1. Start auto active test. Refer to PG-24, "
Auto Active Test" .
2. Make sure headlamp high beam operation.
OK or NG
OK >> GO TO 3.
NG >> GO TO 4.
3. CHECK IPDM E/R
1. Select “IPDM E/R” on CONSULT-II. Select “DATA MONITOR”
on “SELECT DIAG MODE” screen.
2. Make sure “HL LO REQ” and “HL HI REQ” turns ON when light-
ing switch is in HI position.
OK or NG
OK >> Replace IPDM E/R. Refer to PG-31, "Removal and
Installation of IPDM E/R" .
NG >> Replace BCM. Refer to BCS-17, "
Removal and Installa-
tion of BCM" . When lighting switch is
HIGH position: HI BEAM SW ON
PKIA7585E
Headlamp high beam should operate
(Headlamp high beam repeats ON–OFF every 1 second).
Headlamp high beam should operate.
SKIA5774E
When lighting switch is
HIGH position: HL LO REQ ON
: HL HI REQ ON
PKIA7638E
Page 4490 of 5621

HEADLAMP (FOR USA) - XENON TYPE -
LT-63
C
D
E
F
G
H
I
J
L
MA
B
LT
Revision: 2006 January2006 M35/M45
4. CHECK HEADLAMP INPUT SIGNAL
With CONSULT-II
1. Turn ignition switch OFF.
2. Disconnect front combination lamp RH and LH connector.
3. Select “IPDM E/R” on CONSULT-II, select “ACTIVE TEST” on “SELECT DIAG MODE” screen.
4. Select “LAMPS” on “SELECT TEST ITEM” screen.
5. Touch “HI” screen.
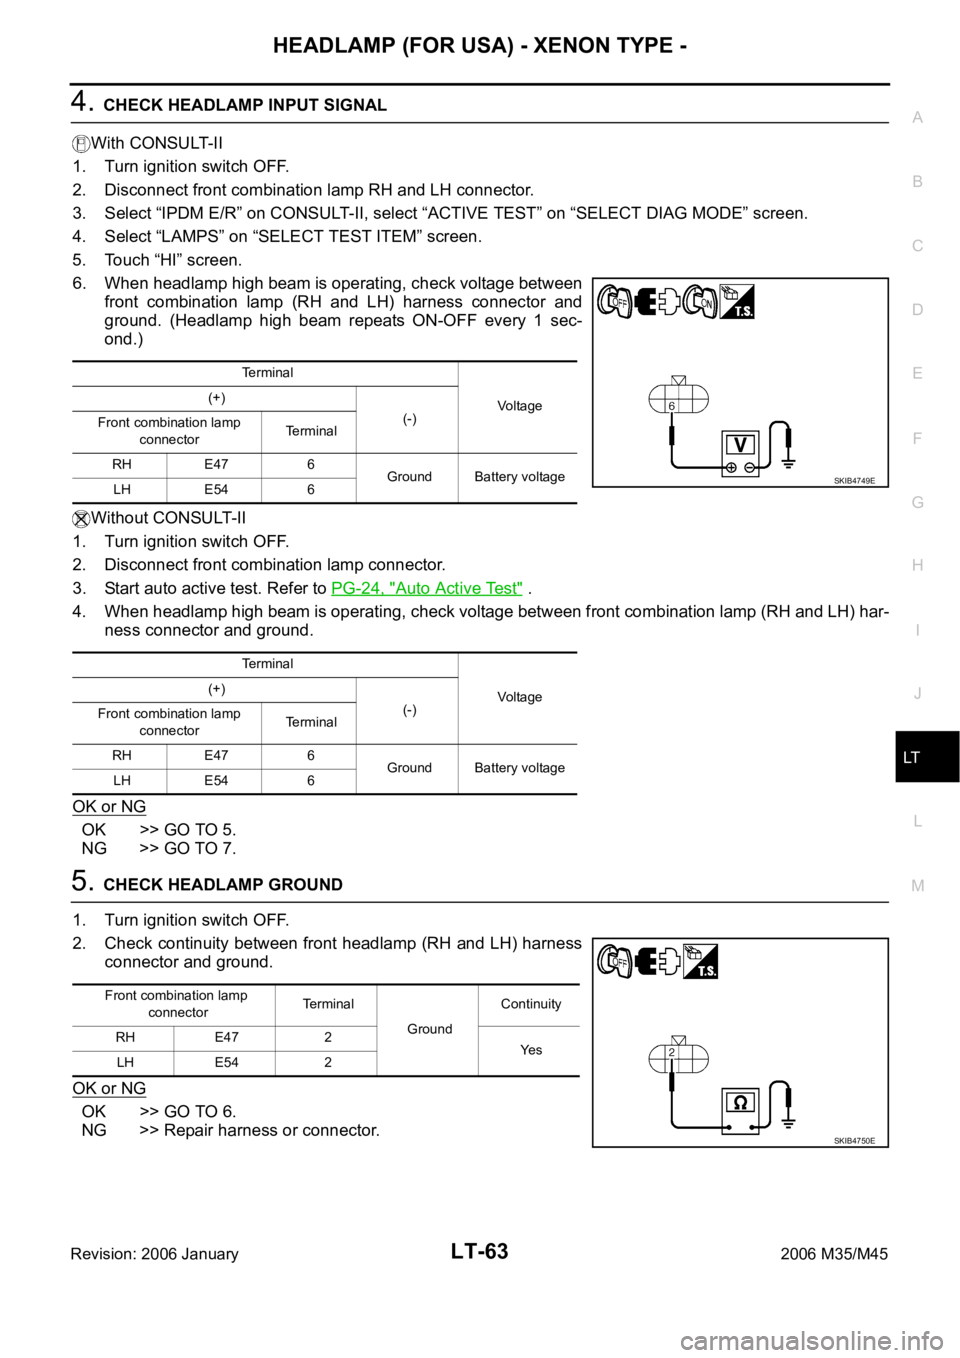
6. When headlamp high beam is operating, check voltage between
front combination lamp (RH and LH) harness connector and
ground. (Headlamp high beam repeats ON-OFF every 1 sec-
ond.)
Without CONSULT-II
1. Turn ignition switch OFF.
2. Disconnect front combination lamp connector.
3. Start auto active test. Refer to PG-24, "
Auto Active Test" .
4. When headlamp high beam is operating, check voltage between front combination lamp (RH and LH) har-
ness connector and ground.
OK or NG
OK >> GO TO 5.
NG >> GO TO 7.
5. CHECK HEADLAMP GROUND
1. Turn ignition switch OFF.
2. Check continuity between front headlamp (RH and LH) harness
connector and ground.
OK or NG
OK >> GO TO 6.
NG >> Repair harness or connector.
Terminal
Vo l ta g e (+)
(-)
Front combination lamp
connectorTerminal
RH E47 6
Ground Battery voltage
LH E54 6
Terminal
Vo l ta g e (+)
(-)
Front combination lamp
connectorTerminal
RH E47 6
Ground Battery voltage
LH E54 6
SKIB4749E
Front combination lamp
connectorTe r m i n a l
GroundContinuity
RH E47 2
Ye s
LH E54 2
SKIB4750E
Page 4492 of 5621

HEADLAMP (FOR USA) - XENON TYPE -
LT-65
C
D
E
F
G
H
I
J
L
MA
B
LT
Revision: 2006 January2006 M35/M45
Headlamp High Beam Does Not Illuminate (One Side)NKS003OX
1. CHECK BULB
Check bulb of lamp which does not illuminate.
OK or NG
OK >> GO TO 2.
NG >> Replace headlamp bulb.
2. CHECK HEADLAMP INPUT SIGNAL
With CONSULT-II
1. Turn ignition switch OFF.
2. Disconnect front combination lamp RH or LH connector.
3. Select “IPDM E/R” on CONSULT-II. Select “ACTIVE TEST” on “SELECT DIAG MODE” screen.
4. Select “LAMPS” on “SELECT TEST ITEM” screen.
5. Touch “HI” screen.
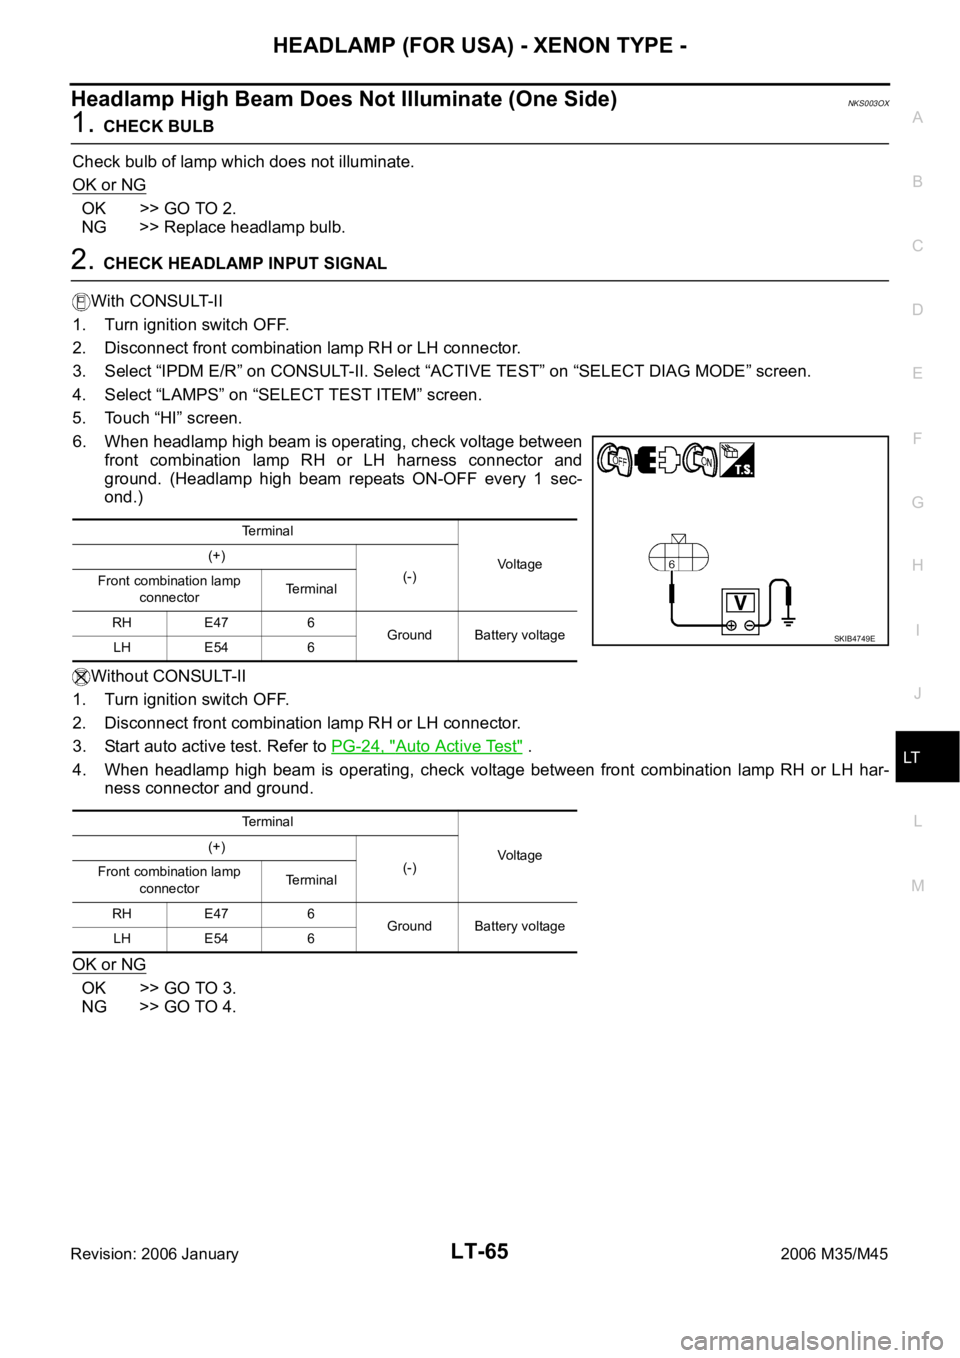
6. When headlamp high beam is operating, check voltage between
front combination lamp RH or LH harness connector and
ground. (Headlamp high beam repeats ON-OFF every 1 sec-
ond.)
Without CONSULT-II
1. Turn ignition switch OFF.
2. Disconnect front combination lamp RH or LH connector.
3. Start auto active test. Refer to PG-24, "
Auto Active Test" .
4. When headlamp high beam is operating, check voltage between front combination lamp RH or LH har-
ness connector and ground.
OK or NG
OK >> GO TO 3.
NG >> GO TO 4.
Terminal
Vo l ta g e (+)
(-)
Front combination lamp
connectorTerminal
RH E47 6
Ground Battery voltage
LH E54 6
Terminal
Vo l ta g e (+)
(-)
Front combination lamp
connectorTerminal
RH E47 6
Ground Battery voltage
LH E54 6
SKIB4749E
Page 4493 of 5621

LT-66
HEADLAMP (FOR USA) - XENON TYPE -
Revision: 2006 January2006 M35/M45
3. CHECK HEADLAMP GROUND
1. Turn ignition switch OFF.
2. Check continuity between front headlamp RH or LH harness
connector and ground.
OK or NG
OK >> Check connecting condition headlamp harness connec-
tor.
NG >> Repair harness or connector.
4. CHECK CIRCUIT BETWEEN IPDM E/R AND FRONT COMBINATION LAMP
1. Turn ignition switch OFF.
2. Disconnect IPDM E/R connector and front combination lamp RH or LH connector.
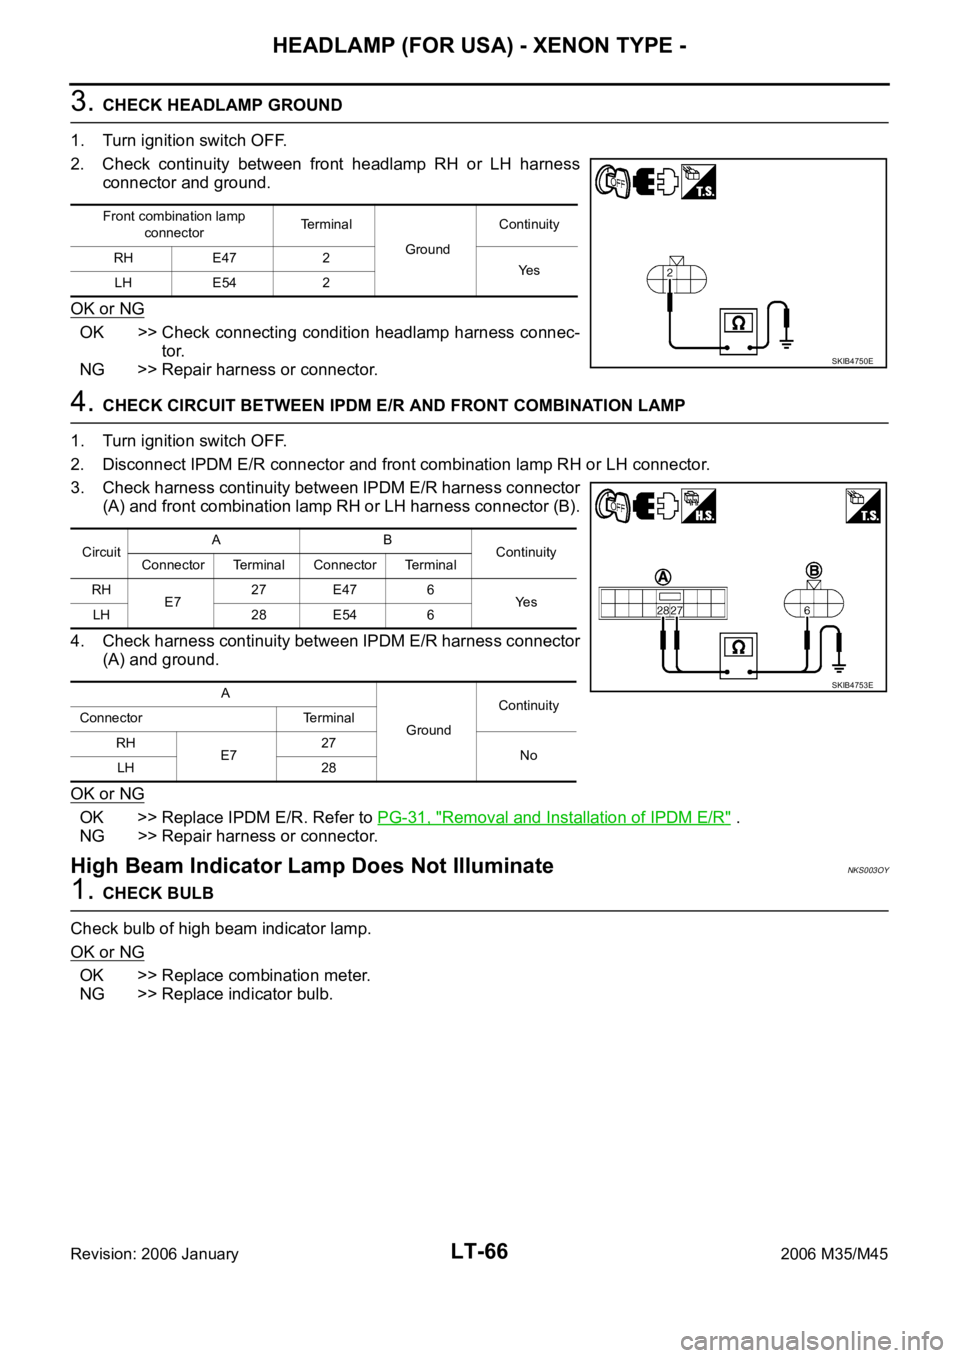
3. Check harness continuity between IPDM E/R harness connector
(A) and front combination lamp RH or LH harness connector (B).
4. Check harness continuity between IPDM E/R harness connector
(A) and ground.
OK or NG
OK >> Replace IPDM E/R. Refer to PG-31, "Removal and Installation of IPDM E/R" .
NG >> Repair harness or connector.
High Beam Indicator Lamp Does Not IlluminateNKS003OY
1. CHECK BULB
Check bulb of high beam indicator lamp.
OK or NG
OK >> Replace combination meter.
NG >> Replace indicator bulb.
Front combination lamp
connectorTerminal
GroundContinuity
RH E47 2
Ye s
LH E54 2
SKIB4750E
CircuitAB
Continuity
Connector Terminal Connector Terminal
RH
E727 E47 6
Ye s
LH 28 E54 6
A
GroundContinuity
Connector Terminal
RH
E727
No
LH 28
SKIB4753E