2006 INFINITI M35 warning light
[x] Cancel search: warning lightPage 1506 of 5621

WARNING CHIME
DI-73
C
D
E
F
G
H
I
J
L
MA
B
DI
Revision: 2006 January2006 M35/M45
4. CHECK BATTERY POWER SUPPLY OF UNIFIED METER AND A/C AMP.
Check battery power supply of unified meter and A/C amp. Refer to DI-35, "
Power Supply and Ground Circuit
Inspection" in unified meter and A/C amp.
OK or NG
OK >> Replace BCM. Refer to BCS-17, "Removal and Installation of BCM" .
NG >> Repair battery power supply circuit of unified meter and A/C amp.
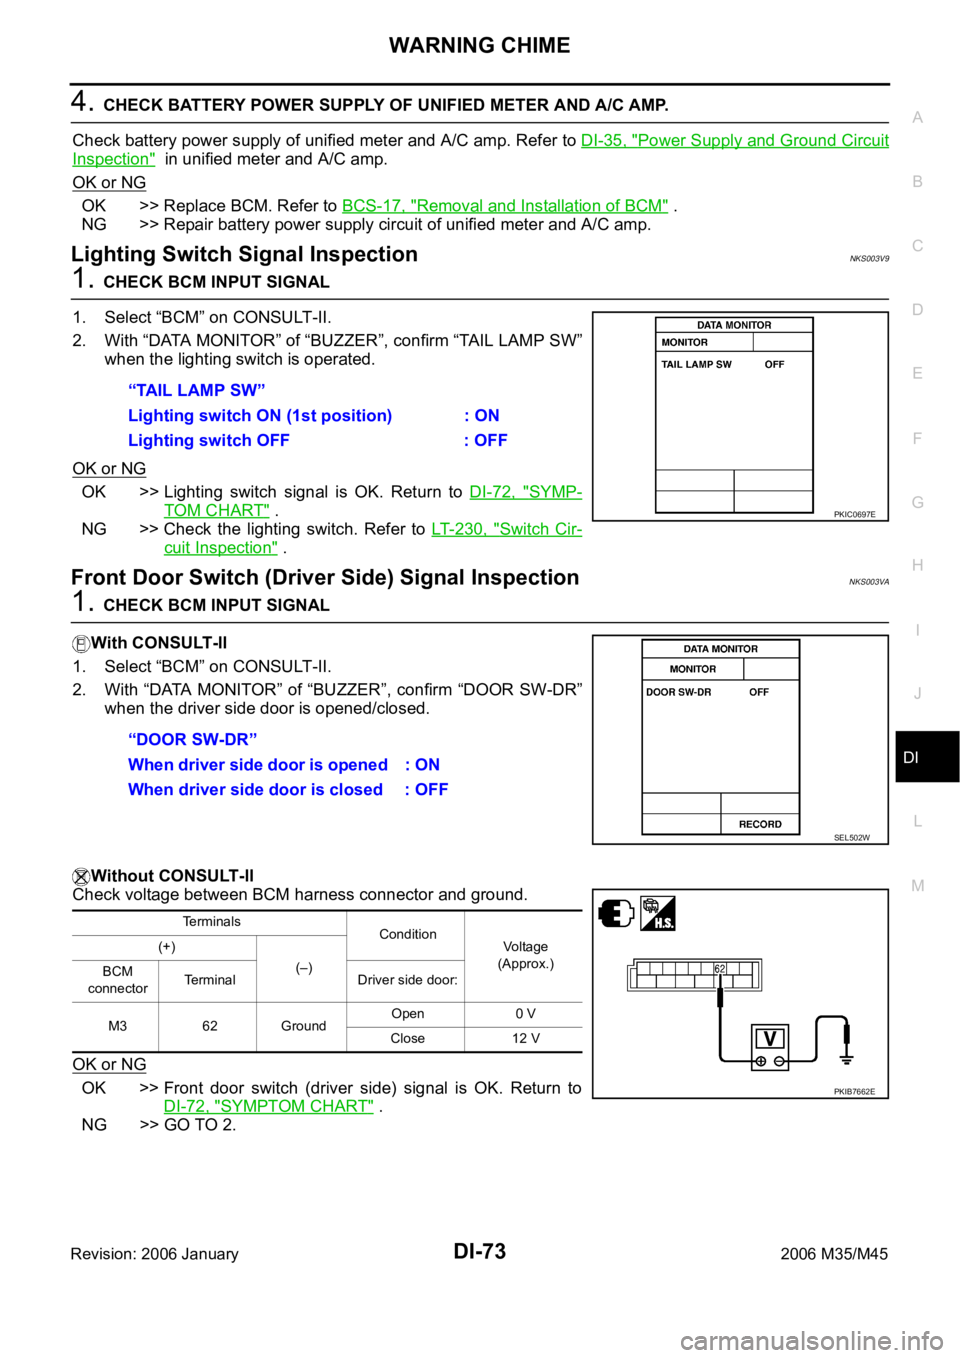
Lighting Switch Signal InspectionNKS003V9
1. CHECK BCM INPUT SIGNAL
1. Select “BCM” on CONSULT-II.
2. With “DATA MONITOR” of “BUZZER”, confirm “TAIL LAMP SW”
when the lighting switch is operated.
OK or NG
OK >> Lighting switch signal is OK. Return to DI-72, "SYMP-
TOM CHART" .
NG >> Check the lighting switch. Refer to LT- 2 3 0 , "
Switch Cir-
cuit Inspection" .
Front Door Switch (Driver Side) Signal InspectionNKS003VA
1. CHECK BCM INPUT SIGNAL
With CONSULT-ll
1. Select “BCM” on CONSULT-II.
2. With “DATA MONITOR” of “BUZZER”, confirm “DOOR SW-DR”
when the driver side door is opened/closed.
Without CONSULT-ll
Check voltage between BCM harness connector and ground.
OK or NG
OK >> Front door switch (driver side) signal is OK. Return to
DI-72, "
SYMPTOM CHART" .
NG >> GO TO 2.“TAIL LAMP SW”
Lighting switch ON (1st position) : ON
Lighting switch OFF : OFF
PKIC0697E
“DOOR SW-DR”
When driver side door is opened : ON
When driver side door is closed : OFF
SEL502W
Terminals
Condition
Voltage
(Approx.) (+)
(–)
BCM
connectorTerminal Driver side door:
M3 62 GroundOpen 0 V
Close 12 V
PKIB7662E
Page 1511 of 5621

DI-78
LANE DEPARTURE WARNING SYSTEM
Revision: 2006 January2006 M35/M45
LANE DEPARTURE WARNING SYSTEM PFP:28442
Precautions for Lane Departure Warning (LDW) systemNKS003VF
WAR NING :
Lane Departure Warning (LDW) is only a warning device to inform the driver of an unintended lane
departure. It will not steer the vehicle or prevent loss of control. It is the driver's responsibility to stay
alert, drive safely, keep the vehicle in the traveling lane, and be in control of the vehicle at all times.
LDW system does not operate under the following conditions:
–At speeds below approx. 72 km/h (45 MPH).
–If it cannot detect lane markers.
LDW system may not function properly under the following conditions:
–On roads where a water puddle, dirt or snow is covering the lane markers.
–On roads where the lane markers are faded or are not painted clearly.
–On roads where the lane markers are painted yellow.
LDW system may not monitor the lane markers in certain road, weather or driving conditions.
–On roads where there are sharp curves.
–Where the traveling lane merges or separates.
–On roads where the discontinued lane markers are present, such as near tollgates, etc.
–On roads where there are not general lane markers.
–On roads where the lane width is too narrow.
–During bad weather (rain, fog, snow, etc.).
–When strong light (for example, at sunrise or sunset) is directly shining on the front of the vehicle.
–When entering or exiting a tunnel where sudden changes in brightness occur.
–When traveling close to the vehicle in front of you, which causes obstruction of the camera unit
range.
–When the vehicle's traveling direction does not align with the lane marker.
–When rain, snow or dirt adhere to the windshield in front of the camera unit.
Excessive noise interferes with warning system chime sound and the chime may not be heard.
CAUTION:
To keep the LDW system operating properly, be sure to observe the following:
Always keep the windshield clean. The sensing capability of the camera unit depends on the con-
dition of the windshield. See “Appearance and care” for cleaning instruction.
Never strike or damage the areas around the camera unit.
Never touch the camera lens.
Never attach a sticker (including transparent material) or install an accessory near the camera
unit.
Never place reflective materials, such as a white paper or mirrors on the instrument panel. Reflec-
tion of the sunlight may adversely affect the camera unit's lane marker detection capability.
System DescriptionNKS003VG
LDW SYSTEM OPERATION
The Lane Departure Warning (LDW) system warns the driver when the vehicle is traveling close to either
the left or the right of the traveling lane.
The system monitors lane markers of the traveling lane using the LDW camera unit. When the LDW cam-
era unit detects that the vehicle is traveling close to either the left or the right of the traveling lane, the
LDW indicator lamp flashes and a chime sounds to alert the driver.
NOTE:
When activating turn signal, LDW system does not give a warning to the lane marker on the turn signal
side.
The LDW system can be turned on or off by pushing the LDW switch. When the system is on, the LDW
system ON indicator illuminates.
The LDW system has an automatic mode and manual mode.
Page 1512 of 5621

LANE DEPARTURE WARNING SYSTEM
DI-79
C
D
E
F
G
H
I
J
L
MA
B
DI
Revision: 2006 January2006 M35/M45
In the automatic mode
–LDW system automatically turns on, when the ignition switch is turned to the ON position.
–LDW system ON indicator located on the LDW switch illuminates, indicating that the system is on.
–To cancel LDW system, push the LDW switch to turn off LDW system ON indicator.
–To turn on the system, push LDW switch again.
In the manual mode
–LDW system is still off when the ignition switch is turned to the ON position.
–The LDW switch must be pushed to turn on the system.
To the change modes
–Push and hold LDW switch for more than 4 seconds, when LDW system ON indicator is off.
–Then LDW chime sounds and blinking of LDW system ON indicator informs that the mode change is com-
pleted.
Temporary disabled status at high temperature
–If the vehicle is parked in direct sunlight under high temperature conditions [approximately over 104 F (40
C)] and then started, the LDW system may sound a chime and cancel automatically. Then LDW system
ON indicator will blink.
–When the interior temperature is reduced, the system will resume to operate automatically and the LDW
system ON indicator illuminates.
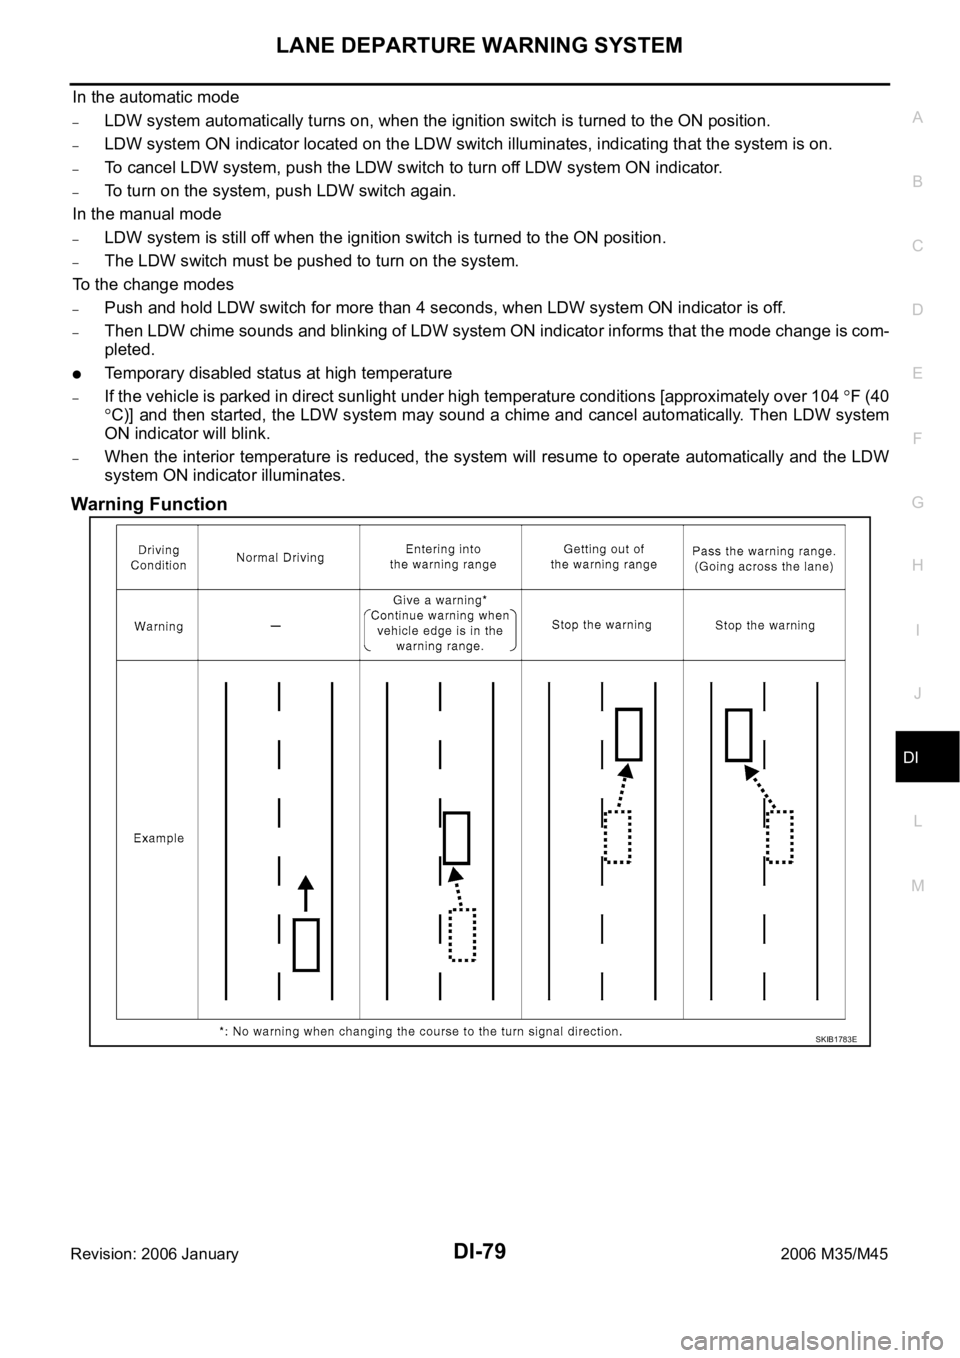
Warning Function
SKIB1783E
Page 1516 of 5621

LANE DEPARTURE WARNING SYSTEM
DI-83
C
D
E
F
G
H
I
J
L
MA
B
DI
Revision: 2006 January2006 M35/M45
Target Setting
CAUTION:
Perform this operation in a horizontal position where there is a clear view for 5 m (16.4 ft) forward
and 3 m (9.84 ft) wide.
Place the target at a well-lighted location. (Poor lighting may make it hard to adjust.)
The target may not be detected when there is a light source within 1.5 m (4.92 ft) from either side
and within 1 m (3.28 ft) upward/downward from the target.
Make sure location of the sun. (Sunlight should not shine directly on front of the vehicle.)
The target may not be detected when there is the same pattern of black and white as the target
when the pattern is within 1 m (3.28 ft) from either side and upward/downward position from the
target. (It is desirable that the vehicle is positioned on the opposite side of a single-color wall.)
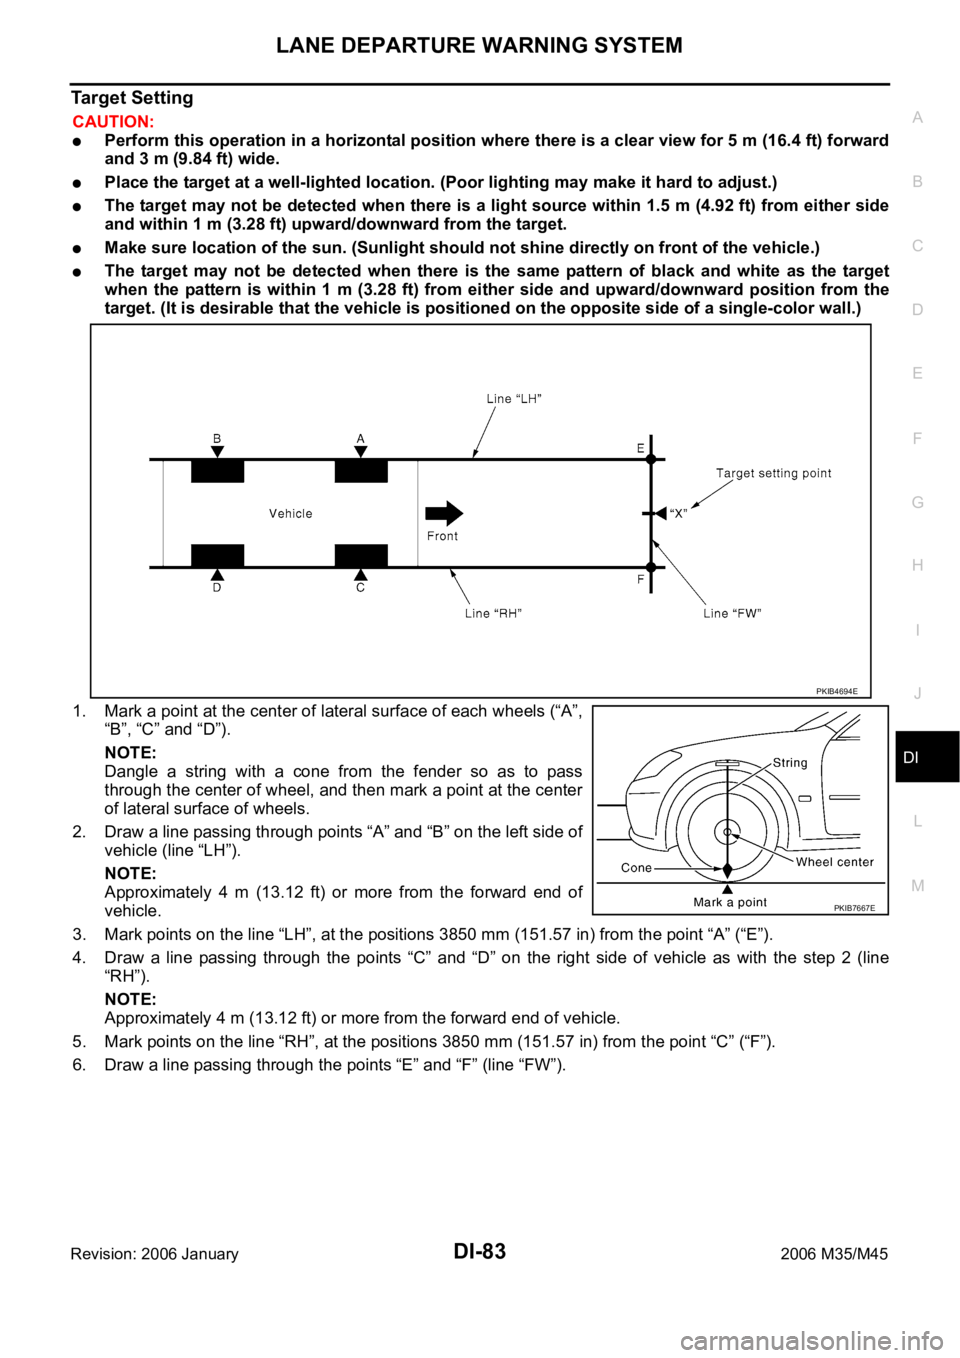
1. Mark a point at the center of lateral surface of each wheels (“A”,
“B”, “C” and “D”).
NOTE:
Dangle a string with a cone from the fender so as to pass
through the center of wheel, and then mark a point at the center
of lateral surface of wheels.
2. Draw a line passing through points “A” and “B” on the left side of
vehicle (line “LH”).
NOTE:
Approximately 4 m (13.12 ft) or more from the forward end of
vehicle.
3. Mark points on the line “LH”, at the positions 3850 mm (151.57 in) from the point “A” (“E”).
4. Draw a line passing through the points “C” and “D” on the right side of vehicle as with the step 2 (line
“RH”).
NOTE:
Approximately 4 m (13.12 ft) or more from the forward end of vehicle.
5. Mark points on the line “RH”, at the positions 3850 mm (151.57 in) from the point “C” (“F”).
6. Draw a line passing through the points “E” and “F” (line “FW”).
PKIB4694E
PKIB7667E
Page 1536 of 5621

LANE DEPARTURE WARNING SYSTEM
DI-103
C
D
E
F
G
H
I
J
L
MA
B
DI
Revision: 2006 January2006 M35/M45
Turn Signal Input InspectionNKS003VY
1. CHECK TURN SIGNAL INPUT
Check turn signal input “TURN SIGNAL” in “DATA MONITOR” mode
with CONSULT-II.
OK or NG
OK >> Turn signal input is OK. Return to DI-96, "SYMPTOM
CHART" .
NG >> Check turn signal and hazard warning lamps system,
and repair or replace corresponding parts. Refer to LT- 2 2 0 , "
How to Perform Trouble Diagnoses" .
Electrical Component InspectionNKS003VZ
LDW SWITCH
Check continuity between terminals 6 and 7.
Removal and Installation for LDW Camera UnitNKS003W0
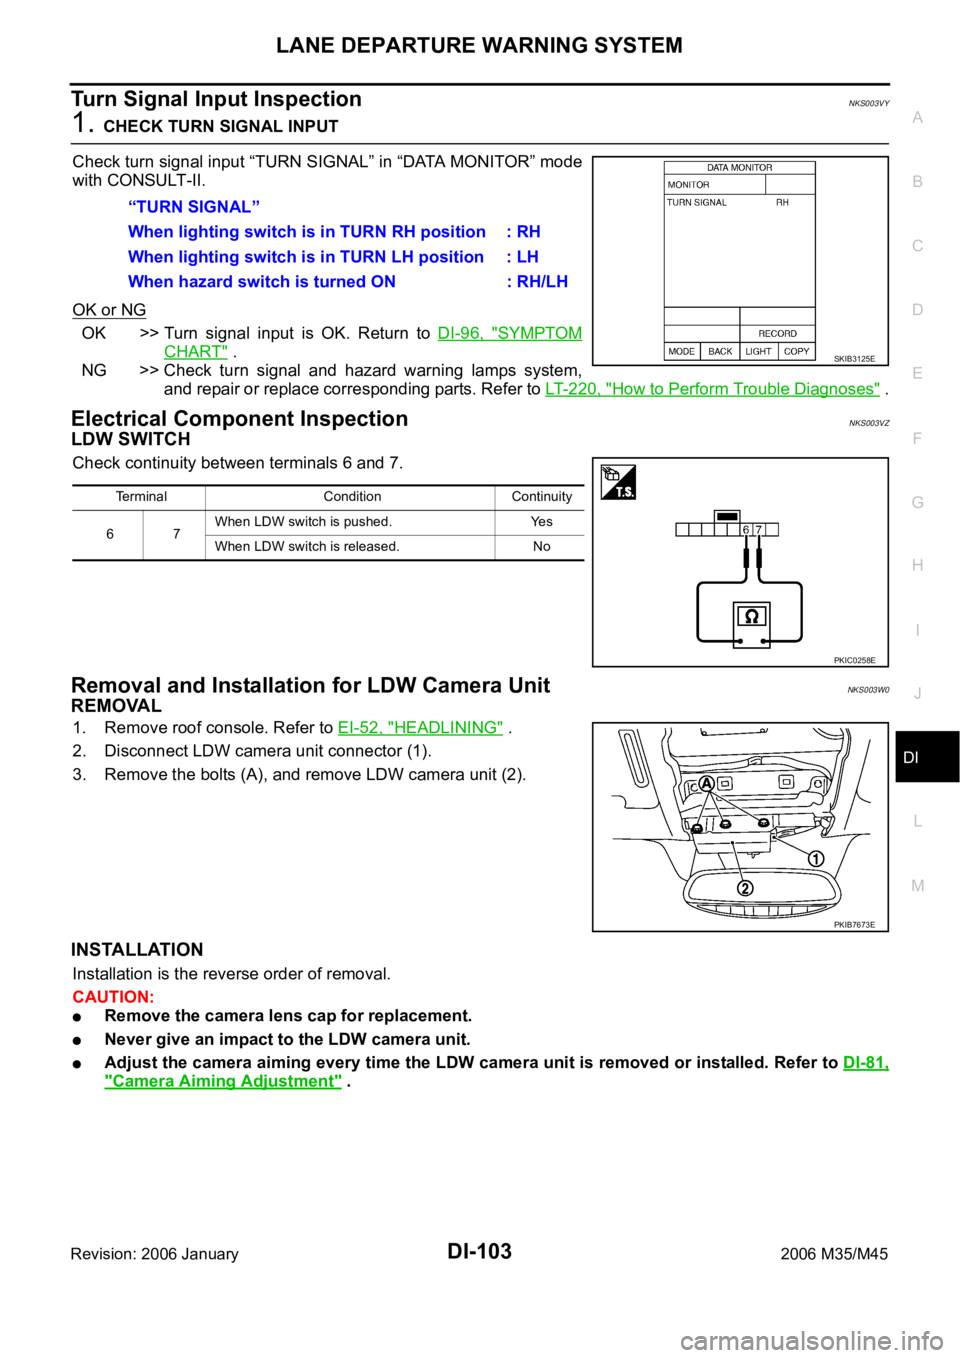
REMOVAL
1. Remove roof console. Refer to EI-52, "HEADLINING" .
2. Disconnect LDW camera unit connector (1).
3. Remove the bolts (A), and remove LDW camera unit (2).
INSTALLATION
Installation is the reverse order of removal.
CAUTION:
Remove the camera lens cap for replacement.
Never give an impact to the LDW camera unit.
Adjust the camera aiming every time the LDW camera unit is removed or installed. Refer to DI-81,
"Camera Aiming Adjustment" . “TURN SIGNAL”
When lighting switch is in TURN RH position : RH
When lighting switch is in TURN LH position : LH
When hazard switch is turned ON : RH/LH
SKIB3125E
Terminal Condition Continuity
67When LDW switch is pushed. Yes
When LDW switch is released. No
PKIC0258E
PKIB7673E
Page 1612 of 5621
![INFINITI M35 2006 Factory Service Manual ON BOARD DIAGNOSTIC (OBD) SYSTEM
EC-69
[VQ35DE]
C
D
E
F
G
H
I
J
K
L
MA
EC
Revision: 2006 January2006 M35/M45
–Te s t v a l u e s
Actual work procedures are explained using a DTC as an example. Be INFINITI M35 2006 Factory Service Manual ON BOARD DIAGNOSTIC (OBD) SYSTEM
EC-69
[VQ35DE]
C
D
E
F
G
H
I
J
K
L
MA
EC
Revision: 2006 January2006 M35/M45
–Te s t v a l u e s
Actual work procedures are explained using a DTC as an example. Be](/manual-img/42/57023/w960_57023-1611.png)
ON BOARD DIAGNOSTIC (OBD) SYSTEM
EC-69
[VQ35DE]
C
D
E
F
G
H
I
J
K
L
MA
EC
Revision: 2006 January2006 M35/M45
–Te s t v a l u e s
Actual work procedures are explained using a DTC as an example. Be careful so that not only the DTC, but all
of the data listed above, are cleared from the ECM memory during work procedures.
Malfunction Indicator Lamp (MIL)NBS004SO
DESCRIPTION
The MIL is located on the instrument panel.
1. The MIL will light up when the ignition switch is turned ON with-
out the engine running. This is a bulb check.
If the MIL does not light up, refer to DI-40, "
WARNING LAMPS" ,
or see EC-722, "
MIL AND DATA LINK CONNECTOR" .
2. When the engine is started, the MIL should go off.
If the MIL remains on, the on board diagnostic system has
detected an engine system malfunction.
ON BOARD DIAGNOSTIC SYSTEM FUNCTION
The on board diagnostic system has the following three functions.
When there is an open circuit on MIL circuit, the ECM cannot warn the driver by lighting up MIL when there is
malfunction on engine control system.
Therefore, when electrical controlled throttle and part of ECM related diagnoses are continuously detected as
NG for 5 trips, ECM warns the driver that engine control system malfunctions and MIL circuit is open by means
of operating fail-safe function.
The fail-safe function also operates when above diagnoses except MIL circuit are detected and demands the
driver to repair the malfunction.
SEF217U
Diagnostic Test
ModeKEY and ENG.
StatusFunction Explanation of Function
Mode I Ignition switch in
ON position
Engine stoppedBULB CHECK This function checks the MIL bulb for damage (blown,
open circuit, etc.).
If the MIL does not come on, check MIL circuit.
Engine running MALFUNCTION
WARNINGThis is a usual driving condition. When a malfunction is
detected twice in two consecutive driving cycles (two trip
detection logic), the MIL will light up to inform the driver
that a malfunction has been detected.
The following malfunctions will light up or blink the MIL in
the 1st trip.
Misfire (Possible three way catalyst damage)
One trip detection diagnoses
Mode II Ignition switch in
ON position
Engine stoppedSELF-DIAGNOSTIC
RESULTSThis function allows DTCs and 1st trip DTCs to be read.
Engine operating condition in fail-safe mode Engine speed will not rise more than 2,500 rpm due to the fuel cut
Page 2323 of 5621
![INFINITI M35 2006 Factory Service Manual EC-780
[VK45DE]
ON BOARD DIAGNOSTIC (OBD) SYSTEM
Revision: 2006 January2006 M35/M45
–Test values
Actual work procedures are explained using a DTC as an example. Be careful so that not only the DTC, INFINITI M35 2006 Factory Service Manual EC-780
[VK45DE]
ON BOARD DIAGNOSTIC (OBD) SYSTEM
Revision: 2006 January2006 M35/M45
–Test values
Actual work procedures are explained using a DTC as an example. Be careful so that not only the DTC,](/manual-img/42/57023/w960_57023-2322.png)
EC-780
[VK45DE]
ON BOARD DIAGNOSTIC (OBD) SYSTEM
Revision: 2006 January2006 M35/M45
–Test values
Actual work procedures are explained using a DTC as an example. Be careful so that not only the DTC, but all
of the data listed above, are cleared from the ECM memory during work procedures.
Malfunction Indicator Lamp (MIL)NBS005A4
DESCRIPTION
The MIL is located on the instrument panel.
1. The MIL will light up when the ignition switch is turned ON with-
out the engine running. This is a bulb check.
If the MIL does not light up, refer to DI-40, "
WARNING LAMPS" ,
or see EC-1459, "
MIL AND DATA LINK CONNECTOR" .
2. When the engine is started, the MIL should go off.
If the MIL remains on, the on board diagnostic system has
detected an engine system malfunction.
ON BOARD DIAGNOSTIC SYSTEM FUNCTION
The on board diagnostic system has the following three functions.
When there is an open circuit on MIL circuit, the ECM cannot warn the driver by lighting up MIL when there is
malfunction on engine control system.
Therefore, when electrical controlled throttle and part of ECM related diagnoses are continuously detected as
NG for 5 trips, ECM warns the driver that engine control system malfunctions and MIL circuit is open by means
of operating fail-safe function.
The fail-safe function also operates when above diagnoses except MIL circuit are detected and demands the
driver to repair the malfunction.
SEF217U
Diagnostic Test
ModeKEY and ENG.
Sta tusFunction Explanation of Function
Mode I Ignition switch in
ON position
Engine stoppedBULB CHECK This function checks the MIL bulb for damage (blown,
open circuit, etc.).
If the MIL does not come on, check MIL circuit.
Engine running MALFUNCTION
WARNINGThis is a usual driving condition. When a malfunction is
detected twice in two consecutive driving cycles (two trip
detection logic), the MIL will light up to inform the driver
that a malfunction has been detected.
The following malfunctions will light up or blink the MIL in
the 1st trip.
Misfire (Possible three way catalyst damage)
One trip detection diagnoses
Mode II Ignition switch in
ON position
Engine stoppedSELF-DIAGNOSTIC
RESULTSThis function allows DTCs and 1st trip DTCs to be read.
Engine operating condition in fail-safe mode Engine speed will not rise more than 2,500 rpm due to the fuel cut
Page 3703 of 5621
![INFINITI M35 2006 Factory Service Manual LAN-34
[CAN]
CAN COMMUNICATION
Revision: 2006 January2006 M35/M45
CAN COMMUNICATIONPFP:23710
System DescriptionNKS003XV
CAN (Controller Area Network) is a serial communication line for real time appli INFINITI M35 2006 Factory Service Manual LAN-34
[CAN]
CAN COMMUNICATION
Revision: 2006 January2006 M35/M45
CAN COMMUNICATIONPFP:23710
System DescriptionNKS003XV
CAN (Controller Area Network) is a serial communication line for real time appli](/manual-img/42/57023/w960_57023-3702.png)
LAN-34
[CAN]
CAN COMMUNICATION
Revision: 2006 January2006 M35/M45
CAN COMMUNICATIONPFP:23710
System DescriptionNKS003XV
CAN (Controller Area Network) is a serial communication line for real time application. It is an on-vehicle mul-
tiplex communication line with high data communication speed and excellent error detection ability. Many elec-
tronic control units are equipped onto a vehicle, and each control unit shares information and links with other
control units during operation (not independent). In CAN communication, control units are connected with 2
communication lines (CAN H line, CAN L line) allowing a high rate of information transmission with less wiring.
Each control unit transmits/receives data but selectively reads required data only.
CAN Communication UnitNKS003XW
Go to CAN system, when selecting your CAN system type from the following table.
: Applicable
SYSTEM DIAGRAM
Ty pe 1
Body typeSedan
Axle 2WD AWD
Engine VQ35DE/VK45DE VQ35DE
TransmissionA/T
Brake controlVDC
Navigation system
Pre-crash seat belt
Adaptive front-lighting system
ICC system
Lane departure warning
Rear active steer
CAN system type 12 3456789101112131415
CAN system trouble diagnosisLA
N-
48
LA
N-
89
LA
N-
130
LA
N-
177
LA
N-
224
LA
N-
275
LA
N-
321
LA
N-
367
LA
N-
417
LA
N-
467
LA
N-
521
LA
N-
564
LA
N-
607
LA
N-
656
LA
N-
705
PKIB8588E