Page 263 of 344

there is a smell of exhaust fumes, imme-
diately locate the trouble and correct it.
See ªPrecautions when starting and
drivingº in the ª5. Starting and drivingº
section for exhaust gas (Carbon mon-
oxide).
Fluid leaks: Check under the vehicle for
fuel, oil, water or other fluid leaks after
the vehicle has been parked for a while.
Water dripping from the air conditioner
after use is normal. If you should notice
any leaks or if gasoline fumes are evi-
dent, check for the cause and have it cor-
rected immediately.
Power steering fluid level* and lines:
Check the level when the fluid is cold and
the engine is turned off. Check the lines
for proper attachment, leaks, cracks, etc.
Radiator and hoses: Check the front of the
radiator and clean off any dirt, insects,
leaves, etc., that may have accumulated.
Make sure the hoses have no cracks, de-
formation, deterioration or loose connec-
tions.
Underbody: The underbody is frequently
exposed to corrosive substances such as
those used on icy roads or to control
dust. It is very important to remove these
substances, otherwise rust will form on the floor pan, frame, fuel lines and
around the exhaust system. At the end of
winter, the underbody should be thor-
oughly flushed with plain water, being
careful to clean those areas where mud
and dirt may accumulate. For additional
information, see ªCleaning exteriorº in
the ª7. Appearance and careº section.
Windshield washer fluid*: Check that
there is adequate fluid in the tank. When performing any inspection or main-
tenance work on your vehicle, always take
care to prevent serious accidental injury
to yourself or damage to the vehicle. The
following are general precautions which
should be closely observed.
WARNING O Park the vehicle on a level surface, apply
the parking brake securely and block the
wheels to prevent the vehicle from
moving. For a manual transmission,
move the shift lever to N (Neutral) posi-
tion. For an automatic transmission
models, move the selector lever to P
(Park).
O Be sure the ignition key is in the OFF or
LOCK position when performing any
parts replacement or repairs.
O If you must work with the engine run-
ning, keep your hands, clothing, hair
and tools away from moving fans, belts
and any other moving parts.
O It is advisable to secure or remove any
loose clothing and remove any jewelry,MAINTENANCE PRECAUTIONS
Maintenance and do-it-yourself
8-5
w 06.1.4/V35-D/V5.0
X
Page 265 of 344
1. Fuse/fusible link holder
2. Battery
3. Engine oil filler cap
4. Brake fluid reservoir
5. Clutch fluid reservoir (MT models)
6. Power steering fluid reservoir
7. Engine coolant reservoir
8. Window washer fluid reservoir
9. Radiator filler cap
10. Drive belts
11. Engine oil dipstick
12. Air cleaner
SSI0160ENGINE COMPARTMENT CHECK
LOCATIONS
Maintenance and do-it-yourself
8-7
w 06.1.4/V35-D/V5.0
X
Page 268 of 344

2. Close the radiator drain plug securely
after the coolant is drained.
3. Fill the radiator slowly with the proper
mixture of antifreeze solution and
demineralized water/distilled water.
Fill the reservoir tank up to the MAX
level. Then install the radiator filler
cap.
4. Start the engine and warm it up until
it reaches normal operating tempera-
ture. Then race the engine 2 or 3 times
under no load. Watch the engine cool-
ant temperature gauge for signs of
overheating.
5. Stop the engine. After it completely
cools down, refill the radiator up to
the filler opening. Fill the reservoir
tank up to the MAX level. Check the
drain plug for any sign of leakage.
6. Check the coolant level again after
driving the vehicle.
CHECKING ENGINE OIL LEVEL 1. Park the vehicle on a level surface and
apply the parking brake.
2. Run the engine until it reaches operat-
ing temperature.
3. Turn off the engine. Wait more than 10
minutes for the oil to drain back into
the oil pan.
4. Remove the dipstick
q A
and wipe it
clean. Reinsert it all the way. 5. Remove the dipstick again and check
the oil level. It should be between the
H and L marks
q B
. If the oil level is
below the L mark
q A
, remove the oil
filler cap and pour recommended oil
through the opening. Do not overfill
q C
.
6. Recheck oil level with dipstick.
It is normal to add some oil between oil
maintenance intervals or during the break-
in period, depending on the severity of op-
erating conditions. SDI1386D SDI1781
ENGINE OIL
8-10 Maintenance and do-it-yourself
w 06.1.4/V35-D/V5.0
X
Page 269 of 344

CAUTIONOil level should be checked regularly. Oper-
ating the engine with an insufficient amount
of oil can damage the engine, and such dam-
age is not covered by warranty.
CHANGING ENGINE OIL AND FILTER Change the engine oil and filter according
to the maintenance intervals shown in the
INFINITI Service and Maintenance Guide.
Vehicle set-up 1. Park the vehicle on a level surface and
apply the parking brake.
2. Run the engine until it reaches operat-
ing temperature.
3. Turn the engine off and wait more
than 10 minutes.
4. Raise and support the vehicle using a
suitable floor jack and safety jack
stands.
O Place the safety jack stands under
the vehicle jack-up points.
O A suitable adapter should be at-
tached to the jack stand saddle. 5. Remove the plastic engine undercover.
a. Remove the small plastic clip at the
center point of the undercover.
b. Then remove the other bolts that
hold the undercover in place.
CAUTION Make sure the correct lifting and support
points are used to avoid vehicle damage.
Engine oil and filter 1. Place a large drain pan under the
drain plug.
2. Remove the oil filler cap.
3. Remove the drain plug
q A
with a
wrench and completely drain the oil.
CAUTION Be careful not to burn yourself, as the engine
oil is hot. SDI1520B
Maintenance and do-it-yourself
8-11
w 06.1.4/V35-D/V5.0
X
Page 272 of 344

CAUTIONO Do not overfill.
O Use Genuine NISSAN PSF or equivalent. For additional brake fluid specification in-
formation, refer to ªCapacities and recom-
mended fuel/lubricantsº in the ª9. Tech-
nical and consumer informationº section.
WARNING Use only new fluid. Old, inferior, or contami-
nated fluid may damage the brake system.
Do not add synthetic brake fluid. The use of
improper fluids can damage the brake
system and affect the vehicle's stopping
ability.
CAUTION Do not spill the fluid on any painted sur-
faces. This will damage the paint. If fluid is
spilled, immediately wash the surface with
water.
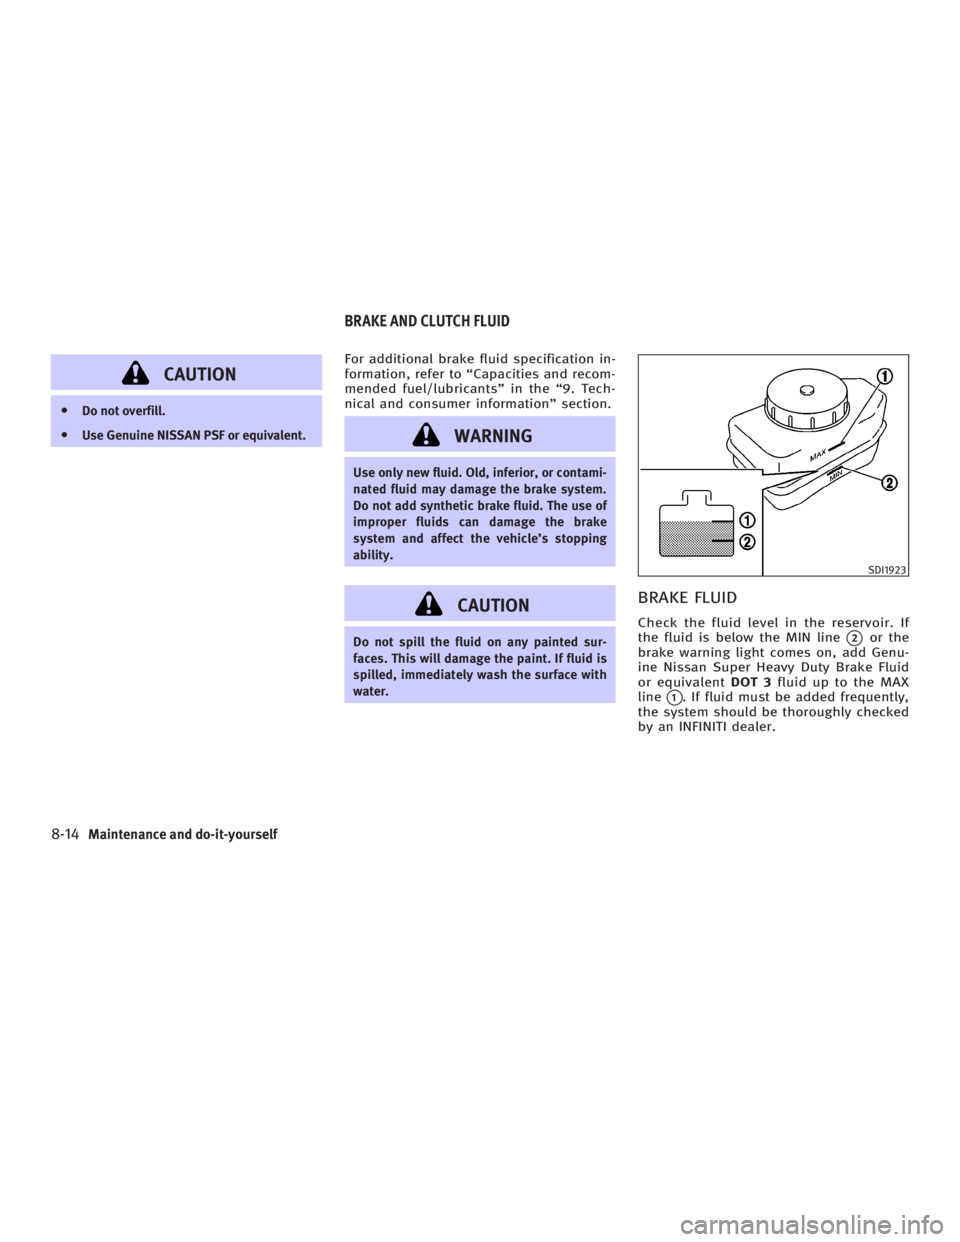
BRAKE FLUID Check the fluid level in the reservoir. If
the fluid is below the MIN line
q 2
or the
brake warning light comes on, add Genu-
ine Nissan Super Heavy Duty Brake Fluid
or equivalent DOT 3 fluid up to the MAX
line
q 1
. If fluid must be added frequently,
the system should be thoroughly checked
by an INFINITI dealer. SDI1923
BRAKE AND CLUTCH FLUID
8-14 Maintenance and do-it-yourself
w 06.1.4/V35-D/V5.0
X
Page 273 of 344

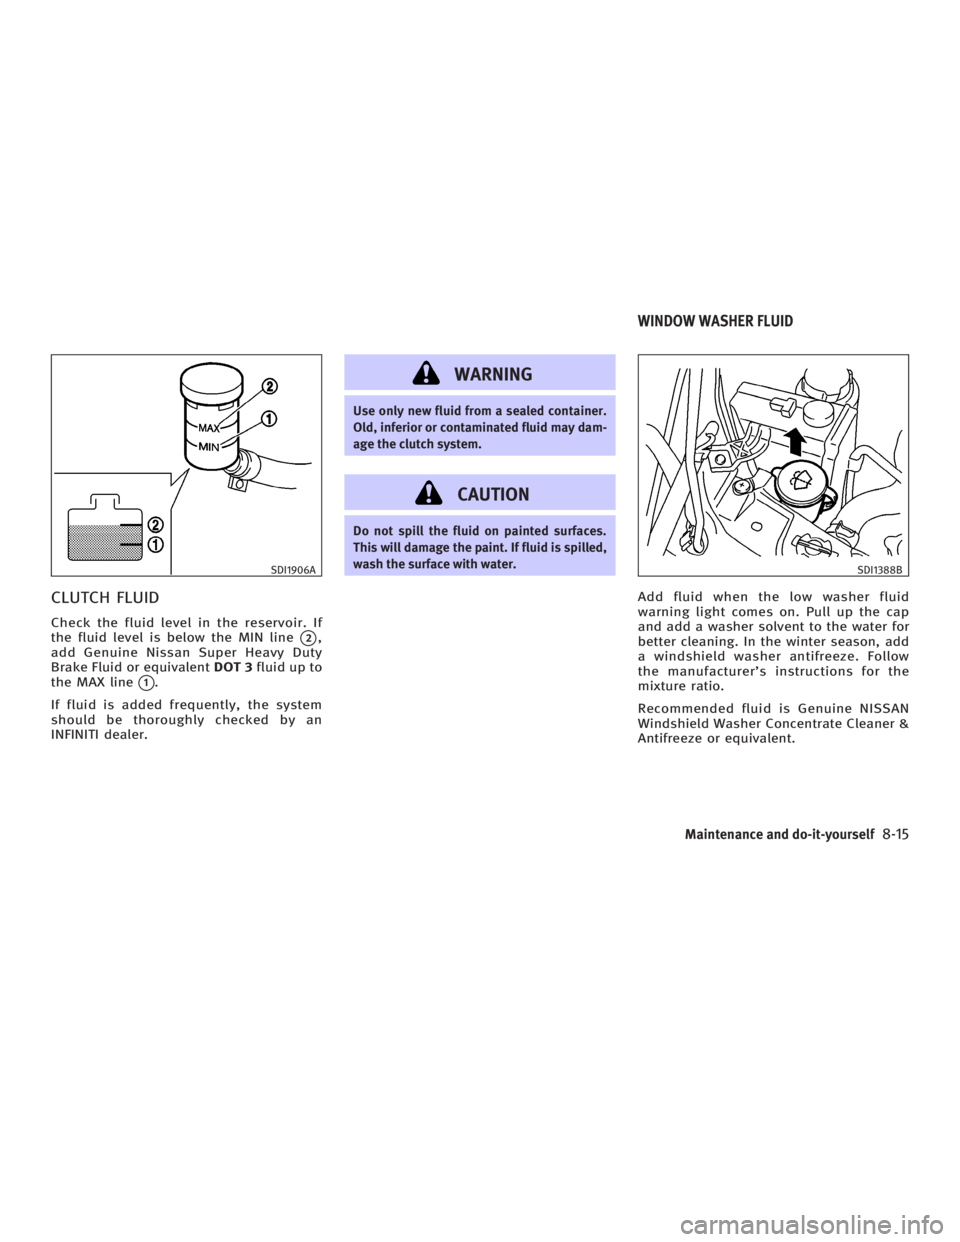
CLUTCH FLUID Check the fluid level in the reservoir. If
the fluid level is below the MIN line
q 2
,
add Genuine Nissan Super Heavy Duty
Brake Fluid or equivalent DOT 3 fluid up to
the MAX line
q 1
.
If fluid is added frequently, the system
should be thoroughly checked by an
INFINITI dealer. WARNING Use only new fluid from a sealed container.
Old, inferior or contaminated fluid may dam-
age the clutch system.
CAUTION Do not spill the fluid on painted surfaces.
This will damage the paint. If fluid is spilled,
wash the surface with water.
Add fluid when the low washer fluid
warning light comes on. Pull up the cap
and add a washer solvent to the water for
better cleaning. In the winter season, add
a windshield washer antifreeze. Follow
the manufacturer's instructions for the
mixture ratio.
Recommended fluid is Genuine NISSAN
Windshield Washer Concentrate Cleaner &
Antifreeze or equivalent.SDI1906A SDI1388B
WINDOW WASHER FLUID
Maintenance and do-it-yourself
8-15
w 06.1.4/V35-D/V5.0
X
Page 277 of 344
1. Power steering fluid pump
2. Fan
3. Alternator
4. Crankshaft pulley
5. Air conditioner compressor
D : Tension checking points WARNING Be sure the ignition key is in the OFF or LOCK
position. The engine could rotate unexpect-
edly.
1. Visually inspect each belt for signs of
unusual wear, cuts, fraying, oil adhe-
sion or looseness. If the belt is in poor
condition or loose, have it replaced or
adjusted by an INFINITI dealer.
2. Have the belts checked regularly for
condition and tension in accordance
with the maintenance schedule in the
INFINITI Service and Maintenance
Guide.
WARNING Be sure the engine and ignition switch are
off and that the parking brake is engaged se-
curely.
CAUTION Be sure to use the correct socket to remove
the spark plugs. An incorrect socket can
damage the spark plugs.SDI1389
DRIVE BELTS SPARK PLUGS
Maintenance and do-it-yourself
8-19
w 06.1.4/V35-D/V5.0
X
Page 281 of 344

CHECKING PARKING BRAKE
Pedal type From the released position, depress the
parking brake pedal slowly and firmly,
and check the notches between the initial
and final position of the pedal
q A
.Ifitis
out of the range, see an INFINITI dealer.
Range
q A
: 2 to 3 notches under a de-
pressing force of 44 lb (196
N) Lever type From the released position, pull the park-
ing brake lever up slowly and firmly. If the
number of clicks is out of the range
q A
,
see an INFINITI dealer.
Range
q A
: 6 to 7 clicks under pulling force
of 44 lb (196 N)
CHECKING BRAKE PEDAL With the engine running, check the dis-
tance
q A
between the upper surface of
the pedal and the metal floor. If it is out
of the range shown below, see an INFINITI
dealer.
Distance
q A
: Under depressing force of
110 lb (490 N) Automatic
Transmission model Manual
Transmission model
3.74 in (95 mm) or more 3.54 in (90 mm) or moreSDI1391F SDI1447B DI1020MO
PARKING BRAKE AND BRAKE PEDAL
Maintenance and do-it-yourself
8-23
w 06.1.4/V35-D/V5.0
X