Page 531 of 4462
TROUBLE DIAGNOSIS ATC-85
C
D E
F
G H
I
K L
M A
B
AT C
Revision: 2006 December 2006 FX35/FX45
5. CHECK BCM INPUT (COMPRESSOR ON) SIGNAL
Check compressor ON/OFF signal. Refer to AT C - 4 0 , "
CONSULT-II
Function (BCM)" .
OK or NG
OK >> GO TO 8.
NG >> GO TO 6.
6. CHECK CIRCUIT CONTINUITY BETWEEN BCM AND UNIFIED METER AND A/C AMP.
1. Turn ignition switch OFF.
2. Disconnect BCM connector and unified meter and A/C amp. connector.
3. Check continuity between BCM harness connector M3 terminal 27 and unified meter and A/C amp. harness connector M57 ter-
minal 42.
OK or NG
OK >> GO TO 7.
NG >> Repair harness or connector. A/C SW ON : AIR COND SW ON
A/C SW OFF : AIR COND SW OFF
R J I A 1111 E
27 – 42 : Continuity should exist.
RJIA2006E
Page 532 of 4462
ATC-86
TROUBLE DIAGNOSIS
Revision: 2006 December 2006 FX35/FX45
7. CHECK VOLTAGE FOR UNIFIED METER AND A/C AMP. (COMPRESSOR ON SIGNAL)
1. Reconnect BCM connector and unified meter and A/C amp. connector.
2. Turn ignition switch ON.
3. Check voltage between unified meter and A/C amp. harness connector M57 terminal 42 and ground using an oscilloscope.
OK or NG
OK >> GO TO 8.
NG-1 >> If the voltage is approx. 5 V when A/C switch is ON: Replace unified meter and A/C amp.
NG-2 >> If the voltage is approx. 0 V when A/C switch is OFF: Replace BCM.
RJIA2007E
Terminals
Condition Voltage
(+)
( − )
Unified meter
and A/C amp. connector Terminal
No.
M57 42 Ground A/C switch: ON
(Blower motor operates.) Approx. 0 V
OFF switch: ON
(A/C system: OFF)
SJIA1423J
Page 533 of 4462

TROUBLE DIAGNOSIS ATC-87
C
D E
F
G H
I
K L
M A
B
AT C
Revision: 2006 December 2006 FX35/FX45
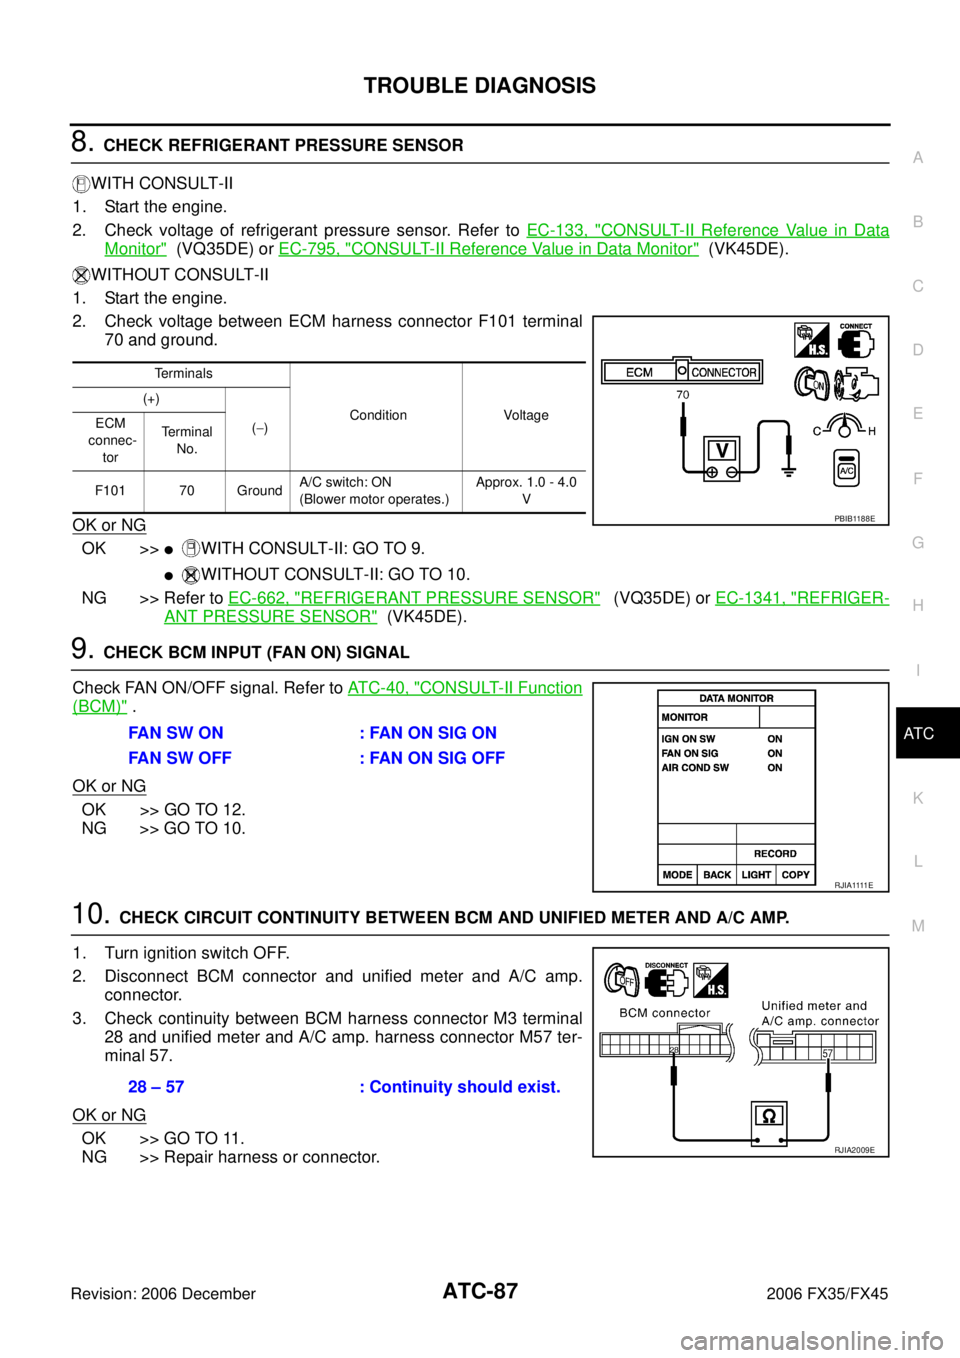
8. CHECK REFRIGERANT PRESSURE SENSOR
WITH CONSULT-II
1. Start the engine.
2. Check voltage of refrigerant pressure sensor. Refer to EC-133, "
CONSULT-II Reference Value in Data
Monitor" (VQ35DE) or EC-795, "CONSULT-II Reference Value in Data Monitor" (VK45DE).
WITHOUT CONSULT-II
1. Start the engine.
2. Check voltage between ECM harness connector F101 terminal 70 and ground.
OK or NG
OK >>�WITH CONSULT-II: GO TO 9.
�WITHOUT CONSULT-II: GO TO 10.
NG >> Refer to EC-662, "
REFRIGERANT PRESSURE SENSOR" (VQ35DE) or EC-1341, "REFRIGER-
ANT PRESSURE SENSOR" (VK45DE).
9. CHECK BCM INPUT (FAN ON) SIGNAL
Check FAN ON/OFF signal. Refer to AT C - 4 0 , "
CONSULT-II Function
(BCM)" .
OK or NG
OK >> GO TO 12.
NG >> GO TO 10.
10. CHECK CIRCUIT CONTINUITY BETWEEN BCM AND UNIFIED METER AND A/C AMP.
1. Turn ignition switch OFF.
2. Disconnect BCM connector and unified meter and A/C amp. connector.
3. Check continuity between BCM harness connector M3 terminal 28 and unified meter and A/C amp. harness connector M57 ter-
minal 57.
OK or NG
OK >> GO TO 11.
NG >> Repair harness or connector.
Terminals
Condition Voltage
(+)
( − )
ECM
connec-
tor Terminal
No.
F101 70 Ground A/C switch: ON
(Blower motor operates.) Approx. 1.0 - 4.0
V
PBIB1188E
FAN SW ON : FAN ON SIG ON
FAN SW OFF : FAN ON SIG OFF
R J I A 1111 E
28 – 57 : Continuity should exist.
RJIA2009E
Page 534 of 4462

ATC-88
TROUBLE DIAGNOSIS
Revision: 2006 December 2006 FX35/FX45
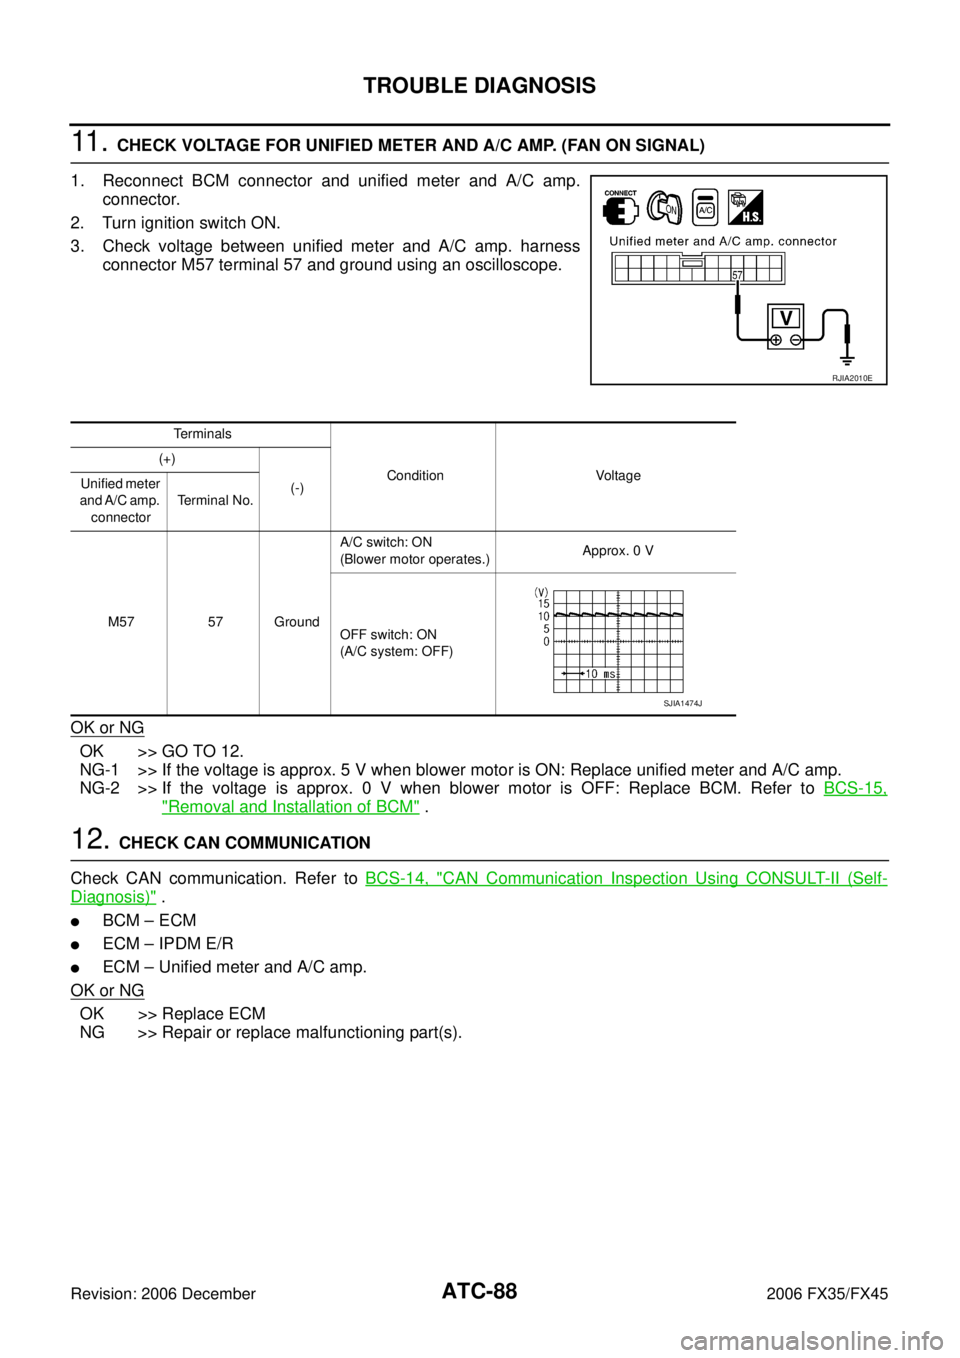
11 . CHECK VOLTAGE FOR UNIFIED METER AND A/C AMP. (FAN ON SIGNAL)
1. Reconnect BCM connector and unified meter and A/C amp. connector.
2. Turn ignition switch ON.
3. Check voltage between unified meter and A/C amp. harness connector M57 terminal 57 and ground using an oscilloscope.
OK or NG
OK >> GO TO 12.
NG-1 >> If the voltage is approx. 5 V when blower motor is ON: Replace unified meter and A/C amp.
NG-2 >> If the voltage is approx. 0 V when blower motor is OFF: Replace BCM. Refer to BCS-15,
"Removal and Installation of BCM" .
12. CHECK CAN COMMUNICATION
Check CAN communication. Refer to BCS-14, "
CAN Communication Inspection Using CONSULT-II (Self-
Diagnosis)" .
�BCM – ECM
�ECM – IPDM E/R
�ECM – Unified meter and A/C amp.
OK or NG
OK >> Replace ECM
NG >> Repair or replace malfunctioning part(s).
RJIA2010E
Terminals
Condition Voltage
(+)
(-)
Unified meter
and A/C amp. connector Terminal No.
M57 57 Ground A/C switch: ON
(Blower motor operates.) Approx. 0 V
OFF switch: ON
(A/C system: OFF)
SJIA1474J
Page 544 of 4462

ATC-98
TROUBLE DIAGNOSIS
Revision: 2006 December 2006 FX35/FX45
2. CHECK ECV CONTROL SIGNAL
1. Turn ignition switch OFF.
2. Reconnect compressor (ECV) connector.
3. Perform self-diagnosis. Refer to AT C - 5 2 , "
Self-diagnosis Func-
tion" .
4. Set in self-diagnosis STEP-4 (Code No. 45). Refer to AT C - 5 3 ,
"FUNCTION CONFIRMATION PROCEDURE" .
5. Confirm ECV control signal between unified meter and A/C amp. harness connector M57 terminal 45 and ground using an oscillo-
scope.
OK or NG
OK >> Replace compressor.
NG >> GO TO 3.
3. CHECK CIRCUIT CONTINUITY BETWEEN ECV AND UNIFIED METER AND A/C AMP.
1. Turn ignition switch OFF.
2. Disconnect compressor (ECV) and unified meter and A/C amp. connector.
3. Check continuity between compressor (ECV) harness connector F6 terminal 3 and unified meter and A/C amp. harness connec-
tor M57 terminal 45.
OK or NG
OK >> GO TO 4.
NG >> Repair harness or connector.
4. CHECK ECV
Check continuity between compressor (ECV) connector F6 terminals
2 and 3.
OK or NG
OK >> Replace unified meter and A/C amp.
NG >> Replace compressor.
RJIA2295E
RJIA1475E
3 – 45 : Continuity should exist.
RJIA2296E
2 – 3 : Continuity should exist.
RJIA2297E
Page 641 of 4462

AUDIO AV-35
C
D E
F
G H
I
J
L
M A
B
AV
Revision: 2006 December 2006 FX35/FX45
A/C and AV Switch Self-Diagnosis FunctionNKS003AT
It can check ON/OFF operation of each switch in the A/C and AV switch and diagnose the input signals to the
audio steering wheel switch.
STARTING THE SELF-DIAGNOSIS MODE
1. Turn ignition switch from OFF to ACC.
2. Within 10 seconds press and hold the switches “1” and “6” simultaneously for 3 seconds.
DIAGNOSIS FUNCTION
The following are checked:
�All the indicators (LED) in the A/C and AV switch.
�Continuity of the switches by sounding the buzzer when the A/C and AV switch and audio steering switch
is pressed.
�Continuity of harness between A/C and AV switch and audio steering switch.
NOTE:
Rear window defogger switch operation is not checked. (No beep sound even under normal status)
EXITING THE SELF-DIAGNOSIS MODE
�Turn ignition switch OFF.
10 (L/W) Ground Communication signal
Rx (AUDIO-SAT) Input ON When setting to satellite
radio mode
12 (Y) Ground Battery power supply Input OFF — Battery voltage
15 (B) Ground Ground — ON — Approx. 0 V
16 (P) Ground ACC power supply Input ACC — Battery voltage 17 — Satellite radio antenna — — — — Terminal
(Wire color) Item Signal
input/
output Condition
Reference value
+– Ignition
switch Operation
SKIB7336E
SKIB8660E
Page 642 of 4462

AV-36
AUDIO
Revision: 2006 December 2006 FX35/FX45
Trouble DiagnosisNKS003LC
�The majority of the audio malfunctions are the result of outside causes (bad CD, electromagnetic interfer-
ence, etc.). Check the symptoms below to diagnose the malfunction.
�The vehicle itself can be a source of noise if noise prevention parts or electrical equipment is malfunction-
ing. Check if noise is caused and/or changed by engine speed, ignition switch turned to each position, and
operation of each piece of electrical equipment, and then determine the cause.
�Make sure that other operation except audio system can be performed with A/C and AV switch. If these
operations are inoperative with A/C and AV switch, refer to AV- 8 4 , "
Unable to Operate System with A/C
and AV Switch" (Without navigation system), or AV- 1 3 9 , "Unable to Operate System with A/C and AV
Switch" (With navigation system).
�Refer to "SERVICE BULLETIN ITB04-055" for the diagnosis of satellite radio.
NOTE:
Noise resulting from variations in field strength, such as fading noise and multi-path noise, or external noise
from trains and other sources. It is not a malfunction.
�Fading noise: This noise occurs because of variations in the field strength in a narrow range due to moun-
tains or buildings blocking the signal.
�Multi-path noise: This noise results from a time difference between the broadcast waves directly from the
station arriving at the antenna and the waves reflected by mountains or buildings.
Symptom Possible malfunction location
Audio system does not work properly.
�Audio unit power supply circuit
�Communication signal circuit between audio unit and display control unit
�A/C and AV switch
�Audio unit
No sound can be heard from all speakers.
�BOSE speaker amp. power supply and ground circuit
�BOSE speaker amp. ON signal circuit
�Audio unit
�BOSE speaker amp.
No sound can be heard from one or several speakers.
�Audio signal circuit between audio unit and BOSE speaker amp.
�Audio signal circuit between BOSE speaker amp. and speaker
�Speaker
�Tw e e te r
�Audio unit
�BOSE speaker amp.
No sound can be heard from woofer.
�Audio signal circuit between BOSE speaker amp. and woofer
�Woofer
�BOSE speaker amp.
No sound can be heard from radio or noise is caught.
�Antenna amp. ON signal circuit
�Antenna feeder
�Roof antenna
�Antenna amp.
�Audio unit
Audio steering switch does not operate properly.
�Remote control signal circuit between audio steering switch and A/C and
AV switch
�Audio steering switch
�Spiral cable
�TEL adapter unit (With telephone system)
�A/C and AV switch
Page 646 of 4462

AV-40
AUDIO
Revision: 2006 December 2006 FX35/FX45
6. CHECK AUDIO STEERING WHEEL SWITCH RESISTANCE
Check resistance audio steering wheel switch terminals.
�*1: Without telephone system
�*2: With telephone system
OK or NG
OK >> INSPECTION END
NG >> Replace audio steering wheel switch.
A/C and AV Switch InspectionNKS003AY
1. A/C AND AV SWITCH SELF-DIAGNOSIS FUNCTION
1. Start A/C and AV switch self-diagnosis function. Refer to AV- 3 5 , "
A/C and AV Switch Self-Diagnosis Func-
tion" .
2. Operate A/C and AV switch.
Does the A/C and AV switch is operated normally?
YES >> INSPECTION END (System is OK)
NO >> Replace A/C and AV switch.
BOSE Speaker Amp. InspectionNKS003AZ
1. CHECK HARNESS
1. Turn ignition switch OFF.
2. Disconnect audio unit and BOSE speaker amp. connectors.
3. Check continuity between audio unit harness connector M59 ter- minal 12 and BOSE speaker amp. harness connector B213 ter-
minal 31.
4. Check continuity between audio unit harness connector M59 ter- minal 12 and ground.
OK or NG
OK >> GO TO 2.
NG >> Repair harness or connector.
Terminal Signal name Condition Resistance
( Ω )
16 17 Power
*1Depress power switch. Approx. 0
Mode
*2Depress mode switch. Approx. 0
Seek down Depress (station) down switch. Approx. 165
Volume (down) Depress volume down switch. Approx. 652
20 Mode
*1Depress mode switch. Approx. 0
PTT
*2Depress PTT switch. Approx. 0
Seek up Depress (station) up switch. Approx. 165
Volume (up) Depress volume up switch. Approx. 652
SKIA5010E
12 – 31 : Continuity should exist.
12 – Ground : Continuity should not exist.
SKIA6816E