Page 3706 of 4462

LT-144
PARKING, LICENSE PLATE AND TAIL LAMPS
Revision: 2006 December 2006 FX35/FX45
Terminals and Reference Value for Rear Combination Lamp Control UnitNKS003NA
Refer to LT- 9 9 , "Terminals and Reference Value for Rear Combination Lamp Control Unit" .
How to Proceed With Trouble DiagnosisNKS003H7
1. Confirm the symptom or customer complaint.
2. Understand operation description and function description. Refer to LT- 1 3 3 , "
System Description" .
3. Perform Preliminary Check. Refer to LT- 1 4 4 , "
Preliminary Check" .
4. Check symptom and repair or replace the cause of malfunction.
5. Do parking, license plate, side marker and tail lamps operate normally? If YES, GO TO 6. If NO, GO TO 4.
6. INSPECTION END
Preliminary CheckNKS003H8
CHECK POWER SUPPLY AND GROUND CIRCUIT
1. CHECK FUSES
Check for blown fuses.
Refer to LT- 1 3 7 , "
Wiring Diagram — TAIL/L —" .
OK or NG
OK >> GO TO 2.
NG >> If fuse is blown, be sure to eliminate cause of malfunction before installing new fuse. Refer to PG-
3, "POWER SUPPLY ROUTING CIRCUIT" .
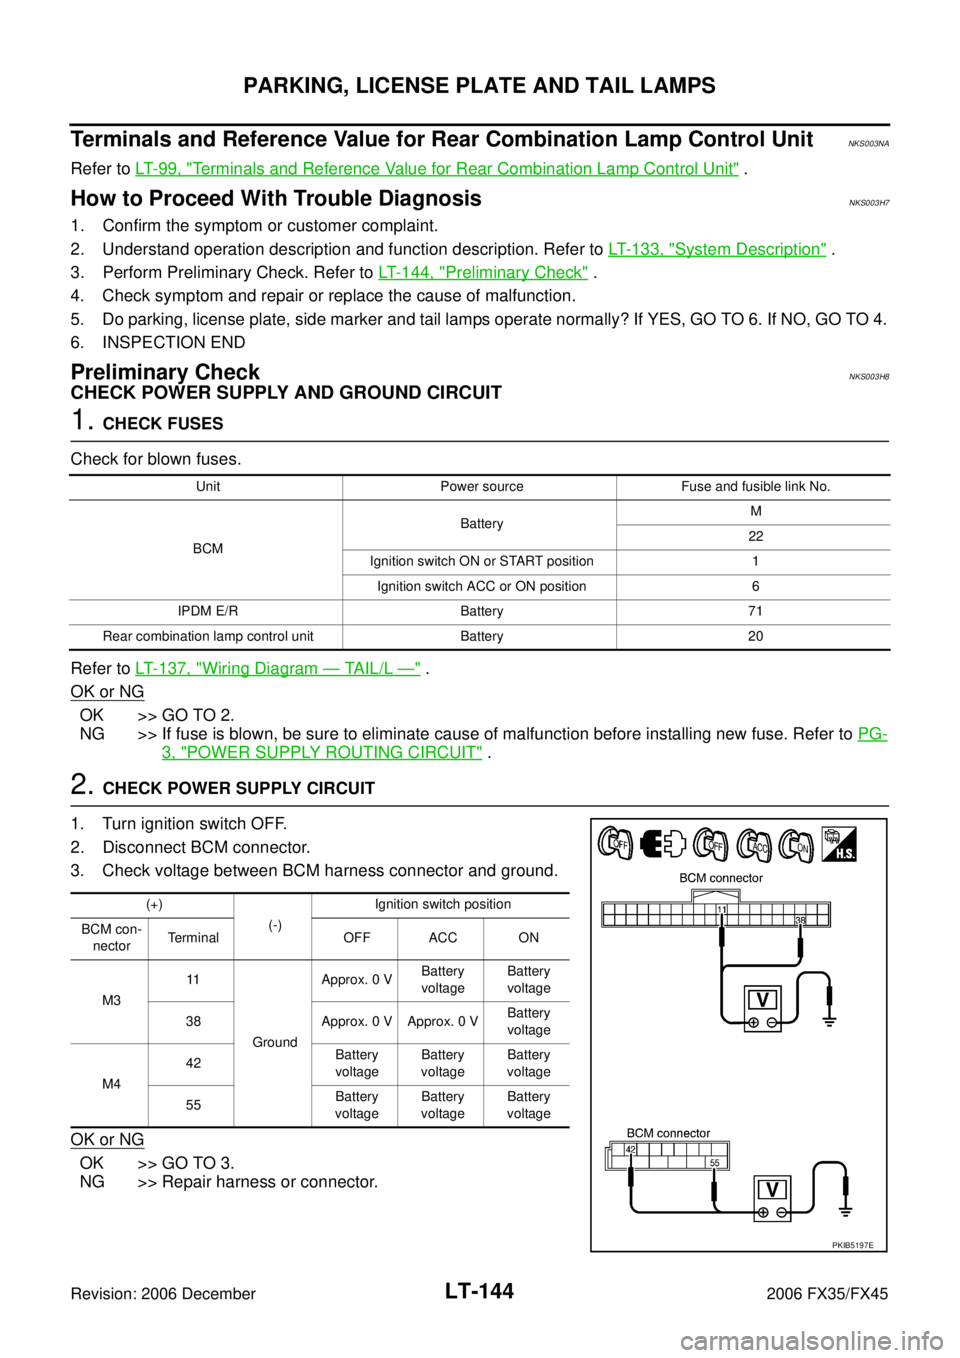
2. CHECK POWER SUPPLY CIRCUIT
1. Turn ignition switch OFF.
2. Disconnect BCM connector.
3. Check voltage between BCM harness connector and ground.
OK or NG
OK >> GO TO 3.
NG >> Repair harness or connector.
Unit Power source Fuse and fusible link No.
BCM Battery
M
22
Ignition switch ON or START position 1 Ignition switch ACC or ON position 6
IPDM E/R Battery 71
Rear combination lamp control unit Battery 20
(+) (-) Ignition switch position
BCM con- nector Terminal OFF ACC ON
M3 11
Ground Approx. 0 V
Battery
voltage Battery
voltage
38 Approx. 0 V Approx. 0 V Battery
voltage
M4 42
Battery
voltage Battery
voltage Battery
voltage
55 Battery
voltage Battery
voltage Battery
voltage
PKIB5197E
Page 3726 of 4462
LT-164
INTERIOR ROOM LAMP
Revision: 2006 December 2006 FX35/FX45
Wiring Diagram — ROOM/L —NKS002YP
TKWM4314E
Page 3735 of 4462

INTERIOR ROOM LAMP LT-173
C
D E
F
G H
I
J
L
M A
B
LT
Revision: 2006 December 2006 FX35/FX45
How to Proceed With Trouble DiagnosisNKS002YR
1. Confirm the symptom or customer complaint.
2. Understand operation description and function description. Refer to LT- 1 5 6 , "
System Description" .
3. Perform Preliminary Check. Refer to LT- 1 7 3 , "
Preliminary Check" .
4. Check symptom and repair or replace the cause of malfunction.
5. Does interior room lamp operate normally? If YES, GO TO 6. If NO, GO TO 4.
6. INSPECTION END
Preliminary CheckNKS002YS
CHECK FOR POWER SUPPLY AND GROUND CIRCUIT
1. CHECK FUSES
Check for blown fuses.
Refer to LT- 1 6 4 , "
Wiring Diagram — ROOM/L —" .
OK or NG
OK >> GO TO 2.
NG >> If fuse is blown, be sure to eliminate cause of malfunction before installing new fuse. Refer to PG-
3, "POWER SUPPLY ROUTING CIRCUIT" .
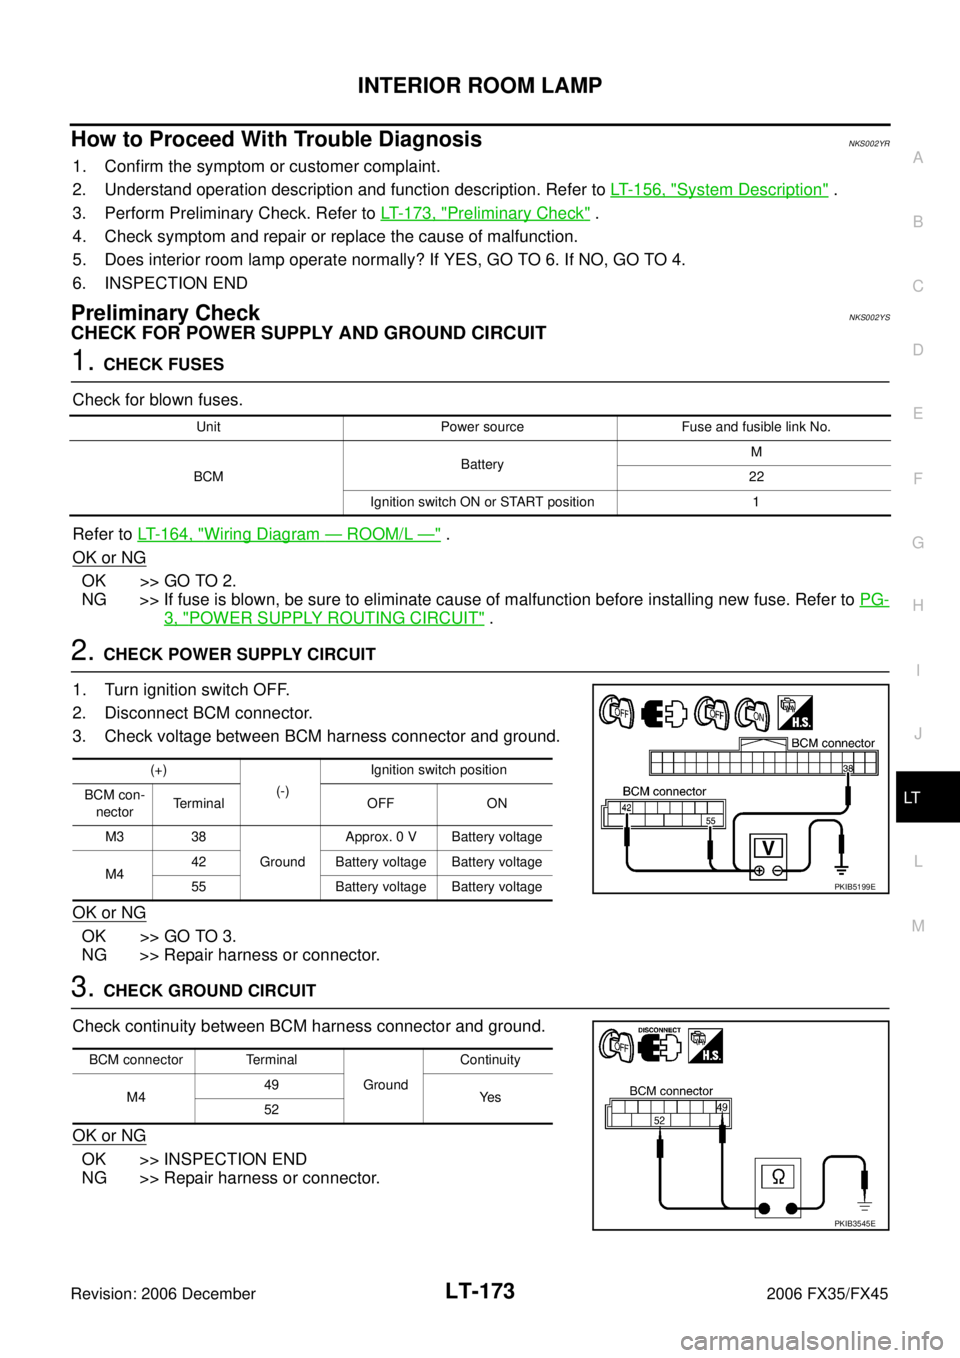
2. CHECK POWER SUPPLY CIRCUIT
1. Turn ignition switch OFF.
2. Disconnect BCM connector.
3. Check voltage between BCM harness connector and ground.
OK or NG
OK >> GO TO 3.
NG >> Repair harness or connector.
3. CHECK GROUND CIRCUIT
Check continuity between BCM harness connector and ground.
OK or NG
OK >> INSPECTION END
NG >> Repair harness or connector.
Unit Power source Fuse and fusible link No.
BCM Battery
M
22
Ignition switch ON or START position 1
(+) (-) Ignition switch position
BCM con- nector Terminal OFF ON
M3 38 Ground Approx. 0 V Battery voltage
M4 42 Battery voltage Battery voltage
55 Battery voltage Battery voltage
PKIB5199E
BCM connector Terminal Ground Continuity
M4 49
Ye s
52
PKIB3545E
Page 3753 of 4462
ILLUMINATION LT-191
C
D E
F
G H
I
J
L
M A
B
LT
Revision: 2006 December 2006 FX35/FX45
CAN Communication System DescriptionNKS002Z3
CAN (Controller Area Network) is a serial communication line for real time application. It is an on-vehicle mul-
tiplex communication line with high data communication speed and excellent error detection ability. Many elec-
tronic control units are equipped onto a vehicle, and each control unit shares information and links with other
control units during operation (not independent). In CAN communication, control units are connected with 2
communication lines (CAN H line, CAN L line) allowing a high rate of information transmission with less wiring.
Each control unit transmits/receives data but selectively reads required data only.
CAN Communication UnitNKS002Z4
Refer to LAN-32, "CAN Communication Unit" .
Page 3756 of 4462
LT-194
ILLUMINATION
Revision: 2006 December 2006 FX35/FX45
Wiring Diagram — ILL —NKS002Z6
TKWM4329E
Page 3853 of 4462

PG-1
POWER SUPPLY, GROUND & CIRCUIT ELEMENTS
K ELECTRICAL
CONTENTS
C
D E
F
G H
I
J
L
M
SECTION PG
A
B
PG
Revision: 2006 December 2006 FX35/FX45
POWER SUPPLY, GROUND & CIRCUIT ELEMENTS
POWER SUPPLY ROUTING CIRCUIT ................. ..... 3
Schematic ........................................................... ..... 3
Wiring Diagram — POWER — ............................ ..... 4
BATTERY POWER SUPPLY — IGNITION SW.
IN ANY POSITION ........................................... ..... 4
ACCESSORY POWER SUPPLY — IGNITION
SW. IN “ACC” OR “ON” .................................... ... 10
IGNITION POWER SUPPLY — IGNITION SW.
IN “ON” AND/OR “START” ............................... ... 12
Fuse .................................................................... ... 16
Fusible Link ......................................................... ... 16
Circuit Breaker .................................................... ... 16
IPDM E/R (INTELLIGENT POWER DISTRIBUTION
MODULE ENGINE ROOM) ................................... ... 17
System Description ............................................. ... 17
SYSTEMS CONTROLLED BY IPDM E/R ........ ... 17
CAN COMMUNICATION LINE CONTROL ...... ... 17
IPDM E/R STATUS CONTROL ........................ ... 18
CAN Communication System Description ........... ... 18
CAN Communication Unit ................................... ... 18
Function of Detecting Ignition Relay Malfunction ... 18
CONSULT-II Function (IPDM E/R) ...................... ... 19
CONSULT-II INSPECTION PROCEDURE ...... ... 19
SELF-DIAG RESULTS ..................................... ... 19
DATA MONITOR .............................................. ... 19
ACTIVE TEST .................................................. ... 20
Auto Active Test .................................................. ... 21
DESCRIPTION ................................................. ... 21
OPERATION PROCEDURE ............................ ... 21
INSPECTION IN AUTO ACTIVE TEST MODE ... 22
Schematic ........................................................... ... 24
IPDM E/R Terminal Arrangement ........................ ... 25
IPDM E/R Power/Ground Circuit Inspection ....... ... 26
Inspection With CONSULT-II (Self-Diagnosis) .... ... 27
Removal and Installation of IPDM E/R ................ ... 28
REMOVAL ........................................................ ... 28
INSTALLATION ................................................ ... 28 GROUND ................................................................
... 29
Ground Distribution .............................................. ... 29
MAIN HARNESS .............................................. ... 29
ENGINE ROOM HARNESS ............................. ... 32
ENGINE HARNESS/VK ENGINE MODELS ..... ... 35
ENGINE HARNESS/VQ ENGINE MODELS .... ... 36
ENGINE CONTROL HARNESS/VK ENGINE
MODELS .......................................................... ... 37
ENGINE CONTROL HARNESS/VQ ENGINE
MODELS .......................................................... ... 38
BODY HARNESS ............................................. ... 39
BODY NO. 2 HARNESS .................................. ... 42
ROOM LAMP HARNESS ................................. ... 43
HARNESS .............................................................. ... 44
Harness Layout ................................................... ... 44
HOW TO READ HARNESS LAYOUT .............. ... 44
OUTLINE .......................................................... ... 45
MAIN HARNESS .............................................. ... 46
ENGINE ROOM HARNESS ............................. ... 49
ENGINE HARNESS/VK ENGINE MODELS ..... ... 52
ENGINE HARNESS/VQ ENGINE MODELS .... ... 53
ENGINE CONTROL HARNESS/VK ENGINE
MODELS .......................................................... ... 54
ENGINE CONTROL HARNESS/VQ ENGINE
MODELS .......................................................... ... 56
BODY HARNESS ............................................. ... 58
BODY NO. 2 HARNESS .................................. ... 60
ROOM LAMP HARNESS ................................. ... 61
FRONT DOOR HARNESS ............................... ... 62
REAR DOOR HARNESS ................................. ... 63
BACK DOOR HARNESS ................................. ... 64
Wiring Diagram Codes (Cell Codes) ................... ... 65
ELECTRICAL UNITS LOCATION ......................... ... 68
Electrical Units Location ...................................... ... 68
ENGINE COMPARTMENT ............................... ... 68
PASSENGER COMPARTMENT ...................... ... 69
LUGGAGE COMPARTMENT ........................... ... 71
HARNESS CONNECTOR ...................................... ... 72
Description ........................................................... ... 72
HARNESS CONNECTOR (TAB-LOCKING
Page 3856 of 4462
PG-4
POWER SUPPLY ROUTING CIRCUIT
Revision: 2006 December 2006 FX35/FX45
Wiring Diagram — POWER —NKS003G7
BATTERY POWER SUPPLY — IGNITION SW. IN ANY POSITION
TKWM4458E
Page 3868 of 4462

PG-16
POWER SUPPLY ROUTING CIRCUIT
Revision: 2006 December 2006 FX35/FX45
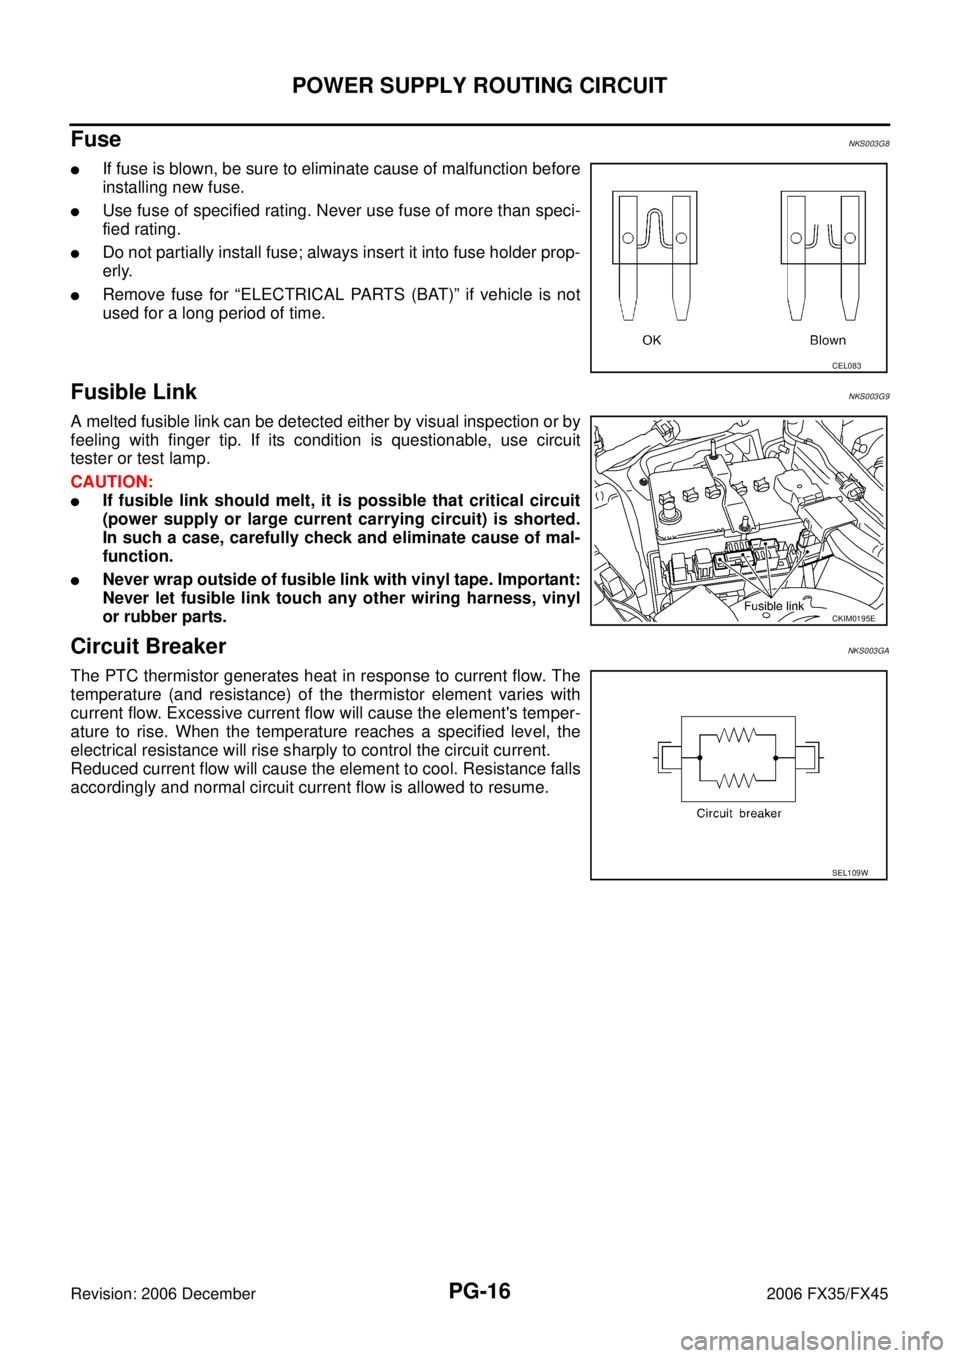
Fuse NKS003G8
�If fuse is blown, be sure to eliminate cause of malfunction before
installing new fuse.
�Use fuse of specified rating. Never use fuse of more than speci-
fied rating.
�Do not partially install fuse; always insert it into fuse holder prop-
erly.
�Remove fuse for “ELECTRICAL PARTS (BAT)” if vehicle is not
used for a long period of time.
Fusible LinkNKS003G9
A melted fusible link can be detected either by visual inspection or by
feeling with finger tip. If its condition is questionable, use circuit
tester or test lamp.
CAUTION:
�If fusible link should melt, it is possible that critical circuit
(power supply or large current carrying circuit) is shorted.
In such a case, carefully check and eliminate cause of mal-
function.
�Never wrap outside of fusible link with vinyl tape. Important:
Never let fusible link touch any other wiring harness, vinyl
or rubber parts.
Circuit Breaker NKS003GA
The PTC thermistor generates heat in response to current flow. The
temperature (and resistance) of the thermistor element varies with
current flow. Excessive current flow will cause the element's temper-
ature to rise. When the temperature reaches a specified level, the
electrical resistance will rise sharply to control the circuit current.
Reduced current flow will cause the element to cool. Resistance falls
accordingly and normal circuit current flow is allowed to resume.
CEL083
CKIM0195E
SEL109W