Page 3611 of 4462

DAYTIME LIGHT SYSTEM LT-49
C
D E
F
G H
I
J
L
M A
B
LT
Revision: 2006 December 2006 FX35/FX45
Preliminary CheckNKS002W4
CHECK POWER SUPPLY AND GROUND CIRCUIT
1. CHECK FUSES
Check for blown fuses.
Refer to LT- 4 2 , "
Wiring Diagram — DTRL —" .
OK or NG
OK >> GO TO 2.
NG >> If fuse is blown, be sure to eliminate cause of malfunction before installing new fuse. Refer to PG-
3, "POWER SUPPLY ROUTING CIRCUIT" .
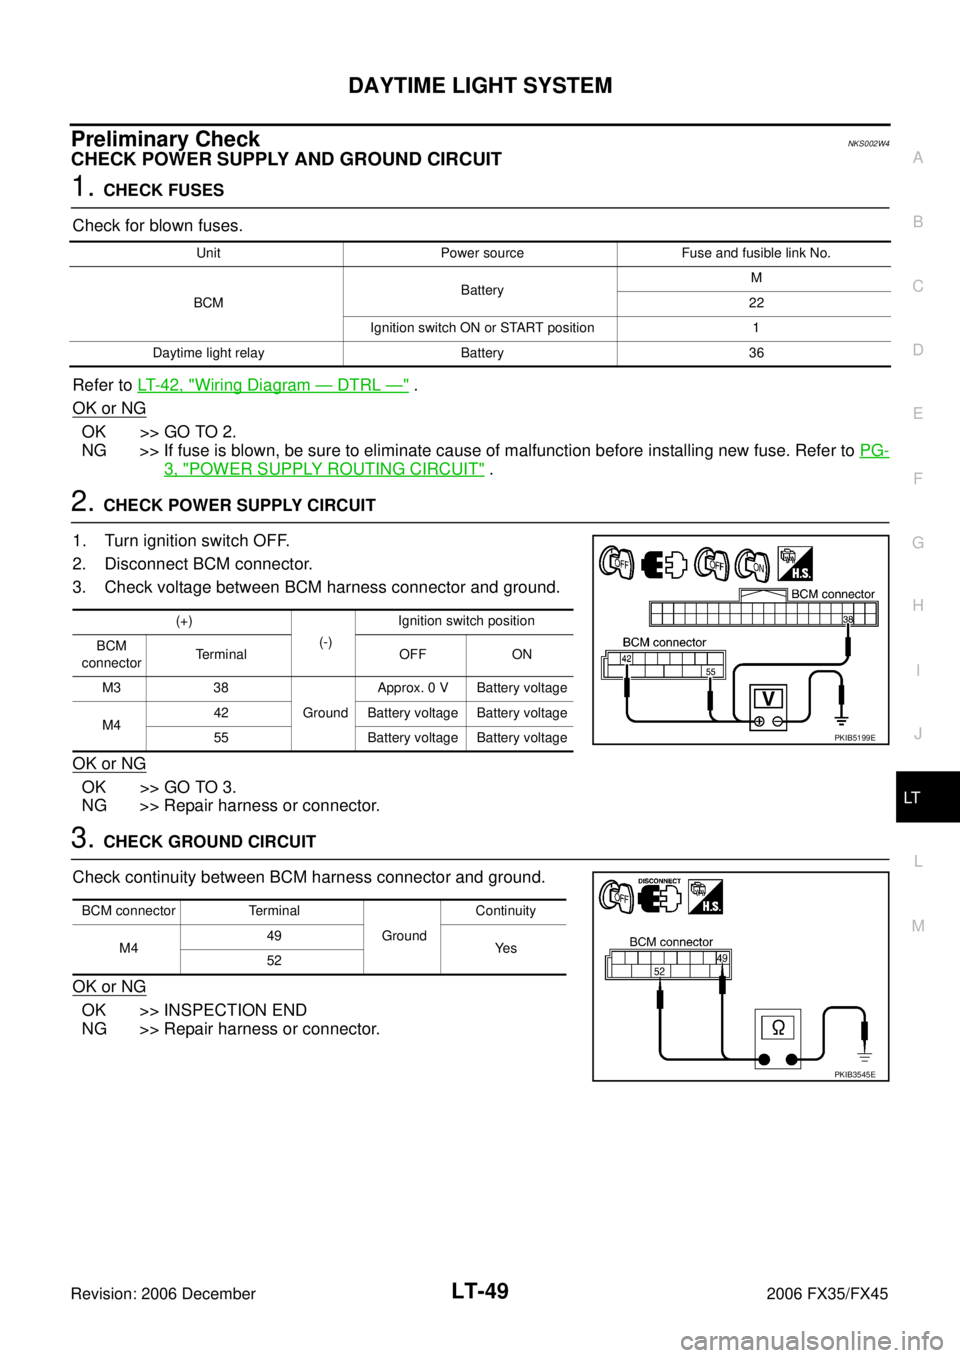
2. CHECK POWER SUPPLY CIRCUIT
1. Turn ignition switch OFF.
2. Disconnect BCM connector.
3. Check voltage between BCM harness connector and ground.
OK or NG
OK >> GO TO 3.
NG >> Repair harness or connector.
3. CHECK GROUND CIRCUIT
Check continuity between BCM harness connector and ground.
OK or NG
OK >> INSPECTION END
NG >> Repair harness or connector.
Unit Power source Fuse and fusible link No.
BCM Battery
M
22
Ignition switch ON or START position 1
Daytime light relay Battery 36
(+) (-) Ignition switch position
BCM
connector Te r m i n a l O F F O N
M3 38 Ground Approx. 0 V Battery voltage
M4 42 Battery voltage Battery voltage
55 Battery voltage Battery voltage
PKIB5199E
BCM connector Terminal Ground Continuity
M4 49
Ye s
52
PKIB3545E
Page 3619 of 4462

AUTO LIGHT SYSTEM LT-57
C
D E
F
G H
I
J
L
M A
B
LT
Revision: 2006 December 2006 FX35/FX45
When ignition switch is turn to ON position, and
When outside brightness is darker than prescribed level, input is supplied
�from BCM terminal 14
�to optical sensor terminal 2
The headlamps will then illuminate. For a description of headlamp operation, Refer to LT- 5 6 , "
System Descrip-
tion" .
COMBINATION SWITCH READING FUNCTION
Refer to BCS-3, "COMBINATION SWITCH READING FUNCTION" .
DELAY TIMER FUNCTION
Delay timer function carries out a function that BCM activates the timer and controls lights out of headlamps by
door switch signal and lightning switch signal when turning the Ignition switch OFF while it is ON and head-
lamps are ON by the auto light function.
Timer types are a 5 minute timer and a 45 second timer
�When opening any door (door switch is ON), the 5 minute timer starts and then headlamps go out 5 min-
utes later
�When all the doors are closed (from door switch ON to OFF), the 45 second timer starts and then head-
lamps go out 45 seconds later. If any door is opened (door switch ON) while the 45 second timer is in
operation, the 5 minute timer starts again
�The timer stops when turning on the ignition switch or turning off the auto light switch under the above
conditions.
Delay timer control mode can be changed by the function setting of CONSULT-II or display.
CAN Communication System DescriptionNKS002WD
CAN (Controller Area Network) is a serial communication line for real time application. It is an on-vehicle mul-
tiplex communication line with high data communication speed and excellent error detection ability. Many elec-
tronic control units are equipped onto a vehicle, and each control unit shares information and links with other
control units during operation (not independent). In CAN communication, control units are connected with 2
communication lines (CAN H line, CAN L line) allowing a high rate of information transmission with less wiring.
Each control unit transmits/receives data but selectively reads required data only.
CAN Communication UnitNKS002WE
Refer to LAN-32, "CAN Communication Unit" .
Major Components and FunctionsNKS002WF
Components Functions
BCM
�Turns on/off circuits of tail light and headlamp according to signals from light sensor, lighting switch
(AUTO), driver door switch, passenger door switch, rear door switch, and ignition switch (ON, OFF).
Optical sensor
�Converts outside brightness (lux) to voltage, and sends it to BCM. (Detects brightness of 800 to 2,500 lux)
Page 3621 of 4462
AUTO LIGHT SYSTEM LT-59
C
D E
F
G H
I
J
L
M A
B
LT
Revision: 2006 December 2006 FX35/FX45
Wiring Diagram — AUTO/L —NKS002WH
TKWM4297E
Page 3626 of 4462

LT-64
AUTO LIGHT SYSTEM
Revision: 2006 December 2006 FX35/FX45
Preliminary CheckNKS002WL
SETTING CHANGE FUNCTIONS
Sensitivity of auto light system can be adjusted using CONSULT-II. Refer to LT- 6 6 , "WORK SUPPORT" .
CHECK POWER SUPPLY AND GROUND CIRCUIT
1. CHECK FUSES
Check for blown fuses.
Refer to LT- 5 9 , "
Wiring Diagram — AUTO/L —" .
OK or NG
OK >> GO TO 2.
NG >> If fuse is blown, be sure to eliminate cause of malfunction before installing new fuse. Refer to PG-
3, "POWER SUPPLY ROUTING CIRCUIT" .
2. CHECK POWER SUPPLY CIRCUIT
1. Turn ignition switch OFF.
2. Disconnect BCM connector.
3. Check voltage between BCM harness connector and ground.
OK or NG
OK >> GO TO 3.
NG >> Repair harness or connector.
Unit Power source Fuse and fusible link No.
BCM Battery
M
22
Ignition switch ON or START position 1 Ignition switch ACC or ON position 6
IPDM E/R Battery 71
72
74
76
86
(+) (-) Ignition switch position
BCM con- nector Terminal OFF ACC ON
M3 11
Ground Approx. 0 V
Battery
voltage Battery
voltage
38 Approx. 0 V Approx. 0 V Battery
voltage
M4 42
Battery
voltage Battery
voltage Battery
voltage
55 Battery
voltage Battery
voltage Battery
voltage
PKIB5197E
Page 3636 of 4462
LT-74
HEADLAMP AIMING CONTROL
Revision: 2006 December 2006 FX35/FX45
Wiring Diagram — H/AIM —NKS002WT
TKWM4300E
Page 3641 of 4462

FRONT FOG LAMP LT-79
C
D E
F
G H
I
J
L
M A
B
LT
Revision: 2006 December 2006 FX35/FX45
�to BCM terminal 38.
When ignition switch is in ACC or ON position, power is supplied
�through 10A fuse [No. 6, located in fuse block (J/B)]
�to BCM terminal 11.
Ground is supplied
�to BCM terminals 49 and 52
�through grounds M35, M45 and M85,
�to IPDM E/R terminals 38 and 60
�through grounds E21, E50 and E51.
FRONT FOG LAMP OPERATION
The front fog lamp switch is built into combination switch. The lighting switch must be in the 2ND position or
AUTO position (headlamp is ON) and the front fog lamp switch must be ON for front fog lamp operation.
With the front fog lamp switch in the ON position, the CPU located in the IPDM E/R grounds the coil side of the
front fog lamp relay. The front fog lamp relay then directs power
�through IPDM E/R terminal 36
�to front fog lamp RH terminal 1,
�through IPDM E/R terminal 37
�to front fog lamp LH terminal 1.
Ground is supplied
�to front fog lamp RH and LH terminals 2
�through grounds E21, E50 and E51.
With power and grounds supplied, front fog lamps illuminate.
COMBINATION SWITCH READING FUNCTION
Refer to BCS-3, "COMBINATION SWITCH READING FUNCTION" .
EXTERIOR LAMP BATTERY SAVER CONTROL
When the combination switch (lighting switch) is in the 2ND position (ON), the front fog lamp switch is ON, and
the ignition switch is turned from ON or ACC to OFF, the battery saver control feature is activated.
Under this condition, the front fog lamps (and headlamps) remain illuminated for 5 minutes, then the front fog
lamps (and headlamps) are turned off.
Exterior lamp battery saver control mode can be changed by the function setting of CONSULT-II.
CAN Communication System DescriptionNKS002WY
CAN (Controller Area Network) is a serial communication line for real time application. It is an on-vehicle mul-
tiplex communication line with high data communication speed and excellent error detection ability. Many elec-
tronic control units are equipped onto a vehicle, and each control unit shares information and links with other
control units during operation (not independent). In CAN communication, control units are connected with 2
communication lines (CAN H line, CAN L line) allowing a high rate of information transmission with less wiring.
Each control unit transmits/receives data but selectively reads required data only.
CAN Communication UnitNKS002WZ
Refer to LAN-32, "CAN Communication Unit" .
Page 3642 of 4462
LT-80
FRONT FOG LAMP
Revision: 2006 December 2006 FX35/FX45
Wiring Diagram — F/FOG —NKS002X0
TKWM4303E
Page 3645 of 4462

FRONT FOG LAMP LT-83
C
D E
F
G H
I
J
L
M A
B
LT
Revision: 2006 December 2006 FX35/FX45
How to Proceed With Trouble DiagnosisNKS002X3
1. Confirm the symptom or customer complaint.
2. Understand operation description and function description. Refer to LT- 7 8 , "
System Description" .
3. Perform Preliminary Check. Refer to LT- 8 3 , "
Preliminary Check" .
4. Check symptom and repair or replace the cause of malfunction.
5. Does front fog lamp operate normally? If YES, GO TO 6. If NO, GO TO 4.
6. INSPECTION END
Preliminary CheckNKS002X4
CHECK POWER SUPPLY AND GROUND CIRCUIT
1. CHECK FUSES
Check for blown fuses.
Refer to LT- 8 0 , "
Wiring Diagram — F/FOG —" .
OK or NG
OK >> GO TO 2.
NG >> If fuse is blown, be sure to eliminate cause of malfunction before installing new fuse. Refer to PG-
3, "POWER SUPPLY ROUTING CIRCUIT" .
48 L CAN − H— — —
49 R CAN − L— — —
60 B Ground ON — Approx. 0 V
Termi-
nal
No. Wire
color Signal
name Measuring condition
Reference value
Ignition
switch Operation or condition
Unit Power source Fuse and fusible link No.
BCM Battery
M
22
Ignition switch ON or START position 1 Ignition switch ACC or ON position 6
IPDM E/R Battery 88