Page 752 of 4462

AV-146
NAVIGATION SYSTEM
Revision: 2006 December 2006 FX35/FX45
2. CHECK RGB SIGNAL
1. Connect display control unit and display connectors.
2. Turn ignition switch ON.
3. Start Confirmation/Adjustment mode. Refer to AV- 1 2 9 , "
Confirmation/Adjustment Mode" .
4. Display color bar by selecting “Display Color Spectrum Bar” on Display Diagnosis screen. Refer to AV-
130, "DISPLAY DIAGNOSIS" .
5. Check the malfunctioning circuit according to the symptoms.
�Light blue (Cyan) tinged screen
Check voltage waveform between display control unit harness
connector M76 terminal 50 and ground with CONSULT-II or
oscilloscope.
�Purple (Magenta) tinged screen
Check voltage waveform between display control unit harness
connector M76 terminal 52 and ground with CONSULT-II or
oscilloscope.
�Yellow tinged screen
Check voltage waveform between display control unit harness
connector M76 terminal 54 and ground with CONSULT-II or
oscilloscope.
OK or NG
OK >> Replace display.
NG >> Replace display control unit. 50 – Ground:
SKIB7856ESKIB7769E
52 – Ground:
SKIB7857ESKIB7770E
54 – Ground:
SKIB7858ESKIB7771E
Page 753 of 4462

NAVIGATION SYSTEM AV-147
C
D E
F
G H
I
J
L
M A
B
AV
Revision: 2006 December 2006 FX35/FX45
Tint Is Strange for The RGB Image (Only NAVI Screen)NKS003KT
Symptom: Tint of map screen is strange. (Status screen for audio and A/C, TRIP screen and FUEL ECON-
OMY screen are normal.)
1. CHECK HARNESS
1. Turn ignition switch OFF.
2. Disconnect NAVI control unit and display unit connectors.
3. Check the malfunctioning circuit according to the symptoms.
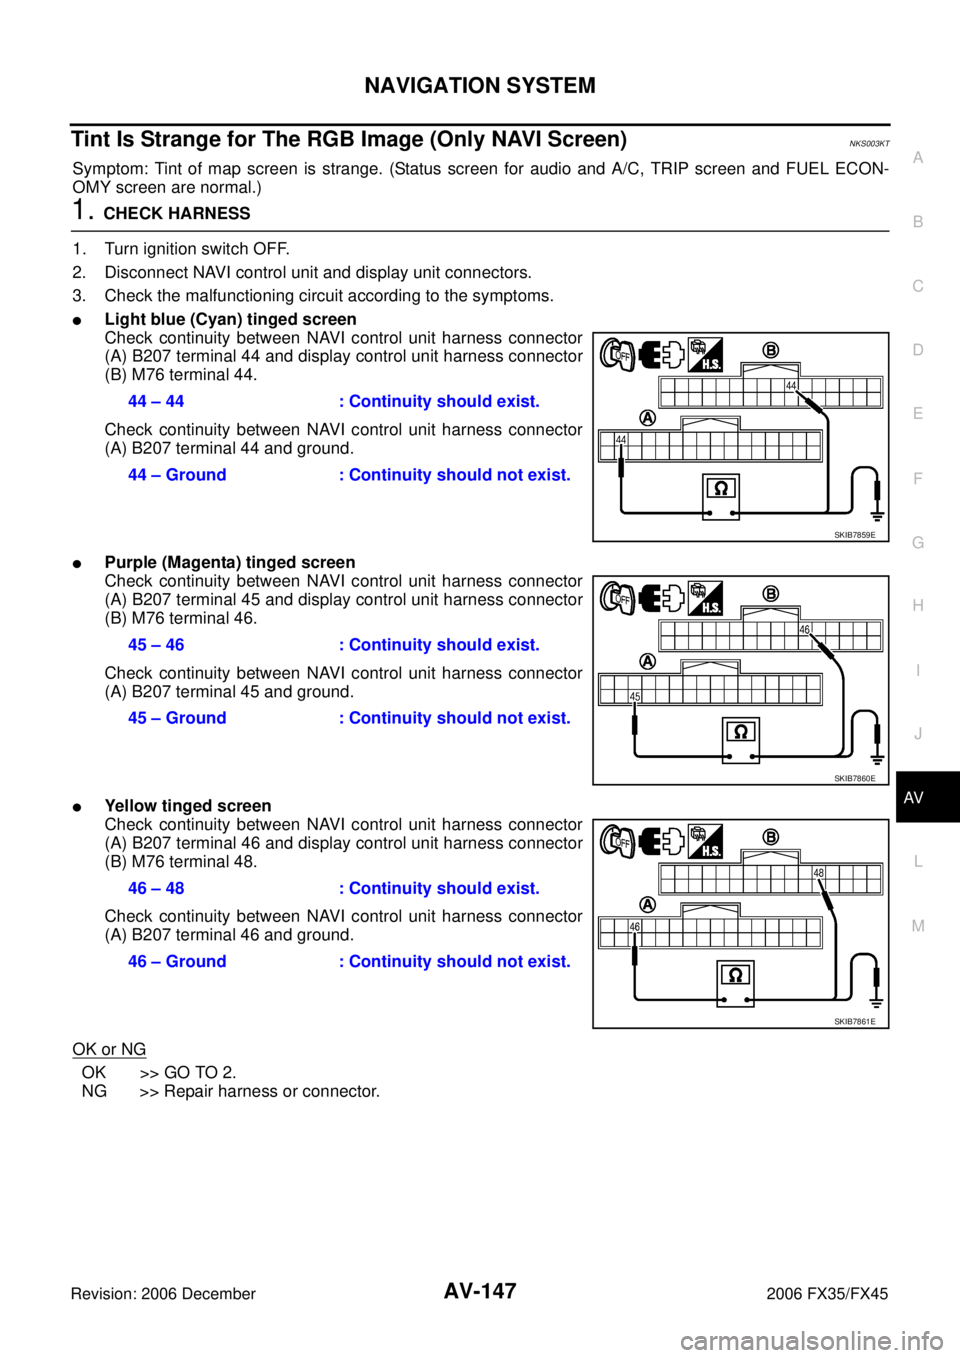
�Light blue (Cyan) tinged screen
Check continuity between NAVI control unit harness connector
(A) B207 terminal 44 and display control unit harness connector
(B) M76 terminal 44.
Check continuity between NAVI control unit harness connector
(A) B207 terminal 44 and ground.
�Purple (Magenta) tinged screen
Check continuity between NAVI control unit harness connector
(A) B207 terminal 45 and display control unit harness connector
(B) M76 terminal 46.
Check continuity between NAVI control unit harness connector
(A) B207 terminal 45 and ground.
�Yellow tinged screen
Check continuity between NAVI control unit harness connector
(A) B207 terminal 46 and display control unit harness connector
(B) M76 terminal 48.
Check continuity between NAVI control unit harness connector
(A) B207 terminal 46 and ground.
OK or NG
OK >> GO TO 2.
NG >> Repair harness or connector. 44 – 44 : Continuity should exist.
44 – Ground : Continuity should not exist.
SKIB7859E
45 – 46 : Continuity should exist.
45 – Ground : Continuity should not exist.
SKIB7860E
46 – 48 : Continuity should exist.
46 – Ground : Continuity should not exist.
SKIB7861E
Page 754 of 4462

AV-148
NAVIGATION SYSTEM
Revision: 2006 December 2006 FX35/FX45
2. CHECK RGB SIGNAL
1. Connect NAVI control unit and display control unit connectors.
2. Turn ignition switch ON.
3. Start Confirmation/Adjustment (Navigation) mode. Refer to AV- 1 2 9 , "
Confirmation/Adjustment Mode" .
4. Display color bar by selecting “Color Spectrum bar” on Display Diagnosis screen. Refer to AV- 1 3 1 , "
Dis-
play Diagnosis" .
5. Check the malfunctioning circuit according to the symptoms.
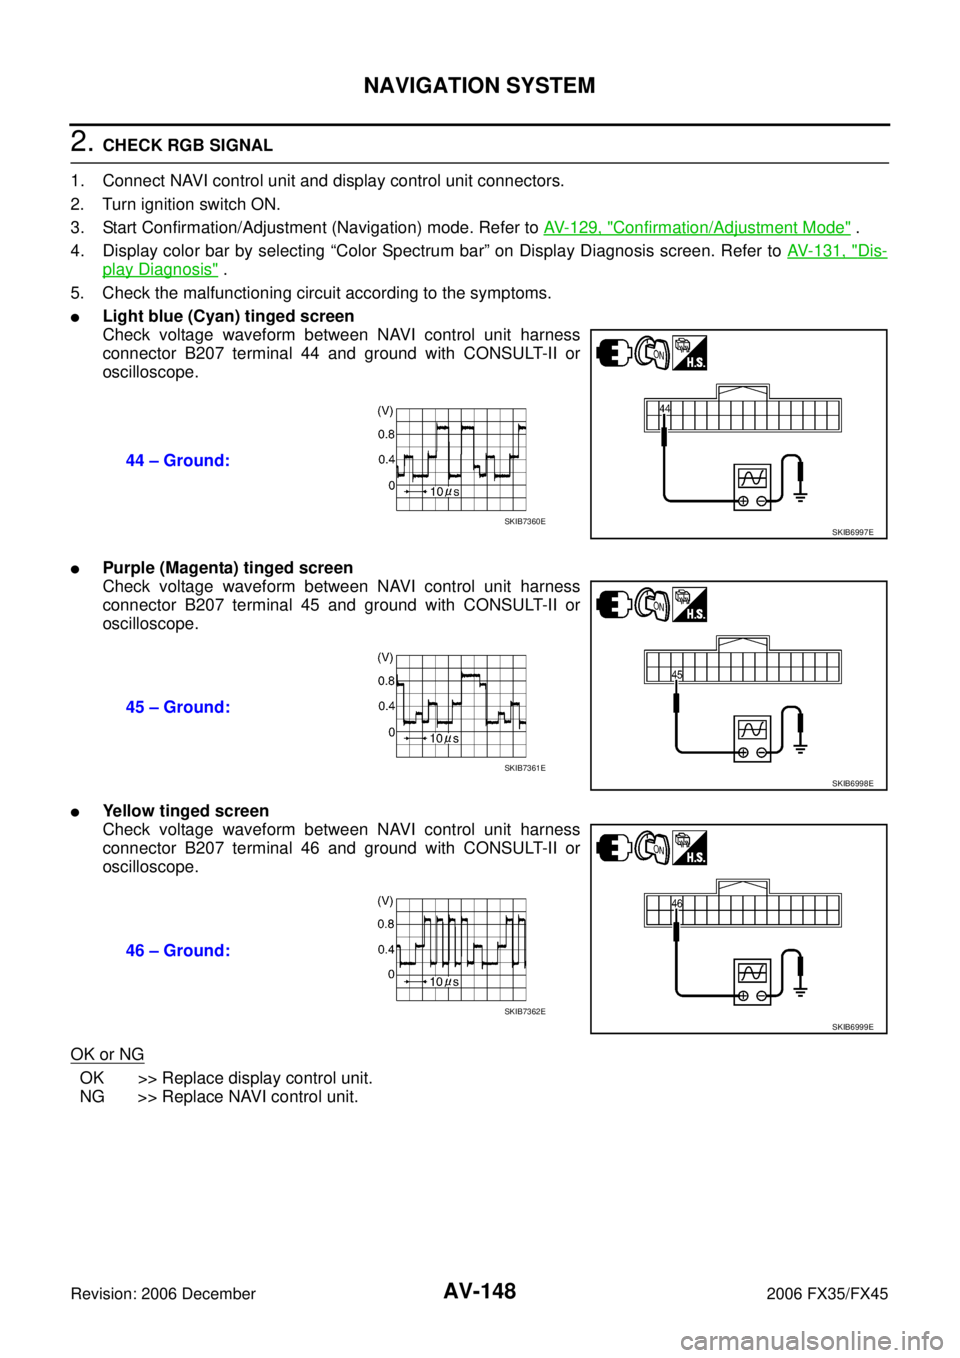
�Light blue (Cyan) tinged screen
Check voltage waveform between NAVI control unit harness
connector B207 terminal 44 and ground with CONSULT-II or
oscilloscope.
�Purple (Magenta) tinged screen
Check voltage waveform between NAVI control unit harness
connector B207 terminal 45 and ground with CONSULT-II or
oscilloscope.
�Yellow tinged screen
Check voltage waveform between NAVI control unit harness
connector B207 terminal 46 and ground with CONSULT-II or
oscilloscope.
OK or NG
OK >> Replace display control unit.
NG >> Replace NAVI control unit. 44 – Ground:
SKIB6997ESKIB7360E
45 – Ground:
SKIB6998ESKIB7361E
46 – Ground:
SKIB6999ESKIB7362E
Page 780 of 4462

AV-174
TELEPHONE
Revision: 2006 December 2006 FX35/FX45
TELEPHONEPFP:28342
System DescriptionNKS003IK
HANDS-FREE PHONE SYSTEM
�For Hands-free phone system operation information, refer to Owner's Manual.
�TEL adapter unit has Bluetooth module. It can perform wireless hands-free telephone calls using a cellu-
lar phone in vehicle compartment.
�5 or less cellular phones can be registered into the TEL adapter unit.
�Hands-free phone mode starts by transmitting switch signal to TEL adapter unit when pressing but-
ton.
�Hands-free phone mode ends by transmitting switch signal to TEL adapter unit when pressing button.
�When uttering to the microphone, microphone signal (audio signal) is transmitted from the microphone to
the TEL adapter unit and transmitted to the cellular phone with the Bluetooth
® communication.
�Audio sound is muted when turning audio ON while hands-free phone system works.
�Sound signal transmits to receiver's telephone through microphone unit, TEL adapter unit, and TEL
antenna when sending voice.
�Sound signal outputs to front RH speakers through TEL antenna, TEL adapter unit, audio unit, and BOSE
speaker amp. when receiving voice.
SKIB8653E
Page 791 of 4462
TELEPHONE AV-185
C
D E
F
G H
I
J
L
M A
B
AV
Revision: 2006 December 2006 FX35/FX45
NOTE:
Vehicle speed pulse is reset to 0 when turning ignition switch OFF.
6. Beep sounds (while 1 second) outputs 3 seconds after voice guidance of microphone check.
7. Voice giving to microphone outputs from speaker. Microphone function can be checked.
8. Diagnosis mode exits after a beep sounds.
Number of indicator flashes Voice guidance Malfunction Possible solution
1 Internal failure TEL adapter unit is malfunctioning Replace TEL adapter unit
2 Bluetooth antenna open TEL antenna feeder is open Replace TEL antenna
3 Bluetooth antenna shorted TEL antenna feeder is short
Page 1044 of 4462

BL-230
BODY REPAIR
Revision: 2006 December 2006 FX35/FX45
BODY REPAIRPFP:60100
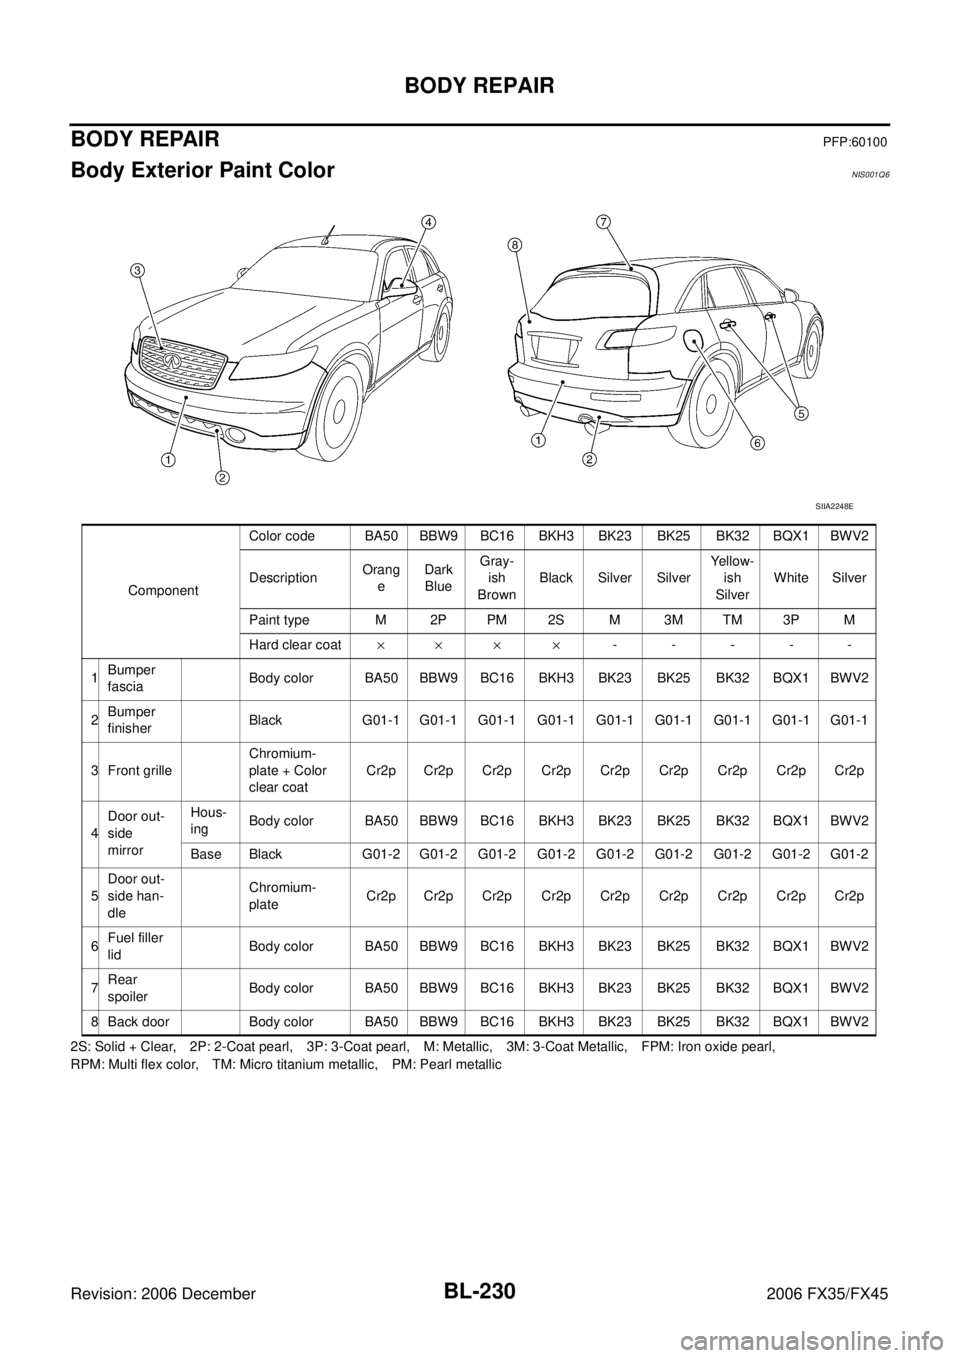
Body Exterior Paint ColorNIS001Q6
2S: Solid + Clear, 2P: 2-Coat pearl, 3P: 3-Coat pearl, M: Metallic, 3M: 3-Coat Metallic, FPM: Iron oxide pearl,
RPM: Multi flex color, TM: Micro titanium metallic, PM: Pearl metallic
SIIA2248E
Component Color code BA50 BBW9 BC16 BKH3 BK23 BK25 BK32 BQX1 BWV2
Description Orang
e Dark
Blue Gray-
ish
Brown Black Silver Silver
Ye l l o w -
ish
Silver White Silver
Paint type M 2P PM 2S M 3M TM 3P M
Hard clear coat ×× × × -----
1 Bumper
fascia Body color BA50 BBW9 BC16 BKH3 BK23 BK25 BK32 BQX1 BWV2
2 Bumper
finisher Black G01-1 G01-1 G01-1 G01-1 G01-1 G01-1 G01-1 G01-1 G01-1
3 Front grille Chromium-
plate + Color
clear coat Cr2p Cr2p Cr2p Cr2p Cr2p Cr2p Cr2p Cr2p Cr2p
4 Door out-
side
mirror Hous-
ing Body color BA50 BBW9 BC16 BKH3 BK23 BK25 BK32 BQX1 BWV2
Base Black G01-2 G01-2 G01-2 G01-2 G01-2 G01-2 G01-2 G01-2 G01-2
5 Door out-
side han-
dle Chromium-
plate Cr2p Cr2p Cr2p Cr2p Cr2p Cr2p Cr2p Cr2p Cr2p
6 Fuel filler
lid Body color BA50 BBW9 BC16 BKH3 BK23 BK25 BK32 BQX1 BWV2
7 Rear
spoiler Body color BA50 BBW9 BC16 BKH3 BK23 BK25 BK32 BQX1 BWV2
8 Back door Body color BA50 BBW9 BC16 BKH3 BK23 BK25 BK32 BQX1 BWV2
Page 2839 of 4462
![INFINITI FX35 2006 Service Manual FUEL INJECTOR AND FUEL TUBE EM-45
[VQ35DE]
C
D E
F
G H
I
J
K L
M A
EM
Revision: 2006 December 2006 FX35/FX45
FUEL INJECTOR AND FUEL TUBEPFP:16600
ComponentsNBS003GJ
CAUTION:
Do not remove INFINITI FX35 2006 Service Manual FUEL INJECTOR AND FUEL TUBE EM-45
[VQ35DE]
C
D E
F
G H
I
J
K L
M A
EM
Revision: 2006 December 2006 FX35/FX45
FUEL INJECTOR AND FUEL TUBEPFP:16600
ComponentsNBS003GJ
CAUTION:
Do not remove](/manual-img/42/57019/w960_57019-2838.png)
FUEL INJECTOR AND FUEL TUBE EM-45
[VQ35DE]
C
D E
F
G H
I
J
K L
M A
EM
Revision: 2006 December 2006 FX35/FX45
FUEL INJECTOR AND FUEL TUBEPFP:16600
ComponentsNBS003GJ
CAUTION:
Do not remove or disassemble parts unless instructed as shown in the figure.
Removal and InstallationNBS003GK
REMOVAL
WARNING:
�Put a “CAUTION FLAMMABLE” sign in the workshop.
�Be sure to work in a well ventilated area and furnish workshop with a CO2 fire extinguisher.
�Do not smoke while servicing fuel system. Keep open flames and sparks away from the work area.
�To avoid the danger of being scalded, do not drain engine coolant when the engine is hot.
1. Remove engine cover with power tool. Refer to EM-19, "
INTAKE MANIFOLD COLLECTOR" .
2. Release fuel pressure. Refer to EC-86, "
FUEL PRESSURE RELEASE" .
3. Drain engine coolant, or when water hoses are disconnected, attach plug to prevent engine coolant leak- age. Refer to CO-11, "
Changing Engine Coolant" and EM-19, "INTAKE MANIFOLD COLLECTOR" .
CAUTION:
Perform this step when the engine is cold.
1. Fuel damper 2. O-ring 3. Fuel sub-tube
4. EVAP hose 5. Intake manifold collector (lower) 6. Fuel feed hose (with damper)
7. Fuel tube 8. Spacer 9. Clip
10. O-ring (blue) 11. Fuel injector 12. O-ring (brown)
13. Hose clamp 14. Bracket 15. Quick connector cap
16. Centralized under-floor piping
SBIA0580E
Page 2842 of 4462
![INFINITI FX35 2006 Service Manual EM-48
[VQ35DE]
FUEL INJECTOR AND FUEL TUBE
Revision: 2006 December 2006 FX35/FX45
�Lubricate O-ring with new engine oil.
�Do not clean O-ring with solvent.
�Make sure that O-ring and its mating part a INFINITI FX35 2006 Service Manual EM-48
[VQ35DE]
FUEL INJECTOR AND FUEL TUBE
Revision: 2006 December 2006 FX35/FX45
�Lubricate O-ring with new engine oil.
�Do not clean O-ring with solvent.
�Make sure that O-ring and its mating part a](/manual-img/42/57019/w960_57019-2841.png)
EM-48
[VQ35DE]
FUEL INJECTOR AND FUEL TUBE
Revision: 2006 December 2006 FX35/FX45
�Lubricate O-ring with new engine oil.
�Do not clean O-ring with solvent.
�Make sure that O-ring and its mating part are free of foreign material.
�When installing O-ring, be careful not to scratch it with tool or fingernails. Also be careful not
to twist or stretch O-ring. If O-ring was stretched while it was being attached, do not insert it
quickly into fuel tube.
�Insert new O-ring straight into fuel tube. Do not decenter or twist it.
�Insert fuel damper and fuel sub-tube straight into fuel tube.
�Tighten mounting bolts evenly in turn.
�After tightening mounting bolts, make sure that there is no gap between flange and fuel tube.
2. Install new O-rings to fuel injector, paying attention to the following.
CAUTION:
�Upper and lower O-ring are different. Be careful not to confuse them.
�Handle O-ring with bare hands. Do not wear gloves.
�Lubricate O-ring with new engine oil.
�Do not clean O-ring with solvent.
�Make sure that O-ring and its mating part are free of foreign material.
�When installing O-ring, be careful not to scratch it with tool or fingernails. Also be careful not to
twist or stretch O-ring. If O-ring was stretched while it was being attached, do not insert it
quickly into fuel tube.
�Insert O-ring straight into fuel injector. Do not decenter or twist it.
3. Install fuel injector to fuel tube as follows:
a. Insert clip into clip mounting groove on fuel injector.
�Insert clip so that protrusion “A” of fuel injector matches cutout
“A” of clip.
CAUTION:
�Do not reuse clip. Replace it with a new one.
�Be careful to keep clip from interfering with O-ring. If
interference occurs, replace O-ring.
b. Insert fuel injector into fuel tube with clip attached.
�Insert it while matching it to the axial center.
�Insert fuel injector so that protrusion “B” of fuel tube matches
cutout “B” of clip.
�Make sure that fuel tube flange is securely fixed in flange fix-
ing groove on clip.
c. Make sure that installation is complete by checking that fuel injector does not rotate or come off.
�Make sure that protrusions of fuel injectors are aligned with
cutouts of clips after installation.
4. Install spacers on intake manifold.
5. Install fuel tube and fuel injector assembly to intake manifold. CAUTION:
Be careful not to let tip of injector nozzle come in contact with other parts. Fuel tube side : Blue
Nozzle side : Brown
PBIC2545E