Page 1199 of 4462
PREPARATION CO-5
[VQ35DE]
C
D E
F
G H
I
J
K L
M A
CO
Revision: 2006 December 2006 FX35/FX45
PREPARATIONPFP:00002
Special Service ToolsNBS003JP
The actual shapes of Kent-Moore tools may differ from those of special service tools illustrated here. Tool number
(Kent-Moore No.)
Tool name Description
EG17650301
(J33984-A)
Radiator cap tester adapter Adapting radiator cap tester to radiator cap
and radiator filler neck
a: 28 (1.10) dia.
b: 31.4 (1.236) dia.
c: 41.3 (1.626) dia.
Unit: mm (in)
KV99103510
(—)
Radiator plate pliers A Installing radiator upper and lower tanks
KV99103520
(—)
Radiator plate pliers B Removing radiator upper and lower tanks
KV10111100
(J37228)
Seal cutter Removing chain tensioner cover and water
pump cover
WS39930000
(—)
Tube presser Pressing the tube of liquid gasket
S-NT564
S-NT224
S-NT225
NT046
S-NT052
Page 1201 of 4462

OVERHEATING CAUSE ANALYSIS CO-7
[VQ35DE]
C
D E
F
G H
I
J
K L
M A
CO
Revision: 2006 December 2006 FX35/FX45
OVERHEATING CAUSE ANALYSISPFP:00012
Troubleshooting ChartNBS003JR
Symptom Check items
Cooling sys-
tem parts
malfunction Poor heat transfer
Water pump malfunction Worn or loose drive belt
—
Thermostat stuck closed —
Damaged fins Dust contamination or
paper clogging
Physical damage
Clogged radiator cooling
tube Excess foreign material
(rust, dirt, sand, etc.)
Reduced air flow Cooling fan does not oper-
ate
Fan assembly —
High resistance to fan rota-
tion
Damaged fan blades
Damaged radiator shroud — — —
Improper engine coolant
mixture ratio —— —
Poor engine coolant quality — Engine coolant density —
Insufficient engine coolant Engine coolant leaks Cooling hose
Loose clamp
Cracked hose
Water pump Poor sealing
Radiator cap Loose
Poor sealing
Radiator O-ring for damage, deterio-
ration or improper fitting
Cracked radiator tank
Cracked radiator core
Reservoir tank Cracked reservoir tank
Overflowing reservoir tank Exhaust gas leaks into
cooling system Cylinder head deterioration
Cylinder head gasket dete-
rioration
Page 1205 of 4462

ENGINE COOLANT CO-11
[VQ35DE]
C
D E
F
G H
I
J
K L
M A
CO
Revision: 2006 December 2006 FX35/FX45
ENGINE COOLANTPFP:KQ100
InspectionNBS003JU
LEVEL CHECK
�Check if the reservoir tank engine coolant level is within the
“MIN” to “MAX” when the engine is cool.
�Adjust the engine coolant level as necessary.
LEAK CHECK
�To check for leaks, apply pressure to the cooling system with the
radiator cap tester (commercial service tool) and radiator cap
tester adapter (SST).
WARNING:
Do not remove radiator cap when engine is hot. Serious
burns could occur from high-pressure engine coolant
escaping from radiator.
CAUTION:
Higher test pressure than specified may cause radiator
damage.
NOTE:
In a case that engine coolant decreases, replenish radiator with engine coolant.
�If anything is found, repair or replace damaged parts.
Changing Engine CoolantNBS003JV
WARNING:
�To avoid being scalded, do not change engine coolant when the engine is hot.
�Wrap a thick cloth around radiator cap and carefully remove radiator cap. First, turn radiator cap a
quarter of a turn to release built-up pressure. Then turn radiator cap all the way.
DRAINING ENGINE COOLANT
1. Remove front engine undercover with power tool.
2. Open radiator drain plug at the bottom of radiator, and then remove radiator cap.
When draining all of engine coolant in the system, open water drain plugs on cylinder block. Refer
to EM-124, "
DISASSEMBLY" .
3. Remove reservoir tank as necessary, and drain engine coolant and clean reservoir tank before installing.
SMA412B
Testing pressure : 157 kPa (1.6 kg/cm
2 , 23 psi)
SLC756A
SBIA0444E
Page 1206 of 4462

CO-12
[VQ35DE]
ENGINE COOLANT
Revision: 2006 December 2006 FX35/FX45
4. Check drained engine coolant for contaminants such as rust, corrosion or discoloration. If contaminated, flush the engine cooling system. Refer to CO-13, "
FLUSHING COOLING SYSTEM" .
REFILLING ENGINE COOLANT
1. Install reservoir tank if removed, and radiator drain plug.
CAUTION:
Be sure to clean drain plug and install with new O-ring.
If water drain plugs on cylinder block are removed, close and tighten them. Refer to EM-129,
"ASSEMBLY" .
2. Make sure that each hose clamp has been firmly tightened.
3. Remove air relief plug on heater hose.
4. Fill radiator, and reservoir tank if removed, to specified level.
�Pour engine coolant through engine coolant filler neck
slowly of less than 2 (2-1/8 US qt, 1-3/4 lmp qt) a minute
to allow air in system to escape.
�Use Genuine Nissan Long Life Antifreeze/Coolant or
equivalent mixed with water (distilled or demineralized).
Refer to MA-12, "
RECOMMENDED FLUIDS AND LUBRI-
CANTS" .
�When engine coolant overflows air relief hole on heater hose,
install air relief plug with new O-ring.
5. Install radiator cap.
6. Warm up until opening thermostat. Standard for warming-up time is approximately 10 minutes at 3,000 rpm.
�Make sure thermostat opening condition by touching radiator hose (lower) to see a flow of warm water.
CAUTION:
Watch water temperature gauge so as not to overheat engine.
7. Stop the engine and cool down to less than approximately 50 °C (122 °F).
�Cool down using fan to reduce the time. Radiator drain plug:
: 1.18 N·m (0.12 kg-m, 10 in-lb)
SBIA0445E
Engine coolant capacity
(With reservoir tank at “MAX” level)
: Approximately 8.6 (9-1/8 US qt, 7-5/8 lmp qt)
SMA182B
Reservoir tank engine coolant capacity
(At “MAX” level)
: 0.8 (7/8 US qt, 3/4 lmp qt)
Air relief plug: : 1.19 N·m (0.12 kg-m, 11 in-lb)
SMA412B
Page 1207 of 4462

ENGINE COOLANT CO-13
[VQ35DE]
C
D E
F
G H
I
J
K L
M A
CO
Revision: 2006 December 2006 FX35/FX45
�If necessary, refill radiator up to filler neck with engine coolant.
8. Refill reservoir tank to “MAX” level line with engine coolant.
9. Repeat steps 4 through 7 two or more times with radiator cap installed until engine coolant level no longer drops.
10. Check cooling system for leaks with engine running.
11. Warm up the engine, and check for sound of engine coolant flow while running engine from idle up to 3,000 rpm with heater temperature controller set at several position between “COOL” and “WARM”.
�Sound may be noticeable at heater unit.
12. Repeat step 11 three times.
13. If sound is heard, bleed air from cooling system by repeating step 4 through 7 until engine coolant level no longer drops.
FLUSHING COOLING SYSTEM
1. Install reservoir tank if removed, and radiator drain plug.
If water drain plugs on cylinder block are removed, close and tighten them. Refer to EM-129,
"ASSEMBLY" .
2. Remove air relief plug on heater hose.
3. Fill radiator with water until water spills from the air relief hole, then close air relief plug. Fill radiator and reservoir tank with water and reinstall radiator cap.
4. Run the engine and warm it up to normal operating temperature.
5. Rev the engine two or three times under no-load.
6. Stop the engine and wait until it cools down.
7. Drain water from the system. Refer to CO-11, "
DRAINING ENGINE COOLANT" .
8. Repeat steps 1 through 7 until clear water begins to drain from radiator. Radiator drain plug:
: 1.18 N·m (0.12 kg-m, 10 in-lb)
SBIA0445E
Air relief plug: : 1.19 N·m (0.12 kg-m, 11 in-lb)
Page 1210 of 4462
CO-16
[VQ35DE]
RADIATOR
Revision: 2006 December 2006 FX35/FX45
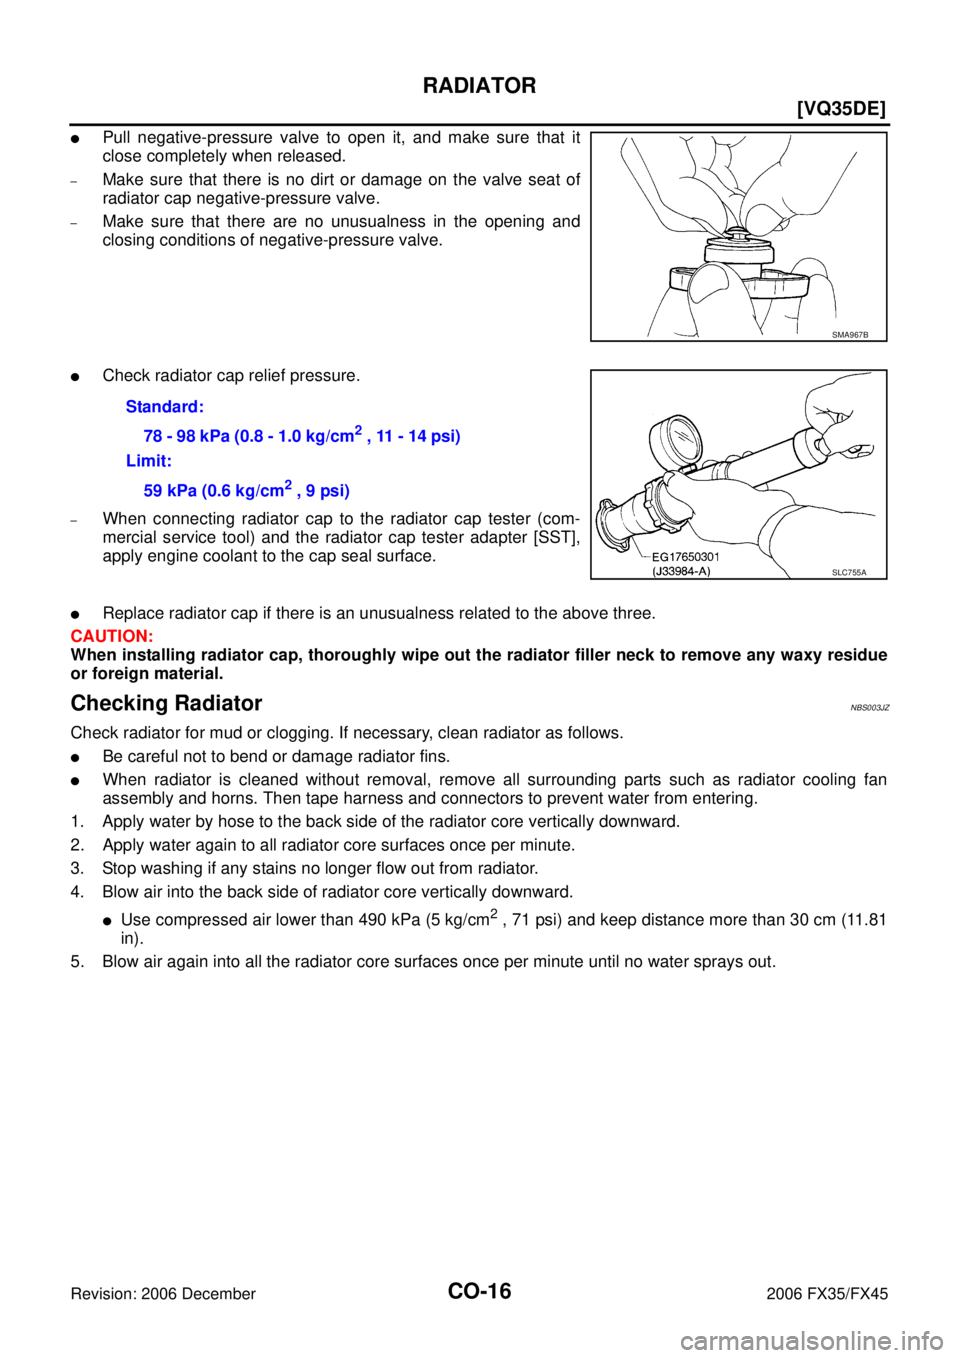
�Pull negative-pressure valve to open it, and make sure that it
close completely when released.
–Make sure that there is no dirt or damage on the valve seat of
radiator cap negative-pressure valve.
–Make sure that there are no unusualness in the opening and
closing conditions of negative-pressure valve.
�Check radiator cap relief pressure.
–When connecting radiator cap to the radiator cap tester (com-
mercial service tool) and the radiator cap tester adapter [SST],
apply engine coolant to the cap seal surface.
�Replace radiator cap if there is an unusualness related to the above three.
CAUTION:
When installing radiator cap, thoroughly wipe out the radiator filler neck to remove any waxy residue
or foreign material.
Checking RadiatorNBS003JZ
Check radiator for mud or clogging. If necessary, clean radiator as follows.
�Be careful not to bend or damage radiator fins.
�When radiator is cleaned without removal, remove all surrounding parts such as radiator cooling fan
assembly and horns. Then tape harness and connectors to prevent water from entering.
1. Apply water by hose to the back side of the radiator core vertically downward.
2. Apply water again to all radiator core surfaces once per minute.
3. Stop washing if any stains no longer flow out from radiator.
4. Blow air into the back side of radiator core vertically downward.
�Use compressed air lower than 490 kPa (5 kg/cm2 , 71 psi) and keep distance more than 30 cm (11.81
in).
5. Blow air again into all the radiator core surfaces once per minute until no water sprays out.
SMA967B
Standard:
78 - 98 kPa (0.8 - 1.0 kg/cm
2 , 11 - 14 psi)
Limit:
59 kPa (0.6 kg/cm
2 , 9 psi)
SLC755A
Page 1214 of 4462
CO-20
[VQ35DE]
RADIATOR (ALUMINUM TYPE)
Revision: 2006 December 2006 FX35/FX45
4. Make sure that the rim is completely crimped down.
5. Make sure that there is no leakage. Refer to CO-20, "
INSPECTION" .
INSPECTION
1. Apply pressure with the radiator cap tester adapter (SST) and
the radiator cap tester (commercial service tool).
WARNING:
To prevent the risk of hose coming undone while under
pressure, securely fasten it down with hose clamp.
CAUTION:
Attach hose to A/T fluid cooler to seal its inlet and outlet. (A/
T models)
2. Check for leakage by soaking radiator in water container with the testing pressure applied. Standard height “H” : 8.0 - 8.4 mm (0.315 - 0.331 in)
SLC554A
Testing pressure
: 157 kPa (1.6 kg/cm
2 , 23 psi)
SLC933-A
SLC934
Page 1216 of 4462
CO-22
[VQ35DE]
WATER PUMP
Revision: 2006 December 2006 FX35/FX45
WATE R P U M PPFP:21020
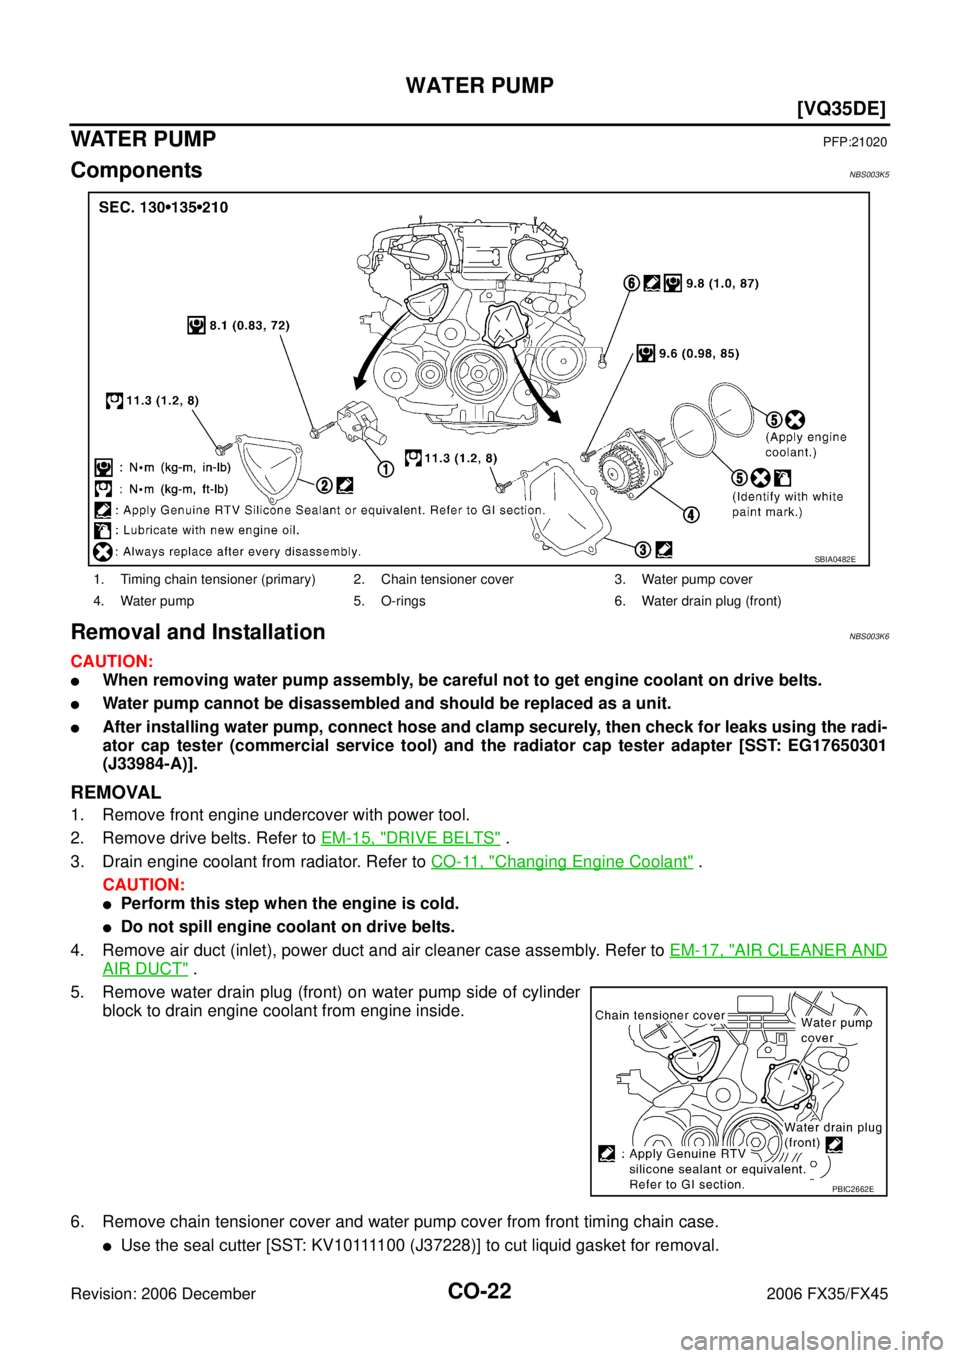
ComponentsNBS003K5
Removal and InstallationNBS003K6
CAUTION:
�When removing water pump assembly, be careful not to get engine coolant on drive belts.
�Water pump cannot be disassembled and should be replaced as a unit.
�After installing water pump, connect hose and clamp securely, then check for leaks using the radi-
ator cap tester (commercial service tool) and the radiator cap tester adapter [SST: EG17650301
(J33984-A)].
REMOVAL
1. Remove front engine undercover with power tool.
2. Remove drive belts. Refer to EM-15, "
DRIVE BELTS" .
3. Drain engine coolant from radiator. Refer to CO-11, "
Changing Engine Coolant" .
CAUTION:
�Perform this step when the engine is cold.
�Do not spill engine coolant on drive belts.
4. Remove air duct (inlet), power duct and air cleaner case assembly. Refer to EM-17, "
AIR CLEANER AND
AIR DUCT" .
5. Remove water drain plug (front) on water pump side of cylinder block to drain engine coolant from engine inside.
6. Remove chain tensioner cover and water pump cover from front timing chain case.
�U s e t h e s e a l c u t t e r [ S S T: K V 1 0 1111 0 0 ( J 3 7 2 2 8 ) ] t o c u t l i q u i d g a s k e t f o r r e m o v a l .
1. Timing chain tensioner (primary) 2. Chain tensioner cover 3. Water pump cover
4. Water pump 5. O-rings 6. Water drain plug (front)
SBIA0482E
PBIC2662E

