Page 1293 of 4462
WARNING LAMPS DI-43
C
D E
F
G H
I
J
L
M A
B
DI
Revision: 2006 December 2006 FX35/FX45
TKWM4349E
Page 1294 of 4462
DI-44
WARNING LAMPS
Revision: 2006 December 2006 FX35/FX45
TKWM4350E
Page 1295 of 4462
WARNING LAMPS DI-45
C
D E
F
G H
I
J
L
M A
B
DI
Revision: 2006 December 2006 FX35/FX45
TKWM4351E
Page 1296 of 4462
DI-46
WARNING LAMPS
Revision: 2006 December 2006 FX35/FX45
TKWM4352E
Page 1297 of 4462
WARNING LAMPS DI-47
C
D E
F
G H
I
J
L
M A
B
DI
Revision: 2006 December 2006 FX35/FX45
TKWM4353E
Page 1298 of 4462

DI-48
WARNING LAMPS
Revision: 2006 December 2006 FX35/FX45
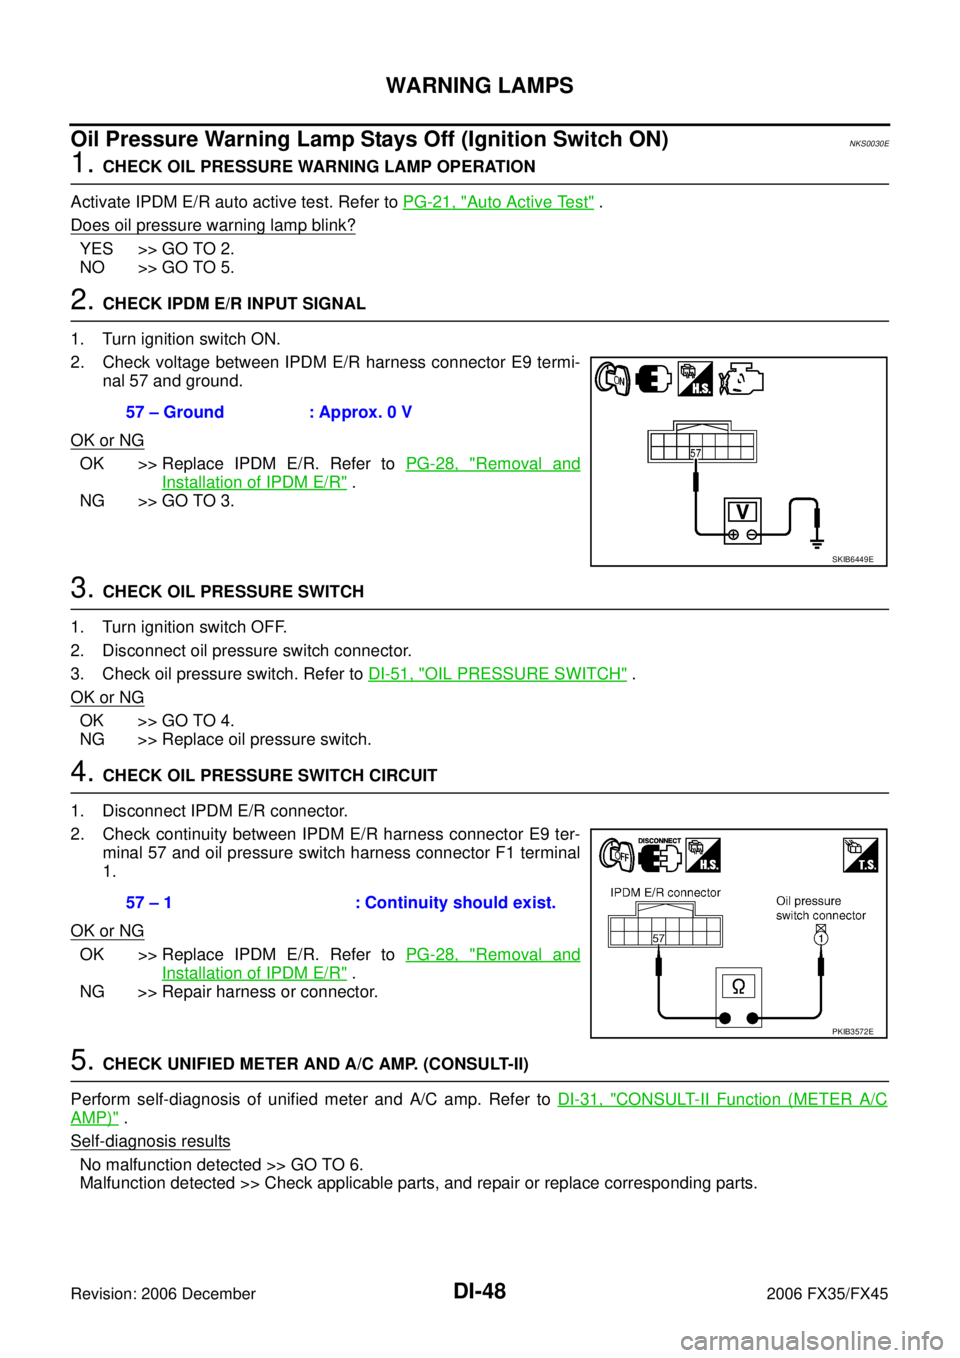
Oil Pressure Warning Lamp Stays Off (Ignition Switch ON)NKS0030E
1. CHECK OIL PRESSURE WARNING LAMP OPERATION
Activate IPDM E/R auto active test. Refer to PG-21, "
Auto Active Test" .
Does oil pressure warning lamp blink?
YES >> GO TO 2.
NO >> GO TO 5.
2. CHECK IPDM E/R INPUT SIGNAL
1. Turn ignition switch ON.
2. Check voltage between IPDM E/R harness connector E9 termi- nal 57 and ground.
OK or NG
OK >> Replace IPDM E/R. Refer to PG-28, "Removal and
Installation of IPDM E/R" .
NG >> GO TO 3.
3. CHECK OIL PRESSURE SWITCH
1. Turn ignition switch OFF.
2. Disconnect oil pressure switch connector.
3. Check oil pressure switch. Refer to DI-51, "
OIL PRESSURE SWITCH" .
OK or NG
OK >> GO TO 4.
NG >> Replace oil pressure switch.
4. CHECK OIL PRESSURE SWITCH CIRCUIT
1. Disconnect IPDM E/R connector.
2. Check continuity between IPDM E/R harness connector E9 ter- minal 57 and oil pressure switch harness connector F1 terminal
1.
OK or NG
OK >> Replace IPDM E/R. Refer to PG-28, "Removal and
Installation of IPDM E/R" .
NG >> Repair harness or connector.
5. CHECK UNIFIED METER AND A/C AMP. (CONSULT-II)
Perform self-diagnosis of unified meter and A/C amp. Refer to DI-31, "
CONSULT-II Function (METER A/C
AMP)" .
Self-diagnosis results
No malfunction detected >> GO TO 6.
Malfunction detected >> Check applicable parts, and repair or replace corresponding parts. 57 – Ground : Approx. 0 V
SKIB6449E
57 – 1 : Continuity should exist.
PKIB3572E
Page 1299 of 4462

WARNING LAMPS DI-49
C
D E
F
G H
I
J
L
M A
B
DI
Revision: 2006 December 2006 FX35/FX45
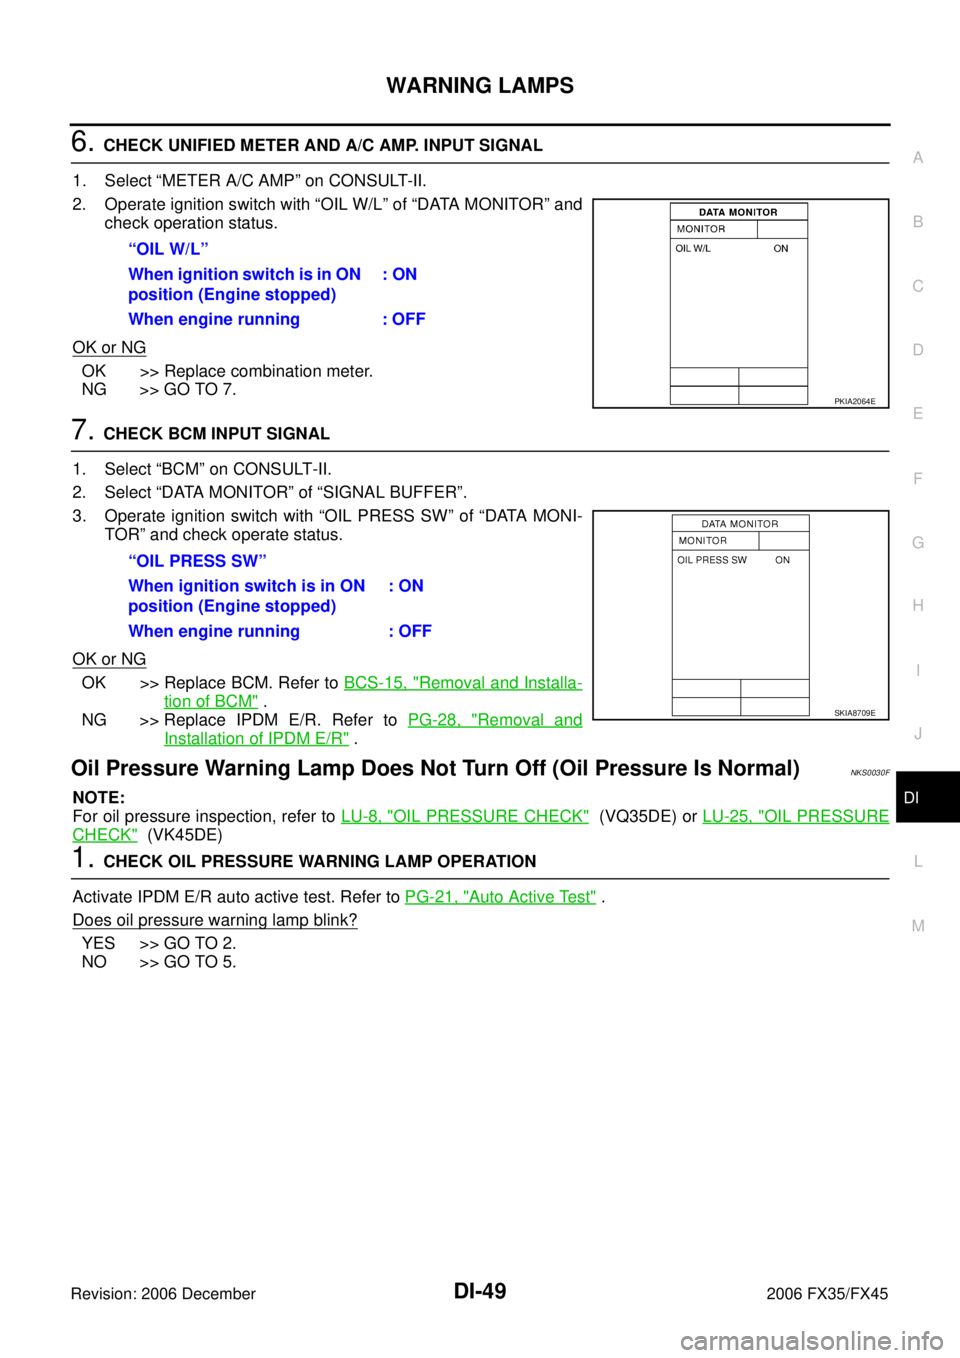
6. CHECK UNIFIED METER AND A/C AMP. INPUT SIGNAL
1. Select “METER A/C AMP” on CONSULT-II.
2. Operate ignition switch with “OIL W/L” of “DATA MONITOR” and check operation status.
OK or NG
OK >> Replace combination meter.
NG >> GO TO 7.
7. CHECK BCM INPUT SIGNAL
1. Select “BCM” on CONSULT-II.
2. Select “DATA MONITOR” of “SIGNAL BUFFER”.
3. Operate ignition switch with “OIL PRESS SW” of “DATA MONI- TOR” and check operate status.
OK or NG
OK >> Replace BCM. Refer to BCS-15, "Removal and Installa-
tion of BCM" .
NG >> Replace IPDM E/R. Refer to PG-28, "
Removal and
Installation of IPDM E/R" .
Oil Pressure Warning Lamp Does Not Turn Off (Oil Pressure Is Normal)NKS0030F
NOTE:
For oil pressure inspection, refer to LU-8, "
OIL PRESSURE CHECK" (VQ35DE) or LU-25, "OIL PRESSURE
CHECK" (VK45DE)
1. CHECK OIL PRESSURE WARNING LAMP OPERATION
Activate IPDM E/R auto active test. Refer to PG-21, "
Auto Active Test" .
Does oil pressure warning lamp blink?
YES >> GO TO 2.
NO >> GO TO 5. “OIL W/L”
When ignition switch is in ON
position (Engine stopped) : ON
When engine running : OFF
PKIA2064E
“OIL PRESS SW”
When ignition switch is in ON
position (Engine stopped) : ON
When engine running : OFF
SKIA8709E
Page 1300 of 4462

DI-50
WARNING LAMPS
Revision: 2006 December 2006 FX35/FX45
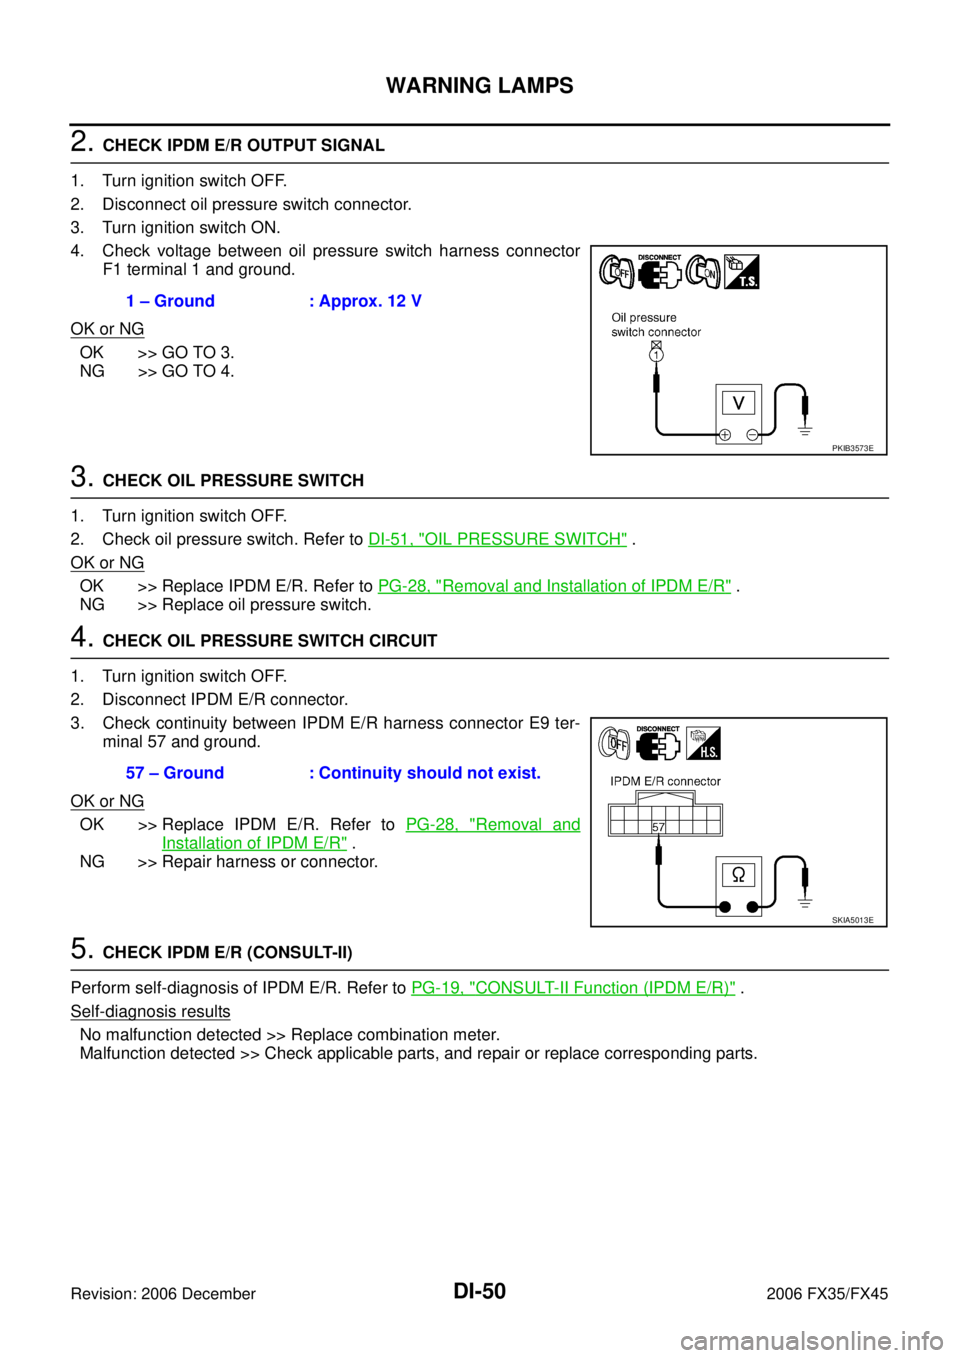
2. CHECK IPDM E/R OUTPUT SIGNAL
1. Turn ignition switch OFF.
2. Disconnect oil pressure switch connector.
3. Turn ignition switch ON.
4. Check voltage between oil pressure switch harness connector F1 terminal 1 and ground.
OK or NG
OK >> GO TO 3.
NG >> GO TO 4.
3. CHECK OIL PRESSURE SWITCH
1. Turn ignition switch OFF.
2. Check oil pressure switch. Refer to DI-51, "
OIL PRESSURE SWITCH" .
OK or NG
OK >> Replace IPDM E/R. Refer to PG-28, "Removal and Installation of IPDM E/R" .
NG >> Replace oil pressure switch.
4. CHECK OIL PRESSURE SWITCH CIRCUIT
1. Turn ignition switch OFF.
2. Disconnect IPDM E/R connector.
3. Check continuity between IPDM E/R harness connector E9 ter- minal 57 and ground.
OK or NG
OK >> Replace IPDM E/R. Refer to PG-28, "Removal and
Installation of IPDM E/R" .
NG >> Repair harness or connector.
5. CHECK IPDM E/R (CONSULT-II)
Perform self-diagnosis of IPDM E/R. Refer to PG-19, "
CONSULT-II Function (IPDM E/R)" .
Self-diagnosis results
No malfunction detected >> Replace combination meter.
Malfunction detected >> Check applicable parts, and repair or replace corresponding parts. 1 – Ground : Approx. 12 V
PKIB3573E
57 – Ground : Continuity should not exist.
SKIA5013E