2006 Hyundai Terracan coolant temperature
[x] Cancel search: coolant temperaturePage 450 of 539
3 IN CASE OF EMERGENCY
4
!
1. Ensure that the booster battery is 12
volt type. If the booster battery is installed in another vehicle, ensure that the two vehicles are not touch- ing.
2. Turn off all unnecessary electrical equipment in both vehicles.
3. Ensure that the engine of the ve- hicle providing the jump start is run- ning prior to connection of the jump cables.
4. Connect the red jump cable to the positive (+) terminal of the boosterbattery and the other end to thepositive (+) terminal of the dis- charged battery.
5. Attach the black jump cable to the negative (-) terminal of the boosterbattery, and the other end to a ground point within the engine compartmentof the vehicle with the flat bat-tery. Do not connect to the negative bat- tery terminal of the flat battery sincesparks may be generated with the subsequent risk of explosion.
6. Raise the booster vehicle engine speed to 2,000 r.p.m. and start theengine of the vehicle with the flat battery. 7. Switch "ON" the main beam
headlamps before carefully remov-ing the jumper cables in the reverse order of attachment. Once the jumper cables have been removed,switch "OFF" the main beam headlamps.
CAUTION:
If the jump cables are incorrectly installed, damage to the vehicle elec- trical system may occur, in particu- lar the electronic components suchas the Fuel Injection system com- puter and the Automatic transmis- sion computer. The battery mustnever be disconnected whilst the engine is running.
IF THE ENGINE OVERHEATS
HPD040A2-E If the temperature gauge indicates overheating:
1. Pull off the road and stop as soon as it is safe to do so.
2. Place the gear selector lever in "P"
(automatic), or neutral (manual trans- mission) and set the parking brake. If the air conditioning is on, turn it off.
3. If coolant is running out under the car or steam is coming out from underthe bonnet, stop the engine. Do not open the bonnet until the coolant hasstopped running or the steaming has stopped. If there is no visible loss of coolant and no steam, leave theengine running and check to be sure the engine cooling fan is operating. If the fan is not running, turn theengine off.
4. Check to see if the water pump drive
belt is broken. If it is not missing,check to see that it is tight. If the drive belt seems to be satisfactory, check for coolant leaking from theradiator, hoses or under the car. (If the air conditioning had been in use, it is normal for cold water to bedraining from it).
Page 451 of 539
3
IN CASE OF EMERGENCY
5
!
!
!WARNING:
Whilst the engine is running, keep hands and clothing away from mov- ing parts such as the fan and drive belts to prevent injury.
WARNING (Diesel only):
Never work on injection system withengine running or within 30 seconds after shutting off engine. High pres- sure pump, rail, injectors and highpressure pipes are subject to high pressure even after the engine stopped. The fuel jet produced byfuel leaks may cause serious in- jury, if it contacts the body. People using pacemakers should ensure thatthey keep a distance of 30cm from the ECU or wiring harness within the engine room while engine is run-ning, since the high currents in the Common Rail system produce con- siderable magnetic fields. 5. If the water pump drive belt is broken
or coolant is leaking out, stop theengine immediately and call the near- est Hyundai authorised repairer for assistance.
WARNING:
Do not remove the radiator cap when the engine is hot since steam and boiling water may be ejected fromthe radiator resulting in burns or scalding.
6. If the cause of the overheating can- not be found, wait until the engine temperature has returned to normal. Then, if coolant has been lost, care-fully remove the radiator cap and add water to bring the fluid level in the reservoir(page 6-10) up to the baseof the radiator fill opening. Fill the coolant expansion tank to the half- way mark.
7. Proceed with caution until it is estab- lished that the engine is operatingnormally. If the engine overheatsrepeatedly, the advice of a Hyundai authorised repairer should be sought.! CAUTION:
Serious loss of coolant indicates there is a leak in the cooling system and this should be checked as soon as possible by a Hyundai authorisedrepairer.
Page 477 of 539
5
VEHICLE MAINTENANCE REQUIREMENTS
9
F070C01A-AAT
o Coolant
The coolant should be changed at
the intervals specified in the mainte- nance schedule. F070D01HP-AAT
o Manual transmission oil
Inspect the manual transmission oil according to the maintenance sched- ule.
NOTE: If the oil level is low, check forpossible leaks before adding oil. Do not overfill. F070E03HP-GAT
o Automatic transmission fluid
The fluid level should be in the "HOT"
range of the dipstick, after engine andtransmission and filter are at normal operating temperature. Check the Au-tomatic and filter Transmission and filter Fluid level with the engine running and the transmission and filter inneutral, with the parking brake properly applied. Use MOBIL DEXRON-II when adding or changing fluid. Refer to the chapter6. F070F01A-AAT
o Brake hoses and lines
Visually check for proper installation,
chafing, cracks, deterioration and any leakage. Replace any deteriorated or damaged parts immediately. F070G02A-AAT o Brake fluid Check brake fluid level in the brake fluid reservoir. The level should be between "MIN" and "MAX" marks on the side of the reservoir. Use onlyhydraulic brake fluid conforming to DOT 3 or DOT 4. F070H01HP-AAT
o Rear brake linings, pad and parking brake Check the rear brake linings and pads for scoring, burning, leaking fluid, bro-ken parts, and excessive wear. In- spect the parking brake system in- cluding the parking brake lever andcables. For detailed service proce- dures, refer to the Shop Manual.
Page 489 of 539
6
OWNER MAINTENANCE
11
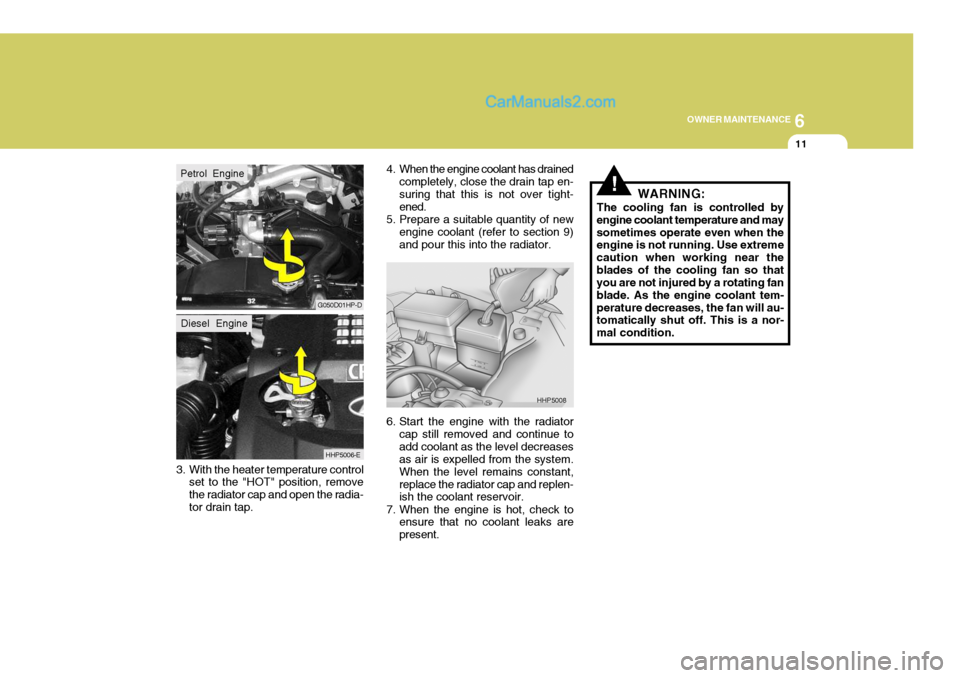
3. With the heater temperature control set to the "HOT" position, remove the radiator cap and open the radia-tor drain tap. 4. When the engine coolant has drained
completely, close the drain tap en-suring that this is not over tight- ened.
5. Prepare a suitable quantity of new engine coolant (refer to section 9)and pour this into the radiator.
6. Start the engine with the radiator cap still removed and continue to add coolant as the level decreases as air is expelled from the system. When the level remains constant,replace the radiator cap and replen- ish the coolant reservoir.
7. When the engine is hot, check to ensure that no coolant leaks are present.
G050D01HP-D
HHP5006-E
HHP5008
Petrol EngineDiesel Engine
!WARNING:
The cooling fan is controlled by engine coolant temperature and maysometimes operate even when the engine is not running. Use extreme caution when working near theblades of the cooling fan so that you are not injured by a rotating fan blade. As the engine coolant tem-perature decreases, the fan will au- tomatically shut off. This is a nor- mal condition.
Page 507 of 539
6
OWNER MAINTENANCE
29
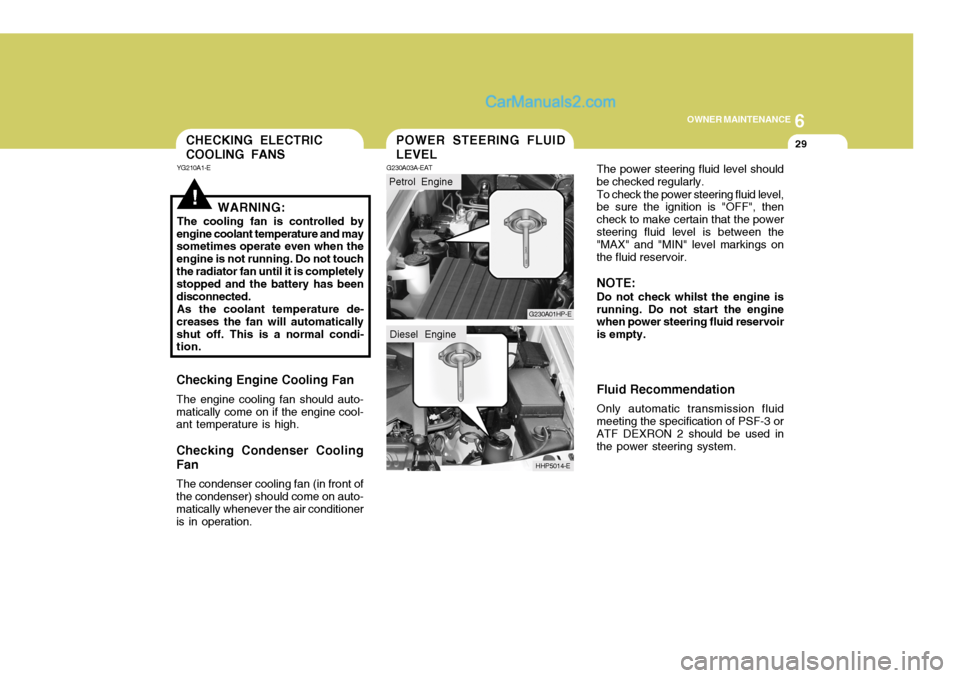
The power steering fluid level should be checked regularly. To check the power steering fluid level, be sure the ignition is "OFF", then check to make certain that the powersteering fluid level is between the "MAX" and "MIN" level markings on the fluid reservoir. NOTE: Do not check whilst the engine is running. Do not start the engine when power steering fluid reservoir is empty. Fluid Recommendation Only automatic transmission fluid meeting the specification of PSF-3 orATF DEXRON 2 should be used in the power steering system.POWER STEERING FLUID LEVEL
G230A03A-EAT
Petrol Engine
G230A01HP-E
HHP5014-E
Diesel Engine
!WARNING:
The cooling fan is controlled by
engine coolant temperature and may sometimes operate even when the engine is not running. Do not touchthe radiator fan until it is completely stopped and the battery has been disconnected. As the coolant temperature de-
creases the fan will automaticallyshut off. This is a normal condi- tion.
Checking Engine Cooling Fan The engine cooling fan should auto- matically come on if the engine cool- ant temperature is high.
Checking Condenser Cooling Fan The condenser cooling fan (in front of the condenser) should come on auto- matically whenever the air conditioner is in operation.
CHECKING ELECTRIC COOLING FANS
YG210A1-E
Page 536 of 539

10
INDEX
3
Coolant temperature gauge .....................................1-57
If the engine overheats ............................................. 3-4
Number ..................................................................... 8-2
Oil ............................................................................. 6-4 Starting ..................................................................... 2-5
Engine Exhaust Can Be Dangerous! ........................... 2-2
Exhaust Gas Warning .................................................. 7-2
F Fan Speed Control ................. .........................1-91, 1-102
Fog Light Switch
Front ....................................................................... 1-62
Rear ........................................................................ 1-62
Four-Wheel Drive(4WD) ............................................. 2-14
Front Door Edge Warning Light ................................. 1-85
Front Seats Adjustable head restraints ...................................... 1-17
Adjusting seatback angle ....................................... 1-17
Driver's seat lumbar support control .......................1-18
Seat adjust ment ..................................................... 1-16
Seat cushion height adjustment ............................. 1-19
Seat fore/aft adjustment ......................................... 1-16
Fuel
Capacity ................................................................... 9-2
Gauge ..................................................................... 1-57
Recommendations .................................................... 1-2
Fuel-Filler Flap
Remote release ...................................................... 1-82
Full-time 4WD Operation ............................................ 2-17
Fusible Links ............................................................. 6-25G
Glove Box ................................................................. 1-73
H Hatchback Door ......................................................... 1-78
Hazard Warning System ............................................ 1-65
Headlight Aiming Adjustment..................................... 6-33
Headlight Bulbs Replacement ....................................6-31
Headlight Leveling Device S ystem ............................1-86
Heated Front/Rear Window .. ......................................1-65
Heating and Cooling Control ......................................1-90
Heating and Ventilation
Air flow control ............................................. 1-92, 1-103
Air intake control ......................................... 1-92, 1-102
Defrosting/Defogging ............................................... 1-96
Fan speed control ........................................ 1-91, 1-102
Temperature control ................................................ 1-94
High-Mounted Rear Stop Light ...................................1-82
Horn ........................................................................... 1-85
I Ignition Switch ............................................................. 2-4
Illuminated ignition switch ......................................... 1-8
Immobiliser System ..................................................... 1-5
Indicator and Warning Lights ..................................... 1-50
Instrument Cluster and Indicator Lights ..................... 1-46
Interior Light ............................................................... 1-72
Interior Rearview Mirror .............................................. 1-77
Intermittent Wi pe Facility ........................................... 1-64