2006 Hyundai Terracan height
[x] Cancel search: heightPage 288 of 539

9 VEHICLE SPECIFICATIONS
2
J010A02HP-GAT MEASUREMENT
4700 (4765* 1
)
1860
1795 (1840* 2
)
2750 15301530
Overall length Overall width Overall heightWheel base Wheel tread
Front
Rear
Type Wheel free play Oil pump type Ball and nut, torsion bar type (Integral type) 0 ~ 30 mm (0 ~ 1.18 in.)Vane type
J060A01Y-GAT FUEL SYSTEM
J020A01HP-GAT POWER STEERING J030A02HP-GAT TIRE
Standard Spare
J050A02HP-GAT BRAKE Dual hydraulic with brake booster Ventilated disc Disc type Disc type (with ABS)Drum type (without ABS) Cable operated on rear wheel
Type Front brake type Rear brake type Parking brake
ITEM Battery Alternator
J040A02HP-GAT ELECTRICAL
mm
Fuel tank capacity 75 liter
2.5 TCI
MF 90AH
90A (12 V)
Tire Size
255/65 R16 Full Size Kpa(psi)
2.9 CRDi
MF 100AH
110A (12V)GASOLINE
MF 68AH
120A (13.5V)DIESEL
E.C only Except E.C*1: With Bumper Guard *2: With Roof Rack Inflation Pressure
200kPa (29 psi)
Page 326 of 539
1CONTROLS AND EQUIPMENT
18
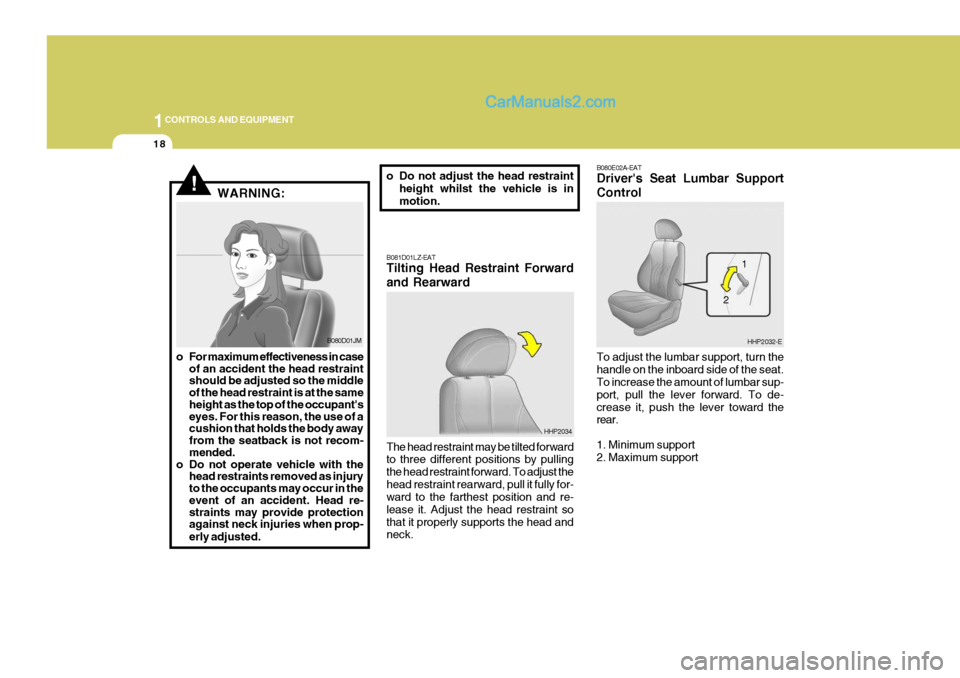
B080E02A-EAT Driver's Seat Lumbar Support Control To adjust the lumbar support, turn the handle on the inboard side of the seat. To increase the amount of lumbar sup- port, pull the lever forward. To de-crease it, push the lever toward the rear. 1. Minimum support 2. Maximum support
HHP2032-E
HHP2034
!WARNING:
B081D01LZ-EAT Tilting Head Restraint Forward and Rearward The head restraint may be tilted forward to three different positions by pulling the head restraint forward. To adjust thehead restraint rearward, pull it fully for- ward to the farthest position and re- lease it. Adjust the head restraint sothat it properly supports the head and neck. 1
2
B080D01JM
o For maximum effectiveness in case of an accident the head restraint should be adjusted so the middle of the head restraint is at the same height as the top of the occupant's eyes. For this reason, the use of a cushion that holds the body away from the seatback is not recom- mended.
o Do not operate vehicle with the head restraints removed as injury to the occupants may occur in the event of an accident. Head re- straints may provide protection against neck injuries when prop- erly adjusted. o Do not adjust the head restraint
height whilst the vehicle is inmotion.
Page 327 of 539
1
CONTROLS AND EQUIPMENT
19
!
!
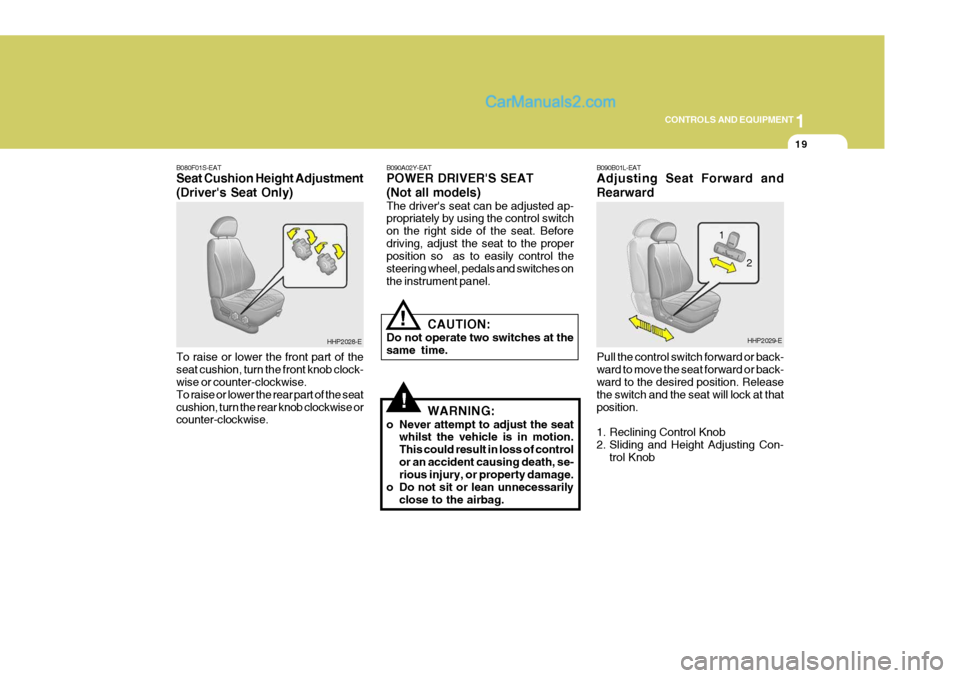
B080F01S-EAT Seat Cushion Height Adjustment (Driver's Seat Only) To raise or lower the front part of the seat cushion, turn the front knob clock- wise or counter-clockwise. To raise or lower the rear part of the seatcushion, turn the rear knob clockwise or counter-clockwise. B090A02Y-EAT POWER DRIVER'S SEAT (Not all models) The driver's seat can be adjusted ap- propriately by using the control switch on the right side of the seat. Beforedriving, adjust the seat to the proper position so as to easily control the steering wheel, pedals and switches onthe instrument panel.
CAUTION:
Do not operate two switches at thesame time.
WARNING:
o Never attempt to adjust the seat whilst the vehicle is in motion.This could result in loss of controlor an accident causing death, se- rious injury, or property damage.
o Do not sit or lean unnecessarily close to the airbag.
HHP2028-E B090B01L-EAT Adjusting Seat Forward and Rearward Pull the control switch forward or back- ward to move the seat forward or back- ward to the desired position. Release the switch and the seat will lock at thatposition.
1. Reclining Control Knob
2. Sliding and Height Adjusting Con-
trol KnobHHP2029-E
2
1
Page 328 of 539
1CONTROLS AND EQUIPMENT
20
!
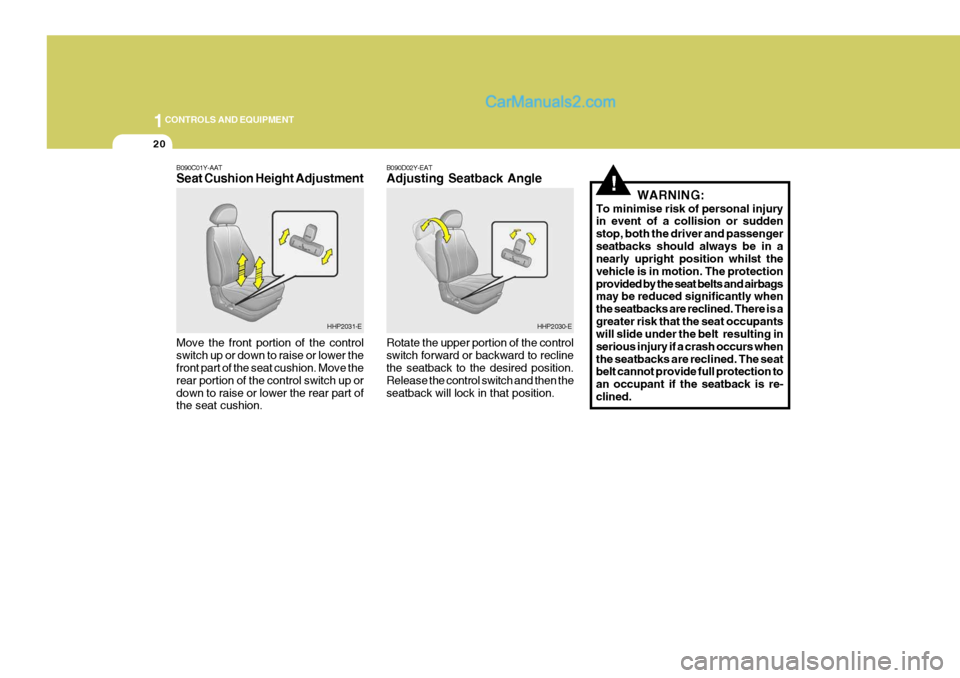
B090C01Y-AAT Seat Cushion Height Adjustment Move the front portion of the control switch up or down to raise or lower the front part of the seat cushion. Move the rear portion of the control switch up ordown to raise or lower the rear part of the seat cushion. B090D02Y-EAT Adjusting Seatback Angle Rotate the upper portion of the control switch forward or backward to recline the seatback to the desired position. Release the control switch and then theseatback will lock in that position.
WARNING:
To minimise risk of personal injury in event of a collision or sudden stop, both the driver and passengerseatbacks should always be in a nearly upright position whilst the vehicle is in motion. The protectionprovided by the seat belts and airbags may be reduced significantly when the seatbacks are reclined. There is agreater risk that the seat occupants will slide under the belt resulting in serious injury if a crash occurs whenthe seatbacks are reclined. The seat belt cannot provide full protection to an occupant if the seatback is re-clined.
HHP2031-EHHP2030-E
Page 330 of 539
1CONTROLS AND EQUIPMENT
22
!
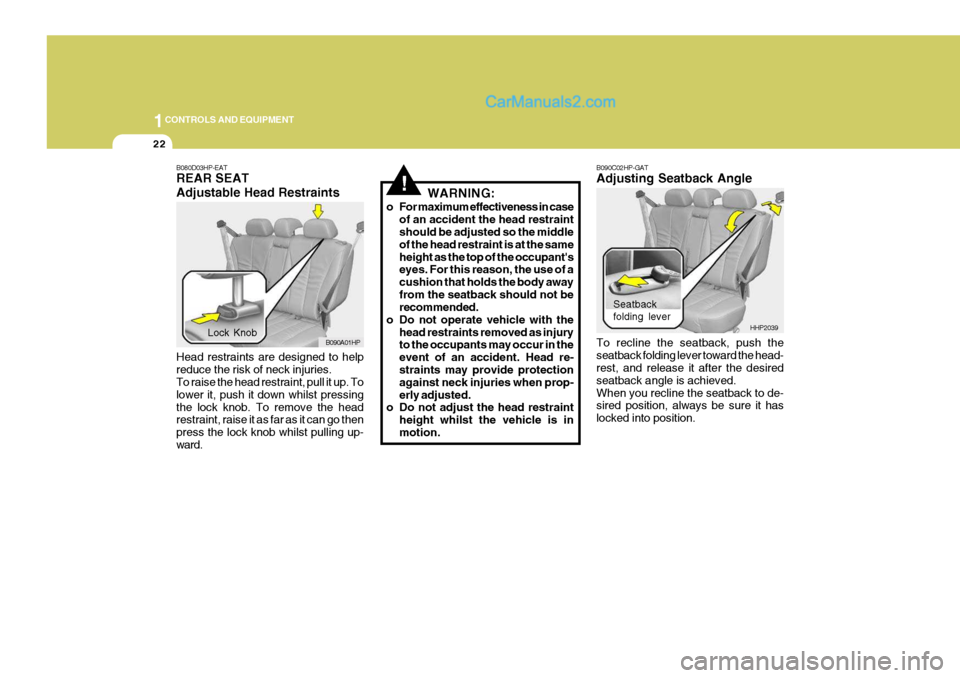
B080D03HP-EAT REAR SEAT Adjustable Head Restraints Head restraints are designed to help reduce the risk of neck injuries. To raise the head restraint, pull it up. To lower it, push it down whilst pressingthe lock knob. To remove the head restraint, raise it as far as it can go then press the lock knob whilst pulling up-ward. WARNING:
o For maximum effectiveness in case of an accident the head restraint should be adjusted so the middle of the head restraint is at the sameheight as the top of the occupant's eyes. For this reason, the use of a cushion that holds the body awayfrom the seatback should not be recommended.
o Do not operate vehicle with the
head restraints removed as injuryto the occupants may occur in the event of an accident. Head re- straints may provide protection against neck injuries when prop-erly adjusted.
o Do not adjust the head restraint
height whilst the vehicle is inmotion.
Lock Knob B090A01HP B090C02HP-GAT Adjusting Seatback Angle To recline the seatback, push the seatback folding lever toward the head- rest, and release it after the desired seatback angle is achieved.When you recline the seatback to de- sired position, always be sure it has locked into position.
Seatback folding lever
HHP2039
Page 335 of 539
1
CONTROLS AND EQUIPMENT
27
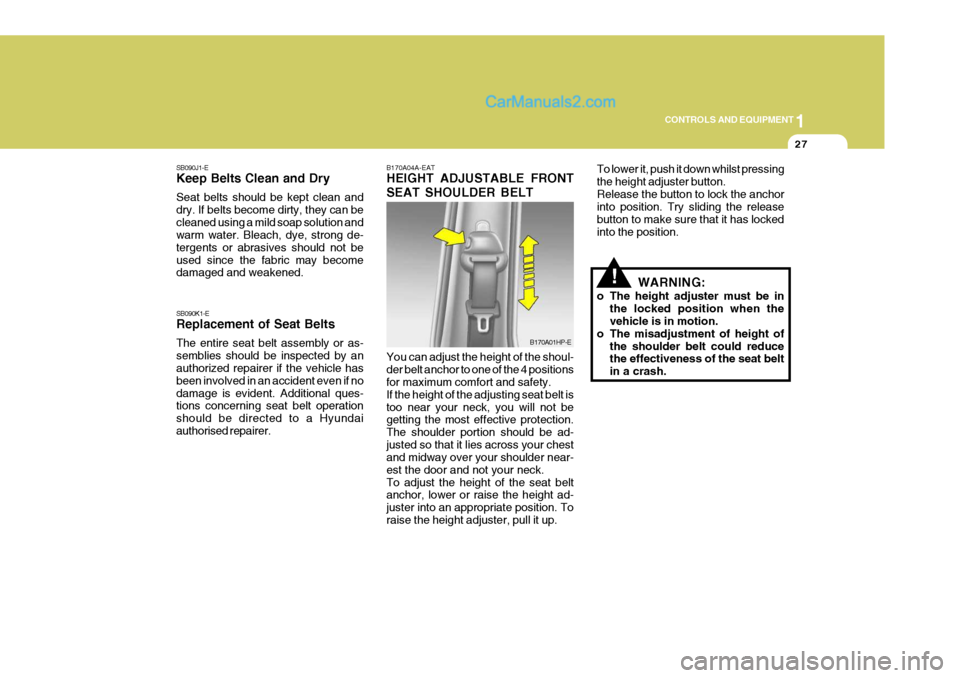
SB090J1-E Keep Belts Clean and Dry Seat belts should be kept clean and dry. If belts become dirty, they can becleaned using a mild soap solution and warm water. Bleach, dye, strong de- tergents or abrasives should not beused since the fabric may become damaged and weakened. SB090K1-E Replacement of Seat Belts The entire seat belt assembly or as- semblies should be inspected by an authorized repairer if the vehicle has been involved in an accident even if nodamage is evident. Additional ques- tions concerning seat belt operation should be directed to a Hyundaiauthorised repairer. B170A04A-EAT HEIGHT ADJUSTABLE FRONT SEAT SHOULDER BELT You can adjust the height of the shoul- der belt anchor to one of the 4 positions for maximum comfort and safety. If the height of the adjusting seat belt istoo near your neck, you will not be getting the most effective protection. The shoulder portion should be ad-justed so that it lies across your chest and midway over your shoulder near- est the door and not your neck.To adjust the height of the seat belt anchor, lower or raise the height ad- juster into an appropriate position. Toraise the height adjuster, pull it up.
B170A01HP-E
!
To lower it, push it down whilst pressing the height adjuster button.Release the button to lock the anchor into position. Try sliding the release button to make sure that it has lockedinto the position.
WARNING:
o The height adjuster must be in the locked position when the vehicle is in motion.
o The misadjustment of height of the shoulder belt could reducethe effectiveness of the seat belt in a crash.
Page 340 of 539
1CONTROLS AND EQUIPMENT
32
!WARNING:
o A child restraint system must be placed in the rear seat. Never install a child or infant seat on the front passenger's seat. Should an accident occur andcause the passenger side airbag to deploy, it could severely in- jure or kill an infant or child seatedin an infant or child seat. Thus, only use a child restraint in the rear seat of your vehicle.
o Since a safety belt or child re-
straint system can become veryhot if it is left in a closed vehicle, be sure to check the seat cover and buckles before placing achild there.
o When the child restraint system
is not in use, fasten it with asafety belt so that it will not be thrown forward in the case of a sudden stop or an accident. o Children who are too large to be in
a child restraint should sit in the rear seat and be restrained with the available lap/shoulder belts.Never allow children to ride in the front passanger seat.
o Always make sure that the shoul- der belt portion of the outboardlap/shoulder belt is positioned midway over the shoulder, neveracross the neck. Moving the child closer to the centre of the vehicle may help provide a good shoul-der belt fit. The lap belt portion of the lap/shoulder belt or the cen- tre seat lap belt must always bepositioned as low as possible on the child's hips and as snug as possible.
o If the seat belt will not properly fit the child, we recommend the useof an approved booster seat inthe rear seat in order to raise the child's seating height so that the seat belt will properly fit the child.
o Never allow a child to stand up or kneel on the seat. o Never use an infant carrier or child
safety seat that "hooks" over aseatback; it may not provide ad-equate security in an accident.
o Never allow a child to be held in a
person's arms whilst they are in amoving vehicle, as this could re- sult in serious injury to the child in the event of an accident or asudden stop. Holding a child in a moving vehicle does not provide the child with any means of pro-tection during an accident, even if the person holding the child is wearing a seat belt.
o If the child restraint seat is not
anchored properly, the risk of achild being seriously injured or killed in a collision greatly in- creases.
Page 438 of 539
2 DRIVING YOUR HYUNDAI
22
!
EFFECTIVE BRAKING
HPC141A1-E Braking system performance and fric- tion material life are greatly affected by the driving style adopted. The follow- ing suggestions are made to assist inachieving the best results from the braking system.
o Anticipate the road and conditions ahead in order that heavy braking may be avoided.
o When descending long gradients,
use the engine to assist in retardingthe vehicle to minimise the possibil- ity of brake fade occurring.
o When trailer towing, ensure that the trailer brakes function correctly anduse engine braking to assist the vehicle braking system.
o Use only genuine Hyundai replace- ment brake pads and shoes to en-sure consistent friction characteris-tics and wear rates.
o After driving through deep water (e.g.
fording), the brakes may becomewet and performance reduced. Al- ways check brake efficiency after emerging from the water and dry thebrakes by lightly depressing the brake pedal several times whilst driv- ing slowly.LIMITED-SLIP DIFFEREN- TIAL (LSD)
D190A01HP-EAT (Not all models) A limited-slip differential, if equipped, is for the rear wheel differential only.The features of this limited-slip differ- ential are described below: Just as with a conventional differential,the wheel on one side is allowed to turn at a different speed from the wheel on the other side when the vehicle iscornering. The difference between the limited-slip differential and a conven- tional differential is that if the wheel onone side of the vehicle loses traction, a greater amount of torque is applied to the rear wheel on the other side toimprove traction.
WARNING:
ABS will not prevent accidents dueto improper or dangerous drivingmanoeuvres. Even though vehicle control is improved during emer- gency braking, always maintain asafe distance between you and ob- jects ahead. Vehicle speeds should always be reduced during extremeroad conditions. The braking distance for cars equipped with an anti-lock braking system may be longer than for those without it, in the following road con-ditions. These roads should be driven at reduced speeds.
o Rough, gravel or snow-covered roads.
o With tyre chains installed.
o On roads where the road surface is pitted or has different surfaceheight.
The safety features of an ABSequipped vehicle should not be testedby high speed driving or cornering. This could endanger the safety of yourself or others.
! CAUTION:
o Never start the engine with the gearshift lever placed in the for- ward or reverse whilst one of therear wheels is jacked up and the other in contact with the ground; doing so may cause the vehicle tojump forward.
o Use only recommended oil for
LSD in the rear axle.See page 9-4 for the recommended oil descriptions.