2006 Hyundai Terracan battery
[x] Cancel search: batteryPage 160 of 539
2
DRIVING YOUR HYUNDAI
5
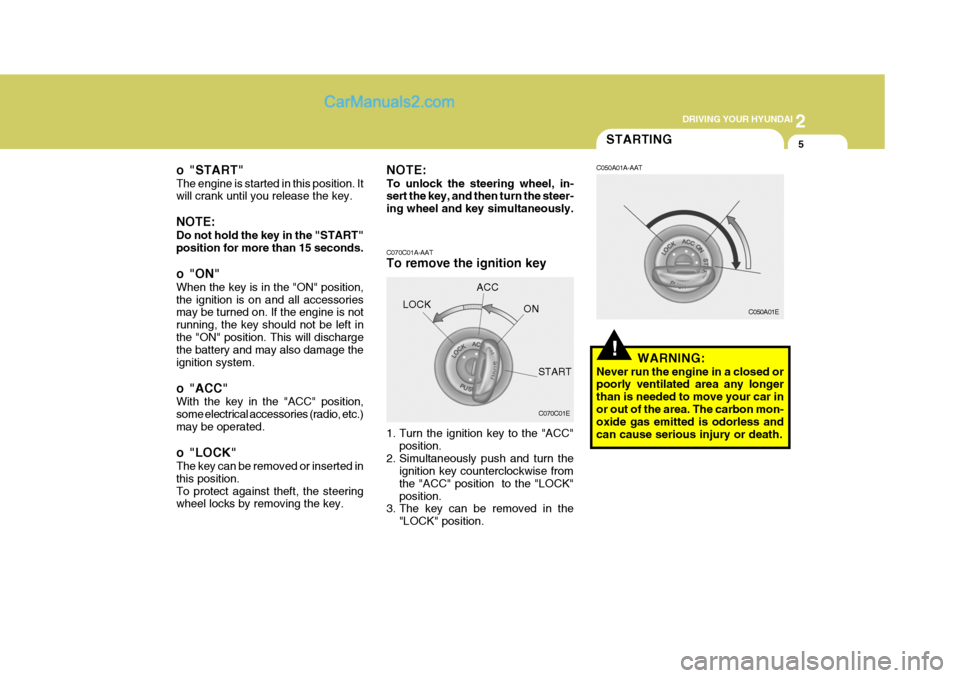
o "START" The engine is started in this position. It will crank until you release the key. NOTE: Do not hold the key in the "START" position for more than 15 seconds.
o "ON" When the key is in the "ON" position, the ignition is on and all accessories may be turned on. If the engine is not running, the key should not be left inthe "ON" position. This will discharge the battery and may also damage the ignition system.
o "ACC" With the key in the "ACC" position, some electrical accessories (radio, etc.)may be operated.
o "LOCK" The key can be removed or inserted in this position.To protect against theft, the steering wheel locks by removing the key.STARTING
!
NOTE: To unlock the steering wheel, in- sert the key, and then turn the steer- ing wheel and key simultaneously. C070C01A-AAT To remove the ignition key
1. Turn the ignition key to the "ACC" position.
2. Simultaneously push and turn the ignition key counterclockwise from the "ACC" position to the "LOCK"position.
3. The key can be removed in the
"LOCK" position.LOCK
C050A01A-AAT
WARNING:
Never run the engine in a closed or poorly ventilated area any longer than is needed to move your car inor out of the area. The carbon mon- oxide gas emitted is odorless and can cause serious injury or death.
C070C01E C050A01E
ACC
ON
START
Page 181 of 539

2 DRIVING YOUR HYUNDAI
26
C160F01A-AAT Check Spark Plugs and Ignition System Inspect your spark plugs as described in Section 6 and replace them if neces-sary. Also check all ignition wiring and components to be sure they are not cracked, worn or damaged in any way. C160G02A-GAT To Keep Locks from Freezing To keep the locks from freezing, squirt an approved de-icer fluid or glycerine into the key opening. If a lock is cov-ered with ice, squirt it with an approved de-icing fluid to remove the ice. If the lock is frozen internally, you may beable to thaw it out by using a heated key. Handle the heated key with care to avoid injury. NOTE: The proper temperature for using the immobilizer key is from -40°C (-40°F) to 80°C (176°F). If you heatthe immobilizer key over 80°C (176°F) to open the frozen lock, it may cause damage to the transpon-der in its head.
C160D01A-AAT Check Battery and Cables Winter puts additional burdens on the battery system. Visually inspect thebattery and cables as described in Section 6. The level of charge in your battery can be checked by your Hyundaidealer or a service station. C160E01A-AAT Change to "Winter Weight" Oil if Necessary In some climates it is recommended that a lower viscosity "winter weight" oil be used during cold weather. See Section 9 for recommendations. If youaren't sure what weight oil you should use, consult your Hyundai dealer.
C160C01A-AAT Use High Quality Ethylene Gly- col Coolant Your Hyundai is delivered with high quality ethylene glycol coolant in thecooling system. It is the only type of coolant that should be used because it helps prevent corrosion in the coolingsystem, lubricates the water pump and prevents freezing. Be sure to replace or replenish your coolant in accor-dance with the maintenance schedule in Section 5. Before winter, have your coolant tested to assure that its freez-ing point is sufficient for the tempera- tures anticipated during the winter.
Page 189 of 539
3 WHAT TO DO IN AN EMERGENCY
2
!
IF THE ENGINE WILL NOT START
D010A01A-AAT D010B01HP-GAT If Engine Doesn’t Turn Over or Turns Over Slowly
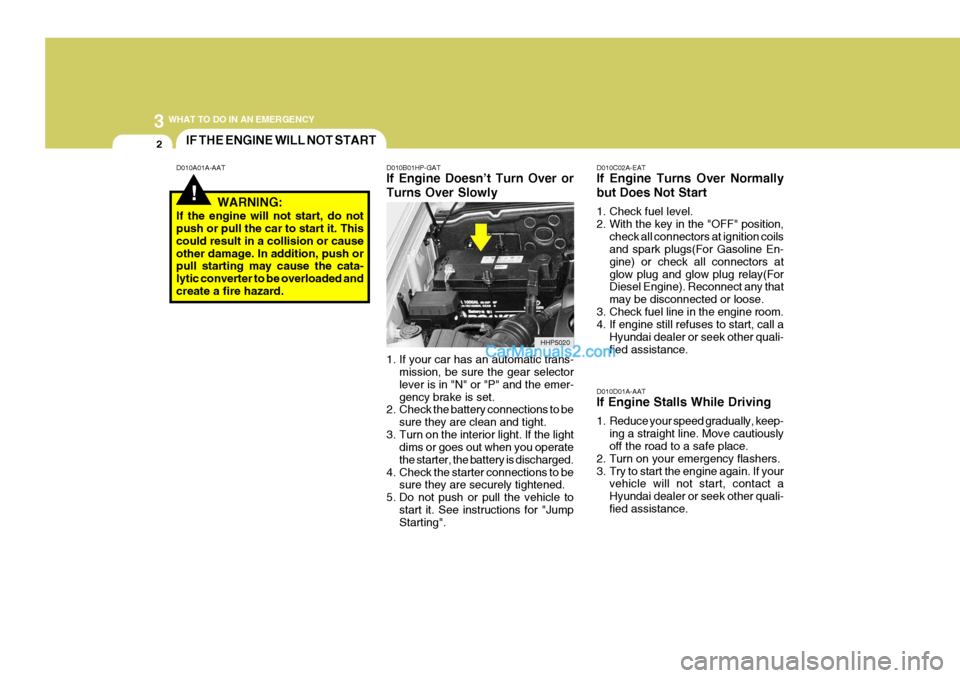
1. If your car has an automatic trans- mission, be sure the gear selector lever is in "N" or "P" and the emer-gency brake is set.
2. Check the battery connections to be
sure they are clean and tight.
3. Turn on the interior light. If the light dims or goes out when you operatethe starter, the battery is discharged.
4. Check the starter connections to be sure they are securely tightened.
5. Do not push or pull the vehicle to start it. See instructions for "Jump Starting". D010C02A-EAT If Engine Turns Over Normally but Does Not Start
1. Check fuel level.
2. With the key in the "OFF" position,
check all connectors at ignition coils and spark plugs(For Gasoline En- gine) or check all connectors atglow plug and glow plug relay(For Diesel Engine). Reconnect any that may be disconnected or loose.
3. Check fuel line in the engine room.
4. If engine still refuses to start, call a
Hyundai dealer or seek other quali- fied assistance.
WARNING:
If the engine will not start, do not push or pull the car to start it. This could result in a collision or causeother damage. In addition, push or pull starting may cause the cata- lytic converter to be overloaded andcreate a fire hazard.
D010D01A-AAT If Engine Stalls While Driving
1. Reduce your speed gradually, keep-ing a straight line. Move cautiously off the road to a safe place.
2. Turn on your emergency flashers.
3. Try to start the engine again. If your vehicle will not start, contact aHyundai dealer or seek other quali-fied assistance.
HHP5020
Page 190 of 539
3
WHAT TO DO IN AN EMERGENCY
3JUMP STARTING
!
D020A02A-AAT
WARNING:
The gas produced by the battery during the jump-start operation is highly explosive. If these instruc- tions are not followed exactly, seri-ous personal injury and damage to the vehicle may occur! If you are not sure how to follow this proce-dure, seek qualified assistance. Automobile batteries contain sul- furic acid. This is poisonous andhighly corrosive. When jump start- ing, wear protective glasses and be careful not to get acid on yourself,your clothing or on the car. o If you should accidentally get acid
on your skin or in your eyes,immediately remove any contami- nated clothing and flush the area with clear water for at least 15 min-utes. Then promptly obtain medical attention. If you must be transported to an emergency facility, continue toapply water to the affected area with a sponge or cloth.
o The gas produced by the battery
during the jump-start operation ishighly explosive. Do not smoke or allow a spark or an open flame inthe vicinity.
o The battery being used to provide
the jump start must be 12-volt. If youcannot determine that it is a 12-volt battery, do not attempt to use it for the jump start.
o To jump start a car with a discharged battery, follow this procedure ex-actly:
1. If the booster battery is installed in another vehicle, be sure the twovehicles are not touching. 2. Turn off all unnecessary lights and
acces-sories in both vehicles.
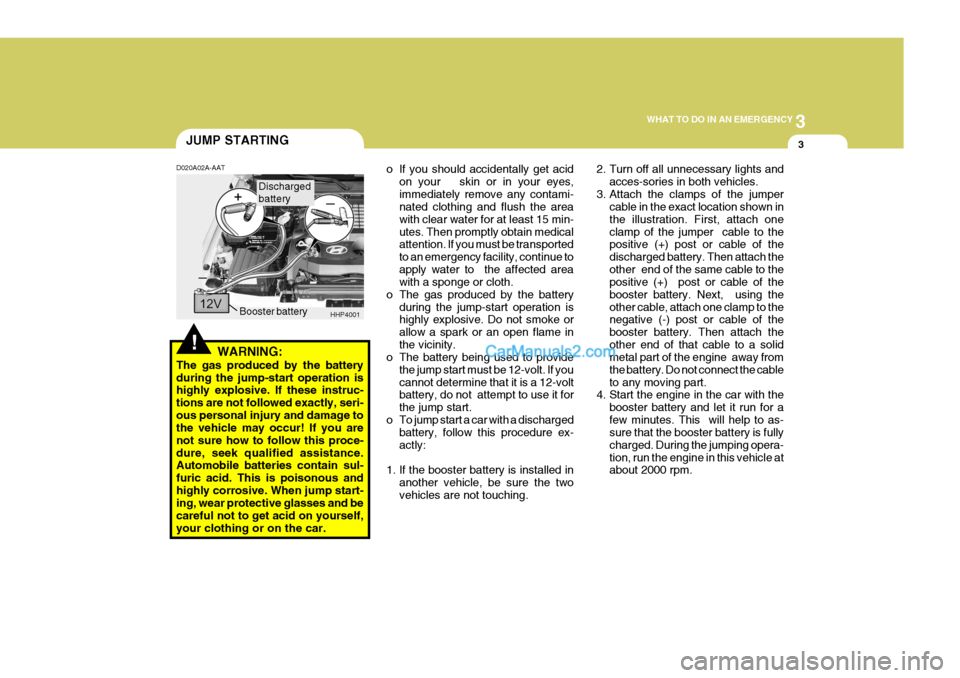
3. Attach the clamps of the jumper cable in the exact location shown inthe illustration. First, attach oneclamp of the jumper cable to the positive (+) post or cable of the discharged battery. Then attach theother end of the same cable to the positive (+) post or cable of the booster battery. Next, using theother cable, attach one clamp to the negative (-) post or cable of the booster battery. Then attach theother end of that cable to a solid metal part of the engine away from the battery. Do not connect the cableto any moving part.
4. Start the engine in the car with the
booster battery and let it run for afew minutes. This will help to as- sure that the booster battery is fully charged. During the jumping opera-tion, run the engine in this vehicle at about 2000 rpm.
HHP4001
Booster battery
Discharged battery
Page 191 of 539
3 WHAT TO DO IN AN EMERGENCY
4IF THE ENGINE OVERHEATS
!
5. Start the engine in the car with the
discharged battery using the nor- mal starting procedure. After the engine starts, leave the jumper cables connected and let the enginerun at fast idle or about 2000 rpm for several minutes.
6. Carefully remove the jumper cables in the reverse order of attachment.
If you do not know why your battery became discharged (because the lights were left on, etc.), have the charging system checked by your Hyundaidealer. D030A02HP-AAT If your temperature gauge indicates overheating, you experience a loss of power, or hear loud pinging or knock- ing, the engine is probably too hot. Ifthis happens to you, you should:
1. Pull off the road and stop as soon as
it is safe to do so.
2. Place the gear selector lever in "P"
(automatic), or neutral (manual transmission) and set the parking brake. If the air conditioning is on, turn it off.
3. If engine coolant is running out un- der the car or steam is coming outfrom under the hood, stop the en-gine. Do not open the hood until the engine coolant has stopped running or the steaming has stopped. If thereis no visible loss of coolant and no steam, leave the engine running and check to be sure the enginecooling fan is operating. If the fan is not running, turn the engine off. 4. Check to see if the water pump drive
belt is missing. If it is not missing, check to see that it is tight. If the drive belt seems to be satisfactory, check for engine coolant leakingfrom the radiator, hoses or under the car. (If the air conditioning had been in use, it is normal for coldwater to be draining from it when you stop).
WARNING:
While the engine is running, keephands and clothing away from mov- ing parts such as the fan and drivebelts to prevent injury.
Page 228 of 539

Engine Compartment .................................................... 6-2
General Checks ........................................................... 6-5
Checking the Engine Oil .............................................. 6-6 Changing the Engine Oil and Filter ............................. 6-10
Checking and Changing the Engine Coolant ..............6-11
Changing the Air Cleaner Filte r ...................................6-14
Checking the Transmission Oil (Manual)................... 6-17
Checking the Transmission Fluid (Automatic)............6-18
Checking the Brakes .................................................. 6-21
Checking the Clutch Fluid ........................................... 6-22
Air Conditioning Care .................................................. 6-23
Changing the Climate Control Air Filter .. ....................6-24
Checking Drive Belts .................................................. 6-27
Checking and Replacing Fuses ..................................6-28
Checking The Battery ................................................. 6-31
Checking The Electric Cooling Fans ..........................6-33
Power Steering Fluid Level ......................................... 6-33
Fuel Filter ..................................................................... 6-34
Replacement of Headlight Bulbs ................................. 6-38
Headlight Aiming Adjustment ...................................... 6-39
Bulb Wattages ............................................................. 6-42
Fuse Panel D escription ............................................... 6-43
DO-IT-YOURSELF MAINTENANCE
6
6
Page 229 of 539
6 DO-IT-YOURSELF MAINTENANCE
2
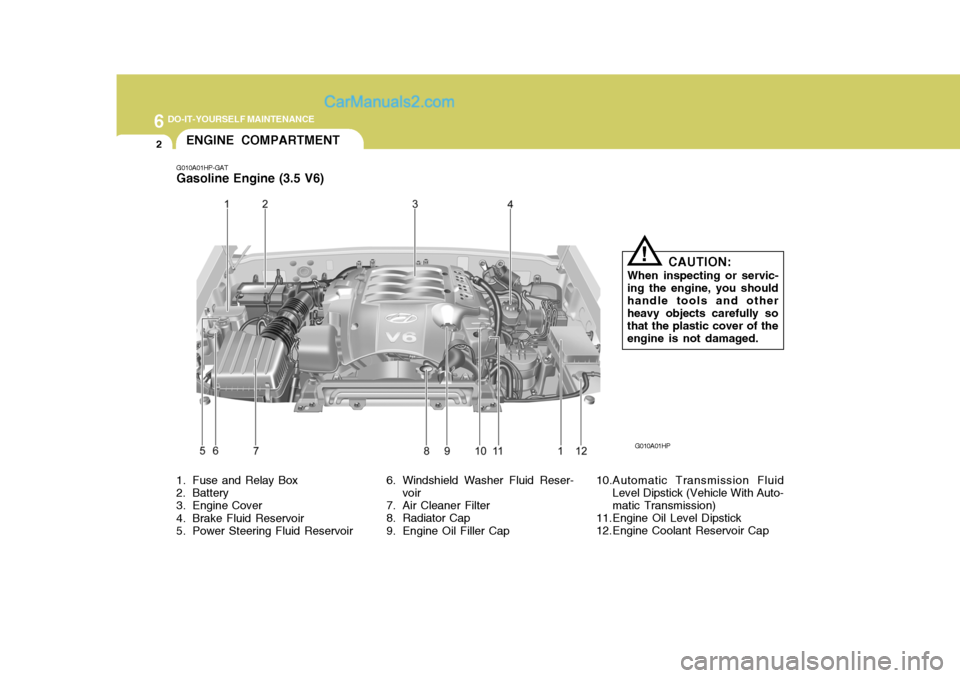
1. Fuse and Relay Box
2. Battery
3. Engine Cover
4. Brake Fluid Reservoir
5. Power Steering Fluid Reservoir 6. Windshield Washer Fluid Reser-
voir
7. Air Cleaner Filter
8. Radiator Cap
9. Engine Oil Filler Cap 10.Automatic Transmission Fluid
Level Dipstick (Vehicle With Auto- matic Transmission)
11.Engine Oil Level Dipstick
12.Engine Coolant Reservoir Cap G010A01HP
G010A01HP-GAT Gasoline Engine (3.5 V6)
CAUTION:
When inspecting or servic-
ing the engine, you should handle tools and other heavy objects carefully so that the plastic cover of theengine is not damaged.
!
ENGINE COMPARTMENT
Page 230 of 539
6
DO-IT-YOURSELF MAINTENANCE
3
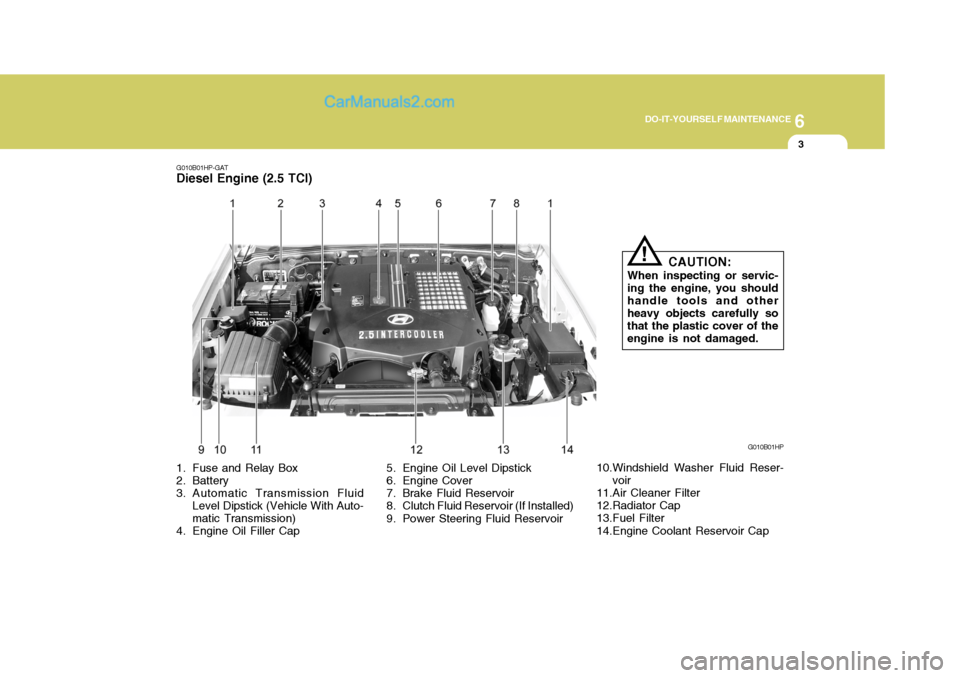
G010B01HP-GAT
Diesel Engine (2.5 TCI)
G010B01HP
1. Fuse and Relay Box
2. Battery
3. Automatic Transmission Fluid Level Dipstick (Vehicle With Auto- matic Transmission)
4. Engine Oil Filler Cap 5. Engine Oil Level Dipstick
6. Engine Cover
7. Brake Fluid Reservoir
8. Clutch Fluid Reservoir (If Installed)
9. Power Steering Fluid Reservoir
10.Windshield Washer Fluid Reser-
voir
11.Air Cleaner Filter
12.Radiator Cap
13.Fuel Filter
14.Engine Coolant Reservoir Cap CAUTION:
When inspecting or servic- ing the engine, you shouldhandle tools and other heavy objects carefully so that the plastic cover of theengine is not damaged.
!