2006 Hyundai Terracan wheel
[x] Cancel search: wheelPage 458 of 539
3 IN CASE OF EMERGENCY
12
!
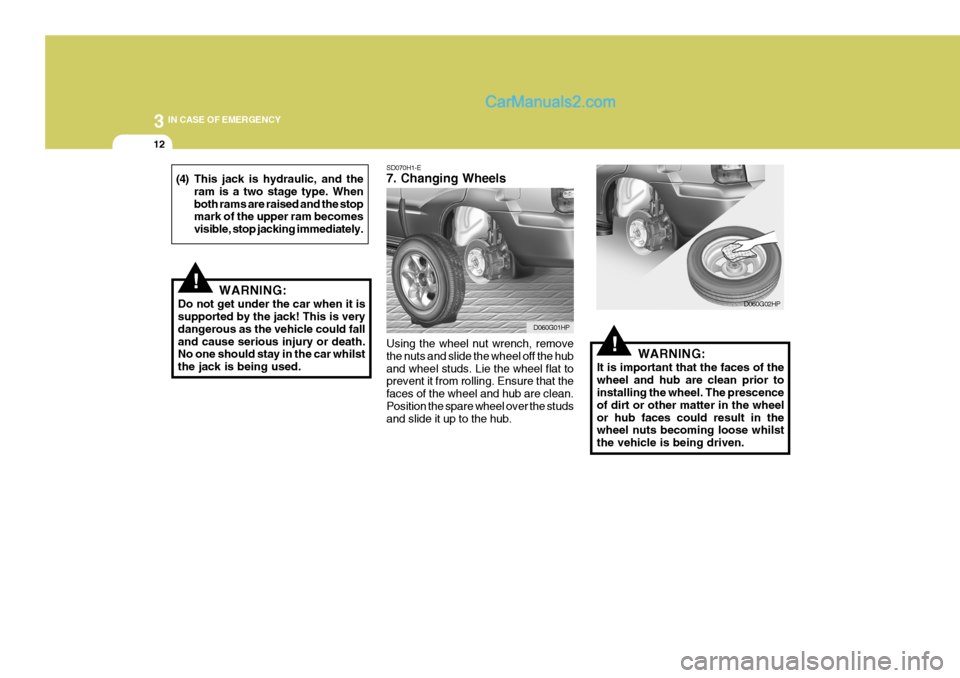
SD070H1-E 7. Changing Wheels Using the wheel nut wrench, remove the nuts and slide the wheel off the huband wheel studs. Lie the wheel flat to prevent it from rolling. Ensure that the faces of the wheel and hub are clean.Position the spare wheel over the studs and slide it up to the hub. WARNING:
It is important that the faces of the wheel and hub are clean prior to installing the wheel. The prescence of dirt or other matter in the wheelor hub faces could result in the wheel nuts becoming loose whilst the vehicle is being driven.
!
(4) This jack is hydraulic, and the ram is a two stage type. When both rams are raised and the stop mark of the upper ram becomes visible, stop jacking immediately.
WARNING:
Do not get under the car when it issupported by the jack! This is very dangerous as the vehicle could fall and cause serious injury or death. No one should stay in the car whilst the jack is being used. D060G01HP
D060G02HP
Page 459 of 539
3
IN CASE OF EMERGENCY
13
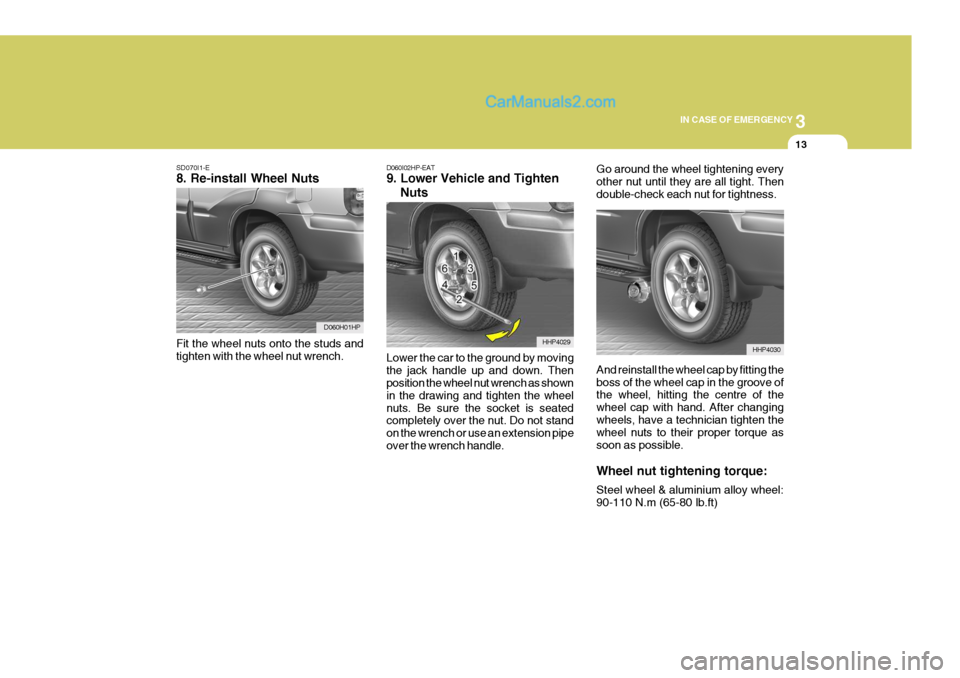
SD070I1-E 8. Re-install Wheel Nuts Fit the wheel nuts onto the studs and tighten with the wheel nut wrench.
D060H01HP D060I02HP-EAT 9. Lower Vehicle and Tighten Nuts Lower the car to the ground by moving the jack handle up and down. Then position the wheel nut wrench as shown in the drawing and tighten the wheelnuts. Be sure the socket is seated completely over the nut. Do not stand on the wrench or use an extension pipeover the wrench handle. Go around the wheel tightening everyother nut until they are all tight. Thendouble-check each nut for tightness. And reinstall the wheel cap by fitting the boss of the wheel cap in the groove of the wheel, hitting the centre of the wheel cap with hand. After changingwheels, have a technician tighten the wheel nuts to their proper torque as soon as possible. Wheel nut tightening torque: Steel wheel & aluminium alloy wheel: 90-110 N.m (65-80 lb.ft)
HHP4029HHP4030
Page 460 of 539
3 IN CASE OF EMERGENCY
14
D060J02O-EAT AFTER CHANGING WHEELS If you have a tyre gauge, remove the valve cap and check the air pressure.If the pressure is lower than recom- mended, drive slowly to the nearest service station and inflate to the cor-rect pressure. If it is too high, adjust it until it is correct. Always reinstall the valve cap after checking or adjustingtyre pressure. If the cap is not re- placed, air may leak from the tyre. If you lose a valve cap, buy another andinstall it as soon as possible. After you have changed wheels, al- ways secure the flat tyre in its placeand return the jack and tools to their proper storage locations.
HHP5019
IF YOUR VEHICLE MUST BE TOWED
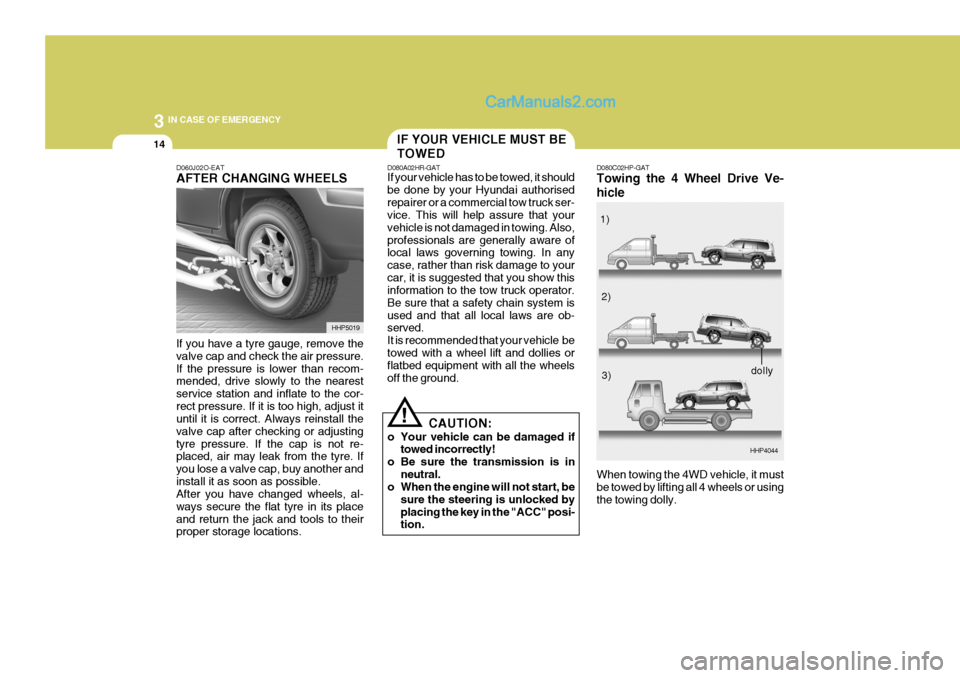
D080A02HR-GAT If your vehicle has to be towed, it should be done by your Hyundai authorisedrepairer or a commercial tow truck ser- vice. This will help assure that your vehicle is not damaged in towing. Also,professionals are generally aware of local laws governing towing. In any case, rather than risk damage to yourcar, it is suggested that you show this information to the tow truck operator. Be sure that a safety chain system isused and that all local laws are ob- served. It is recommended that your vehicle betowed with a wheel lift and dollies or flatbed equipment with all the wheels off the ground.
! CAUTION:
o Your vehicle can be damaged if towed incorrectly!
o Be sure the transmission is in neutral.
o When the engine will not start, be
sure the steering is unlocked by placing the key in the "ACC" posi- tion. D080C02HP-GAT Towing the 4 Wheel Drive Ve- hicle
HHP4044
When towing the 4WD vehicle, it must be towed by lifting all 4 wheels or using the towing dolly. 1)
2)
3)
dolly
Page 461 of 539
3
IN CASE OF EMERGENCY
15
!
HHP4045
CAUTION:
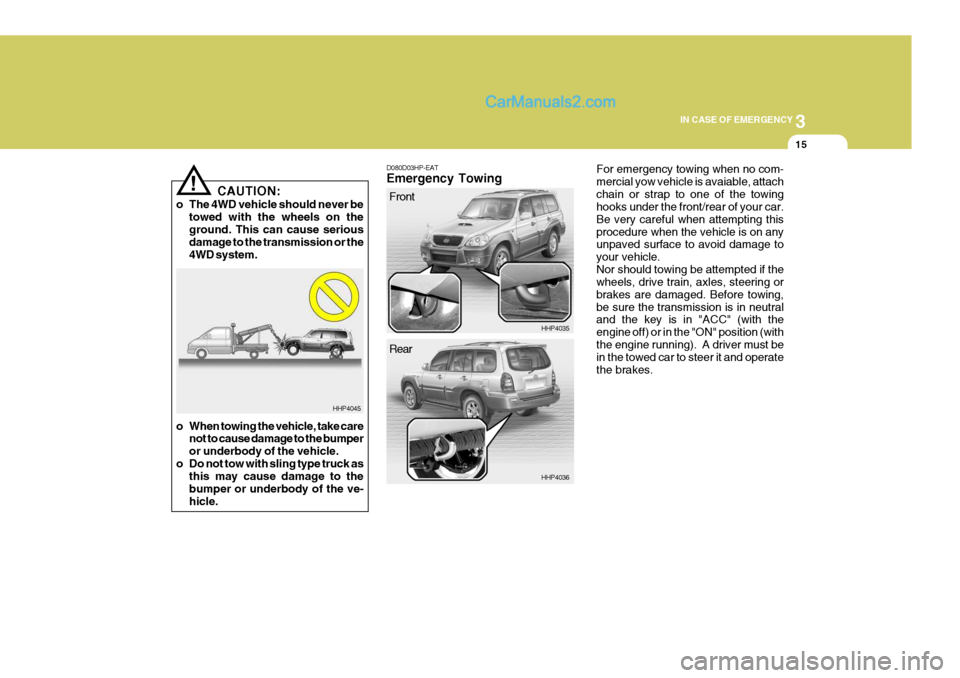
o The 4WD vehicle should never be towed with the wheels on the ground. This can cause serious damage to the transmission or the 4WD system.
o When towing the vehicle, take care not to cause damage to the bumperor underbody of the vehicle.
o Do not tow with sling type truck as this may cause damage to thebumper or underbody of the ve-hicle. D080D03HP-EAT Emergency Towing
For emergency towing when no com- mercial yow vehicle is avaiable, attachchain or strap to one of the towing hooks under the front/rear of your car. Be very careful when attempting thisprocedure when the vehicle is on any unpaved surface to avoid damage to your vehicle.Nor should towing be attempted if the wheels, drive train, axles, steering or brakes are damaged. Before towing,be sure the transmission is in neutral and the key is in "ACC" (with the engine off) or in the "ON" position (withthe engine running). A driver must be in the towed car to steer it and operate the brakes.Front
HHP4035 HHP4036
Rear
Page 464 of 539
44APPEARANCE CARE
2
ZE020B1-E Underbody Coatings Every Hyundai passenger car receives a full underbody and cavity injectiontreatment during production. In order that this treatment may retain maxi- mum effectiveness, it is recommendedthat the underbody receives a power wash and a thorough inspection after each winter season. In doing so anyaccumulations of mud, which act as moisture traps and combine with road salts to accelerate corrosion, will beremoved. Should any damage to or deterioration of the underbody coating be apparent, the advice of a Hyundaiauthorised repairer regarding the use of a compatible repair material should be sought.NOTE: The underbody should never be steam cleaned since the underbody coating may be removed by thisprocess. During the interim period between power washing the underbody, themore vulnerable areas such as wheelarches should be hosed off, particularly during the winter sea-son to prevent prolonged contact of road salt with the body. Ensure that the various drain pointslocated at bottom of the door pan- els are kept clear, to prevent water becoming trapped within the cavi-ties. Wherever possible, the park- ing of the vehicle in a confined, poorly ventilated location (e.g.)garage should be avoided when the vehicle is wet or covered with snow or ice. Under these conditions, theinternal cavities of the vehicle will remain damp for long periods of time which encourage corrosion.Parking the vehicle where good ventilation exists is preferable.APPEARANCE CARE
ZE020A1-E In using the most advanced design and construction practices, every Hyundai is built to retain its original factory finish for many years. How-ever, long term durability is also greatly dependant upon maintaining the vari- ous protection systems and coatingsused in manufacture since constant exposure to the elements will eventu- ally result in their breakdown and lossof effectiveness. The following sug- gestions are made to assist in the maintenance of the vehicle bodywork.
Page 465 of 539
4
CORROSION PREVENTION AND APPEARANCE CARE
3
4
APPEARANCE CARE
3
ZE020C1-E Interior During the winter period, it is possible that the carpet within the passengercompartment may become wet. The carpet should not be allowed to remain in this condition for prolonged periodssince the carpet may begin to create musty smells and promote internal corrosion of the floorpan. Use only a shampoo intended for thepurpose and ensure that the body workis thoroughly wet to soften the dirt film prior to attempting to remove this. After removing the dirt film with a softsponge, the body work should be thor- oughly rinsed and then dried with a good quality chamois leather to pre-vent streaking or spotting of the paint work. Household detergents, solvents andabrasive cleaning materials should not be used in order to avoid damaging the paint film.Plastic wheel covers should be cleaned using a sponge and water. Cast alloy wheels should be cleaned using a mildsoap or neutral detergent. Abrasive compounds must not be used since in the event of these damaging the lac-quer coating, oxidisation of the alu- minium wheel will occur, spoiling the appearance.The use of a toothbrush will facilitate cleaning between the wheel "spokes".VALETING
JE050A1-E Regular cleaning of the exterior paintwork serves two important func- tions. Firstly, the removal of abrasive dirt and contaminants will maintain thelustre of the paintwork and will prevent discolouration and dulling due to pro- longed contact.Secondly, the presence of damage through impact or abrasion will be ap- parent allowing early rectification to bemade thus preventing corrosion from becoming established and spreading beneath the paint film. To avoid "waterspotting" the vehicle should not be washed in direct sunlight particularly in the case of vehicles having dark bodycolours. The heat from the sun rays is absorbed by the paint film increasing the surface temperature. This actioncauses water used for washing to evaporate quickly leaving behind the deposits from the water and the sham-poo used.
Page 473 of 539
5
VEHICLE MAINTENANCE REQUIREMENTS
5
20 24
I
R II I I
RR II I I I I I I I I I I I I I I I
R
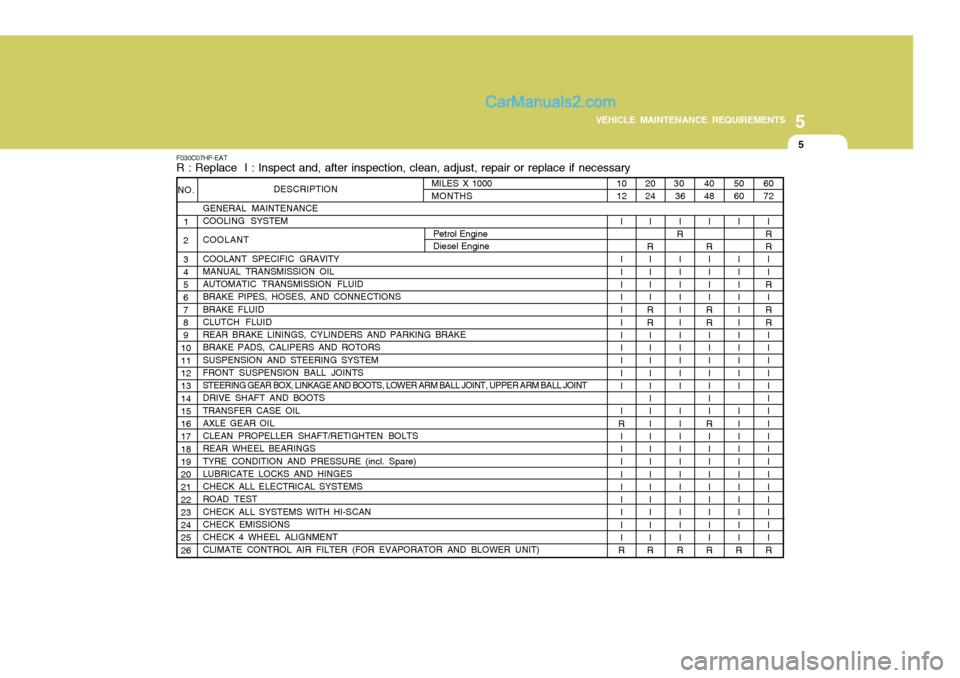
F030C07HP-EAT R : Replace I : Inspect and, after inspection, clean, adjust, repair or replace if necessary
DESCRIPTION
GENERAL MAINTENANCE COOLING SYSTEM COOLANT COOLANT SPECIFIC GRAVITY MANUAL TRANSMISSION OIL AUTOMATIC TRANSMISSION FLUID BRAKE PIPES, HOSES, AND CONNECTIONS BRAKE FLUID CLUTCH FLUID
REAR BRAKE LININGS, CYLINDERS AND PARKING BRAKE BRAKE PADS, CALIPERS AND ROTORS SUSPENSION AND STEERING SYSTEM FRONT SUSPENSION BALL JOINTS
STEERING GEAR BOX, LINKAGE AND BOOTS, LOWER ARM BALL JOINT, UPPER ARM BALL JOINT
DRIVE SHAFT AND BOOTS TRANSFER CASE OIL AXLE GEAR OIL CLEAN PROPELLER SHAFT/RETIGHTEN BOLTS REAR WHEEL BEARINGS TYRE CONDITION AND PRESSURE (incl. Spare) LUBRICATE LOCKS AND HINGES CHECK ALL ELECTRICAL SYSTEMS ROAD TEST CHECK ALL SYSTEMS WITH HI-SCAN CHECK EMISSIONS CHECK 4 WHEEL ALIGNMENT CLIMATE CONTROL AIR FILTER (FOR EVAPORATOR AND BLOWER UNIT)
NO.
1
2 3 4 5 6 7 8 9
1011 12 13 14 15 16 17 18 19 20 21 22 23 24 25 26
60 72
I
RR II
R
I
RR II I I I I I I I I I I I I I I I
R
50 60
I I I I I I I I I I I I I I I I I I I I I I I
R
40 48
I
R II I I
RR II I I I I I
R I I I I I I I I I
R
30
36
I
R
I I I I I I I I I I I I I I I I I I I I I I
R
10 12
I I I I I I I I I I I I I
R I I I I I I I I I
R
MILES X 1000MONTHS
Petrol Engine Diesel Engine
Page 478 of 539
5VEHICLE MAINTENANCE REQUIREMENTS
10
F070J01A-AAT
o Brake pads, calipers and rotors
Check the pads for excessive wear, discs for run out and wear, and cali- pers for fluid leakage. F070K01A-EAT o Exhaust pipe and sliencer Visually inspect the exhaust pipes, sliencer and hangers for cracks, dete- rioration, or damage. Start the engineand listen carefully for any exhaust gas leakage. Tighten connections or replace parts as necessary. F070L01A-AAT
o Suspension mounting bolts
Check the suspension connections for
looseness or damage. Retighten to the specified torque.
F070M01B-AAT
o Steering gear box, linkage & boots/lower arm ball joint, upper arm ball joint
With the vehicle stopped and engine
off, check for excessive free-play in the steering wheel. Check the linkage for bends or dam-
age. Check the dust boots and ball joints for deterioration, cracks, or dam- age. Replace any damaged parts. F070N01A-AAT
o Power steering pump, belt and hoses
Check the power steering pump and
hoses for leakage and damage. Re- place any damaged or leaking parts immediately. Inspect the power steer-ing belt for evidence of cuts, cracks, excessive wear, oil contamination and proper tension. Replace or adjust it ifnecessary.
F070P01HP-AAT
o Drive shafts and boots
Check the drive shafts, boots and
clamps for cracks, deterioration, ordamage. Replace any damaged partsand, if necessary, repack the grease.
F070Q01A-AAT
o Air conditioning refrigerant
Check the air conditioning lines and
connections for leakage and damage. Check air conditioning performance ac- cording to the relevant shop manual ifnecessary.