Page 84 of 320

CONT INUED
Your vehicle has customizable
settings f or the doors to
automatically lock and unlock. Make
all settings bef ore you start driving.
The childproof door locks are
designed to prevent children seated
in the rear f rom accidentally opening
the rear doors. Each rear door has a
lock lever near the edge. With the
lever in the LOCK position, the door
cannot be opened f rom inside
regardless of the position of the lock
tab. To open the door, pull the lock
tab up, and use the outside door
handle. Make sure the shif t lever is in
Park (P), and close the driver’s
door.
Turn the ignition switch to the ON
(II) position.
With the auto door locking and
unlocking, the In-Bed Trunk also
locks and unlocks.
The auto door locking f eature has
three possible settings:
The doors lock whenever you
move the shift lever out of the
Park position.
The doors lock when the vehicle
speed reaches 9 mph (15 km/h).
This is the def ault setting.
The auto door locking is
deactivated all the time. 1.
2.
Locks all doors when the shif t lever is
moved out of Park (P).
Door L ocks
A uto Door L ocking/Unlocking
Childproof Door L ocks
A uto Door L ockingTo activate either auto door lockmode:
Inst rument s and Cont rols
81
LOCK LEVER
�����—�����—�
���y�
�������������y���
�(�����������y���������y
Page 98 of 320
�µ
See pages f or important saf ety
inf ormation and warnings about how toproperly position the seats and seat-backs. 11 13
Make all seat adjustments bef ore
you start driving.
All models except the RT and the
Canadian LX have a power
adjustable driver’s seat. The RT/LX
model has manual driver’s seat
adjustments (see the next column).
To adjust the seat f orward or
backward, pull up on the bar under
the seat cushion’s f ront edge. Move
the seat to the desired position, and
releasethebar.Trytomovetheseat
to make sure it is locked in position.To change the seat-back angle of the
f ront seat, pull up on the lever on the
outside of the seat bottom.
Once your seat is adjusted correctly,
rock it back and f orth to make sure it
is locked in position.
The f ront passenger’s seat in all
models adjusts manually.
Seats
Manual Seat Adjustments
Inst rument s and Cont rols
95
�����—�
���—�����y�
������
������y���
�(�����������y���
�����y
Page 99 of 320
Make sure to pull the lever upward
or downward to its f ull range.
Make all seat adjustments bef ore
you start driving.
The height of your driver’s seat is
adjustable. To raise the seat,
repeatedly pull up the lever on the
outside of the seat cushion. To lower
the seat, push the lever down
repeatedly. Vary the lumbar support by moving
the lever on the right side of the
seat-back. Move the lever forward or
backward to adjust the lumbar
support through its f ull range.
On RTS model
On RT and Canadian LX models
Driver’s Seat Manual Height
Adjustment Driver’s Manual L umbar Support
Seats
96
�����—�
���—�����y�
������
������y���
�(�����������y���
���
�y
Page 100 of 320
�µ
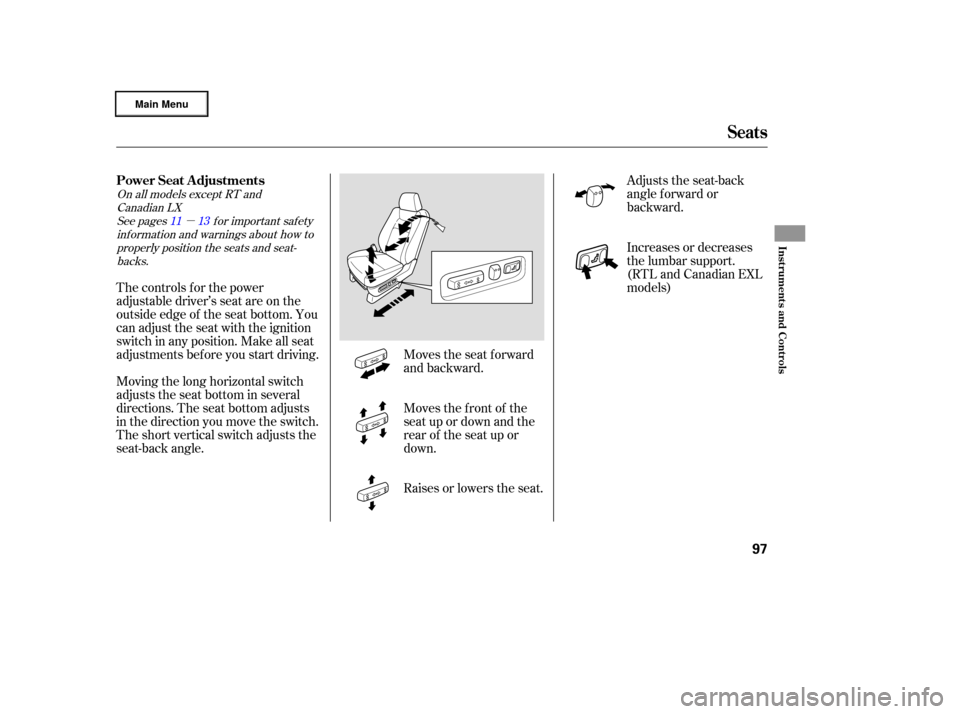
Moves the seat forward
and backward.
Moves the f ront of the
seat up or down and the
rear of the seat up or
down.
Raises or lowers the seat.Adjusts the seat-back
angle f orward or
backward.
Increases or decreases
the lumbar support.
(RTL and Canadian EXL
models)
The controls f or the power
adjustable driver’s seat are on the
outside edge of the seat bottom. You
can adjust the seat with the ignition
switch in any position. Make all seat
adjustments before you start driving.
Moving the long horizontal switch
adjusts the seat bottom in several
directions. The seat bottom adjusts
in the direction you move the switch.
The short vertical switch adjusts the
seat-back angle.
See pages f or important saf ety
inf ormation and warnings about how toproperly position the seats and seat-backs. 11 13
On all models except RT and
Canadian LX
Seats
Power Seat A djustments
Inst rument s and Cont rols
97
�����—�
���—�����y�
������
������y���
�(�����������y���
�����y
Page 104 of 320

In HI, the heater turns of f when the
seat gets warm, and turns back on
after the seat temperature drops.
In LO, the heater runs continuously.
It does not cycle with temperature
changes.
Follow these precautions when using
the seat heaters:Use the HI setting only to heat the
seats quickly, because it draws
large amounts of current f rom the
battery.
If the engine is lef t idling f or an
extended period, do not use the
seat heaters, even on the LO
setting. It can weaken the battery,
causing hard starting.
Make sure all items in the cargo area
are secured. Loose items can f ly
f orward and cause injury if you have
to brake hard (See
on page ).
You can also store small items under
the rear seats. Make sure to secure
the items so they will not shift while
you are driving.
Both front seats have seat heaters.
The passenger seat is only heated in
the seat bottom because of the side
airbag cutoff system. The ignition
switch must be in the ON (II)
position to use seat heaters. Push the
top of the switch, HI, to rapidly heat
up the seat. After the seat reaches a
comf ortable temperature, select LO
by pushing the bottom of the switch.
This will keep the seat warm.
182
If equipped
Seat Heaters
Carrying Cargo
Seats, Seat Heaters
Inst rument s and Cont rols
101
SEAT HEATER SWITCHES
�����—�
���—�����y�
���������
���y���
�(�����������y���
�����y
Page 106 of 320

�µIf the driver’s
window senses any obstacle while it
is closing automatically, it will
reverse direction and then stop. To
close the window, remove the
obstacle, then use the window switch
again.
Auto reverse stops sensing when the
window is almost closed. You should
always check that all passengers and
objects are away from the window
bef ore closing it. Your vehicle has a power back
window.
This indicator comes on when you
turn the ignition switch from ON (II)
to ACCESSORY (I) or LOCK (0)
without closing the back window.
With the ignition switch in the
ACCESSORY (I) position, the
indicator goes of f af ter about 30
seconds. With the ignition switch in
the LOCK (0) position, the indicator
goes of f af ter about 3 minutes.
If the driver’s window f use is
removed, the AUTO f unction may be
disabled. The power window system
needs to be reset af ter reinstalling
the fuse.
Start the engine. Push down and
hold the driver’s window switch
until the window is f ully open.
Pull and hold the driver’s window
switch to close the window
completely, then hold the switch
f or a second or two more.
If the power windows do not operate
properly af ter resetting, have your
vehicle checked by your dealer. 1.
2.
CONT INUED
AUTO REVERSE Back Window
Back Window Open
Indicator
Power Windows
Inst rument s and Cont rols
103
�����—�
���—�����y�
�������������y���
�(�����������y���
�����y
Page 107 of 320

To open:Insert the key in the driver’s door
lock.
Turn the key clockwise, then
release it.
You can open all of the side windows
from the outside with the remote
transmitter.
Press the UNLOCK button once
to unlock the driver’s door.
Press the UNLOCK button a
second time, and hold it. The
passenger’s doors unlock, and all
f our side windows start to open.
To stop the windows, release the
button. You can open and close the side
windows with the key in the driver’s
door lock.
The back window is not designed to
carry long items through it. Do not
use the opened back window as a
cargo area pass-through. If you remove the ignition key and
open the driver’s door without
closing the back window, you hear
f ive beeps and see the indicator blink.
If you do not close the back window
bef ore the beeper stops, the
indicator stops blinking but remains
on. It will go of f af ter about 3
minutes (see page ).
To open the windows further,
press the button again, within
about 3 seconds.
You cannot close the windows with
the remote transmitter. 1.
2.
3.
1.
2.
66
Power Windows
Opening the Side Windows with
the Remote Transmitter
Opening/Closing the Side
Windows with the Key
104
Open
Close
UNLOCK BUTTON
�����—�
���—�����y�
�������������y���
�(�����������y���
�����y
Page 108 of 320
.The moonroof")
Turnthekeyclockwiseagain,and
hold it. All f our side windows start
to open. To stop the windows,
release the key.
To open the windows f urther, turn
andholdthekeyagain(within
10 seconds).The moonroof has two positions: it
can be tilted up in the back f or
ventilation, or it can slide back into
the roof. Use the switch near the left
dashboard vent to operate the
moonroof . The ignition switch must
be in the ON (II) position.
NOTE: If the windows stop bef ore
the desired position, repeat steps 2
and 3.
To close the windows further, turn
andholdthekeyagain(within
10 seconds).
To close: NOTE: If the windows stop bef ore
the desired position, repeat steps 2
and 3. Insert the key in the driver’s door
lock.
Turn the key counterclockwise,
then release it.
Turn the key counterclockwise
again, and hold it. All four side
windowsstarttoclose.Tostopthe
windows, release the key.
1.
2.
3. 4.
3.
4.
If equipped
CONT INUED
Power Windows, Moonroof
Moonroof
Inst rument s and Cont rols
105
MOONROOF SWITCH
�����—�
���—�����y�
�������������y���
�(�����������y���
�
���y