Page 123 of 316
�µ
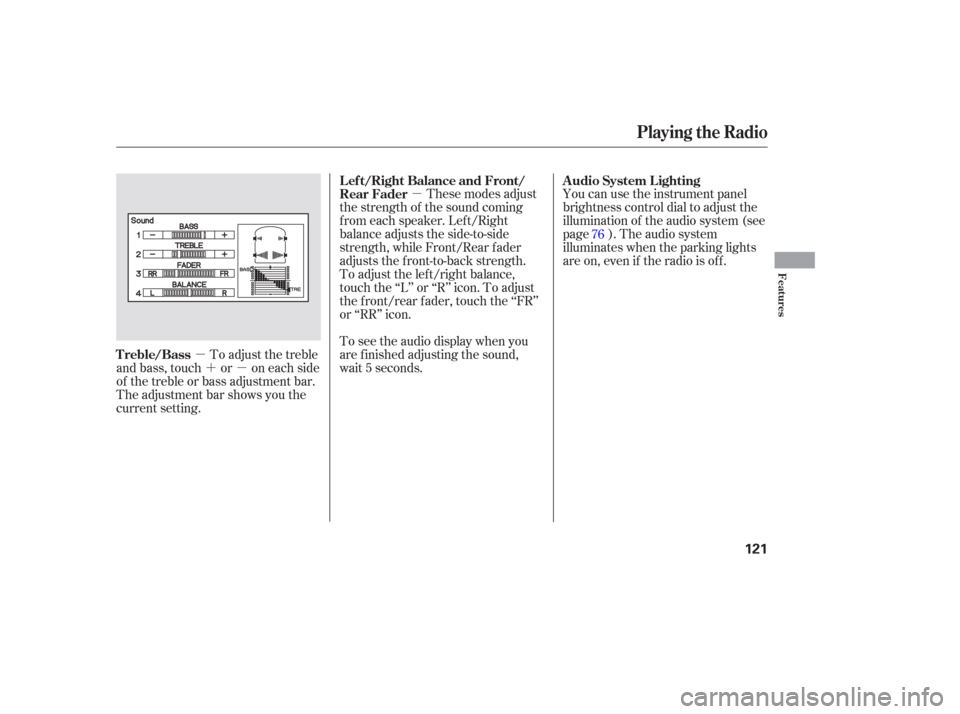
�µ �´�µ You can use the instrument panel
brightness control dial to adjust the
illumination of the audio system (see
page ). The audio system
illuminates when the parking lights
are on, even if the radio is of f .
These modes adjust
the strength of the sound coming
f rom each speaker. Lef t/Right
balance adjusts the side-to-side
strength, while Front/Rear f ader
adjusts the front-to-back strength.
To adjust the left/right balance,
touch the ‘‘L’’ or ‘‘R’’ icon. To adjust
the f ront/rear f ader, touch the ‘‘FR’’
or ‘‘RR’’ icon.
To see the audio display when you
are f inished adjusting the sound,
wait 5 seconds.
To adjust the treble
and bass, touch or on each side
of the treble or bass adjustment bar.
The adjustment bar shows you the
current setting. 76
A udio System L ighting
L ef t/Right Balance and Front/
Rear Fader
Treble/Bass
Playing the Radio
Features
121
Page 128 of 316
 you
want f or that channel. Press and
hold the bar (icon) until you hear a
beep.
Repeat steps 2 and 3 to store the
f irst six channels.
To store a c")
�µ
�µ �µ
�µ
�´
�µ Pick a preset number (icon) you
want f or that channel. Press and
hold the bar (icon) until you hear a
beep.
Repeat steps 2 and 3 to store the
f irst six channels.
To store a channel:
Press the XM button. Either XM1
or XM2 will show in the display. Press the XM button again or
touch the other XM icon (XM1 or
XM2) on the audio display. Store
the next six channels using steps 2
and 3.
In the category mode, only channels
within that category can be selected.
In the channel mode, all channels
can be selected.
Press either side of the CATEGORY
bar ( or ) to select another
category.
The scan f unction gives
you a sampling of all channels while
in the channel mode. In the category
mode, only the channels within that
category are scanned. To activate
scan, press the SCAN/RPT button or
touch the SCAN icon on the audio
display. The system plays each
channel in numerical order f or a f ew
seconds, then selects the next
channel. When you hear a channel
you want to continue listening to,
press the button or touch the icon
again. Youcanstoreupto12
preset channels using the six preset
buttons or preset icons on the audio
display. Each button stores one
channel f rom the XM 1band and one
channel f rom the XM 2band.
Use the TUNE knob, or the
CATEGORY or SCAN buttons to
tune to a desired channel. Once a channel is stored, press and
release the proper preset button
(icon) to tune to it.
Turn the TUNE knob lef t
or right to select channels. In the
category mode, you can only select
channels within that category.
1.
2.3.
4.
5.
Playing the XMSatellite Radio
SEEK /SK IP (CA T EGORY)
SCAN
Preset
TUNE
126
Page 134 of 316
discsinthissystem. Press and hold the LOAD button
until you hear a beep and see
‘‘LOAD’’ in the display, then
release the butto")
�µ�´
�µ
�´
�µ
�µ
�µ
You cannot load and play 3-inch
(8-cm)discsinthissystem. Press and hold the LOAD button
until you hear a beep and see
‘‘LOAD’’ in the display, then
release the button.
To load only one CD, press and
release the LOAD button.
Insert the CD into the CD slot.
Insert it only about halfway; the
drive will pull it in the rest of the
way. You will see ‘‘BUSY’’ in the
display. The CD loaded indicator
turns red and blinks as the CD is
loaded. Ontheupperleftsideof the
display, the disc number f or an
empty position will begin blinking,
and the green CD load indicator
will come on. When ‘‘LOAD’’ appears again in
the display, insert the next CD into
the CD slot.
Do not try to insert a disc until
‘‘LOAD’’ appears. You could
damage the audio unit.
Repeat this until all six positions
are loaded. The system will then
begin playing last CD loaded.
If you are not loading CDs into all six
positions, press the LOAD button
again after the last CD has loaded.
The system will begin playing the
last CD loaded.
If you stop loading CDs bef ore all six
positions are f illed, the system will
wait f or 10 seconds, then stop the
load operation and begin playing the
last CD loaded. Each time you press and
release /( ), the player skips
f orward to the beginning of the next
track. Press and release /( )
to skip backward to the beginning of
the previous track.
To move rapidly within a track, press
andholdthe /( )or /
( ). You will see CUE or REW in
the display.
To continuously replay
a track, press and release the RPT
button. You will see RPT in the
display. Press the RPT button again
to turn it off.
This f eature plays the
tracks in random order. To activate
random play, press and release the
RDM button. You will see RDM in
the display. This continues until you
press the RDM button again.
1.
2.
3.
4.
5.
Except f or LX model
L oading CDs in the In-dash CD
Changer
SK IP
REPEAT
RANDOM
Playing a Disc, Disc Changer
132
Page 135 of 316

On vehicles with navigation system
On vehicles with navigation system
On vehicles with navigation system On LX models
When you press the RDM button or
touch the TRACK RANDOM icon on
the screen, the system plays the
tracks of the current disc in random
order. You will see RDM (TRACK
RANDOM) in the display. To turn
this feature off, press the RDM
button (touch TRACK RANDOM)
again.
Press the eject button ( ) to
remove the CD. If you eject the CD,
but do not remove it f rom the slot,
the system will automatically reload
the CD af ter 10 seconds and put it in
pause mode. To begin playing, press
the CD button.
Press the AM/FM button to switch
to the radio while a CD is playing.
Press the CD button to play the CD.
If you turn the system of f while a CD
is playing, either with the PWR/VOL
knob or by turning off the ignition,
the CD will stay in the drive. When
youturnthesystembackon,theCD
will begin playing where it lef t of f .
When you press and release the RPT
button or touch the TRACK
REPEAT icon on the screen, the
system continuously replays the
current track. As a reminder, you
will see RPT (TRACK REPEAT) in
the display. To turn this feature off,
press the RPT button, or touch the
TRACK REPEAT icon again.
WhenyoupressandholdtheRPT
button until D-RPT (DISC REPEAT)
is in the display, or when you touch
the DISC REPEAT icon on the
screen, the system continuously
replays the current disc. As a
reminder, you will see D-RPT in the
display.
Playing a Disc, Disc Changer
Random Play within a Disc T o Stop Playing a CD
T rack Repeat
Disc Repeat
Features
133
Page 136 of 316
 button. When
a disc is removed f rom a slot, the
system automatically begins the load
sequence so you can load another
CD in that posit")
�µ�´
To remove the disc currently in play,
press the eject ( ) button. When
a disc is removed f rom a slot, the
system automatically begins the load
sequence so you can load another
CD in that position. If you do not
remove the disc f rom the changer
within 15 seconds, the system
returns to the previous mode (AM/
FM or satellite radio). The disc will
reload into the system and will
remainthereinapausemode. To remove a dif f erent CD f rom the
changer,firstselectitwiththe
appropriate preset button. When that
CD begins playing, press the eject
button. Continue pressing the eject
button to remove all the discs from
the changer.
You can also eject discs when the
ignition switch is of f . The disc that
was last selected is ejected f irst.
To eject one disc, press and release
the eject button.
To eject all discs, press and hold the
eject button until the system beeps.
Load the desired CDs into the
magazine, and load the magazine
into the changer according to the
instructions that came with the unit.
To select the CD changer, press the
CD button. The CD and track
numbers will be displayed. To select
a dif f erent CD, use the preset 5
(DISC ) or preset 6 (DISC )
button. If you select an empty slot in
the magazine, the changer will, af ter
f inding that slot empty, try to load
the CD in the next slot.
Except f or LX model
Optional on LX models
Playing a Disc, Disc Changer
Removing CDs f rom the In-dash
CD ChangerOperating the Optional CD
Changer
134
Page 150 of 316

�Û�Ý
Press the or button to
select another category.
Pressing and holding the DISP
button for more than 5 seconds will
change the search mode between
Channel Search and Category
Search. Each time you press and
release the DISP button, the display
above the rear control panel changes
in the f ollowing sequence: Channel
Number, Category Name, Music
Name, Artist Name, Channel Name,
and back to Channel Number. If CDs are loaded in the CD changer,
select them by pressing the CD
button. If a CD is loaded in the DVD
player, press the DVD/AUX button.
Pressthe buttontoskiptothe
beginning of the next track. Press
the button to return to the
beginning of the current track.
To move rapidly within a track, press
andholdthe or button.
The system will continue to move
through the track. Press the
button to move f orward, or the
button to move backward.
Release the button when the system
reaches the point you want.
If CDs are loaded in the CD changer
and the overhead screen is not open,
pressing the or button changes
the discs.
Rear Entertainment System
To Play a CD f rom the Rear
Control Panel
148
Page 151 of 316

The video screen is f or use by rear
seat passengers only. The driver and
f ront seat passenger should not try
to view the screen while driving.Press the button when you
want to pause the DVD. Press this
button again to go back to PLAY.
Pressthe buttontoskiptothe
beginning of the next chapter. Press
the button to return to the
beginning of the current chapter.
To move rapidly within a chapter,
press and hold the orbutton. The system will
continue to move through the chapter. Press the button to
move forward, or the button to
move backward. Release the button
when the system reaches the point
you want.
ToselectthemenuontheDVD,
press the MENU/SCROLL button
(U.S. models) or MENU button
(Canadian models). Use the ,
, , and buttons to
move to the desired menu selection,
then press the ENT button to enter
your selection.
Open the overhead screen by
pushing the OPEN button. The
screen will swing down part-way.
Pivot the screen the rest of the way.
If you pivot the screen too f ar
f orward, past the second detent, the
display will turn of f . Pivot the screen
back to the second or first detent to
turn the display back on. To close
the screen, pivot it up until it latches. To Play a DVD from the Rear
Control Panel
Rear Entertainment System
Features
149
REAR CONTROL PANEL
OPEN
BUTTON
OVERHEAD SCREEN
Page 154 of 316
�Ý�Û�Ý�Û
�Ý�Û
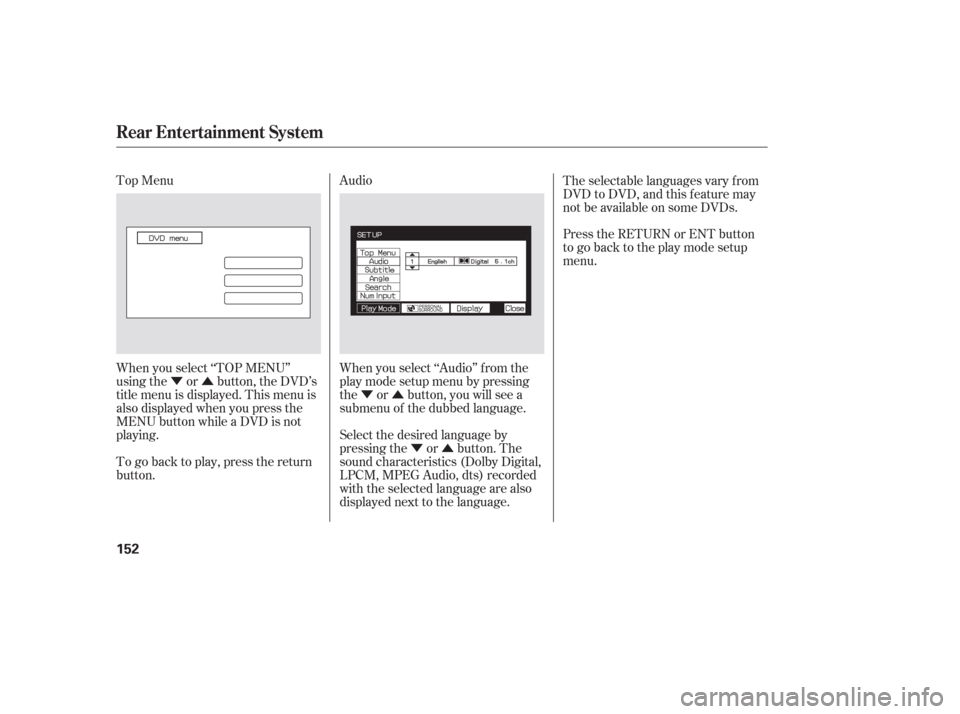
Top Menu
Audio
When you select ‘‘TOP MENU’’
using the or button, the DVD’s
title menu is displayed. This menu is
also displayed when you press the
MENU button while a DVD is not
playing. When you select ‘‘Audio’’ f rom the
play mode setup menu by pressing
the or button, you will see a
submenu of the dubbed language.The selectable languages vary f rom
DVD to DVD, and this feature may
notbeavailableonsomeDVDs.
Press the RETURN or ENT button
to go back to the play mode setup
menu.
Select the desired language by
pressing the or button. The
sound characteristics (Dolby Digital,
LPCM, MPEG Audio, dts) recorded
with the selected language are also
displayed next to the language.
To go back to play, press the return
button.
Rear Entertainment System
152