Page 70 of 316

position. If it comes on while driv")
This indicator monitors the
temperature of the automatic
transmission f luid. It should come on
f or a f ew seconds when you turn the
ignition switch to the ON (II)
position. If it comes on while driving,
it means the transmission f luid
temperature is too high. Pull to the
side of the road when it is saf e, shif t
to Park, and let the engine idle until
the indicator goes out.If the indicator blinks while driving,
the VTM-4 fluid temperature is too
high. Pull to the side of the road
when it is saf e, shif t to Park, and let
the engine idle until the indicator
goes out. This indicator normally comes on f or
a f ew seconds when you turn the
ignition switch to the ON (II)
position. If it comes on at any other
time, there is a problem in the 4WD
system. Take the vehicle to your
dealer to have it checked.While the engine is operating in its
most economical range, this
indicator may come on and stay on.
4WD models only
4WD models only2WD models only
A/T Temperature
IndicatorVT M-4 Indicator
Fuel Economy Indicator
Instrument Panel Indicators
68
Continuing to drive with the A/T
temperature indicator on may cause
serious damage to the transmission.
Continuing to drive with the VTM-4
indicator blinking may cause serious
damage to the system.
Page 73 of 316

�¶�¶�µ�µ�µ�µ
�µ �µ�µ�µ
This shows the temperature of the
engine’s coolant. During normal
operation, the pointer should rise
from the bottom white mark to about
the middle white mark. In severe
driving conditions, such as very hot
weather or a long period of uphill
driving, the pointer may rise to the
upper white mark. If it reaches the
red (Hot) mark, pull saf ely to the
side of the road. Turn to page f or
instructions and precautions on
checking the engine’s cooling
system. If the outside temperature is
incorrectly displayed, you can adjust
it up to 5°F ( 3°C) warmer or
cooler.
NOTE: The temperature must be
stabilized bef ore doing this
procedure.
Select the outside temperature
display, then press the Select/Reset
knob f or 10 seconds. The f ollowing
sequences appear, 1 second at a
time:0,1,2,3,4,5, 5, 4, 3, 2,
1, 0, 1 (0, 1, 2, 3, 3, 2, 1, 0, 1).
When the temperature reaches the
desired value, release the Select/
Reset knob. You should see the new
outside temperature displayed.
In certain weather conditions,
temperature readings near f reezing
(32°F, 0°C) could mean that ice is
f orming on the road surf ace.
This indicator displays the outside
temperature in Fahrenheit (U.S.
models) or Centigrade (Canadian
models). To see the outside
temperature, press and release the
Select/Reset knob until the
temperature is shown in the
inf ormation display.
The temperature sensor is in the
f ront bumper. Theref ore, the
temperature reading can be af f ected
by heat ref lection f rom the road
surf ace, engine heat, and the
exhaust f rom surrounding traf f ic.
This can cause an incorrect
temperature reading when your
speed is under 19 mph (30 km/h).
The sensor delays the display update
until it reaches the correct outside
temperature. This may take several
minutes.
242
On EX and EX-L models
Temperature Gauge
Outside Temperature Indicator
Gauges
Instruments and Controls
71
Page 78 of 316

The knob on the instrument panel
controls the brightness of the instru-
ment panel lights. Turn the knob to
adjust the brightness.
The lights will turn on again when
you unlock or open the driver’s door.
With the headlight switch off, the
high beam headlights come on with
reduced brightness when you turn
the ignition switch to the ON (II)
position and release the parking
brake. They remain on until you turn
the ignition switch of f , even if you
set the parking brake.
The headlights revert to normal
operation when you turn the switch
to the ‘‘ ’’ position. If you unlock the door, but do not
open it within 15 seconds, the lights
will go off. With the driver’s door
open, you will hear a lights-on
reminder chime.
This f eature turns of f the headlights,
parking lights, taillights, side marker
lights, license plate lights, and
instrument panel lights within 15
seconds of removing the key f rom
the ignition switch and closing the
driver’s door.
This feature activates if you leave
the headlight switch in the or
position, remove the key, then
open and close the driver’s door.
If you remove the key f rom the
ignition switch with the headlight
switch on, but do not open the door
and get out, the lights will turn of f
af ter 10 minutes.
On EX and EX-L models
Instrument Panel Brightness
Daytime Running L ights
(Canadian Models)
Automatic Lighting Of f Feature
Headlights, Instrument Panel Brightness
76
INSTRUMENT PANEL BRIGHTNESS
CONTROL KNOB
Page 86 of 316
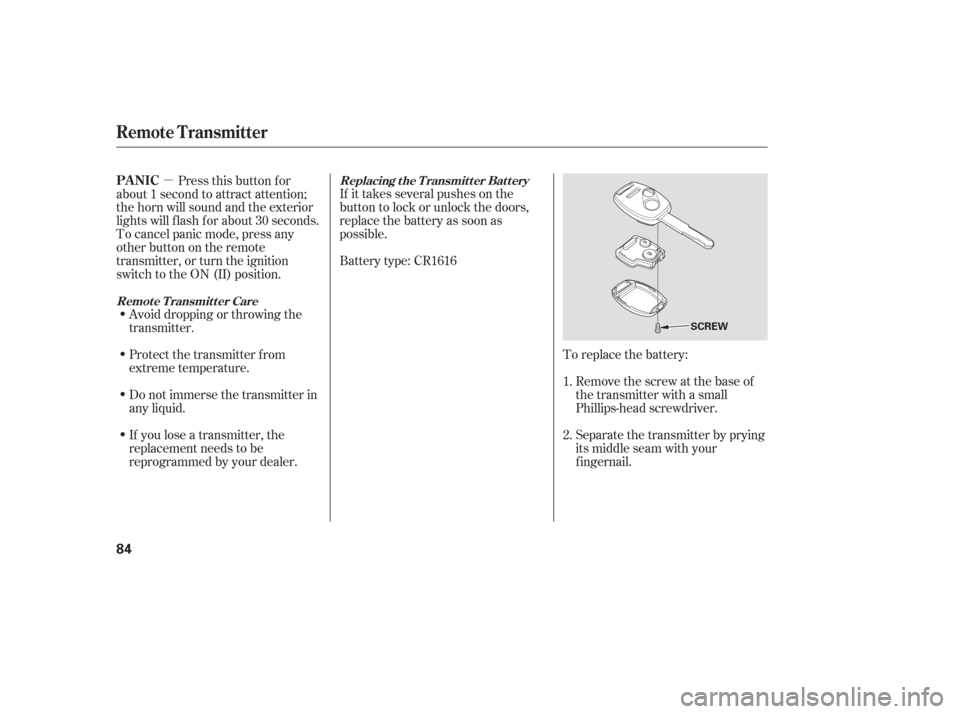
�µTo replace the battery:Remove the screw at the base of
the transmitter with a small
Phillips-head screwdriver.
Separate the transmitter by prying
its middle seam with your
f ingernail.
Battery type: CR1616 If it takes several pushes on the
button to lock or unlock the doors,
replace the battery as soon as
possible.
Pressthisbuttonfor
about 1 second to attract attention;
thehornwillsoundandtheexterior
lights will f lash f or about 30 seconds.
To cancel panic mode, press any
other button on the remote
transmitter, or turn the ignition
switch to the ON (II) position.
Avoid dropping or throwing the
transmitter.
If you lose a transmitter, the
replacement needs to be
reprogrammed by your dealer. Do not immerse the transmitter in
any liquid. Protect the transmitter from
extreme temperature. 1.
2.Replacing the Transmitter Battery
Remote Transmitter CarePA NIC
Remote Transmitter
84
SCREW
Page 115 of 316

�µ
�µ
�µ
A passenger in the second row can
use the rear fan control dial to adjust
the amount of airf low to the rear
passenger compartment.
Press the RR A/C MANUAL button
to enable the rear temperature
control dial; a second row passenger
can now adjust the temperature in
the rear passenger compartment
with the rear temperature control
dial.
OFF (center) The rear A/C unit
shuts off.
Cool Air Turn this dial
counterclockwise to increase the
airflow.
Warm Air Turn this dial clockwise
to increase the airflow. When the RR A/C MANUAL button
is on, you can adjust the temperature
of the rear passenger compartment
manually f rom the second row seat.
When the RR A/C MANUAL button
is off, the temperature in the rear
passenger compartment is controlled
by the f ront passenger with f ront
control panel.
CONT INUED
On LX models
On EX and EX-L models On LX models
On EX and EX-L models
Using the Rear A /C Unit
Vents, Heating, and A/C
Features
113
COOL AIR
WARM AIR
REAR A/C MANUAL BUTTON
Page 116 of 316
�µ
�µ
�µ Theclimatecontrolsystemhastwo
sensors. A sunlight sensor is in the
top of the dashboard, and a
temperature sensor is next to the
steering column. Do not cover the
sensors or spill any liquid on them.
OFF (center) The rear A/C unit
shuts off.
Cool Air Turn this dial
counterclockwise to increase the
temperature.
Warm Air Turn this dial clockwise
to increase the temperature.
On EX and EX-L models
Sunlight and T emperature
Sensors
Vents, Heating, and A/C
114
SUNLIGHT SENSOR TEMPERATURE SENSOR
COOL AIR
WARM AIR
Page 120 of 316

�µ
�µ �µ
�µ
�µ�´ Each preset button can
store one f requency on AM and two
f requencies on FM.
Select the desired band, AM or
FM. FM1 and FM2 let you store
two f requencies with each preset
button.
UsetheTUNE,SEEK,orSCAN
function to tune the radio to a
desired station.
Pickapresetbutton,andholdit
until you hear a beep.
Repeat steps 1 through 3 to store a
total of six stations on AM and
twelve stations on FM.
The preset f requencies will be lost if
your vehicle’s battery goes dead, is
disconnected, or the radio f use is
removed.
The ignition switch must be in the
ACCESSORY (I) or the ON (II)
position. Turn the system on by
pushingthePWR/VOLknoborthe
AM/FM button. (AM or FM button
on U.S. EX model and Canadian
model).
Adjust the volume by turning the
PWR/VOL knob.
The band and f requency that the
radio was last tuned to is displayed.
To change bands, press the AM/FM
button (AM or FM button). On the
FM band, ST will be displayed if the
stationisbroadcastinginstereo.
Stereo reproduction in AM is not
available.
You can use any of f ive methods to
find radio station on the selected
band: , , , the
preset buttons, and
Use the TUNE knob to tune the radio to a desired f requency.
Turn the knob right to tune to a
higher f requency, or lef t to tune to a
lower f requency.
If you do nothing, the system will
scan f or the next strong station and
play it f or 5 seconds. When it plays a
station you want to listen to, press
the SCAN button again.
The scan f unction samples
all stations with strong signals on the
selected band. To activate it, press
the SCAN button, then release it.
You will see SCAN in the display.
The system will scan f or a station
with a strong signal. When it f inds
one, it will stop and play that station
f or about 5 seconds. The SEEK f unction
searches up and down f rom the
current f requency to f ind a station
with a strong signal. To activate it,
press the /( ) or /( )
side of the bar, then release it. 1.
2.
3.
4.
To Play the Radio
Preset
T UNE SEEK SCA N AUTO SELECT.
To Select a Station
TUNE SCAN SEEK
Playing the Radio
118
Page 121 of 316

�µ�µ
�µ
If you are
traveling far from home and can no
longer receive your preset stations,
you can use the auto select feature to
find stations in the local area. Use the TRE/BAS
modes to adjust the tone to your
liking.
You can use the instrument panel
brightness control knob to adjust the
illumination of the audio system (see
page ). The audio system
illuminates when the parking lights
are on, even if the radio is of f .
These two
modes adjust the strength of the
sound coming f rom each speaker.
BAL adjusts the side-to-side strength,
while FAD adjusts the f ront-to-back
strength. Eachmodeisshowninthedisplayas
it changes. Turn the MODE knob to
adjust the setting to your liking.
When the level reaches the center,
you will see ‘‘C’’ in the display. The
system will automatically return the
display to the selected audio mode
about f ive seconds af ter you stop
adjusting a mode. ,pressthe
A. SEL button. This restores the
presets you originally set.
Press the A. SEL button. ‘‘A.SEL’’
f lashes in the display, and the system
goes into scan mode f or several
seconds. It stores the f requencies of
six AM and twelve FM stations in
the preset buttons.
You will see a ‘‘0’’ displayed af ter
pressing a preset button if auto
select cannot f ind a strong station f or
every preset button. Press the MODE (TUNE) knob
repeatedly to display the Bass (BAS),
Treble (TRE), Fader (FAD), and
Balance (BAL) settings.
If you do not like the stations auto
select has stored, you can store
other f requencies on the preset
buttons. Use the TUNE, SEEK, or
SCAN f unction to f ind stations, then
store them in the preset buttons as
described previously. 76To turn of f auto selectAUTO SELECT
A udio System L ighting Treble/Bass
Balance/Fader Adjusting the Sound
Playing the Radio
Features
119