Page 149 of 420

To open a power sliding door, push
and release the bottom of the
appropriate switch. If you f orget to
unlock the door, you will hear three
beeps. Unlock the door, and try
again.To open and close a power sliding
door, press and hold the appropriate
button f or at least 1 second. If you
f orget to unlock the door, you will
hear three beeps. Unlock the door,
and try again.Each power sliding door has an auto-
reverse f eature. If a door meets
resistance while closing, it will beep
three times and reverse direction.
However, the door may not reverse
immediately and may cause some
bruising or discomf ort. Always make
sure passengers and objects are
clear of the doors bef ore closing
them.
If a rear window is open more than
3 in (8 cm), the power sliding door is
designed to stop about half way to
avoid accidents. If this happens,
close the door with the door handles,
the dashboard switch, or the remote
transmitter. Close the window and
open the sliding door. Make sure the
window is f ully closed bef ore you
operate the power sliding door.
To stop movement, push the
appropriate door button; you will
hear three beeps. Push and hold the
same button again f or at least 1
second and the door will reverse
direction.
When the MAIN switch is in the
OFF position, you have to operate
the doors manually. To stop a door, push either the top or
bottom of the switch. The door will
stop and you will hear three beeps.
Push the switch again to resume
movement. To close a sliding door, push and
release the top of the switch.
Sliding Doors
Remote Transmitter
Auto-Reverse
148
DRIVER’S
SIDE
SLIDING
DOOR
BUTTON
PASSENGER’S
SIDE
SLIDING
DOOR
BUTTONLED
Page 166 of 420

Your vehicle has a memory feature
f or the driver’s seat position.Press and release the MEMO
buttononthecontrolpanel.You
will hear a beep. Immediately
press and hold one of the memory
buttons (1 or 2) until you hear two
beeps. The indicator in the
memory button will come on. The
current driver’s seat position is
now stored.
Store a driver’s seat position only
when the vehicle is parked.
Turn the ignition switch to the ON
(II) position. You cannot add a
new seat position in memory
unless the ignition switch is in the
ON (II) position. You can recall a
memorized position with the
ignition switch in any position.
Adjust the seat to a comfortable
position (see page ).
Two seat positions can be stored in
separate memories. You select a
memorized position by pushing the
appropriate button or appropriate
remote transmitter (Driver 1 or
Driver 2). For more inf ormation, see
page .
1.
2.
3.
139
155
CONT INUED
On Touring models onlyStoring a Driver’s Seat Position in
Memory
Driver’s Seat Position Memory System
Inst rument s and Cont rols
165
MEMO BUTTON
MEMORY BUTTONS
Page 167 of 420

Doing any of the f ollowing af ter
pressing the MEMO button will
cancel the storing procedure.Not pressing a memory button
within 5 seconds.
Readjusting the seat position.
Each memory button stores only one
seat position. Storing a new position
erases the previous position stored in
that button’s memory. If you want to
add a new position while retaining
the current one, use the other
memory button. To select a memorized position, do
this:
Make sure the shif t lever is in
Park. Press on the brake pedal.
Press the desired memory button
(1 or 2) until you hear a beep, then
release the button. The system will move the driver’s
seat to the memorized position. The
indicator in the selected memory
button will f lash during movement.
When the adjustment is complete,
you will hear two beeps, and the
indicator will stay on.
To stop the system’s automatic
adjustment, do any of these actions:
If desired, you can use the
adjustment switches to change the
seat position af ter it is in its
memorized position. If you change
the memorized position, the
indicator in the memory button will
go out. To keep this seat position f or
later use, you must store it in the
driver’s seat position memory.
Shif t out of Park. Push any of the adjustment
switches f or the seat. Press any button on the control
panel: MEMO, 1, or 2.
1.
2. Selecting a Memorized Position
Driver’s Seat Position Memory System
166
MEMORY BUTTONS
Page 169 of 420

Start the engine. Push down and
hold the driver’s window switch
until the window is f ully open.
Pull and hold the driver’s window
switch to close the window
completely, then hold the switch
f or about 2 seconds.Press the UNLOCK button a
second time, and hold it. The
passenger’s doors unlock, and all
f our windows start to open. To
stop the windows, release the
button.
To open the windows f urther,
pressthebuttonagainandholdit.
If the windows stop bef ore the
desired position, repeat steps 1
and 2.
You cannot close the windows with
the remote transmitter.
If the power windows do not operate
properly af ter resetting, have your
vehicle checked by your dealer. Press the UNLOCK button once
to unlock the driver’s door.
You can open all of the windows
from the outside with the remote
transmitter.
If your vehicle’s battery is
disconnected or goes dead, or the
driver’s window f use is removed, the
AUTO f unction will be disabled. The
power window system needs to be
reset af ter reconnecting the battery
or installing the f use.
1.
2.
3.
1. 2.
On EX, EX-L and Touring models
Opening the Windows with the
Remote Transmitter
Power Windows
168
Page 170 of 420
Turnthekeyclockwiseagain,and
hold it. All f our windows start to
open. To stop the windows,
release the key.
To open the windows further, turn
andholdthekeyagain(within
15 seconds).
To close: Insert the key in the driver’s door
lock.
Turn the key counterclockwise,
then release it.
Turn the key counterclockwise
again, and hold it. All four
windowsstarttoclose.Tostopthe
windows, release the key.
To close the windows further, turn
andholdthekeyagain(within
15 seconds). If the windows stop bef ore the
desired position, repeat steps 2 and 3.
Turn the key clockwise, then
release it. Insert the key in the driver’s door
lock.
To open: You can open and close the windows
with the key in the driver’s door lock. 1.
2. 3.
4.
1.
2. 3.
4.
On EX, EX-L and Touring models
Opening/Closing the Windows
with the Key
Power Windows
Inst rument s and Cont rols
169
Open
Close
Page 206 of 420
 or ON (II) position.
Turn the system on by pushing the
PWR/VOL knob. Adjust the volume
by turning the same knob.
The band and f")
�µ
�µ �´�µ �µ
�µ
The ignition switch must be in the
ACCESSORY (I) or ON (II) position.
Turn the system on by pushing the
PWR/VOL knob. Adjust the volume
by turning the same knob.
The band and f requency that the
radio was last tuned to is displayed.
To change bands, press the AM or
FM button, or AM/FM button. On
the FM band, ST will be displayed if
the station is broadcasting in stereo.
Stereo reproduction in AM is not
available. Use the TUNE knob to
tune the radio to a desired f requency.
Turn the knob right to tune to a
higher f requency, or lef t to tune to a
lower f requency.
The SEEK f unction
searches up and down from the
current f requency to f ind a station
with a strong signal. To activate it
press the or side of the bar,
then release it. Each preset button can
store one f requency on AM and two
f requencies on FM. Select the desired band, AM or
FM. FM1 and FM2 let you store
two f requencies with each preset
button.
UsetheTUNE,SEEK,orSCAN
function to tune the radio to a
desired station.
Repeat steps 1 through 3 to store a
total of six stations on AM and
twelve stations on FM.
You can use any of f ive methods to
f ind radio stations on the selected
band:
the
preset buttons, and .The SCAN f unction
samples all stations with strong
signals on the selected band. To
activate it, press the SCAN button,
then release it. You will see SCAN in
the display. The system will scan f or
a station with a strong signal. When
it f inds one, it will stop and play that
station for about 5 seconds. If you do nothing, the system will
then scan f or the next strong station
andplayitfor5seconds.Whenit
plays a station you want to listen to,
press the SCAN button again.
Pickapresetbutton,andholdit
until you hear a beep.
1.
2.
3.
4.
CONT INUED
TUNE
SEEK
Preset
To Select a Station TUNE,SEEK,SCAN, AUTO SELECT
To Play the AM/FM Radio
SCAN
Playing the AM/FM Radio
Features
205
Page 214 of 420

�µ�µ
�µ�´ �µ
�µ
On models with a rear entertainment
system and a navigation system, you
cannot listen to XM Radio and a disc
at the same time. For example, when
XM Radio is playing on the f ront
speakers, you cannot listen to a disc
on the rear speakers, or vice versa.
The scan f unction gives
you a sampling of all channels while
in the channel mode. In the category
mode, only the channels within that
category are scanned. To activate
scan, press the SCAN/RPT button or
touch the SCAN icon on the audio
display. The system plays each
channel in numerical order f or a f ew seconds, then selects the next
channel. When you hear a channel
you want to continue listening to,
press the button or touch the icon
again.
Press either side of
the bar ( or ) to select another
category.
In the category mode, only channels
within that category can be selected.
In the channel mode, all channelscan be selected.
Use the TUNE knob, or the
CATEGORY or SCAN buttons to
tune to a desired channel. You can
also touch the SCAN icon on the
audio display. Press the XM RADIO button.
Either XM1 or XM2 will show in
the display.
To store a channel: Youcanstoreupto12
preset channels using the six preset
buttons or preset icons on the audio
display. Each button stores one
channel f rom the XM1 band and one
channel f rom the XM2 band.
The presets will be lost if your
vehicle’s battery goes dead, is
disconnected, or the radio f use is
removed. Once a channel is stored, press and
release the proper preset button
(icon) to tune to it.Press the XM RADIO button again
or touch the other XM icon (XM1
or XM2) on the audio display.
Store the next six channels using
steps 2 and 3. Repeat steps 2 and 3 to store the
f irst six channels. Pick the preset button (icon) you
want f or that channel. Press and
hold the button (icon) until you
hear a beep.
Turn the tune knob lef t or
right to select channels. In the
category mode, you can only select
channels within that category.
1.
2.3.
4.
5.
Playing the XMSatellite Radio
SCAN CATEGORY
Preset
TUNE
Features
213
Page 260 of 420
�Ý�Û
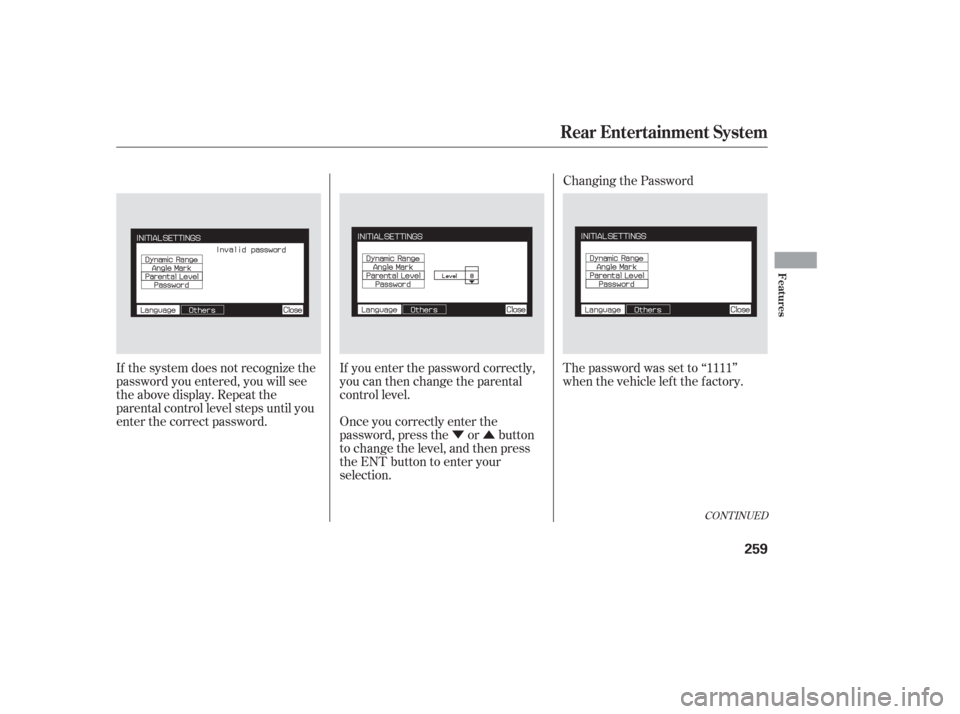
If the system does not recognize the
password you entered, you will see
the above display. Repeat the
parental control level steps until you
enter the correct password.
If you enter the password correctly,
you can then change the parental
control level.
Once you correctly enter the
password, press the or button
to change the level, and then press
the ENT button to enter your
selection.Changing the Password
The password was set to ‘‘1111’’
when the vehicle lef t the f actory.
CONT INUED
Rear Entertainment System
Features
259
.
To close: Insert t")