Page 179 of 253
Maintenance Record
188
mi mimimimimimimimimimimimimi
You or the servicing dealer can record all completed maintenance here. When maintenance is performed, record the mileage, circle the coded item(s)
completed, and write in any other non-coded items (such as brake fluid replacement) below the codes. Keep the rec
eipts for all work done on your
vehicle. Maintenance can also be recorded in your Honda service history booklet.
Mileage
km kmkmkmkmkmkm Signature Date
Mileage
km kmkmkmkmkmkm Signature Date
Maintenance
Performed
AB12345
AB12345
AB12345
AB12345
AB12345
AB12345
AB12345 Maintenance
Performed
AB12345
AB12345
AB12345
AB12345
AB12345
AB12345
AB12345
�����—�����—�����y�
���������
���y���
�(�#���������y���
���
�y
Page 181 of 253
Fluid Locations
190
RADIATOR CAP
ENGINE OIL DIPSTICK
(Orange loop)
ENGINE OIL
FILL CAP
WASHER FLUID
(Blue cap)
POWER STEERING
FLUID (Red cap)
AUTOMATIC
TRANSMISSION
FLUID DIPSTICK
(Yellow loop)
ENGINE COOLANT
RESERVOIR
CLUTCH FLUID
(Manual
Transmission only)
(Light gray cap)
BRAKE FLUID
(Black cap)
�����—�����—���
�y�
�������������y���
�(�#���������y���
�����y
Page 189 of 253

Manual Transmission only
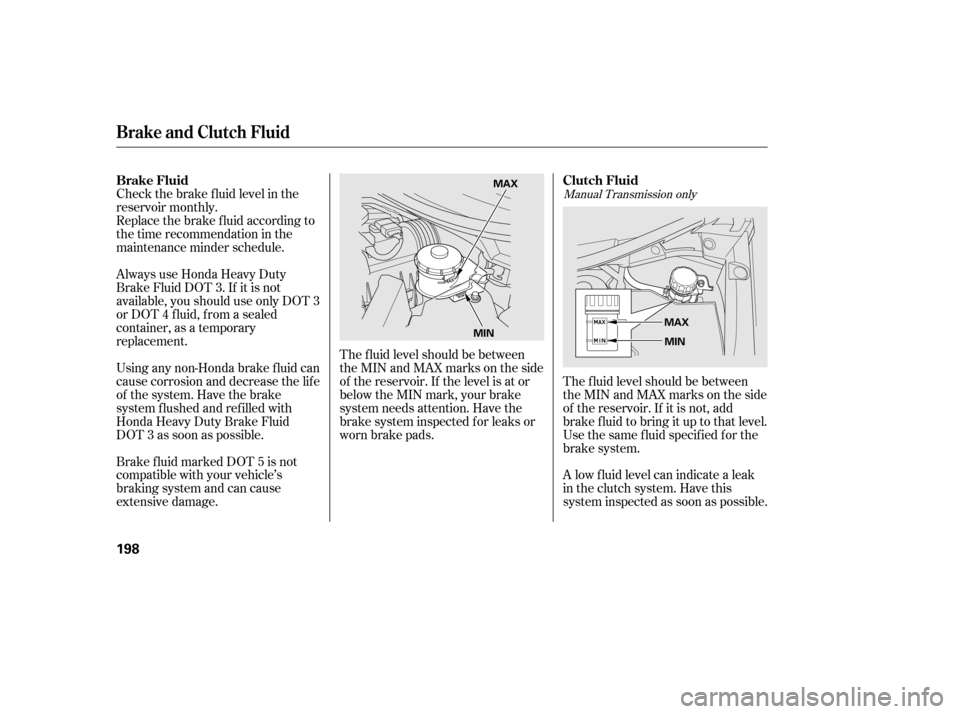
The f luid level should be between
theMINandMAXmarksontheside
of the reservoir. If it is not, add
brake f luid to bring it up to that level.
Use the same fluid specified for the
brake system.
A low f luid level can indicate a leak
in the clutch system. Have this
system inspected as soon as possible.
The f luid level should be between
theMINandMAXmarksontheside
of the reservoir. If the level is at or
below the MIN mark, your brake
system needs attention. Have the
brake system inspected f or leaks or
worn brake pads.
Always use Honda Heavy Duty
Brake Fluid DOT 3. If it is not
available, you should use only DOT 3
or DOT 4 f luid, f rom a sealed
container, as a temporary
replacement.
Using any non-Honda brake f luid can
cause corrosion and decrease the lif e
of the system. Have the brake
system f lushed and ref illed with
Honda Heavy Duty Brake Fluid
DOT 3 as soon as possible.
Brake f luid marked DOT 5 is not
compatible with your vehicle’s
braking system and can cause
extensive damage.
Check the brake f luid level in the
reservoir monthly.
Replace the brake f luid according to
the time recommendation in the
maintenance minder schedule.
Brake and Clutch Fluid
Brake Fluid
Clutch Fluid
198
MAX
MIN MAX
MIN
�����—�����—���
�y�
�������������y���
�(�#���������y�������
�y
Page 196 of 253
Remove the socket by turning it
one-quarter turn counterclockwise.Open the trunk, and remove the
socket f rom the light assembly by
turning it one-quarter turn counter-
clockwise.
Pull the bulb straight out of its
socket. Push the new bulb straight
into the socket until it bottoms.
Reinstall the socket. Turn it
clockwise until it locks. Make sure
the new bulb is working.
Pull the bulb straight out of its
socket. Push the new bulb straight
into the socket until it bottoms.
Insert the socket back into the
light assembly. Turn it clockwise
to lock it in place.
Test the lights to make sure the
new bulb is working.
Push the trunk lid trim back into
position.
Put the f asteners into the holes on
the trunk lid trim. Reinstall the
screws.
2.
1. 3.
4. 5.6. 7. 8.
3.
On LX and EX models
Lights
Replacing a High-mount Brake
Light Bulb
Maint enance
205
BULB
SOCKET
BULB
SOCKET
�����—�����—�����y�
�������������y���
�(�#���������y���������y
Page 205 of 253
When installing cables, f ollow the
manuf acturer’s instructions, and
mount them as tight as you can.
Make sure they are not contacting
the brake lines or suspension. Drive
slowly with them installed. If you
hear them coming into contact with
the body or chassis, stop and
investigate. Remove them as soon as
you begin driving on cleared roads.
Because your vehicle has limited tire
clearance, mount only SAE Class ‘‘S’’
cable-type traction devices, with
rubber chain tensioners, on the f ront
tires. Use traction devices only when
required by driving conditions or
local laws. Make sure they are the
correct size f or your tires. Metal link-
type ‘‘chains’’ should not be used.
Tires
T ire Chains
214
Traction devices that are the wrong
size or improperly installed can
damage your vehicle’s brake lines,
suspension, body, and wheels. Stop
driving if they are hitting any part of
the vehicle.
�����—�����—�����y�
�������������y���
�(�#���������y�����
���y
Page 207 of 253

Fill the f uel tank.
Change the engine oil and f ilter.Block the rear wheels.
If the vehicle is to be stored f or a
longer period, it should be
supported on jackstands so the
tires are of f the ground.
Wash and dry the exterior
completely.
Cleantheinterior.Makesurethe
carpeting, floor mats, etc., are
completely dry.
If you need to park your vehicle f or
an extended period (more than 1
month), there are several things you
should do to prepare it f or storage.
Proper preparation helps prevent
deterioration and makes it easier to
get your vehicle back on the road. If
possible, store your vehicle indoors. Leave one window open slightly (if
the vehicle is being stored
indoors).Cover the vehicle with a
‘‘breathable’’ cover, one made
f rom a porous material such as
cotton. Non-porous materials, such
as plastic sheeting, trap moisture,
which can damage the paint.
To minimize sticking, apply a
silicone spray lubricant to all door
and trunk seals. Also, apply a
vehiclebodywaxtothepainted
surfaces that mate with the door
and trunk seals.
Support the f ront wiper blade
arms with a f olded towel or rag so
they do not touch the windshield.
Disconnect the battery. If possible, periodically run the
engine until it reaches f ull
operating temperature (the
cooling f an cycles twice).
Pref erably, do this once a month.
Leave the parking brake off. Put
the transmission in reverse
(manual) or Park (automatic).
Vehicle Storage
216
�����—�����—�����y�
���������
���y���
�(�#���������y�����
���y
Page 209 of 253

If you have a f lat tire while driving,
stop in a saf e place to change it.
Drive slowly along the shoulder until
you get to an exit or an area to stop
that is far away from the traffic lanes.Turn on the hazard warning lights,
and turn the ignition switch to the
LOCK (0) position. Have all
passengers get out of the vehicle
while you change the tire.
Park the vehicle on f irm, level, and
non-slippery ground. Put the
transmission in Park (automatic)
or reverse (manual). Apply the
parking brake.
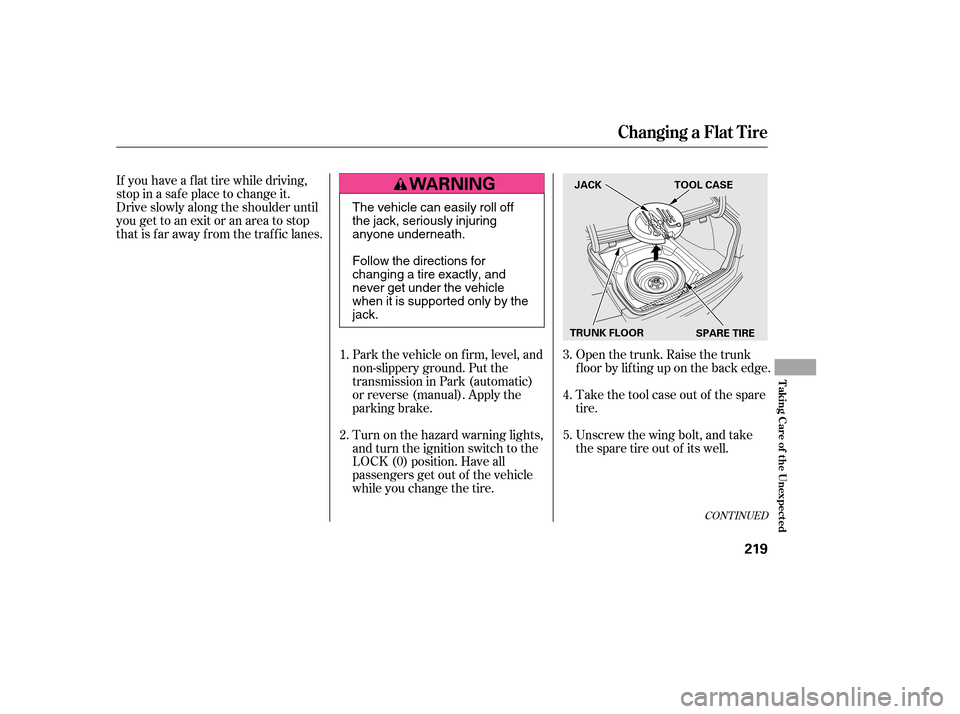
Open the trunk. Raise the trunk
f loor by lif ting up on the back edge.
Take the tool case out of the spare
tire.
Unscrew the wing bolt, and take
the spare tire out of its well.
5.
4.
3.
2.
1.
CONT INUED
Changing a Flat T ire
T aking Care of t he Unexpect ed
219
SPARE TIRE
TRUNK FLOOR JACK TOOL CASE
The vehicle can easily roll off
the jack, seriously injuring
anyone underneath.
Follow the directions for
changing a tire exactly, and
never get under the vehicle
when it is supported only by thejack.
�����—�����—�����y�
�������������y���
�(�#���������y���������y
Page 211 of 253
Bef ore mounting the spare tire,
wipeanydirtoff themounting
surface of the wheel and hub with
a clean cloth. Wipe the hub
carefully;itmaybehotfrom
driving.Put on the spare tire. Put the
wheel nuts back on f inger-tight,
then tighten them in a crisscross
pattern with the wheel nut wrench
until the wheel is f irmly against
the hub. Do not try to tighten
them f ully.
Lower the vehicle to the ground,
and remove the jack.
Do not attempt to forcibly pry the
wheel cover of f with a screwdriver or
other tool. The wheel cover cannot
be removed without f irst removing
the wheel nuts. 10. 11. 12.
CONT INUED
DX, LX, and Canadian DX-G models:
Changing a Flat T ire
T aking Care of t he Unexpect ed
221
WHEEL
NUTS
WHEEL NUTS WHEEL COVER BRAKE HUB
�����—�����—�����y�
�������������y���
�(�#���������y���������y