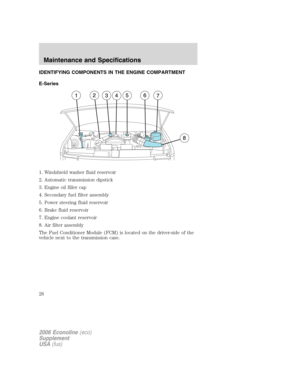
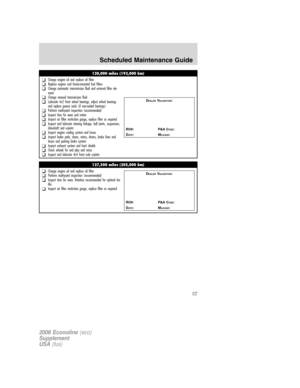
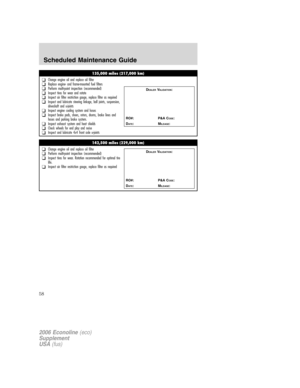
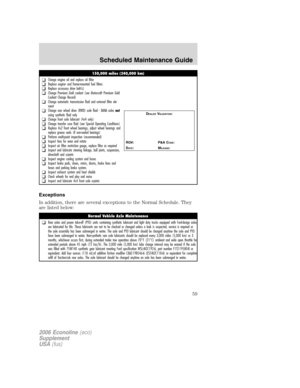
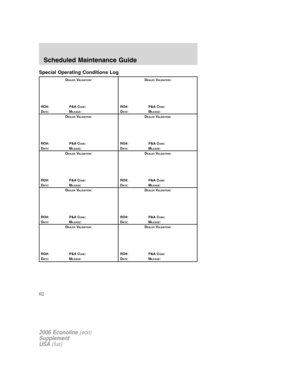
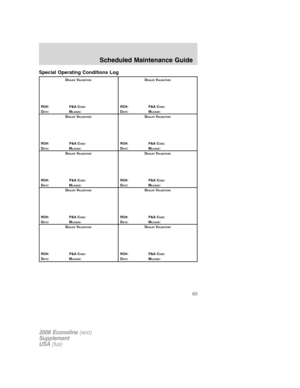
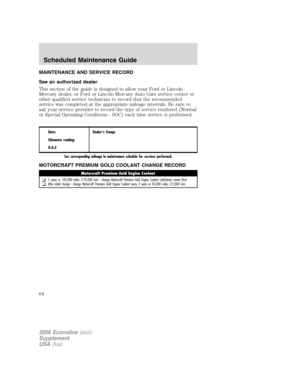
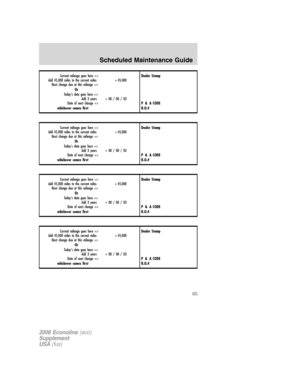
Page 33 of 72
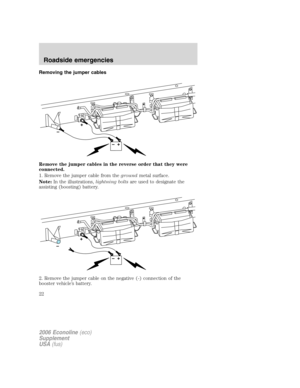
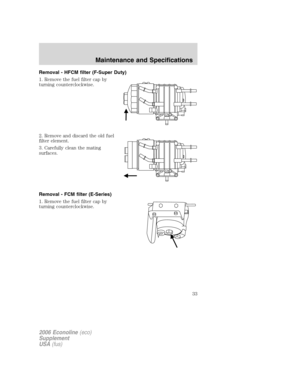
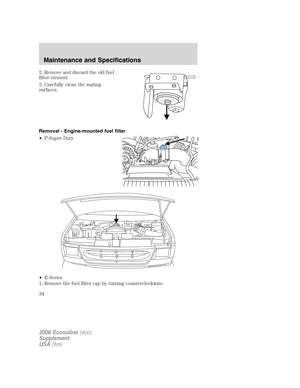
Removal - HFCM filter (F-Super Duty)
1. Remove the fuel filter cap by
turning counterclockwise.
2. Remove and discard the old fuel
filter element.
3. Carefully clean the mating
surfaces.
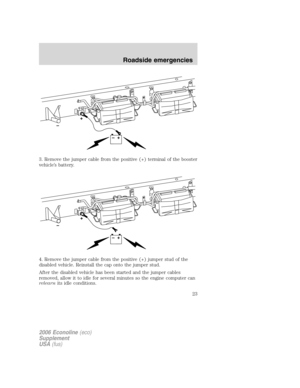
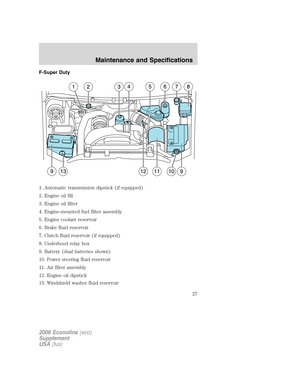
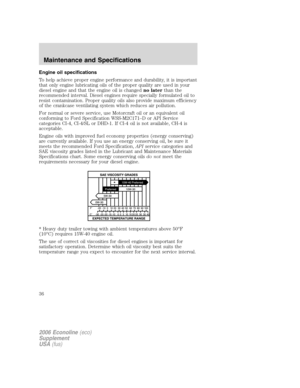
Removal - FCM filter (E-Series)
1. Remove the fuel filter cap by
turning counterclockwise.
2006 Econoline(eco)
Supplement
USA(fus)
Maintenance and Specifications
33
Page 34 of 72
2. Remove and discard the old fuel
filter element.
3. Carefully clean the mating
surfaces.
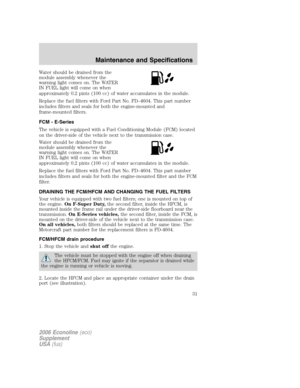
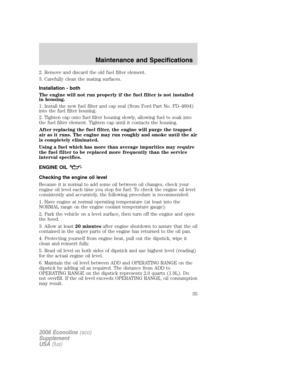
Removal - Engine-mounted fuel filter
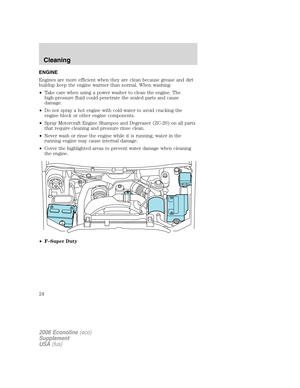
•F-Super Duty
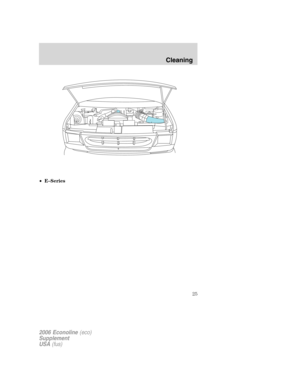
•E-Series
1. Remove the fuel filter cap by turning counterclockwise.
2006 Econoline(eco)
Supplement
USA(fus)
Maintenance and Specifications
34
Page 35 of 72

2. Remove and discard the old fuel filter element.
3. Carefully clean the mating surfaces.
Installation - both
The engine will not run properly if the fuel filter is not installed
in housing.
1. Install the new fuel filter and cap seal (from Ford Part No. FD–4604)
into the fuel filter housing.
2. Tighten cap onto fuel filter housing slowly, allowing fuel to soak into
the fuel filter element. Tighten cap until it contacts the housing.
After replacing the fuel filter, the engine will purge the trapped
air as it runs. The engine may run roughly and smoke until the air
is completely eliminated.
Using a fuel which has more than average impurities may require
the fuel filter to be replaced more frequently than the service
interval specifies.
ENGINE OIL
Checking the engine oil level
Because it is normal to add some oil between oil changes, check your
engine oil level each time you stop for fuel. To check the engine oil level
consistently and accurately, the following procedure is recommended:
1. Have engine at normal operating temperature (at least into the
NORMAL range on the engine coolant temperature gauge).
2. Park the vehicle on a level surface, then turn off the engine and open
the hood.
3. Allow at least20 minutesafter engine shutdown to assure that the oil
contained in the upper parts of the engine has returned to the oil pan.
4. Protecting yourself from engine heat, pull out the dipstick, wipe it
clean and reinsert fully.
5. Read oil level on both sides of dipstick and use highest level (reading)
for the actual engine oil level.
6. Maintain the oil level between ADD and OPERATING RANGE on the
dipstick by adding oil as required. The distance from ADD to
OPERATING RANGE on the dipstick represents 2.0 quarts (1.9L). Do
not overfill. If the oil level exceeds OPERATING RANGE, oil consumption
may result.
2006 Econoline(eco)
Supplement
USA(fus)
Maintenance and Specifications
35
Page 36 of 72

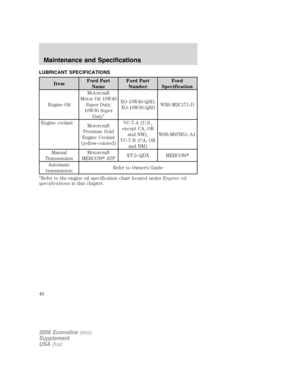
Engine oil specifications
To help achieve proper engine performance and durability, it is important
that only engine lubricating oils of the proper quality are used in your
diesel engine and that the engine oil is changedno laterthan the
recommended interval. Diesel engines require specially formulated oil to
resist contamination. Proper quality oils also provide maximum efficiency
of the crankcase ventilating system which reduces air pollution.
For normal or severe service, use Motorcraft oil or an equivalent oil
conforming to Ford Specification WSS-M2C171–D or API Service
categories CI-4, CI-4/SL or DHD-1. If CI-4 oil is not available, CH-4 is
acceptable.
Engine oils with improved fuel economy properties (energy conserving)
are currently available. If you use an energy conserving oil, be sure it
meets the recommended Ford Specification,APIservice categories and
SAE viscosity grades listed in the Lubricant and Maintenance Materials
Specifications chart. Some energy conserving oilsdo notmeet the
requirements necessary for your diesel engine.
* Heavy duty trailer towing with ambient temperatures above 50°F
(10°C) requires 15W-40 engine oil.
The use of correct oil viscosities for diesel engines is important for
satisfactory operation. Determine which oil viscosity best suits the
temperature range you expect to encounter for the next service interval.
2006 Econoline(eco)
Supplement
USA(fus)
Maintenance and Specifications
36
Page 37 of 72

to help you select the proper engine
oil. It will be included on the oil
container you purchase. The top
section of the symbol sho")
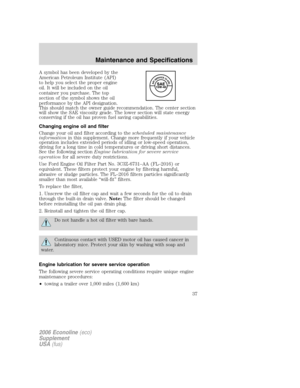
A symbol has been developed by the
American Petroleum Institute (API)
to help you select the proper engine
oil. It will be included on the oil
container you purchase. The top
section of the symbol shows the oil
performance by the API designation.
This should match the owner guide recommendation. The center section
will show the SAE viscosity grade. The lower section will state energy
conserving if the oil has proven fuel saving capabilities.
Changing engine oil and filter
Change your oil and filter according to thescheduled maintenance
informationin this supplement. Change more frequently if your vehicle
operation includes extended periods of idling or low-speed operation,
driving for a long time in cold temperatures or driving short distances.
See the following sectionEngine lubrication for severe service
operationfor all severe duty restrictions.
Use Ford Engine Oil Filter Part No. 3C3Z-6731–AA (FL–2016) or
equivalent. These filters protect your engine by filtering harmful,
abrasive or sludge particles. The FL–2016 filters particles significantly
smaller than most available “will-fit” filters.
To replace the filter,
1. Unscrew the oil filter cap and wait a few seconds for the oil to drain
through the built-in drain valve.Note:The filter should be changed
before reinstalling the oil pan drain plug.
2. Reinstall and tighten the oil filter cap.
Do not handle a hot oil filter with bare hands.
Continuous contact with USED motor oil has caused cancer in
laboratory mice. Protect your skin by washing with soap and
water.
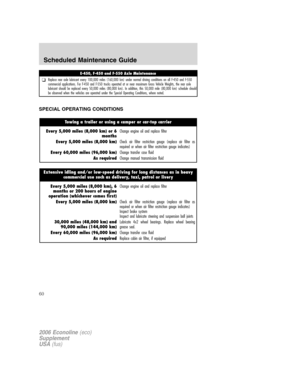
Engine lubrication for severe service operation
The following severe service operating conditions require unique engine
maintenance procedures:
•towing a trailer over 1,000 miles (1,600 km)
2006 Econoline(eco)
Supplement
USA(fus)
Maintenance and Specifications
37
Page 38 of 72
![FORD SUPER DUTY 2006 1.G Diesel Supplement Manual •sustained, high speed driving at Gross Vehicle Weight Rating
(maximum loaded weight for vehicle operation during hot
weather-above 90°F [32°C]).
•frequent or extended idling (over 10 minutes pe](/manual-img/11/5266/w960_5266-37.png "FORD SUPER DUTY 2006 1.G Diesel Supplement Manual •sustained, high speed driving at Gross Vehicle Weight Rating
(maximum loaded weight for vehicle operation during hot
weather-above 90°F [32°C]).
•frequent or extended idling (over 10 minutes pe")
•sustained, high speed driving at Gross Vehicle Weight Rating
(maximum loaded weight for vehicle operation during hot
weather-above 90°F [32°C]).
•frequent or extended idling (over 10 minutes per hour of normal
driving).
•operating in severe dust conditions.
•frequent, short trips of 10 miles (16 km) or less during freezing
weather
If you are operating your vehicle under any of these conditions, observe
the following service procedures:
•Change engine oil and filter every 5,000 miles (8,000 km).
•Use Motorcraft oil or an equivalent oil conforming to Ford
Specification WSS-M2C171–D or API categories CI-4, CI–4/SL, CI-4
PLUS or DHD-1. If CI-4 oil is not available, CH-4 is acceptable.
For more information refer thescheduled maintenance information
section of this supplement.
AIR FILTER
When replacing the air filter element, use the Motorcraft air filter
element listed. Refer to theMotorcraft part numberschart in this
chapter.
Note: Do not start your engine with the air cleaner removed and do not
remove it while the engine is running.
Failure to use the correct air filter element may result in severe
engine damage.
•E-series air filter element:
1. Disconnect the hoses from the air cleaner outlet tube.
2. Loosen the clamp and disconnect
the air cleaner outlet tube.
2006 Econoline(eco)
Supplement
USA(fus)
Maintenance and Specifications
38
Page 39 of 72
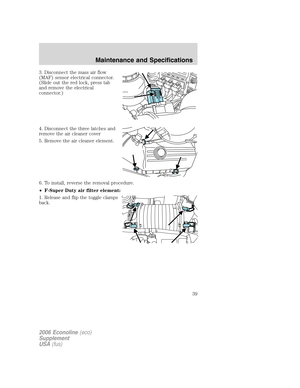
3. Disconnect the mass air flow
(MAF) sensor electrical connector.
(Slide out the red lock, press tab
and remove the electrical
connector.)
4. Disconnect the three latches and
remove the air cleaner cover
5. Remove the air cleaner element.
6. To install, reverse the removal procedure.
•F-Super Duty air filter element:
1. Release and flip the toggle clamps
back.
2006 Econoline(eco)
Supplement
USA(fus)
Maintenance and Specifications
39
Page 40 of 72
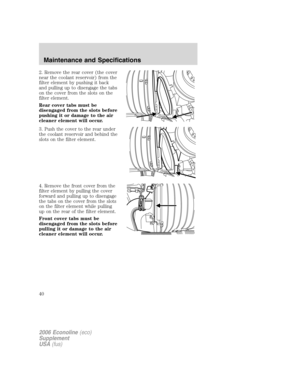
2. Remove the rear cover (the cover
near the coolant reservoir) from the
filter element by pushing it back
and pulling up to disengage the tabs
on the cover from the slots on the
filter element.
Rear cover tabs must be
disengaged from the slots before
pushing it or damage to the air
cleaner element will occur.
3. Push the cover to the rear under
the coolant reservoir and behind the
slots on the filter element.
4. Remove the front cover from the
filter element by pulling the cover
forward and pulling up to disengage
the tabs on the cover from the slots
on the filter element while pulling
up on the rear of the filter element.
Front cover tabs must be
disengaged from the slots before
pulling it or damage to the air
cleaner element will occur.
2006 Econoline(eco)
Supplement
USA(fus)
Maintenance and Specifications
40


1. Remove the fuel filter cap by
turning counterclockwise.
2. Remove and discard the old fuel
filter element.
3. Carefully clean the mating
surfaces.
Removal - FCM")

 sensor electrical connector.
(Slide out the red lock, press tab
and remove the electrical
connector.)
4. Disconnect the three latches and
remove the air cleaner c")
 from the
filter element by pushing it back
and pulling up to disengage the tabs
on the cover from the slots on the
filter element.
Rear")