Page 134 of 198
Downloaded from www.Manualslib.com manuals search engine •Insert the tow ball horizontally andpush forward until the lockingmechanism engages. (Do nothold your hand near the lockingmechanism.)
•The tow ball locks automatically.Lever 1 must be in its originalposition (right-hand side).
•To lock: Insert key with lock insertand turn clockwise. Pull off key.
•Cover the locking mechanismwith the protection cap.
Maintenance
WARNING
Remove the tow ball andprotect the seat with the plugbefore steam cleaning your vehicle.
Keep the system clean. Periodicallylubricate the lock with graphite.
132
TowingE72524
Page 141 of 198
Downloaded from www.Manualslib.com manuals search engine Front fog lamps
Rear fog lamps
Reversing lamp
Dipped beam or parkinglamp switch
Parking lamps
Interior lamps
Headlamp washers
Windscreen wipers,windscreen wiper switch
Rear window wiper
Heated windscreen, heatedwindscreen switch
Heated rear window
Heated exterior mirrors
Electric exterior mirrors,clock
Electric rear windows
Electric front windows
Sunroof
Electric seats
Heated and ventilated seats
Heated seats
Heater blower motor
Air conditioning, heaterblower motor
Air conditioning
Cigar lighter
Hazard warning flashers
Horn
Central locking
Engine management,electronic module
Starter motor
139
Fuses
Page 143 of 198
Downloaded from www.Manualslib.com manuals search engine TOWING POINTS
The screw-in towing eye is storedwith the jack in the luggagecompartment. The towing eye mustalways be carried in the vehicle.
WARNING
The towing eye has a left-handthread. Install it by turninganticlockwise. Tighten by hand.
Prise off the cover in the bumper witha flat-bladed screwdriver and installthe towing eye.
141
Vehicle recoveryE73302 E73303
Page 151 of 198
Downloaded from www.Manualslib.com manuals search engine OPENING AND CLOSING
THE BONNET
Opening the bonnet
WARNING
Remove the key immediatelyafter opening the bonnet.
The bonnet must be opened fromthe outside.
Swivel the Ford badge in the radiatorgrille to the side. Insert the key in thelock on the radiator grille.
Turn the key first anticlockwise 1.Raise the bonnet slightly and turn thekey fully clockwise 2 to open thebonnet. It is held by gas filled liftcylinders.
Closing the bonnet
To close, lower the bonnet and allowit to drop into the catch for the last20 – 30 cm.
Always check to ensure that thebonnet lock is fully engaged.
ENGINE OIL CHECK
WARNING
Do not use oil additives or otherengine treatments. They areunnecessary and could, undercertain conditions, lead to enginedamage which is not covered byFord Warranty.
The oil consumption of new enginesreaches the normal value only afterapproximately 5 000 km (3 000miles).
149
MaintenanceE73406 E73407
Page 153 of 198
Downloaded from www.Manualslib.com manuals search engine Engine oil filler cap
To open, turn anti-clockwise and pullup. Do not open the cap while theengine is running.
To close, turn the cap clockwise untilit clicks.
Engine oil change
Use Ford/Motorcraft Formula ESAE 5W-30 engine oil. Alternativeengine oils with the viscosity SAE5W-30 meeting the requirementsof Ford SpecificationWSS-M2C913-B may also beused.
Engine oil top-up
If you are unable to find an oil thatmeets any of these specifications,you must use an oil of the viscositySAE 5W-30, SAE 10W-40 or SAE5W-40, according to outsidetemperatures, meeting therequirements of either ACEA A1/B1or ACEA A3/B3 specifications. Useof these oils may result in longercranking periods, reduced engineperformance, reduced fuel economy,and increased emission levels.
ENGINE COOLANT
CHECK
151
MaintenanceE73413 E73415
Page 162 of 198

Downloaded from www.Manualslib.com manuals search engine CHANGING A ROAD
WHEEL
Spare wheel
All vehicles
WARNING
Use only approved wheel andtyre sizes. Using other sizescould damage the vehicle and willmake the National Type Approvalinvalid.
Vehicles with a temporaryspare wheel
WARNINGS
If the spare wheel differs fromthe other fitted wheels, theserules must be followed:
Do not exceed 80 km/h (50mph).
Drive the shortest possibledistances.
Do not fit more than one sparewheel on your vehicle at anyone time.
Do not use snow chains on thistype of wheel.
Do not drive through anautomatic car wash.
Vehicles with stability assist
Vehicles with ESP may exhibit someunusual driving characteristics. Switchthe ESP off. See Using stabilitycontrol (page 120).
4-door and 5-door
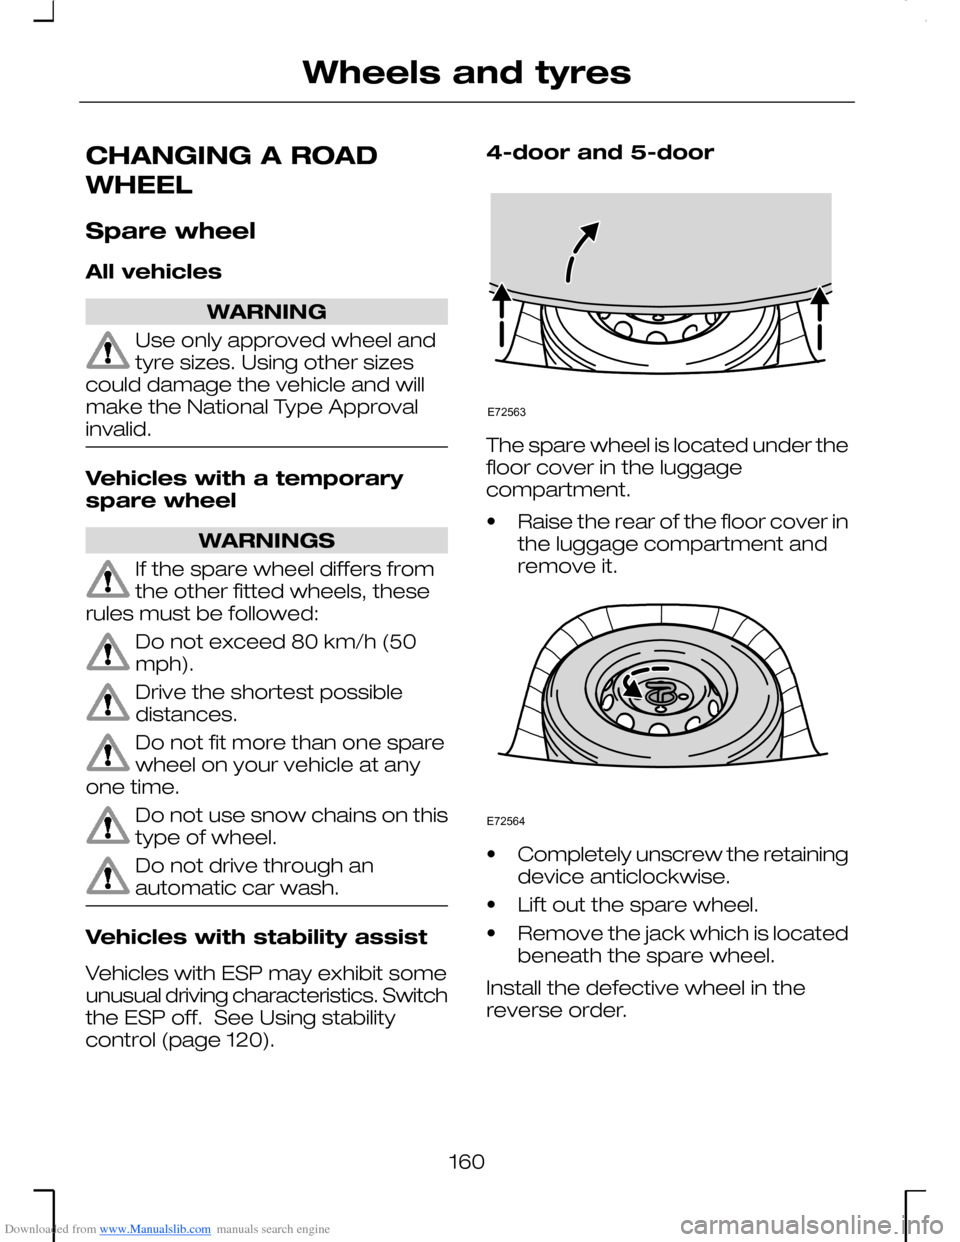
The spare wheel is located under thefloor cover in the luggagecompartment.
•Raise the rear of the floor cover inthe luggage compartment andremove it.
•Completely unscrew the retainingdevice anticlockwise.
•Lift out the spare wheel.
•Remove the jack which is locatedbeneath the spare wheel.
Install the defective wheel in thereverse order.
160
Wheels and tyresE72563 E72564
Page 163 of 198
Downloaded from www.Manualslib.com manuals search engine Estate
The spare wheel is located under thefloor cover in the luggagecompartment.
•Roll up the carpet in the luggagecompartment, raise the floorcover and remove it.
•Completely unscrew the retainingdevice anticlockwise.
•Lift out the spare wheel.
•Remove the jack which is locatedbeneath the spare wheel.
Install the defective wheel in thereverse order.
Vehicle jack
Note: When reinstalling, use the righthole in the jack for the jack retainingdevice and the left hole for the sparewheel retaining device.
The jack and wheelbrace are locatedin the spare wheel well. Unscrew theretaining device by turninganticlockwise, and remove the jackwith the wheelbrace.
Jacking points
All vehicles
161
Wheels and tyresE72565 E72566 E72567 E72568
Page 167 of 198

Downloaded from www.Manualslib.com manuals search engine •Jack up the vehicle until the wheelis clear of the ground.
•Unscrew and remove the wheelnuts and take off the wheel.
Fitting a wheel
Vehicles with alloy wheels
WARNING
Alloy wheels must never besecured using wheel nuts forsteel wheels.
Note: The wheel nuts of alloy wheelscan also be used for the steel sparewheel for a short time (maximum twoweeks).
All vehicles
•Push the wheel onto the wheelstuds. Screw on the wheel nutsand secure in a clockwisedirection ensuring that thetapered end of the wheel nuts isfacing the wheel.
•Lower the vehicle and remove thejack.
Vehicles with locking wheelnuts
•Insert the nut key onto the lockingnut.
All vehicles
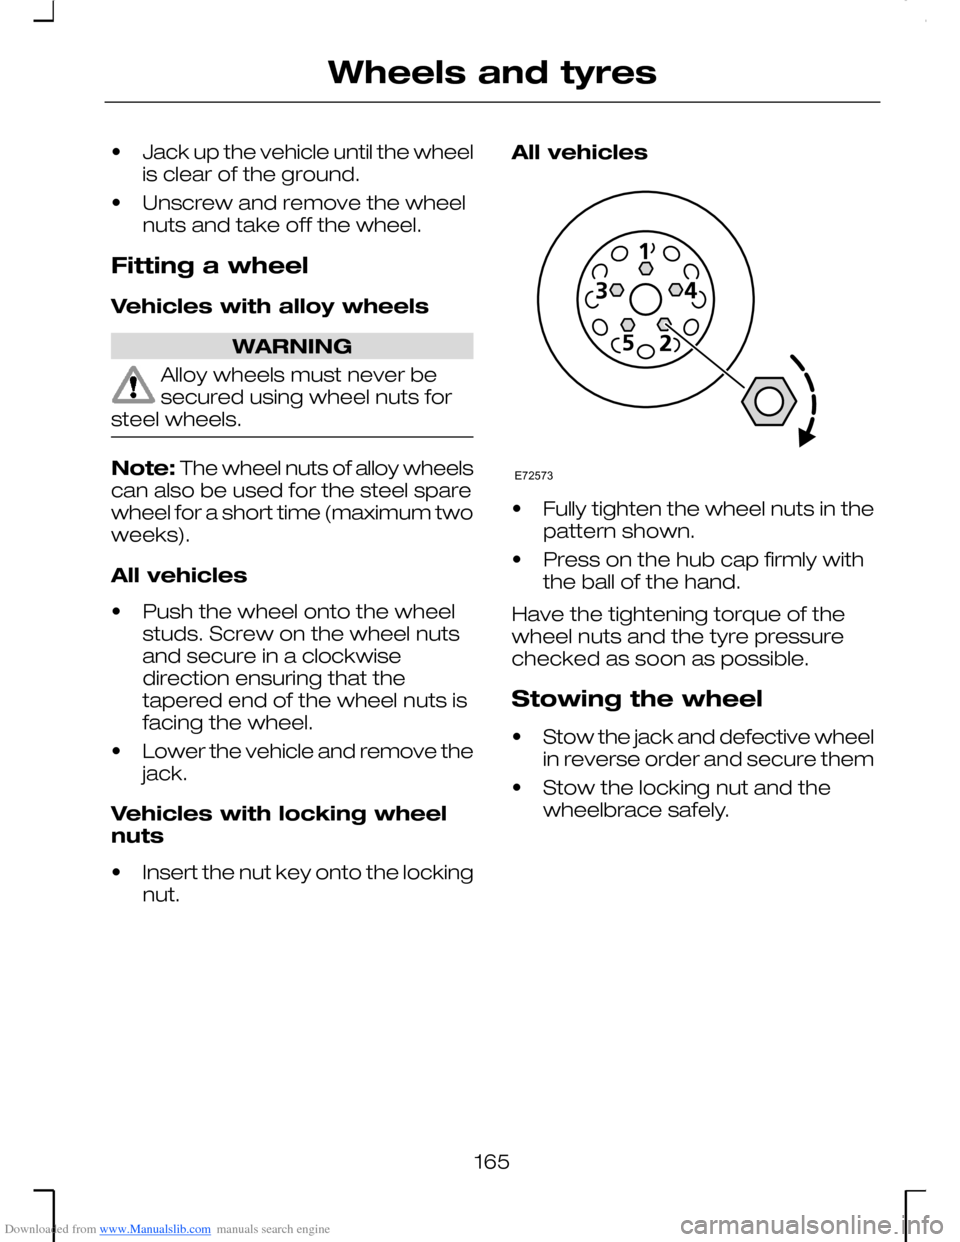
•Fully tighten the wheel nuts in thepattern shown.
•Press on the hub cap firmly withthe ball of the hand.
Have the tightening torque of thewheel nuts and the tyre pressurechecked as soon as possible.
Stowing the wheel
•Stow the jack and defective wheelin reverse order and secure them
•Stow the locking nut and thewheelbrace safely.
165
Wheels and tyresE72573