Page 62 of 198
Downloaded from www.Manualslib.com manuals search engine •Disconnect the wiring connector.
•Release the wire clip and pull outthe bulb.
•Replace the bulb.
Install in the reverse order.
Side repeater indicator
5 watt wedge base bulb
•Slide the lamp assemblydownwards and pull it out.
•Grasp the bulb holder, turn thelamp housing anticlockwise andremove it.
•Pull the bulb out.
Install in the reverse order.
Approach lamps
Please consult an expert.
Fog lamps (vehicles withsport bumpers)
H3, 55 watt halogen bulb
60
LightingE72542 E72543 E72169 E72544
Page 63 of 198
Downloaded from www.Manualslib.com manuals search engine •Loosen the screw in the fog lampbezel. Prise out the fog lampbezel.
•Loosen the screws, and pull outthe lamp assembly.
•Disconnect the wiring connector.
•Pull the bulb out and replace it.
Install in the reverse order.
Fog lamps (ST variants)
H7, 55 watt
•Remove the screws in the foglight bezel.
•Prise out the ring around the lensand the fog light bezel.
•Loosen the screws and pull outthe light assembly.
•Remove the wiring connector.
•Turn the back of the lightassembly anti-clockwise and pullit out.
•Pull the bulb out and replace it.
Install in the reverse order.
Rear lamps (4-door and 5-door)
Open the tailgate.
61
LightingE72545 E72546 E72547
Page 64 of 198
Downloaded from www.Manualslib.com manuals search engine From inside the luggagecompartment, release the rotary clipsof the rear light assembly cover.
Remove the cover.
Press the two red tabs towardseacht other and separate theassembly from the light housing.
Remove the wiring connector.
Direction indicator 21 wattA
Brake/tail lamp 21/4 wattB
Tail lamp 5 wattC
Reversing lamp H1 halogenbulbD
Tail lamp 5 wattE
Rear fog lamp 21 wattF
Turn the bulb anticlockwise underslight pressure, and remove it.
Replace the bulb.
Install in the reverse order. Afterinstallation, check that the lightsoperate correctly.
Rear lamps (Estate)
Open the tailgate.
From inside the luggagecompartment, remove the top rearlight assembly cover. The bottomcover is fastened with clips. Removethe cover.
Unscrew the two wing nuts from thelight assembly. Make sure the wingnuts do not fall into the opening.
Gently pull out the light assembly.
62
LightingE72548 E72549 E72550
Page 65 of 198
Downloaded from www.Manualslib.com manuals search engine Turn the bulb anticlockwise underslight pressure, and remove it.
Brake lamp 21 wattA
Direction indicator 21 watt,orangeB
Reversing lamp 21 watt,halogen bulbC
Rear fog lamp/tail lamp 21/4wattD
Replace the bulb.
Install in the reverse order. Afterinstallation, check that the lightsoperate correctly.
Central brake lamp (4-door)
5 watt wedge base bulbs (5x)
Pull the cover off.
•Disconnect the wiring connector,and take out the lamp assembly.
•Press the catches and pull off thecover.
•Pull the bulb out and replace it.
Install in the reverse order.
Central brake lamp (5-doorand Estate)
5 watt wedge base bulbs (5x)
63
LightingE72551 E72552 E72553 E72555 E72554
Page 92 of 198
Downloaded from www.Manualslib.com manuals search engine SITTING IN THE
CORRECT POSITION
•Sit in an upright position with thebase of your spine as far back aspossible and with the backrestreclined no more than 30degrees.
•Adjust the head restraints so thatthe top is level with the top of yourhead.
•Do not move the front seat tooclose to the instrument panel. Thedriver should hold the steeringwheel in the ‘10 to 2 o’clock’position with arms slightly bent.The legs should also be slightlybent so that the pedals can bepressed fully to the floor.
•The seat belt should cross thecentre of the shoulder; the lapstrap should fit tightly across thehips, not the stomach.
MANUAL SEATS
WARNING
Do not adjust the seats whilethe vehicle is moving.
Moving the seats forwardsor backwards
Pull up on the lever. After releasingthe lever, rock the seat to ensure thatthe catch is securely engaged.
90
SeatsE66528 E72312
Page 99 of 198
Downloaded from www.Manualslib.com manuals search engine SUN VISORS
The sun visors can be released fromthe retention clips and swivelledtowards the side window.
The mirror cover can be slid open.
INSTRUMENT LIGHTING
DIMMER
CLOCK
The time is adjusted by pressing thebutton. To advance the minutes,press the button briefly. To advancerapidly, hold the button pressed.
CIGAR LIGHTER
WARNING
Never hold the lighter in as thiswill result in damage. Alwaysremove the lighter as a precautionwhen children are left alone in thevehicle.
To use the lighter press it in and waituntil it pops out automatically.
97
Convenience featuresE70419 E70454 E70421 E70426
Page 106 of 198
Downloaded from www.Manualslib.com manuals search engine FUEL FILLER FLAP
Pull up the remote release leverbeside the driver’s seat. Open thefiller flap and turn the capanticlockwise.
When the filler cap is removed, ahissing noise may be heard. This isnormal and should be disregarded.
To refit the cap, turn clockwise untilit clicks.
REFUELLING
WARNING
If you fill your vehicle withincorrect fuel or additives, donot attempt to start the engine. Thismay lead to engine damage.
TECHNICAL SPECIFICATIONS
Fuel consumption
4-door and 5-door
Fuel consumption figures
CO2emissionsCombinedExtra-urbanUrban
Variant
g/kml/100 km(mpg)l/100 km(mpg)l/100 km(mpg)
1797.5 (37.7)5.6 (50.4)10.9 (25.9)1.8 l Duratec-HE 81 kW(110 PS), Stage IIIemissions
1827.6 (37.2)5.6 (50.4)11.2 (25.2)1.8 l Duratec-HE 81 kW(110 PS), Stage IVemissions
1827.6 (37.2)5.6 (50.4)11.0 (25.7)1.8 l Duratec-HE 92 kW(125 PS), Stage IIIemissions
104
Fuel and refuellingE72501
Page 132 of 198

Downloaded from www.Manualslib.com manuals search engine DETACHABLE TOW BALL
WARNINGS
Remove and reinstall the towball regularly to keep the lockingmechanism working smoothly.
Do not use any tools formounting/dismounting the towball. Do not modify the trailercoupling. Do not disassemble/repairthe tow ball.
To avoid risk of injury, neverunlock the tow ball with thetrailer attached.
To avoid risk of injury, neverleave the detached tow ballunsecured inside the vehicle.
Note: When the tow ball is not inuse, always remove it and secure itwith the strap to the eye on theright-hand side in the rear of theluggage compartment.
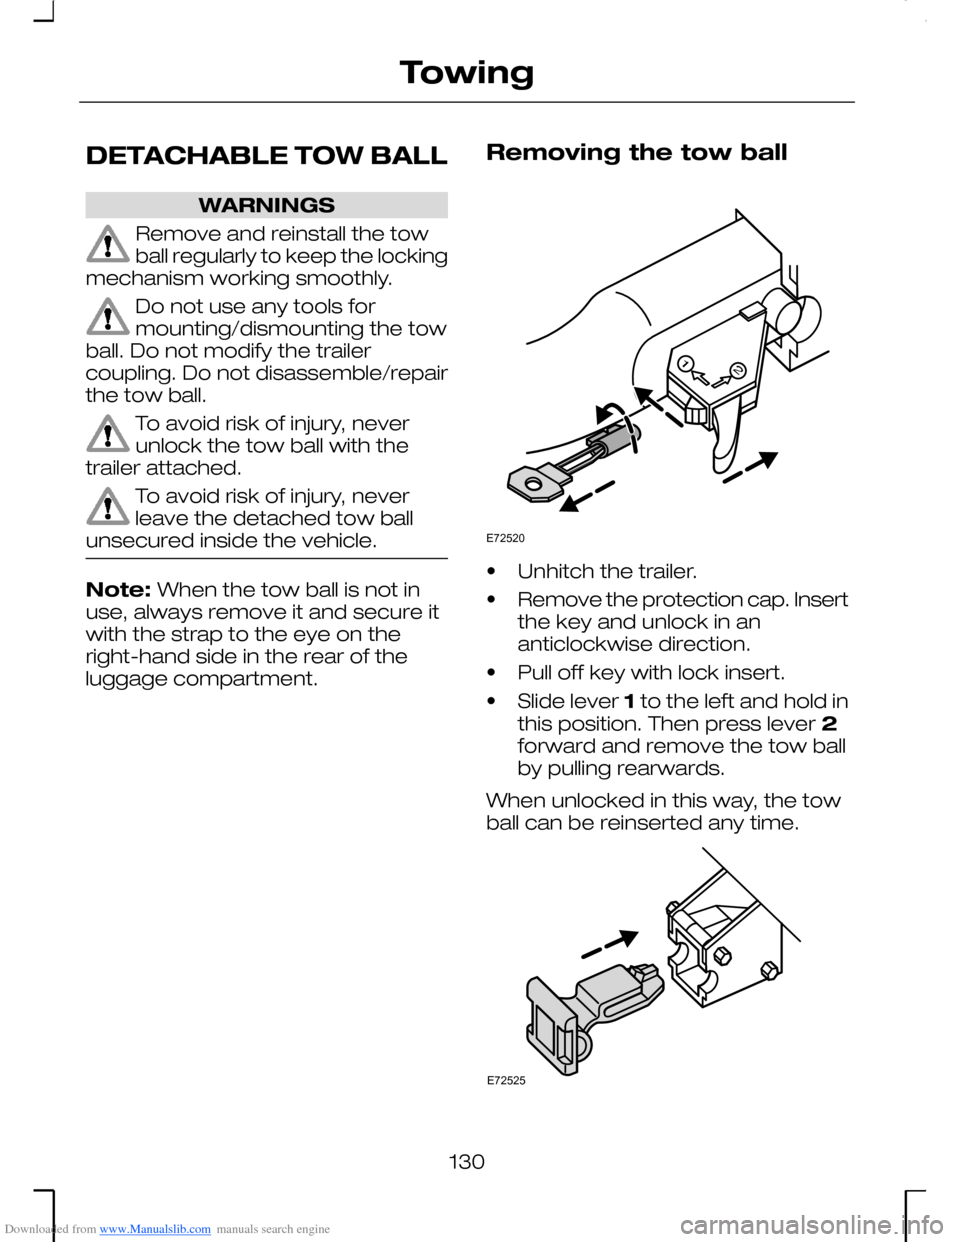
Removing the tow ball
•Unhitch the trailer.
•Remove the protection cap. Insertthe key and unlock in ananticlockwise direction.
•Pull off key with lock insert.
•Slide lever 1 to the left and hold inthis position. Then press lever 2forward and remove the tow ballby pulling rearwards.
When unlocked in this way, the towball can be reinserted any time.
130
TowingE72520 E72525