Page 48 of 198
Downloaded from www.Manualslib.com manuals search engine ADJUSTING THE
STEERING WHEEL
WARNING
Never adjust the steering wheelwhen the vehicle is moving.
Release the locking lever to adjustthe height of the steering wheel andits distance from the driver.
Return the lever to its original positionto secure the wheel.
See Sitting in the correct position(page 90).
HORN
The horn can also be operated whenthe ignition is off.
AUDIO CONTROL
Select radio, CD or cassette modeon the audio unit.
The following functions can beoperated with the remote control:
Volume
Volume up: Pull the VOL+ switchtowards the steering wheel.
46
Steering wheelE70358 E70360 E70361
Page 49 of 198

Downloaded from www.Manualslib.com manuals search engine Volume down: Pull the VOL− switchtowards the steering wheel.
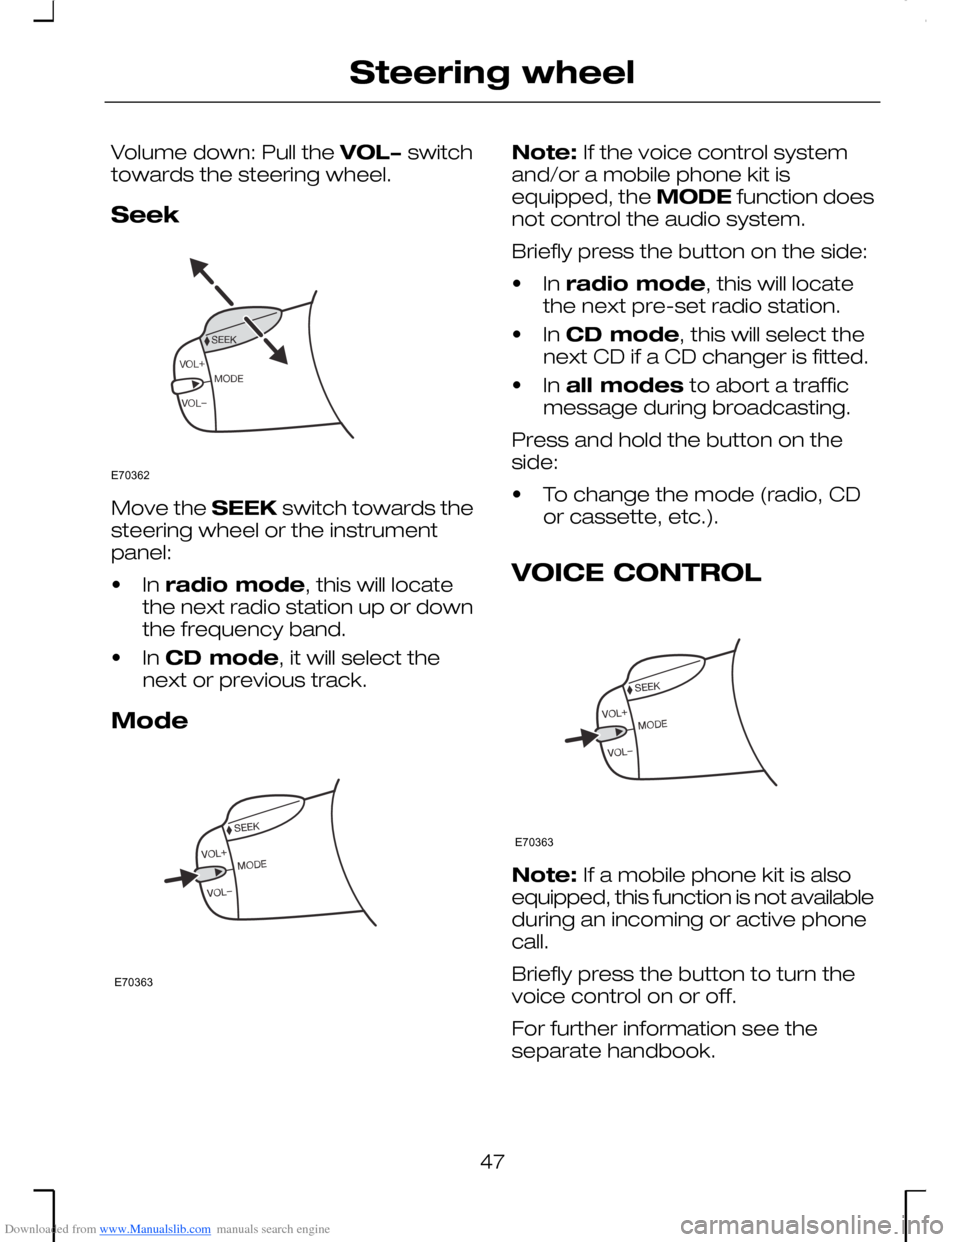
Seek
Move the SEEK switch towards thesteering wheel or the instrumentpanel:
•In radio mode, this will locatethe next radio station up or downthe frequency band.
•In CD mode, it will select thenext or previous track.
Mode
Note: If the voice control systemand/or a mobile phone kit isequipped, the MODE function doesnot control the audio system.
Briefly press the button on the side:
•In radio mode, this will locatethe next pre-set radio station.
•In CD mode, this will select thenext CD if a CD changer is fitted.
•In all modes to abort a trafficmessage during broadcasting.
Press and hold the button on theside:
•To change the mode (radio, CDor cassette, etc.).
VOICE CONTROL
Note: If a mobile phone kit is alsoequipped, this function is not availableduring an incoming or active phonecall.
Briefly press the button to turn thevoice control on or off.
For further information see theseparate handbook.
47
Steering wheelE70362 E70363 E70363
Page 52 of 198
Downloaded from www.Manualslib.com manuals search engine REAR WINDOW WIPER
AND WASHERS
Intermittent wiping
Pull the lever towards the steeringwheel.
Reverse gear wipe
The rear wiper will be activatedautomatically when selecting reversegear, if
•the rear wiper is not alreadyswitched on,
•the wiper lever is in position C, orD
•in position B and the front wipersare operating.
The rear wiper will follow the frontwiper interval (at intermittent ornormal speed).
Washer
WARNING
Do not operate the washer formore than 10 seconds at a time,and never when the reservoir isempty.
Pull the lever fully towards thesteering wheel and hold it to operatethe washer.
The washer will operate inconjunction with the wipers.
The washer jet for the rear windowis located on the roof above the rearwindow.
50
Wipers and washersE72175 E72176
Page 55 of 198
Downloaded from www.Manualslib.com manuals search engine LIGHTING CONTROL
Lighting control positions
OffA
Side and tail lampsB
HeadlampsC
Parking lampsD
Parking lamps
Push in and turn anticlockwise.
Autolamps
WARNING
The autolamps feature is anauxiliary system which is notintended to relieve the driver of hisresponsibility for the vehicle’s exteriorlighting.
When the switch is set to AUTO, thedipped beam headlamps will switchon and off automatically dependingon the ambient light.
Note: Main beam can be activatedonly when the autolamps feature hasturned on the headlamps.
If the headlamps switch offautomatically with main beamactivated, the next time theautolamps feature switches on theheadlamps, main beam will still be on.Dipped beam may be selected bypulling the multi-function levertowards the steering wheel.
Main/dipped beam
To switch over pull the lever towardsthe steering wheel.
53
LightingABCE72161 E72162 E72168
Page 56 of 198

Downloaded from www.Manualslib.com manuals search engine Headlamp flasher
Pull the lever slightly towards thesteering wheel.
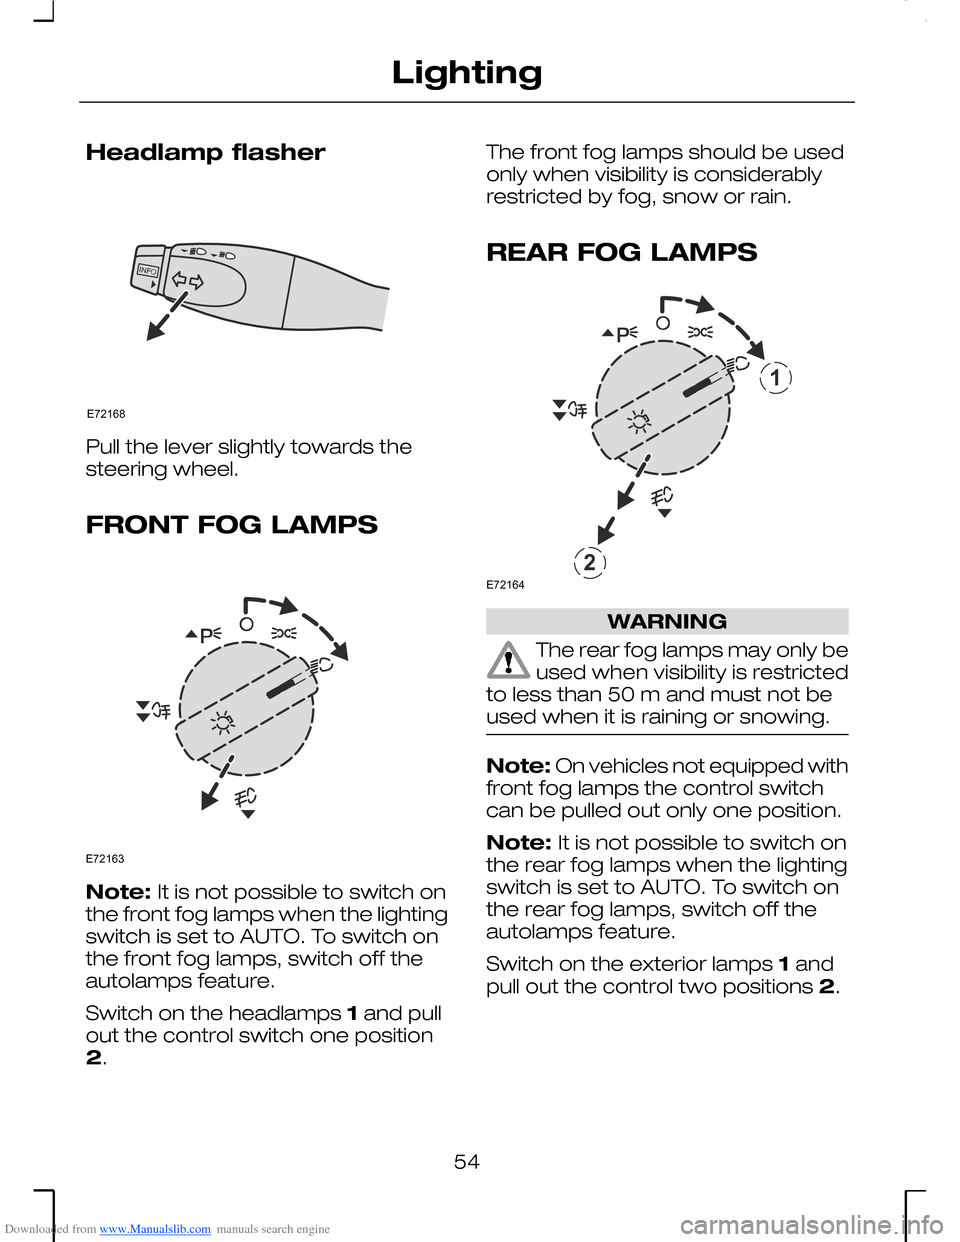
FRONT FOG LAMPS
Note: It is not possible to switch onthe front fog lamps when the lightingswitch is set to AUTO. To switch onthe front fog lamps, switch off theautolamps feature.
Switch on the headlamps 1 and pullout the control switch one position2.
The front fog lamps should be usedonly when visibility is considerablyrestricted by fog, snow or rain.
REAR FOG LAMPS
WARNING
The rear fog lamps may only beused when visibility is restrictedto less than 50 m and must not beused when it is raining or snowing.
Note: On vehicles not equipped withfront fog lamps the control switchcan be pulled out only one position.
Note: It is not possible to switch onthe rear fog lamps when the lightingswitch is set to AUTO. To switch onthe rear fog lamps, switch off theautolamps feature.
Switch on the exterior lamps 1 andpull out the control two positions 2.
54
LightingE72168 E72163 12E72164
Page 57 of 198
Downloaded from www.Manualslib.com manuals search engine ADJUSTING THE
HEADLAMPS
Vehicles with Xenonheadlamps
Vehicles with Xenon headlamps arefitted with automatic headlamplevelling.
The headlamps can be adjusted fordriving on the left or right hand sideof the road i.e. when travellingabroad. This adjustment should onlybe carried out by an expert.
HEADLAMP LEVELLING
Without headlamp levellingA
With headlamp levellingB
The level of the headlamp beams canbe adjusted according to the vehicleload. Turn the thumbwheeldownward to lower the beams, andupward to raise them.
55
LightingABE72165 E65990
Page 92 of 198
Downloaded from www.Manualslib.com manuals search engine SITTING IN THE
CORRECT POSITION
•Sit in an upright position with thebase of your spine as far back aspossible and with the backrestreclined no more than 30degrees.
•Adjust the head restraints so thatthe top is level with the top of yourhead.
•Do not move the front seat tooclose to the instrument panel. Thedriver should hold the steeringwheel in the ‘10 to 2 o’clock’position with arms slightly bent.The legs should also be slightlybent so that the pedals can bepressed fully to the floor.
•The seat belt should cross thecentre of the shoulder; the lapstrap should fit tightly across thehips, not the stomach.
MANUAL SEATS
WARNING
Do not adjust the seats whilethe vehicle is moving.
Moving the seats forwardsor backwards
Pull up on the lever. After releasingthe lever, rock the seat to ensure thatthe catch is securely engaged.
90
SeatsE66528 E72312
Page 93 of 198
Downloaded from www.Manualslib.com manuals search engine Adjusting the lumbarsupport
Turn the handwheel located on theside of the seatback.
Adjusting the angle of the
seatback
When the seats are slid fully forwardthe seatbacks can be fully reclined.
ELECTRIC SEATS
2-way electric seat
8-way electric seat
91
SeatsE72313 E72314 E72315 E72316